We regularly receive requests for examples involving connecting DreamFactory to a web interface. In this chapter we’ll include several examples involving modern JavaScript technologies, and in the near future will provide a GitHub repository where these and other examples can be downloaded.
Dynamic Dashboard with Pagination, Sorting, and Filtering
R&D departments and others interested in rapid prototype development regularly turn to DreamFactory for quickly exposing data through an API which can then be connected to a web-based interface such as a dashboard. This sort of project is particularly easy since numerous interactive table-oriented JavaScript libraries can be configured to consume an API endpoint. One such solution is Tabulator.
In this example (screenshot below), viewable at https://tabulator.demo.dreamfactory.com/ and with the source code available on GitHub, we’ve configured a MySQL database API containing almost 5 million records, and used Tabulator to present 300,000 records residing in one of the tables.
Tip
You can interact with a live version of this application at https://tabulator.demo.dreamfactory.com/.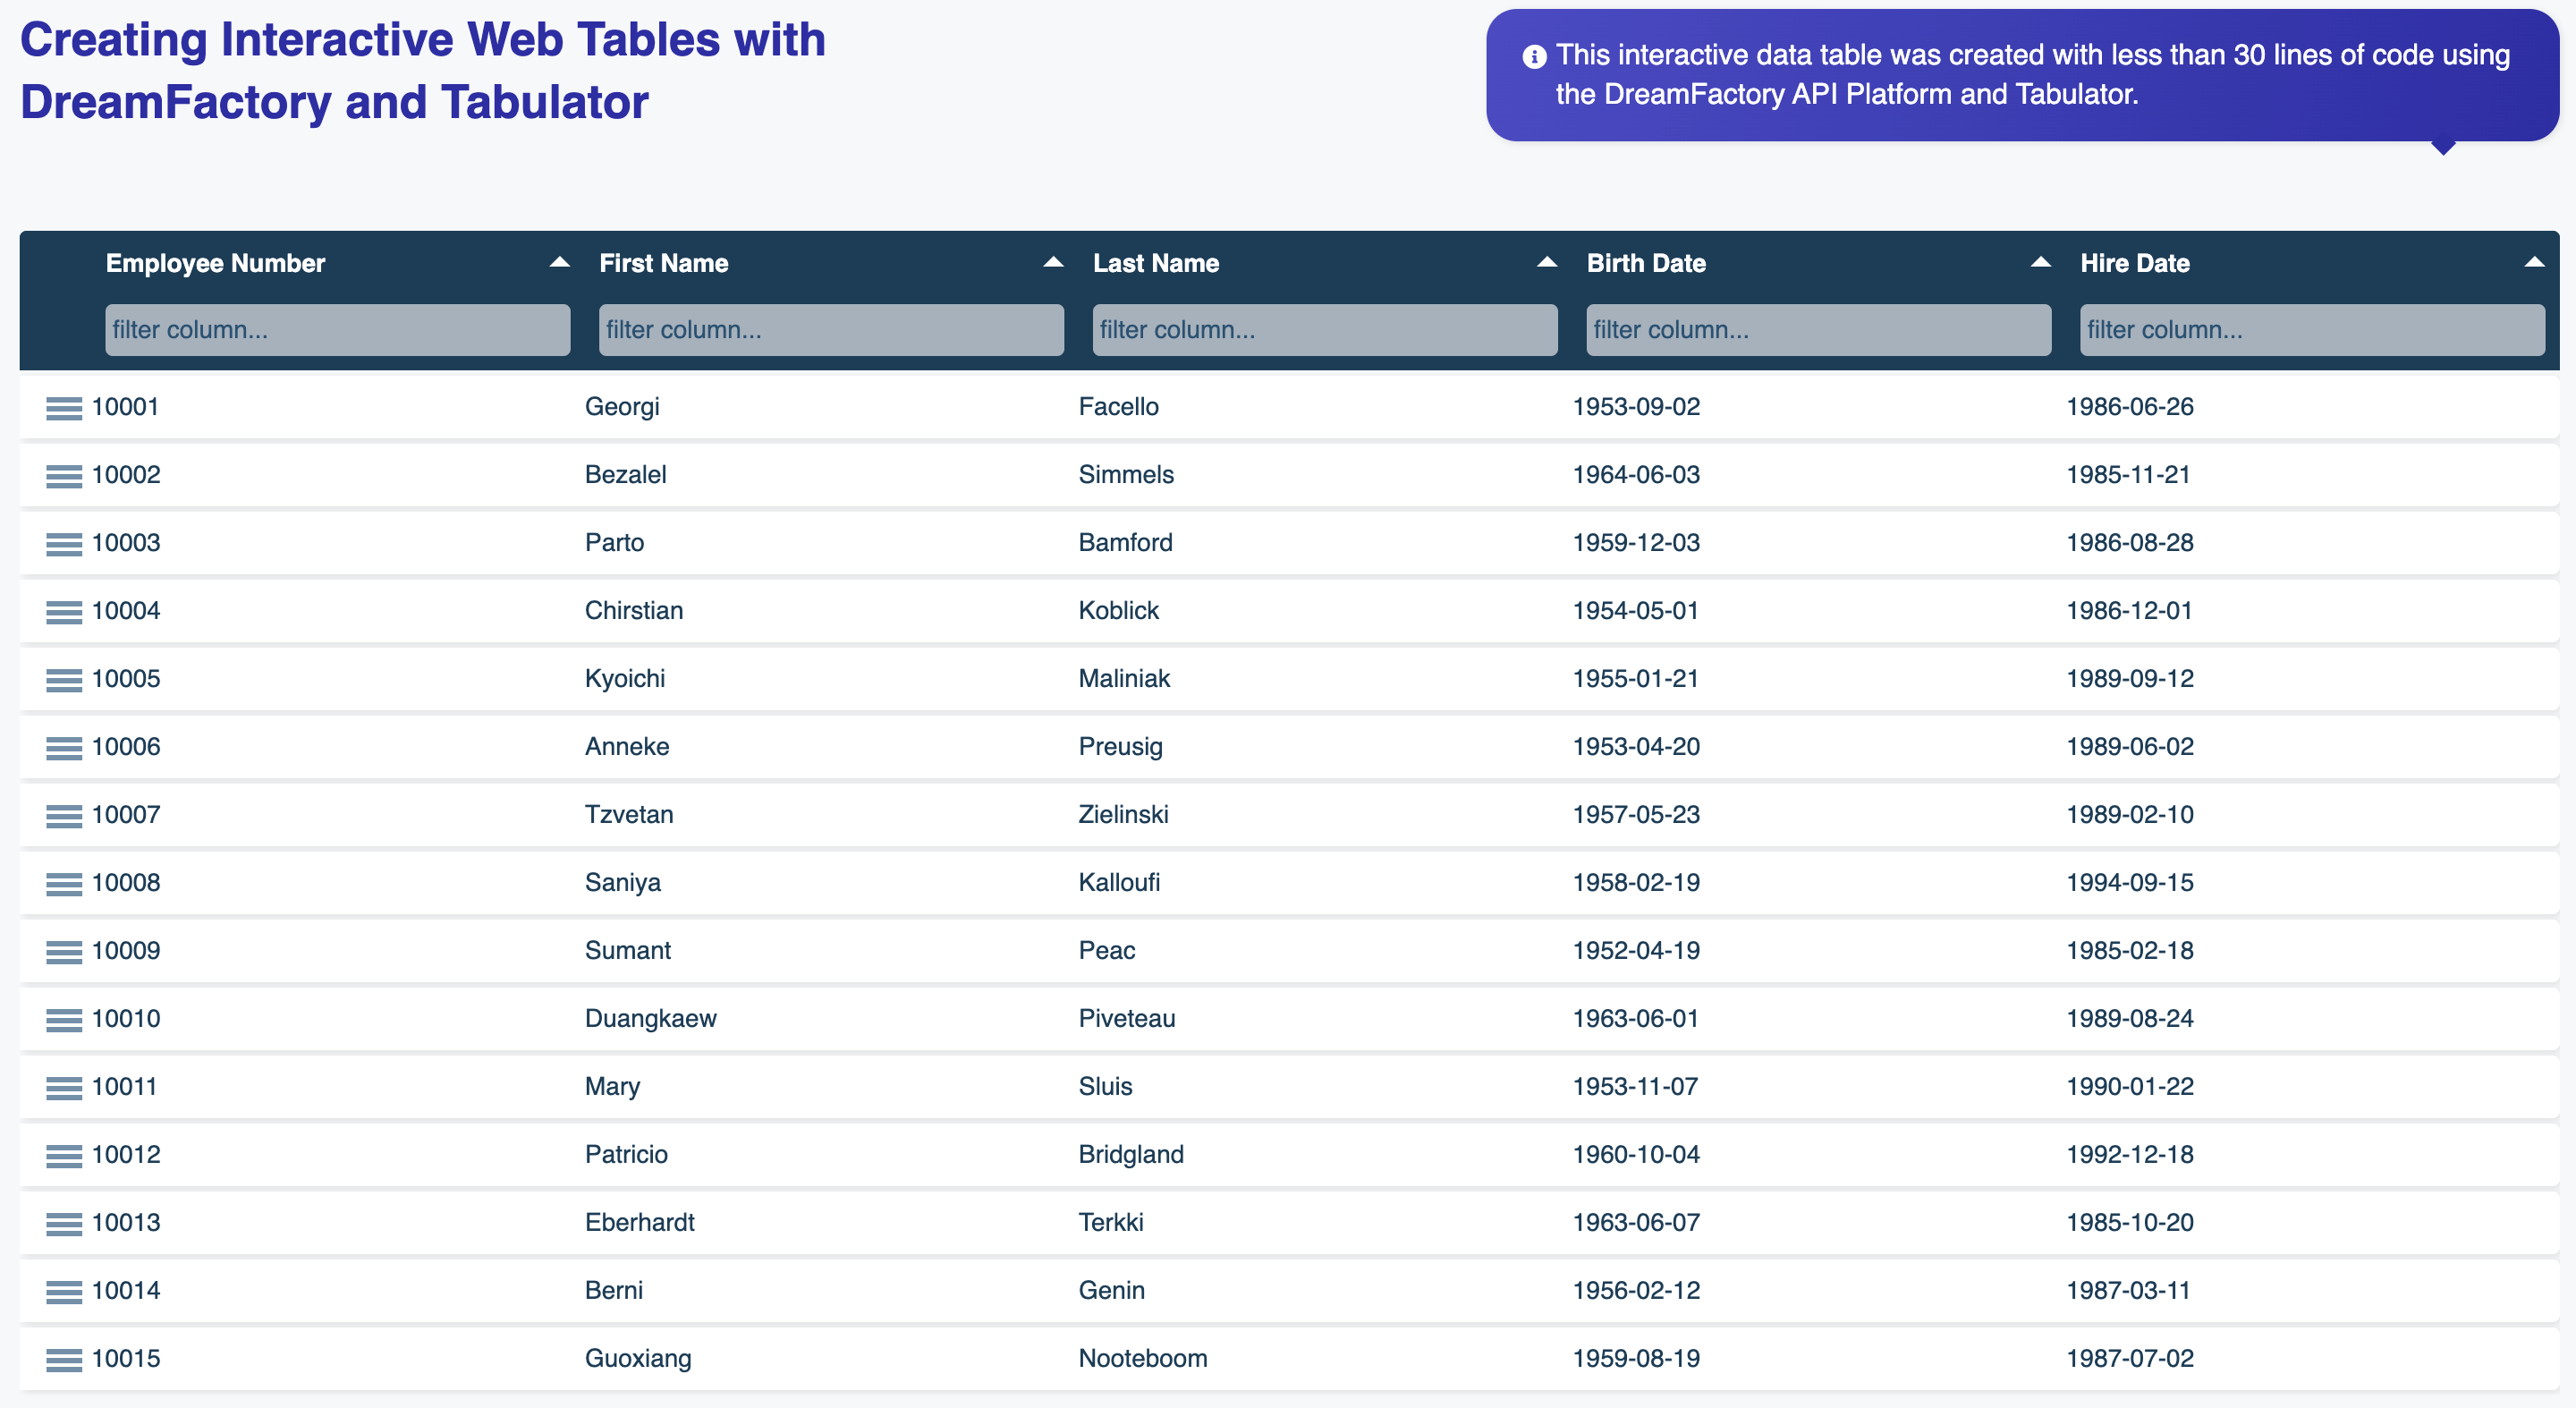
Check out the GitHub project README for information regarding how DreamFactory was configured to expose this API, and how you can easily configure this project to consume your own API.
Progressive Web Application
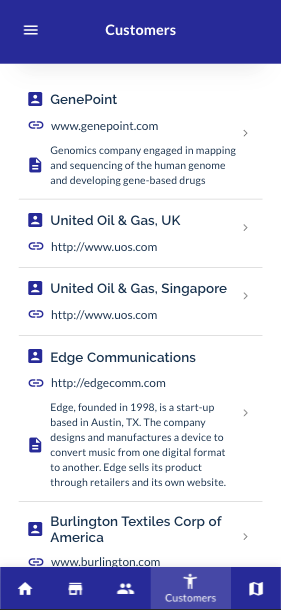
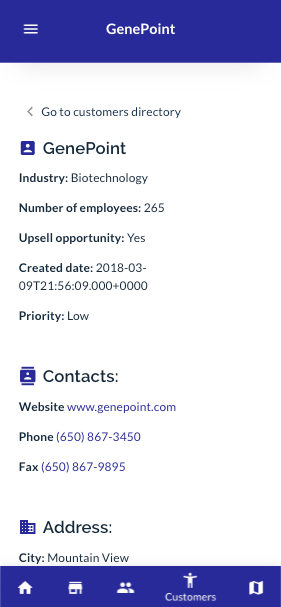
The above dashboard example certainly has its purposes, however web applications are often much more involved. For instance, you might connect to multiple data sources such as Salesforce and MySQL, and require users to authenticate via an authentication services provider such as Okta. Further, the interface must be responsive, capable of suiting different screen sizes (phone, tablet, and desktop).
We’ve created a demo application (screenshots below) to suit this more ambitious set of requirements. It’s live at https://pwa.demo.dreamfactory.com/, and the source code is downloadable via GitHub.
Tip
You can interact with a live version of this application at https://pwa.demo.dreamfactory.com/. Use the test credentials [email protected] / TE%W2E%g0Lud0q8Gej to login!
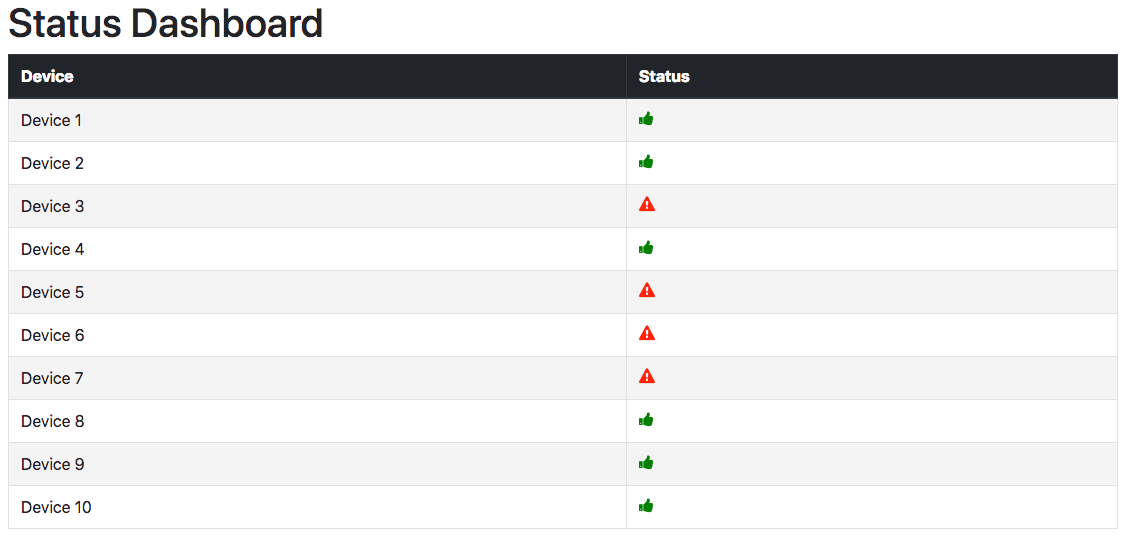
Creating a Simple Status Dashboard
This example demonstrates how to create a simple dashboard which will display status information (enabled or disabled) for a series of devices. Because a picture is worth a thousand words, let’s start with a screenshot of the finished product:
The device information is stored in a database table called devices. Naturally any DreamFactory-supported database could be used, however for sake of example we’ll include the MySQL table creation statement here:
CREATE TABLE `devices` (
  `id` int(11) unsigned NOT NULL AUTO_INCREMENT,
  `name` varchar(100) DEFAULT NULL,
  `status` tinyint(4) DEFAULT NULL,
  PRIMARY KEY (`id`)
) ENGINE=InnoDB AUTO_INCREMENT=11 DEFAULT CHARSET=latin1;
After generating the API within your DreamFactory instance (see Generating a Database-backed API to learn how to create a database-based API), it’s time to create the web page which will interact with the API and present the data. We started by creating a new web page containing a simple HTML5 template. There are plenty such templates online, however we’re fans of the version provided by SitePoint. Here’s what the starter file looks like:
<html lang="en">
<head>
  <meta charset="utf-8">

  <title>Status Dashboard</title>
  <meta name="description" content="Simple status dashboard">
  <meta name="author" content="">

</head>

<body>
</body>
</html>
Next, we’re going to take advantage of three popular open source/free solutions for executing AJAX calls and page design. These include:
- Bootstrap: Bootstrap is the world’s most popular front-end component data, used on hundreds of thousands if not millions of websites around the globe. We’ll use Bootstrap’s CSS styles for stylizing the tabular layout.
- Axios: Axios is a JavaScript-based HTTP client. We’ll use Axios to craft AJAX calls which will talk to the database API.
- Font Awesome: FontAwesome is a very popular icon library. We’ll use two of FontAwesome’s icons to visually depict device status.
With these libraries added, the template looks like this:
<html lang="en">
<head>
  <meta charset="utf-8">

  <title>Status Dashboard</title>
  <meta name="description" content="Simple status dashboard">
  <meta name="author" content="">

  <link rel="stylesheet" href="https://stackpath.bootstrapcdn.com/bootstrap/4.2.1/css/bootstrap.min.css"
  integrity="sha384-GJzZqFGwb1QTTN6wy59ffF1BuGJpLSa9DkKMp0DgiMDm4iYMj70gZWKYbI706tWS"
  crossorigin="anonymous">

  <link href="//maxcdn.bootstrapcdn.com/font-awesome/4.2.0/css/font-awesome.min.css" type="text/css" rel="stylesheet">

  <script src="https://unpkg.com/axios/dist/axios.min.js"></script>

</head>

<body>
</body>
</html>
Next up is the JavaScript. We’ve purposely chosen to use standard JavaScript for this project rather than using more convenient third-party libraries such as React or VueJS. That said, we recognize there are far more eloquent JavaScript-based approaches to this problem, but didn’t want to provide an example which required an additional learning curve or potentially extra configuration. With that said, add the following snippet to the head tag of your template, directly below the libraries we referenced in the previous snippet:
<script>

  var error = '';
  var rows = '';
  var disabled = "<i class='fa fa-exclamation-triangle' style='color: red;'></i>";
  var enabled = "<i class='fa fa-thumbs-up' style='color: green;'></i>";
  window.onload = function() {
    axios.get('https://example.com/api/v2/mysql/_table/devices', { 'headers': { 'X-DreamFactory-Api-Key': 'YOUR_API_KEY_GOES_HERE' }})
    .then(function (response) {

      for (var i= 0; i < response.data.resource.length; i++) {
        if (response.data.resource[i].status == 0) {
          var status = disabled;
        } else {
          var status = enabled;
        }
        rows += "<tr><td>" + response.data.resource[i].name + "</td><td>" + status + "</td></tr>";

      }
      document.getElementById('rows').innerHTML = rows;
    })
    .catch(function (error) {
      error = error;

   });
};
</script>
The only required change you’ll need to make to the above snippet is replacement of the YOUR_API_KEY_GOES_HERE with the actual API key you’ve configured to communicate with the API. If you don’t know how to configure an API key, please refer to Generating a Database Backed Api.
All that remains is the HTML. In the following snippet you’ll see we’ve defined a simple HTML table, adorned with CSS classes exposed by the Bootstrap library. The tbody element is assigned the rows ID, which is what the above JavaScript will use to insert the table rows into the appropriate page location:
<div class="container">
  <div class="row">
    <div class="col">
      <h1>Status Dashboard</h1>
      <table class="table table-striped table-bordered">
        <thead class="thead-dark">
          <th>Device</th>
          <th>Status</th>
        </thead>
        <tbody id="rows">
        </tbody>
      </table>
    </div>
  </div>
</div>
Conclusion
Return to this chapter often as we’ll be periodically updating it with new examples!