DreamFactory’s capabilities are vast, however there is no more popular feature than its ability to generate a database-backed REST API. By embracing this automated approach, development teams can shave weeks if not months off the development cycle, and in doing so greatly reduce the likelihood of bugs or security issues due to mishaps such as SQL injection. This approach doesn’t come at the cost of trade offs either, because DreamFactory’s database-backed APIs are fully-featured REST interfaces, offering comprehensive CRUD (create, retrieve, update, delete) capabilities, endpoints for executing stored procedures, and even endpoints for managing the schema.
In this chapter you’ll learn all about DreamFactory’s ability to generate, secure, and deploy a database-backed API in just minutes. You’ll learn by doing, following along as we:
- Generate a new database-backed REST API
- Secure API access to your API using API keys and roles
- Interact with the auto-generated Swagger documentation
- Query the API using a third-party HTTP client
- Synchronize records between two databases
We chose MySQL as the basis for examples throughout the chapter, because it is free, ubiquitously available on hosting providers and cloud environments, and can otherwise be easily installed on all operating systems. Therefore to follow along with this chapter you’ll need:
- Access to a DreamFactory instance and a MySQL database.
- If your MySQL database is running somewhere other than your laptop, you’ll need to make sure your firewall is configured to allow traffic between port 3306 and the location where your DreamFactory instance is running.
- A MySQL user account configured in such a way that it can connect to your MySQL server from the DreamFactory instance’s IP address.
Before we begin, keep in mind MySQL is just one of DreamFactory supported 18 databases. The following table presents a complete list of what’s supported:
| Databases | SQL and No SQL |
|---|---|
| AWS DynamoDB | IBM Informix |
| AWS Redshift | MongoDB |
| Azure DocumentDB | MySQL |
| Azure Table Storage | Oracle |
| Cassandra | PostgreSQL |
| Couchbase | Salesforce |
| CouchDB | SAP SQL Anywhere |
| Firebird | SQLite |
| IBM Db2 | SQL Server |
Best of all, thanks to DreamFactory’s unified interface and API generation solution, everything you learn in this chapter applies identically to your chosen database! So if you already plan on using another database, then by all means feel free to follow along using it instead!
TIP
Looking for a more concise overview of the database API generation process? Check out our blog post, “Create a MySQL REST API in Minutes Using DreamFactory”!TIP
Want to create a MySQL API but don’t have any test data? You can download a sample database from the MySQL website containing several million records of contrived employee-related data. Click here to learn more about and install the example database. If you’ve started a DreamFactory hosted trial then we’ve created this database for you! Your welcome e-mail includes the credentials.Generating a MySQL-backed API
To generate a MySQL-backed API, login to your DreamFactory instance using an administrator account and click on the Services tab:

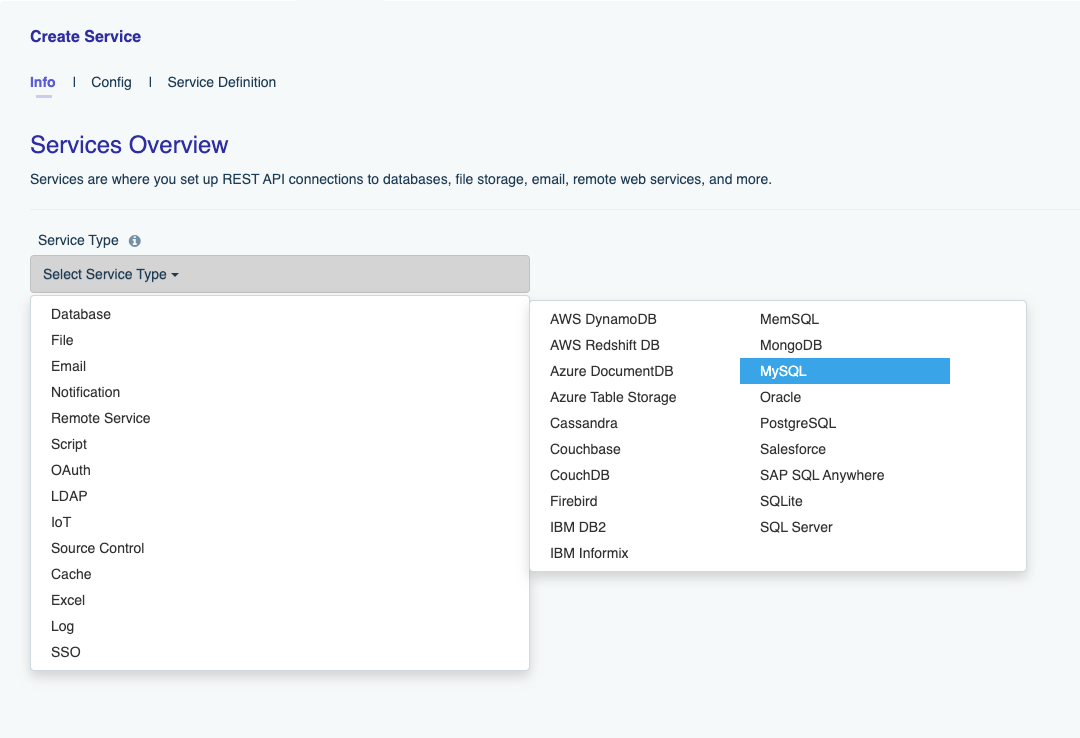
On the left side of the interface you’ll see the Create button. Click this button to begin generating an API. You’ll be presented with a single dropdown form control titled Select Service Type. You’ll use this dropdown to both generate new APIs and configure additional authentication options. There’s a lot to review in this menu, but for the moment let’s stay on track and just navigate to Databases and then MySQL:
After selecting MySQL, you’ll be presented with the following form:
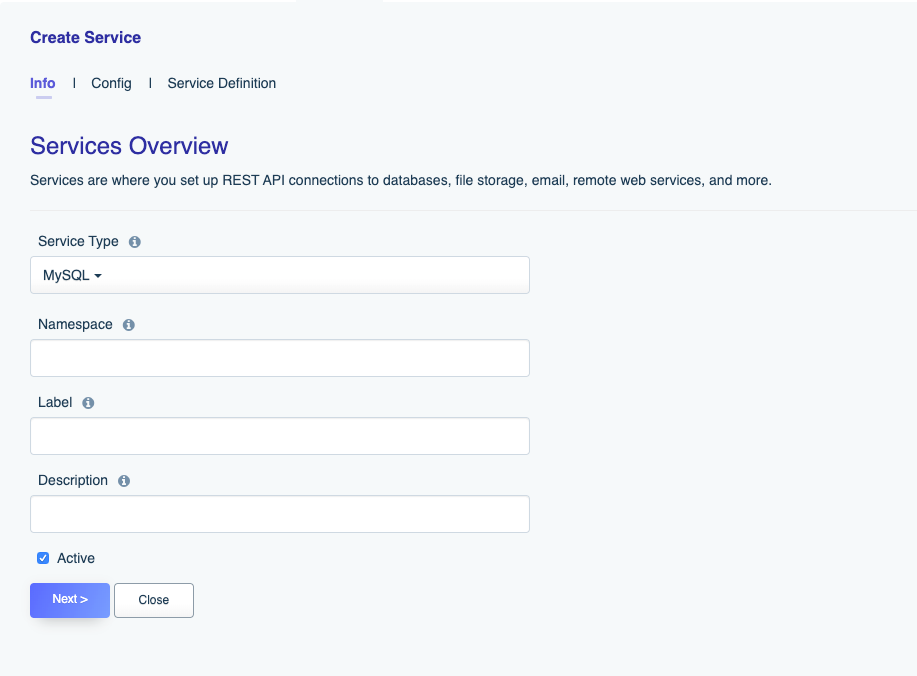
Let’s review these fields:
- Name: The name will form part of your API URL, so you’ll want to use a lowercase string with no spaces or special characters. Further, you’ll want to typically choose something which allows you to easily identify the API’s purpose. For instance for your MySQL-backed API you might choose a name such as
mysql,corporate, orstore.Keep in mind lowercasing the name is a requirement. - Label: The label is used for referential purposes within the administration interface and system-related API responses. You can use something less terse here, such as “MySQL-backed Corporate Database API”.
- Description: Like the label, the description is used for referential purposes within the administration interface and system-related API responses.
- Active: This determines whether the API is active. By default it is set to active however if you’re not yet ready to begin using the API or would like to later temporarily disable it, just return to this screen and toggle the checkbox.
After completing these fields, click on the Config tab located at the top of the interface. You’ll be presented with the following form (I’ll only present the top of the form since this one is fairly long):
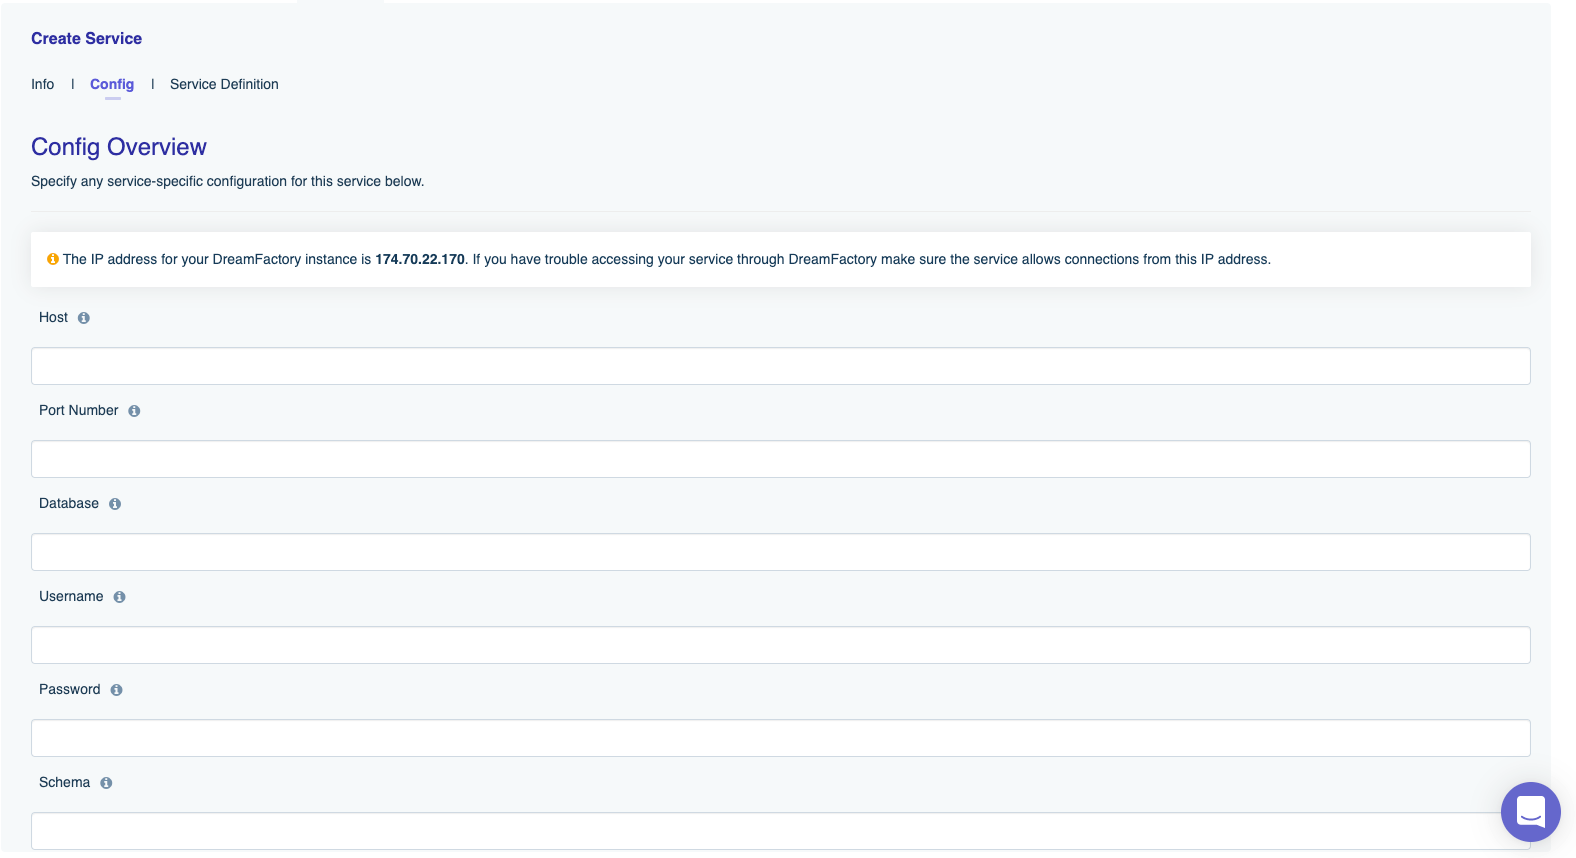
This form might look a bit intimidating at first, however in most cases there are only a few fields you’ll need to complete. Let’s cover those first, followed by an overview of the optional fields.
Required Configuration Fields
There are only five (sometimes six) fields which need to be completed in order to generate a database-backed API. These include:
- Host: The database server’s host address. This may be an IP address or domain name.
- Port Number: The database server’s port number. For instance on MySQL this is 3306.
- Database: The name of the database you’d like to expose via the API.
- Username: The username associated with the database user account used to connect to the database.
- Password: The password associated with the database user account used to connect to the database.
- Schema: If your database supports the concept of a schema, you may specify it here. MySQL doesn’t support the concept of a schema, but many other databases do.
Optional Configuration Fields
Following the required fields you’ll find a number of optional parameters. These can and do vary slightly according to the type of database you’ve selected, so don’t be surprised if you see some variation below. Don’t worry about this too much at the moment, because chances are you’re not going to need to modify any of the optional configuration fields at this point in time. However we’d like to identify a few fields which are used more often than others:
- Maximum Records: You can use this field to place an upper limit on the number of records returned.
- Data Retrieval Caching Enabled: Enabling caching will dramatically improve performance. This field is used in conjunction with
Cache Time to Live, introduced next. - Cache Time to Live (minutes): If data caching is enabled, you can use this field to specify the cache lifetime in minutes.
After completing the required fields in addition to any desired optional fields, press the Save button to generate your API. After a moment you’ll see a pop up message indicating Service Saved Successfully. Congratulations you’ve just generated your first database-backed API! So what can you do with this cool new toy? Read on to learn more.
A Note About API Capabilities
Most databases employ a user authorization system which gives administrators the ability to determine exactly what a user can do after successfully establishing a connection. In the case of MySQL, privileges are used for this purpose. Administrators can grant and revoke user privileges, and in doing so determine what databases a user can connect to, whether the user can create, retrieve, update, and delete records, and whether the user has the ability to manage the schema.
Because DreamFactory connects to your database on behalf of this user, the resulting API is logically constrained by that user’s authorized capabilities. DreamFactory will however display a complete set of Swagger documentation regardless, so if you are attempting to interact with the API via the Swagger docs or via any other client and aren’t obtaining the desired outcome, be sure to check your database user permissions to confirm the user can indeed carry out the desired task.
Further, keep in mind this can serve as an excellent way to further lock down your API. Although as you’ll later learn DreamFactory offers some excellent security-related features for restricting API access, it certainly wouldn’t hurt to additionally configure the connecting database user’s privileges to reflect the desired API capabilities. For instance, if you intend for the API to be read-only, then create a database user with read-only authorization. If API read and create capabilities are desired, then configure the user accordingly.
How to Setup a MySQL API Through an SSH Tunnel
If you prefer DreamFactory to connect to your MySQL database through an SSH tunnel, then this is a relatively easy process, and can be done by starting an SSH tunnel from within your DreamFactory server. First you will need to add your database server’s key to where your DreamFactory Instance is located. Then open up a terminal window and enter in the following command, replacing where necessary:
ssh -N -L <anOpenHostPort>:127.0.0.1:<mySqlPortOfDBServer> computerUser@<ip> -i <pathToKey>
For example, if I want to use port 3307 on my DreamFactory server to connect to the default database port of my MySQL server (3306), and “admin” is the remote SSH user who has the necessary privileges, the command may look like:
ssh -N -L 3307:127.0.0.1:3306 [email protected] -i ./server_key
Now, once the connection has been established, in the DreamFactory interface, we can create our service in the same manner as described above, but instead of pointing to the MySQL server, we will point it to the SSH tunnel (localhost).
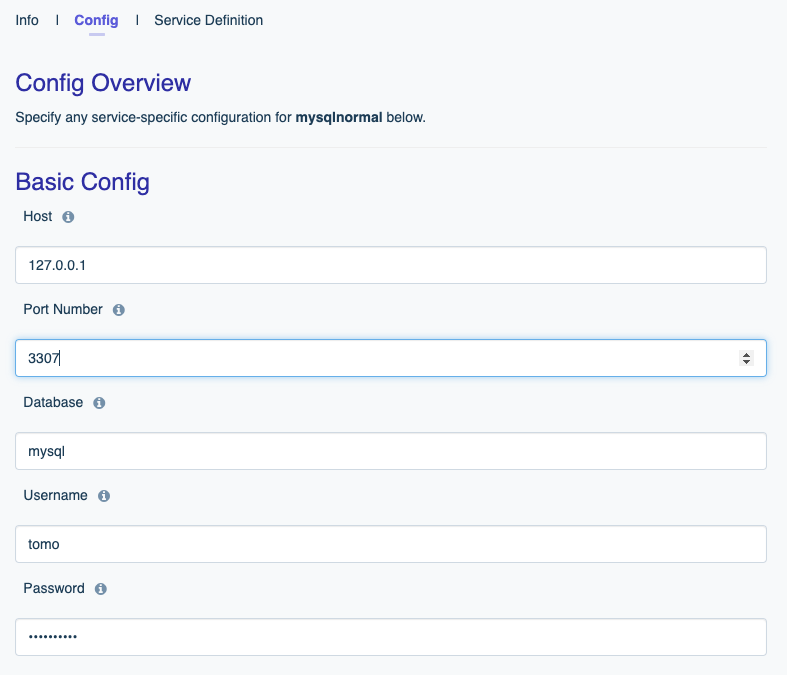
And that’s it! You now have the same capabilties as you would with a standard MySQL-backed API, just connected through SSH.
Reminder!
Remember that your SSH user (which you will use when creating your tunnel from the command line) will most likely be different to your MySQL user (which you will add in DreamFactory when creating your service).Interaction using Postman
Installation
Postman is a utility that allows you to quickly test and use REST APIs. To use the latest published version, click the following button to import the DreamFactory MYSQL API as a collection:
You can also download the collection file from this repo, then import directly into Postman.
Interacting with Your API via the API Docs Tab
The Service Saved Successfully message which appears following successful generation of a new REST API is rather anticlimactic, because this simple message really doesn’t convey exactly how much tedious work DreamFactory has just saved you and your team. Not only did it generate a fully-featured REST API, but also secured it from unauthorized access and additionally generated interactive OpenAPI documentation for all of your endpoints! If you haven’t used Swagger before, you’re in for a treat because it’s a really amazing tool which allows developers to get familiar with an API without being first required to write any code. Further, each endpoint is documented with details about both the input parameters and response.
To access your new API’s documentation, click on the API Docs tab located at the top of the screen:

You’ll be presented with a list of all documentation associated with your DreamFactory instance. The db, email, files, logs, system, and user documentation are automatically included with all DreamFactory instances, and can be very useful should you eventually desire to programmatically manage your instance. Let’s just ignore those for now and focus on the newly generated database documentation. Click on the table row associated with this service to access the documentation. You’ll be presented with a screen that looks like this:
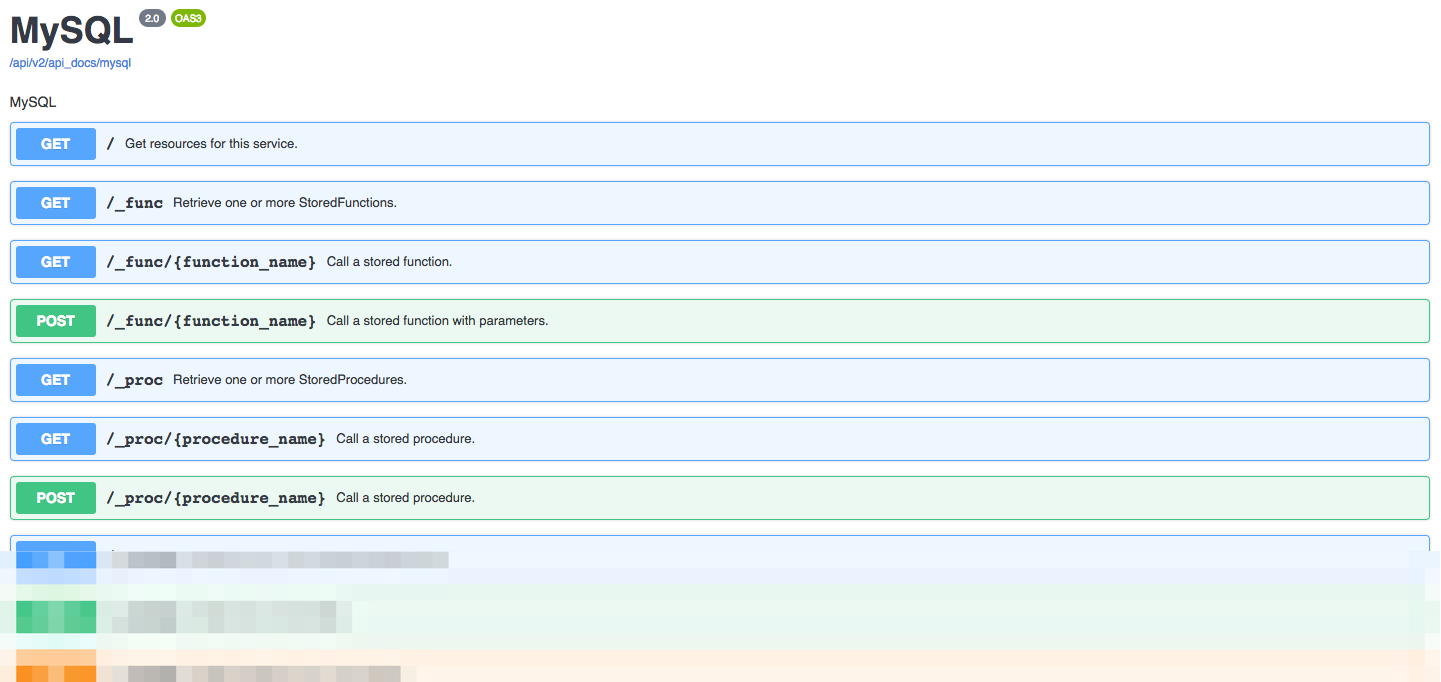
Scrolling through this list, you can see that quite a few API endpoints have been generated! If you generated an API for a database which supports stored procedures, towards the top you’ll find endpoints named GET /_proc/{procedure_name} and POST /_proc/{procedure_name}. Scrolling down, you’ll encounter quite a few endpoints used to manage your schema, followed by a set of CRUD (create, retrieve, update, delete) endpoints which are undoubtedly the most commonly used of the bunch.
Querying Table Records
Let’s test the API by retrieving a set of table records. Select the GET /_table/{table_name} Retrieve one or more records entry:

A slideout window will open containing two sections. The first, Parameters, identifies the supported request parameters. The second, Responses, indicates what you can expect to receive by way of a response, including the status code and a JSON response template. In the case of the GET _/table/{table_name} endpoint, you have quite a few parameters at your disposal, because this endpoint represents the primary way in which table data is queried. By manipulating these parameters you’ll be able to query for all records, or a specific record according to its primary key, or a subset of records according to a particular condition. Further, you can use these parameters to perform other commonplace tasks such as grouping and counting records, and joining tables.
To test the endpoint, click the Try it out button located on the right. When you do, the input parameter fields will be enabled, allowing you to enter values to modify the default query’s behavior. For the moment we’re going to modify just one parameter: table_name. It’s located at the very bottom of the parameter list. Enter the name of a table you know exists in the database, and press the blue Execute button. Below the button you’ll see a “Loading” icon, and soon thereafter a list of records found in the designated table will be presented in JSON format. Here’s an example of what I see when running this endpoint against our test MySQL database:
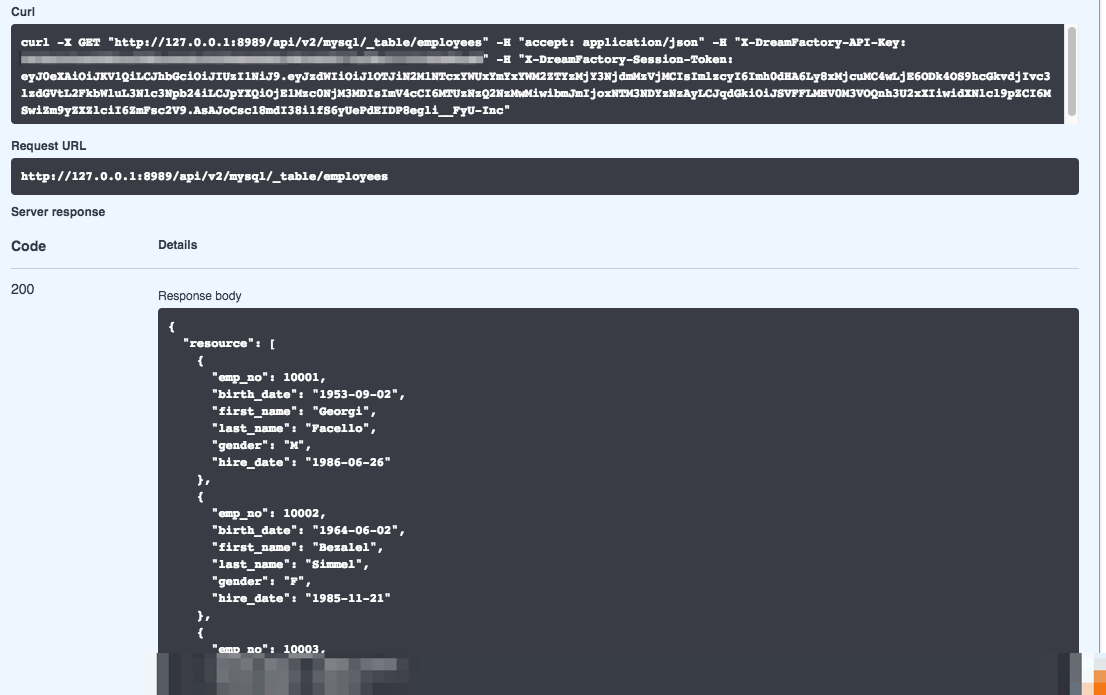
Congratulations! You’ve just successfully interacted with the database API by way of the Swagger documentation. If you don’t see a list of records, be sure to confirm the following:
- Does the specified table exist?
- If you received a
500status code, check the service configuration credentials. The500code almost certainly means DreamFactory was unable to connect to the database. If everything checks out, make sure you can connect to the database from the DreamFactory instance’s IP address via the database port. If you can’t then it’s probably a firewall issue.
The API Docs interface is fantastically useful for getting familiar with an API, and we encourage you to continue experimenting with the different endpoints to learn more about how it works. However, you’ll eventually want to transition from interacting with your APIs via the API Docs interface to doing so using a third-party client, and ultimately by way of your own custom applications. So let’s take that next step now, and interact with the new API using an HTTP client. In the last chapter you were introduced to a few such clients. We’ll be using Insomnia for the following examples however there will be no material differences between Insomnia, Postman, or any other similar client.
But first we need to create an API key which will be used to exclusively access this database API. This is done by first creating a role and then assigning the role to an application. Let’s take care of this next.
Creating a Role
Over time your DreamFactory instance will likely manage multiple APIs. Chances are you’re going to want to silo access to these APIs, creating one or several API keys for each. These API keys will be configured to allow access to one or some APIs, but in all likelihood not all of them. To accomplish this, you’ll create a role which is associated with one or more services, and then assign that role to an application. An application is just an easy way to connect an API key to a role.
To create a role, click on the Roles tab located at the top of the screen:

Presuming this is the first time you’ve created a role, you’ll be prompted to create one as depicted in this screenshot:
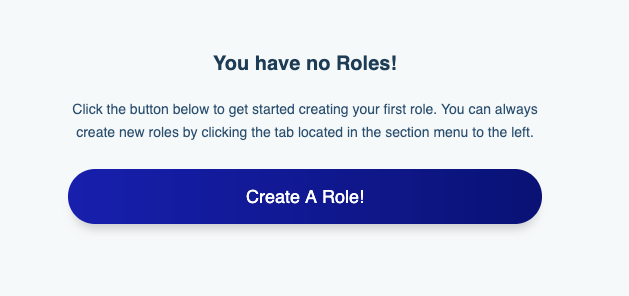
Click the Create a Role! button and you’ll be prompted to enter a role name and description. Unlike the service name, the role name is only used for human consumption so be sure to name it something descriptive such as MySQL Role. Next, click the Access tab. Here you’ll be prompted to identify the API(s) which should be associated with this service. The default interface looks like that presented in the below screenshot:

The Service select box contains all of the APIs you’ve defined this far, including a few which are automatically included with each DreamFactory instance (system, api_docs, etc). Select the mysql service. Now here’s where things get really interesting. After selecting the mysql service, click on the Component select box. You’ll see this select box contains a list of all assets exposed through this API! If you leave the Component select box set to *, then the role will have access to all of the APIs assets. However, you’re free to restrict the role’s access to one or several assets by choosing for instance _table/employees/*. This would limit this role’s access to just performing CRUD operations on the employees table! Further, using the Access select box, you can restrict which methods can be used by the role, selecting only GET, only POST, or any combination thereof.
If you wanted to add access to another asset, or even to another service, just click the plus sign next to the Advanced Filters header, and you’ll see an additional row added to the interface:

Use the new row to assign another service and/or already assigned service component to the role. In the screenshot you can see the role has been granted complete access to the mysql service’s employees table, and read-only access to the departments table.
Once you are satisfied with the role’s configuration, press the Save button to create the role. With that done, it’s time to create a new application which will be assigned an API key and attached to this role.
Creating an Application
Next let’s create an application, done by clicking on the Apps tab located at the top of the interface:

Click the Create tab to create a new application. You’ll be presented with the following form:
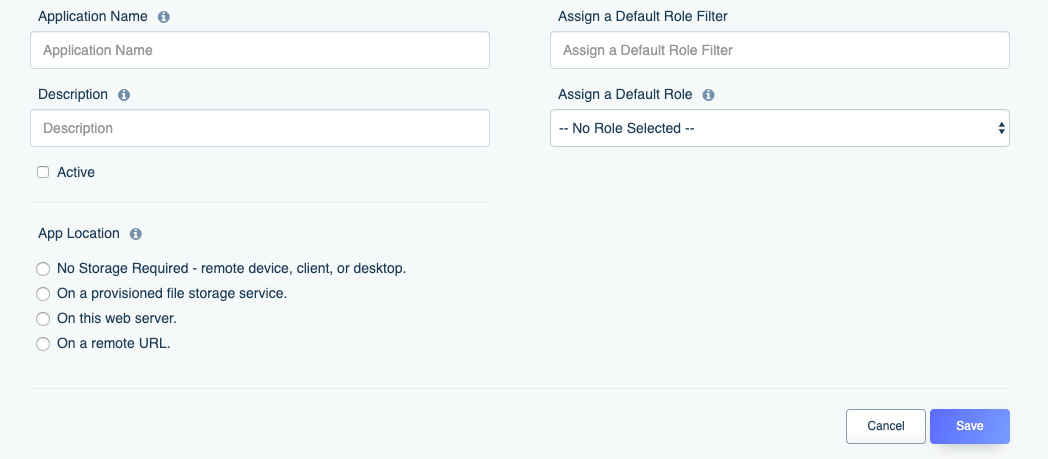
Let’s walk through each form field:
- Application Name and Description: The application name and description are used purely for human consumption, so feel free to complete these as you see fit.
- Active: This checkbox can be used to toggle availability of the API key, which will be generated and presented to you when the application is saved.
- App Location: This field presents four options for specifying the application’s location. The overwhelming majority of users will choose
No Storage Requiredbecause the API key will be used in conjunction with a mobile or web application, or via a server-side script. - Assign a Default Role Filter: Some of our customers manage dozens and even hundreds of role within their DreamFactory environment! To help them quickly find a particular role we added this real-time filtering feature which will adjust what’s displayed in the
Assign a Default Roleselect box. You can leave this blank for now. - Assign a Default Role: It is here where you’ll assign the newly created role to your application. Click on this select box and choose the role.
Click the Save button and the new API key will be generated. Click the clipboard icon next to your new API key to select the key, and then copy it to your clipboard, because in the next section we’ll use it to interact with the API.
Interacting with the API
We’ll conclude this chapter with a series of examples intended to help you become familiar with the many ways in which you can interact with a database-backed API. For these examples we’ll be using the Insomnia HTTP client (introduced in chapter 2) however you can use any similar client or even cURL to achieve the same results.
Retrieving All Records
Let’s begin by retrieving all of a particular table’s records just as was done within the API Docs example. Open your client and in the address bar set the URL to /api/v2/{service_name}/{table_name}, replacing {service_name} with the name of your API and {table_name} with the name of a table found within the database (and to which your API key’s associated role has access). For the remainder of this chapter we’ll use mysql as the service nam, and in this particular example the table we’re querying is called employees so the URL will look like this:
http://localhost/api/v2/_table/employees
Also, because we’re retrieving records the method will be set to GET.
Next, we’ll need to set the header which defines the API key. This header should be named X-DreamFactory-Api-Key. You might have to hunt around for a moment within your HTTP client to figure out where this is placed, but we promise it is definitely there. In the case of Insomnia the header is added via a tab found directly below the address bar:
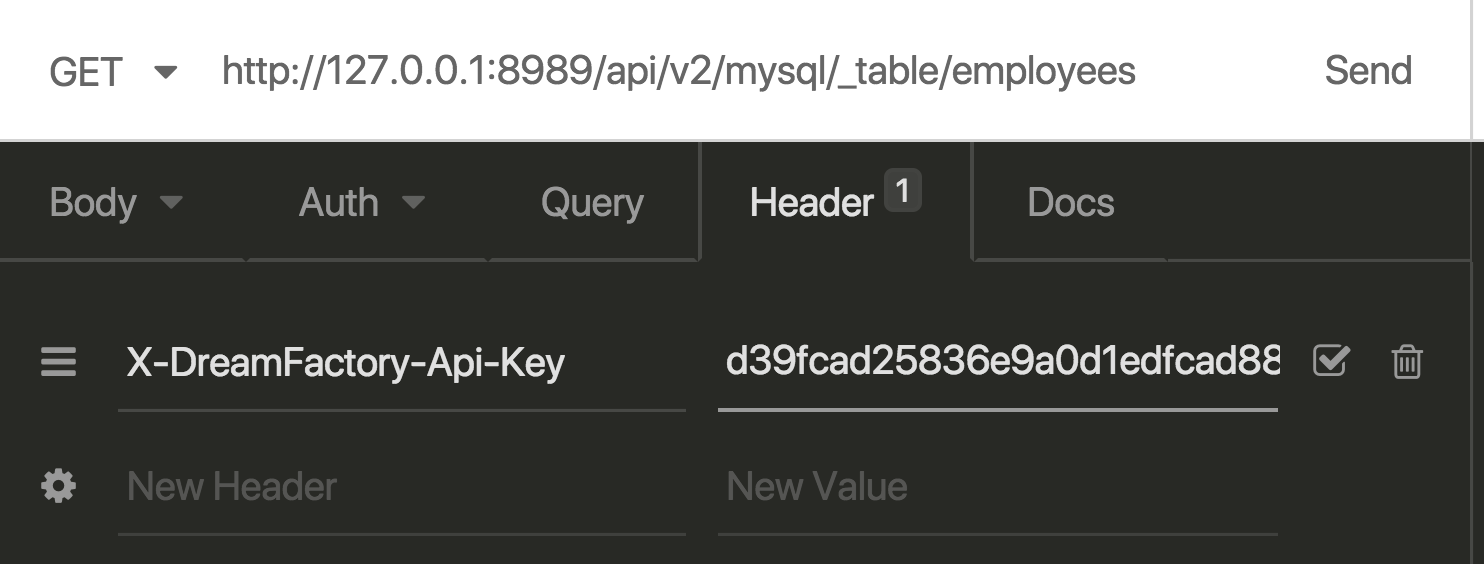
With the URL and header in place, request the URL and you should see the table records returned in JSON format:
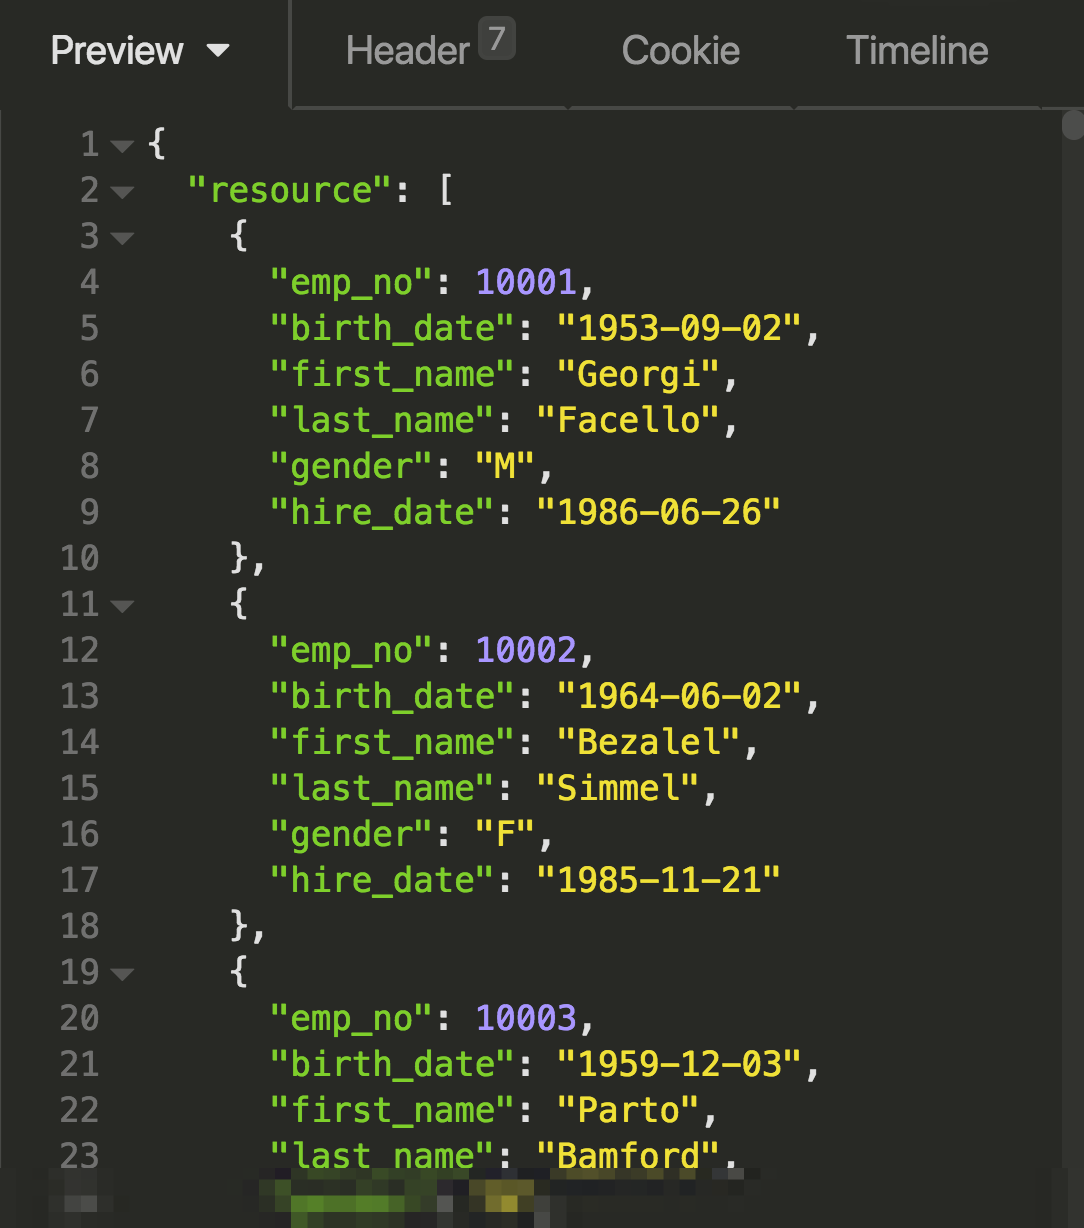
The equivalent SQL query would look like this:
SELECT * FROM employees;
Limiting Results
The previous example returns all records found in the employees table. But what if you only wanted to return five or 10 records? You can use the limit parameter to do so. Modify your URL to look like this:
http://localhost/api/v2/_table/employees?limit=10
The equivalent SQL query would look like this:
SELECT * FROM employees LIMIT 10;
Offsetting Results
The above example will limit your results found in the employees table to 10, but what if you want to select records 11 - 21? You would use the offset parameter like this:
http://localhost/api/v2/_table/employees?limit=10&offset=10
The equivalent SQL query would look like this:
SELECT * FROM employees LIMIT 10 OFFSET 10;
Ordering Results
You can order results by any column using the order parameter. For instance to order the employees tab by the emp_no field, modify your URL to look like this:
http://localhost/api/v2/_table/employees?order=emp_no
The equivalent SQL query looks like this:
SELECT * FROM employees ORDER BY emp_no;
To order in descending fashion, just append desc to the order string:
http://localhost/api/v2/_table/employees?order=emp_no%20desc
Note the space separating emp_no and desc has been HTML encoded. Most programming languages offer HTML encoding capabilities either natively or through a third-party library so there’s no need for you to do this manually within your applications. The equivalent SQL query looks like this:
SELECT * FROM employees ORDER BY emp_no DESC;
Selecting Specific Fields
It’s often the case that you’ll only require a few of the fields found in a table. To limit the fields returned, use the fields parameter:
http://localhost/api/v2/_table/employees?fields=emp_no%2Clast_name
The equivalent SQL query looks like this:
SELECT emp_no, last_name FROM employees;
Filtering Records by Condition
You can filter records by a particular condition using the filter parameter. For instance to return only those records having a gender equal to M, set the filter parameter like so:
http://localhost/api/v2/_table/employees?filter=(gender=M)
The equivalent SQL query looks like this:
SELECT * FROM employees where gender='M';
You’re free to use any of the typical comparison operators, such as LIKE:
http://localhost/api/v2/_table/employees?filter=(last_name%20like%20G%25)
The equivalent SQL query looks like this:
SELECT * FROM employees where last_name LIKE 'G%';
Combining Parameters
The REST API’s capabilities really begin to shine when combining multiple parameters together. For example, let’s query the employees table to retrieve only those records having a last_name beginning with G, ordering the results by emp_no:
http://localhost/api/v2/_table/employees?filter=(last_name%20like%20G%25)&order=emp_no
The equivalent SQL query looks like this:
SELECT * FROM employees where last_name LIKE 'G%' ORDER BY emp_no;
Querying by Primary Key
You’ll often want to select a specific record using a column that uniquely defines it. Often (but not always) this unique value is the primary key. You can retrieve a record using its primary key by appending the value to the URL like so:
/api/v2/_table/supplies/45
The equivalent SQL query looks like this:
SELECT * FROM supplies where id = 5;
If you’d like to use this URL format to search for another unique value not defined as a primary key, you’ll need to additionally pass along the id_field and id_type fields like so:
/api/v2/_table/employees/45abchdkd?id_field=guid&id_type=string
Joining Tables
One of DreamFactory’s most interesting database-related features is the automatic support for table joins. When DreamFactory creates a database-backed API, it parses all of the database tables, learning everything it can about the tables, including the column names, attributes, and relationships. The relationships are assigned aliases, and presented for referential purposes within DreamFactory’s Schema tab. For instance, the following screenshot contains the list of relationship aliases associated with the employees table:
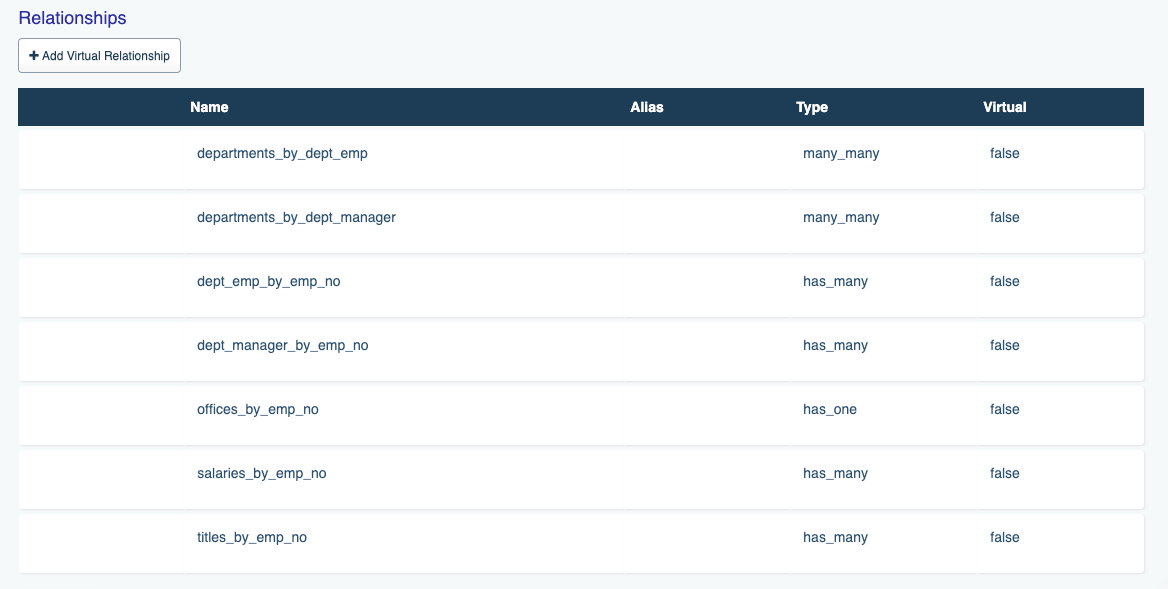
Using these aliases along with the related parameter we can easily return sets of joined records via the API. For instance, the following URI would be used to join the employees and departments tables together:
/api/v2/mysql/_table/employees?related=dept_emp_by_emp_no
The equivalent SQL query looks like this:
SELECT * FROM employees
  LEFT JOIN departments on employees.emp_no = departments.emp_no;
The joined results will be presented within a JSON array having a name matching that of the alias:
{
    "emp_no": 10001,
    "birth_date": "1953-09-02",
    "first_name": "Georgi",
    "last_name": "Facello",
    "gender": "M",
    "hire_date": "1986-06-26",
    "birth_year": "1953",
    "dept_emp_by_emp_no": [
        {
            "emp_no": 10001,
            "dept_no": "d005",
            "from_date": "1986-06-26",
            "to_date": "9999-01-01"
        }
    ]
}
Inserting Records
To insert a record, you’ll send a POST request to the API, passing along a JSON-formatted payload. For instance, to add a new record to the supplies table, we’d send a POST request to the following URI:
/api/v2/mysql/_table/supplies
The body payload would look like this:
{
    "resource": [
        {
            "name": "Stapler"
        }
    ]
}
If the request is successful, DreamFactory will return a 200 status code and a response containing the record’s primary key:
{
    "resource": [
      {
        "id": 9
      }
    ]
}
Adding Records to Multiple Tables
It’s often the case that you’ll want to create a new record and associate it with another table. This is possible via a single HTTP request. Consider the following two tables. The first, supplies, manages a list of company supplies (staplers, brooms, etc). The company requires that all supply whereabouts be closely tracked in the corporate database, and so another table, locations, was created for this purpose. Each record in the locations table includes a location name and foreign key reference to a record found in the supplies table.
Note
We know in the real world the location names would be managed in a separate table and then a join table would relate locations and supplies together; just trying to keep things simple for the purposes of demonstration.The table schemas look like this:
CREATE TABLE `supplies` (
  `id` int(11) unsigned NOT NULL AUTO_INCREMENT,
  `name` varchar(255) DEFAULT NULL,
  PRIMARY KEY (`id`)
) ENGINE=InnoDB AUTO_INCREMENT=2 DEFAULT CHARSET=latin1;

CREATE TABLE `locations` (
  `id` int(11) unsigned NOT NULL AUTO_INCREMENT,
  `supply_id` int(10) unsigned NOT NULL,
  `name` varchar(255) DEFAULT NULL,
  PRIMARY KEY (`id`),
  KEY `supply_id` (`supply_id`),
  CONSTRAINT `locations_ibfk_1` FOREIGN KEY (`supply_id`) REFERENCES `supplies` (`id`)
) ENGINE=InnoDB AUTO_INCREMENT=2 DEFAULT CHARSET=latin1;
Remember from the last example that DreamFactory will create convenient join aliases which can be used in conjunction with the related parameter. In this case, that alias would be locations_by_supply_id. To create the relationship alongside the new supplies record, we’ll use that alias to nest the location name within the payload, as demonstrated here:
{
    "resource": [
        {
            "name": "Broom",
            "locations_by_supply_id": [
                {
                    "name": "Broom Closet"
                }
            ]
        }
    ]
}
With the payload sorted out, all that remains is to make a request to the supplies table endpoint:
/api/v2/mysql/_table/supplies
If the nested insert is successful, you’ll receive a 200 status code in return along with the primary key ID of the newly inserted supplies record:
{
    "resource": [
        {
            "id": 15
        }
    ]
}
Updating Records
Updating database records is a straightforward matter in DreamFactory. However to do so you’ll first need to determine which type of REST update you’d like to perform. Two are supported:
- PUT: The
PUTrequest replaces an existing resource in its entirety. This means you need to pass along all of the resource attributes regardless of whether the attribute value is actually being modified. - PATCH: The
PATCHrequest updates only part of the existing resource, meaning you only need to supply the resource primary key and the attributes you’d like to update. This is typically a much more convenient update approach thanPUT, although to be sure both have their advantages.
Let’s work through update examples involving each method.
Updating Records with PUT
When updating records with PUT you’ll need to send along all of the record attributes within the request payload:
{
    "resource": [
        {
            "emp_no": 500015,
            "birth_date": "1900-12-15",
            "first_name": "Johnny",
            "last_name": "Football",
            "gender": "m",
            "hire_date": "2007-01-01"
        }
    ]
}
With the payload in place, you’ll send a PUT request to the employees table endpoint:
/api/v2/mysql/_table/employees
If successful, DreamFactory will return a 200 status code and a response body containing the primary key of the updated record:
{
    "resource": [
        {
            "emp_no": 500015
        }
    ]
}
The equivalent SQL query looks like this:
UPDATE supplies SET first_name = 'Johnny', last_name = 'Football',
birthdate = '1900-12-15', gender = 'm', hire_date = '2007-01-01' WHERE emp_no = 500015;
Updating Records with PATCH
To update one or more (but not all) attributes associated with a particular record found in the supplies table, you’ll send a PATCH request to the supplies table endpoint, accompanied by the primary key:
/api/v2/mysql/_table/supplies/8
Suppose the supplies table includes attributes such as name, description, and purchase_date, but we only want to modify the name value. The JSON request body would look like this:
{
  "name": "Silver Stapler"
}
If successful, DreamFactory will return a 200 status code and a response body containing the primary key of the updated record:
{
  "id": 8
}
The equivalent SQL query looks like this:
UPDATE supplies SET name = ‘Silver Stapler’ WHERE id = 8;
Deleting Records
To delete a record, you’ll send a DELETE request to the table endpoint associated with the record you’d like to delete. For instance, to delete a record from the employees table you’ll reference this URL:
/api/v2/mysql/_table/employees/500016
If deletion is successful, DreamFactory will return a 200 status code with a response body containing the deleted record’s primary key:
{
    "resource": [
        {
            "emp_no": 500016
        }
    ]
}
The equivalent SQL query looks like this:
DELETE FROM employees WHERE emp_no = 500016;
Synchronizing Records Between Two Databases
You can easily synchronize records between two databases by adding a pre_process event script to the database API endpoint for which the originating data is found. To do so, navigate to the Scripts tab, select the desired database API, and then drill down to the desired endpoint. For instance, if we wanted to retrieve a record from a table named employees found within database API named mysql and send it to another database API (MySQL, SQL Server, etc.) named contacts and possessing a table named names, we would drill down to the following endpoint within the Scripts interface:
mysql > mysql._table.{table_name} > mysql._table.{table_name}.get.post_process mysql._table.employees.get.post_process
Once there, you’ll choose the desired scripting language. We’ve chosen PHP for this example, but you can learn more about other available scripting engines within our wiki documentation. Enable the Active checkbox, and add the following script to the glorified code editor:
// Assign the $platform['api'] array value to a convenient variable
$api = $platform['api'];

// Declare a few arrays for later use
$options = [];
$record = [];

// Retrieve the response body. This contains the returned records.
$responseBody = $event['response']['content'];

// Peel off just the first (and possibly only) record
$employee = $responseBody["resource"][0];

// Peel the employee record's first_name and last_name values,
// and assign them to two array keys named first and last, respectively.
$record["resource"] = [
    [
        'first' => $employee["first_name"],
        'last' => $employee["last_name"],
    ]
];

// Identify the location to which $record will be POSTed
// and execute an API POST call.
$url = "contacts/_table/names";
$post = $api->post;
$result = $post($url, $record, $options);
Save the changes, making sure the script’s Active checkbox is enabled. Then make a call to the employees table which will result in the return of a single record, such as:
/api/v2/mysql/_table/employees?filter=emp_no=10001
Of course, there’s nothing stopping you from modifying the script logic to iterate over an array of returned records.
Working with Stored Procedures
Stored procedure support via the REST API is just for discovery and calling what you have already created on your database, it is not for managing the stored procedures themselves. They can be accessed on each database service by the _proc resource.
As with most database features, there are a lot of common things about stored procedures across the various database vendors, with of course, some pretty big exceptions. DreamFactory’s blended API defines the difference between stored procedures and how they are used in the API as follows.
Procedures can use input parameters (‘IN’) and output parameters (‘OUT’), as well as parameters that serve both as input and output (‘INOUT’). They can, except in the Oracle case, also return data directly.
Database Vendor Exceptions
- SQLite does not support procedures (or indeed functions).
- PostgreSQL calls procedures and functions the same thing (a function) in PostgreSQL. DreamFactory calls them procedures if they have OUT or INOUT parameters or don’t have a designated return type, otherwise functions.
- SQL Server treats OUT parameters like INOUT parameters, and therefore require some value to be passed in.
Listing Available Stored Procedures
The following call will list the available stored procedures, based on role access allowed:
GET http(s)://<dfServer>/api/v2/<serviceName>/_proc
Getting Stored Procedure Details
We can use the ids url parameter and pass a comma delimited list of resource names to retrieve details about each of the stored procedures. For example if you have a stored procedure named getCustomerByLastName a GET call to http(s)://<dfServer>/api/v2/<serviceName>?ids=getCustomerByLastName will return:
{
  "resource": [
    {
      "alias": null,
      "name": "getCustomerByLastName",
      "label": "GetCustomerByLastName",
      "description": null,
      "native": [],
      "return_type": null,
      "return_schema": [],
      "params": [
        {
          "name": "LastName",
          "position": 1,
          "param_type": "IN",
          "type": "string",
          "db_type": "nvarchar",
          "length": 25,
          "precision": null,
          "scale": null,
          "default": null
        }
      ],
      "access": 31
    }
  ]
}
Calling a Stored Procedure
Using GET
When passing no payload is required, any IN or INOUT parameters can be sent by passing the values in the order required inside parentheses
/api/v2/<serviceName>/_proc/myproc(val1, val2, val3)
or as URL parameters by parameter name
/api/v2/<serviceName>/_proc/myproc?param1=val1¶m2=val2¶m3=val3
In the below example, there is a stored procedure getUsernameByDepartment which takes two input parameters, a department code, and a userID. Making the following call:
/api/v2/<serviceName>/_proc/getUserNameByDepartment(AB,1234)
where AB is the department code and 1234 is the userID, will return:
{
  "userID": "1234",
  "username": "Tomo"
}
Using POST
If a payload is required, i.e. passing values that are not url compliant, or passing schema formatting data, include the parameters directly in order. The same call as above can be made with a POST request with the following in the body:
{
  "params": ["AB", 1234]
}
Formatting Results
For procedures that do not have INOUT or OUT parameters, the results can be returned as is, or formatted using the returns URL parameter if the value is a single scalar value, or the schema payload attribute for result sets.
If INOUT or OUT parameters are involved, any procedure response is wrapped using the configured (a URL parameter wrapper) or default wrapper name (typically “resource”), and then added to the output parameter listing. The output parameter values are formatted based on the procedure configuration data types.
Note that without formatting, all data is returned as strings, unless the driver (i.e. mysqlnd) supports otherwise. If the stored procedure returns multiple data sets, typically via multiple “SELECT” statements, then an array of datasets (i.e. array of records) is returned, otherwise a single array of records is returned.
schema - When a result set of records is returned from the call, the server will use any name-value pairs, consisting of “<field_name>": “<desired_type>”, to format the data to the desired type before returning.
wrapper - Just like the URL parameter, the wrapper designation can be passed in the posted data.
Request with formatting configuration…
{
  "schema": {
    "id": "integer",
    "complete": "boolean"
  },
  "wrapper": "data"
}
Response without formatting…
{
  "resource": [
    {
      "id": "3",
      "name": "Write an app that calls the stored procedure.",
      "complete": 1
    },
    {
      "id": "4",
      "name": "Test the application.",
      "complete": 0
    }
  ],
  "inc": 6,
  "count": 2,
  "total": 5
}
Response with formatting applied…
{
  "data": [
    {
      "id": 3,
      "name": "Write an app that calls the stored procedure.",
      "complete": true
    },
    {
      "id": 4,
      "name": "Test the application.",
      "complete": false
    }
  ],
  "inc": 6,
  "count": 2,
  "total": 5
}
Using Symmetric Keys to Decrypt Data in a Stored Procedure (SQL Server)
SQL Server has the ability to do column level encryption using symmetric keys which can be particular useful for storing sensitive information such as passwords. A good example of how to do so can be found here
Typically, you would then decrypt this column (assuming the user has access to the certificate) with a statement such as the below in your sql server workbench:
OPEN SYMMETRIC KEY SymKey
DECRYPTION BY CERTIFICATE <CertificateName>;

SELECT <encryptedColumn> AS 'Encrypted data',
CONVERT(varchar, DecryptByKey(<encryptedColumn>)) AS 'decryptedColumn'
FROM SalesLT.Address;
Now, we cannot call our table endpoint (e.g /api/v2/<serviceName>/_table/<tableWithEncryptedField>) and add this logic with DreamFactory, however we could put the same logic in a stored procedure, and have DreamFactory call that to return our decrypted result. As long as the SQLServer user has permissions to the certificate used for encryption, it will be able to decrypt the field. (You could then use roles to make sure only certain users have access to this stored procedure).
The stored procedure would look something like this:
CREATE PROCEDURE dbo.<procedureName>
AS
BEGIN
  SET NOCOUNT on;
  OPEN SYMMETRIC KEY SymKey
  DECRYPTION BY CERTIFICATE <CertificateName>;

  SELECT <oneField>, CONVERT(nvarchar, DecryptByKey(<encryptedField>)) AS 'decrypted'
  FROM <table>;
END
return;
and then can be called by DreamFactory in with /_proc/<procedureName>
Obfuscating a Table Endpoint
Sometimes you might wish to completely obfuscate the DreamFactory-generated database API endpoints, and give users a URI such as /api/v2/employees rather than /api/v2/mysql/_table/employees. At the same time you don’t want to limit the ability to perform all of the usual CRUD tasks. Fortunately this is easily accomplished using a scripted service. The following example presents the code for a scripted PHP service that has been assigned the namespace employees:
$api = $platform['api'];
$get = $api->get;
$post = $api->post;
$put = $api->put;
$patch = $api->patch;
$delete = $api->delete;

$api_path = 'mysql/_table/employees';

$method = $event['request']['method'];

$options = [];

$params = $event['request']['parameters'];

$result = '';

$resource = $event['response']['content']['resource'];

if ($resource && $resource !== '') {
  $api_path = $api_path + '/' . $resource;
}

if ($event['request']['payload']) {
  $payload = $event['request']['payload'];
} else {
  $payload = null;
}

switch ($method) {
  case 'GET':
      $result = $get($api_path, null, $options);
      break;
  case 'POST':
      $result = $post($api_path, $payload, $options);
      break;
  case 'PUT':
      $result = $put($api_path, $payload, $options);
      break;
  case 'PATCH':
      $result = $patch($api_path, $payload, $options);
      break;
  case 'DELETE':
      $result = $delete($api_path, $payload, $options);
      break;
  default:
      $result = "error";
      break;
}

return $result;
With this script in place, you can now use the following endpoint to interact with the MySQL API’s employees table:
https://dreamfactory.example.com/api/v2/employees
Issuing a GET request to this endpoint would return all of the records. Issuing a POST request to this endpoint with a body such as the following would insert a new record:
{
    "resource": [
    {
      "emp_no": 500037,
      "birth_date": "1900-12-12",
      "first_name": "Joe",
      "last_name": "Texas",
      "gender": "m",
      "hire_date": "2007-01-01"
    }
    ]
}
Troubleshooting
If you’d like to see what queries are being executed by your MySQL database, you can enable query logging. Begin by creating a file named query.log in your Linux environment’s /var/log/mysql directory:
$ cd /var/log/mysql
$ sudo touch query.log
Next, make sure the MySQL daemon can write to the log. Note you might have to adjust the user and group found in the below chmod command to suit your particular environment:
$ sudo chown mysql.mysql /var/log/mysql/query.log
$ sudo chmod u+w /var/log/mysql/query.log
Finally, turn on query logging by running the following two commands:
mysql> SET GLOBAL general_log_file = '/var/log/mysql/query.log';
Query OK, 0 rows affected (0.00 sec)

mysql> SET GLOBAL general_log = 'ON';
Query OK, 0 rows affected (0.00 sec)
To view your executed queries in real-time, tail the query log:
$ tail -f /var/log/mysql/query.log
/usr/sbin/mysqld, Version: 5.7.19-0ubuntu0.16.04.1 ((Ubuntu)). started with:
Tcp port: 3306  Unix socket: /var/run/mysqld/mysqld.sock
Time                 Id Command    Argument
2019-03-28T14:50:19.758466Z	   76 Quit
2019-03-28T14:50:31.648530Z	   77 Connect	[email protected] on employees using TCP/IP
2019-03-28T14:50:31.648635Z	   77 Query	use `employees`
2019-03-28T14:50:31.648865Z	   77 Prepare	set names 'utf8' collate 'utf8_unicode_ci'
2019-03-28T14:50:31.648923Z	   77 Execute	set names 'utf8' collate 'utf8_unicode_ci'
2019-03-28T14:50:31.649029Z	   77 Close stmt
2019-03-28T14:50:31.649305Z	   77 Prepare	select `first_name`, `hire_date` from `employees`.`employees` limit 5 offset 0
2019-03-28T14:50:31.649551Z	   77 Execute	select `first_name`, `hire_date` from `employees`.`employees` limit 5 offset 0
2019-03-28T14:50:31.649753Z	   77 Close stmt
2019-03-28T14:50:31.696379Z	   77 Quit
Checking Your User Credentials
Many database API generation issues arise due to a misconfigured set of user credentials. These credentials must possess privileges capable of connecting from the IP address where DreamFactory resides. To confirm your user can connect from the DreamFactory server, create a file named mysql-test.php and add the following contents to it. Replace the HOSTNAME, DBNAME, USERNAME, and PASSWORD placeholders with your credentials:
<?php

$dsn = "mysql:host=HOSTNAME;dbname=DBNAME";
$user = "USERNAME";
$passwd = "PASSWORD";

$pdo = new PDO($dsn, $user, $passwd);

$stmt = $pdo->query("SELECT VERSION()");

$version = $stmt->fetch();

echo $version[0] . PHP_EOL;
Save the changes and run the script like so:
$ php mysql-test.php
5.7.29-0ubuntu0.16.04.1
If the MySQL version number isn’t returned, then the user is unable to connect remotely.
Logging Your Database Queries
If you wish to see the database queries being generated by DreamFactory, you can open the .env file, and in ‘Database Settings’ you will see the following:
#DB_QUERY_LOG_ENABLED=false
Uncomment and set this to true, and also set APP_LOG_LEVEL=debug. Whenever you make a database query, the statement will be sent to the log file (found in storage/logs/dreamfactory.log). A typical output to the log will look like the following:
[2021-05-28T05:47:10.965487+00:00] local.DEBUG: API event handled: mysqldb._table.{table_name}.get.pre_process
[2021-05-28T05:47:10.966765+00:00] local.DEBUG: API event handled: mysqldb._table.employees.get.pre_process
[2021-05-28T05:47:12.388272+00:00] local.DEBUG: service.mysqldb: select `emp_no`, `birth_date`, `first_name`, `last_name`, `gender`, `hire_date` from `xenonpartners`.`employees` limit 2 offset 0: 1385.25
[2021-05-28T05:47:12.392063+00:00] local.DEBUG: API event handled: mysqldb._table.{table_name}.get.post_process
[2021-05-28T05:47:12.393794+00:00] local.DEBUG: API event handled: mysqldb._table.employees.get.post_process
Adding a Custom Log Message to your Database Queries
When using a scripted service, and with DB_QUERY_LOG_ENABLED set to true, it is possible to add a custom log message using the following syntax:
use Log;

...

if (config('df.db.query_log_enabled')) {
    \Log::debug(<your message>);
}

...
See here for more information about logging.
Using Extensions with your Databases (PostgreSQL)
PostgreSQL has a number of extensions to enhance database capabilities. One of the most popular is PostGIS and its topology functionality for representing vector data.
If your PostgreSQL database uses this (or any other) extension, when using DreamFactory to make an API call (especially a function or procedure), you may see this error, or something similar to it:
"error": {
    "code": 500,
    "context": null,
    "message": "Failed to call database stored function.\nSQLSTATE[42883]: Undefined function: 7 ERROR:  function st_setsrid(public.geometry, integer) does not exist
    ...
}
This is most likely occuring because the extension’s functions are located in a different schema to the schema to the one of the database, and the postgreSQL user that DreamFactory has been assigned, as a result, cannot see it.
In order for DreamFactory to be able to see the extension’s functions, you should add this line to the Additional SQL Statements setting (change to match the extensions and schemas you are using) which you can find in the “Optional Advanced Settings” of your postgres service’s config tab.
SET search_path TO "$user", public, postgis, topology;

This will allow DreamFactory to search through additional schemas to find the functions that the database requires when using any extensions.
Conclusion
Congratulations! In less than an hour you’ve successfully generated, secured, and deployed a database-backed API. In the next chapter, you’ll learn how to add additional authentication and authorization solutions to your APIs.