Welcome to the DreamFactory platform! Whether you’re an open source user, or a paid customer taking advantage of DreamFactory’s advanced capabilities, we wrote this guide to help you begin incorporating the platform into your organization in the most efficient way possible.
This guide is under heavy development, and is a work-in-progress. Check back often as we’ll be publishing updates regularly!
About this Guide
This guide consists of numerous chapters covering the following topics:
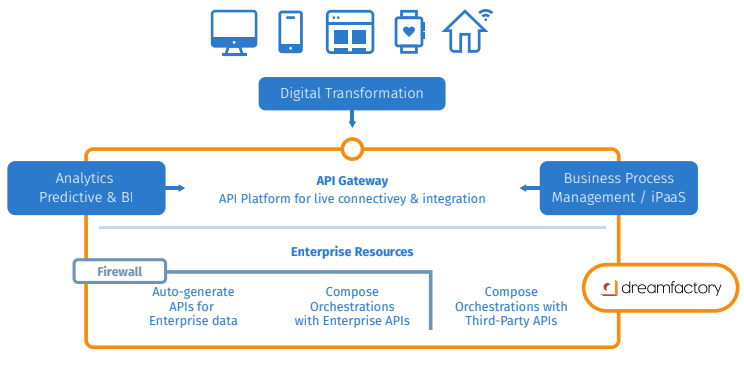
So why would you want to use the DreamFactory platform in the first place? It’s likely because even world class developers and administrators are faced with ever-increasing complexity due in large part to the extraordinary number of internal and third-party data sources which must be integrated with mobile and web applications, ERP solutions, and myriad other services. In this chapter you’ll learn how DreamFactory can bring order to this chaos by introducing silo breaking capabilities to your enterprise, offering a platform for which not only can you auto-generate the APIs used to connect to these data sources, but also secure and monitor them.
Much of the DreamFactory platform is open source, with the code made available via GitHub. But this doesn’t mean you have to be a command-line wizard to begin generating APIs in a flash. In this chapter you’ll learn how to install and configure DreamFactory regardless of your operating system or experience level. We’ll also talk about configuring DreamFactory to suit your specific needs, and highlight key configuration changes which will make your life much easier.
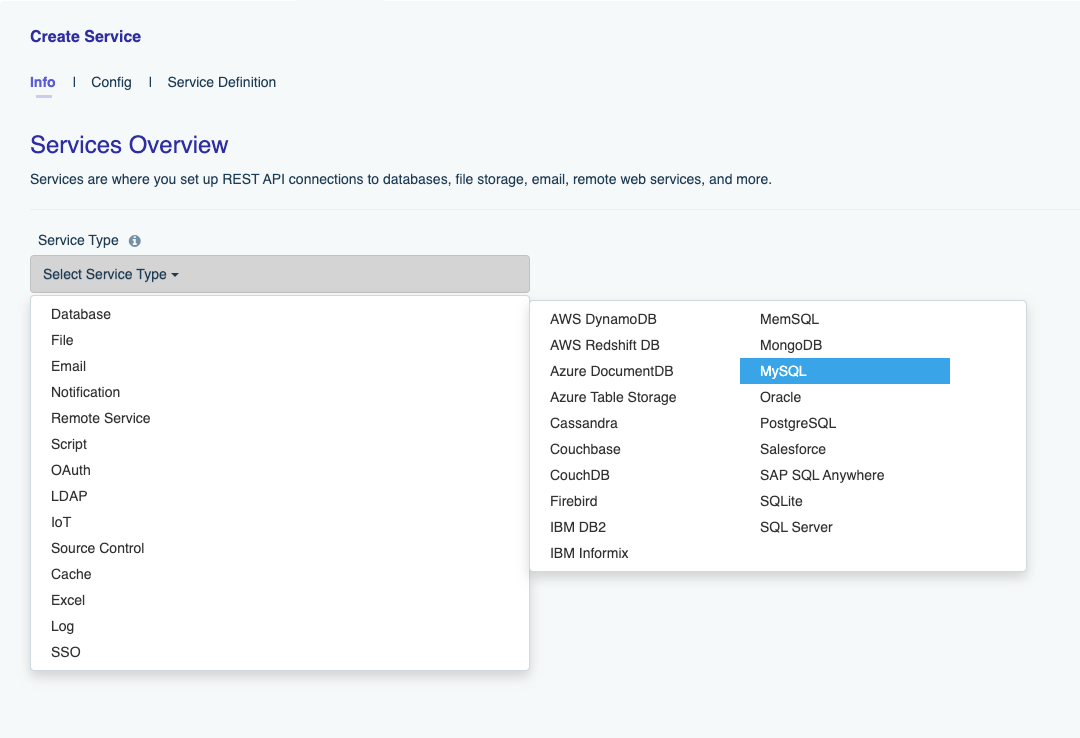
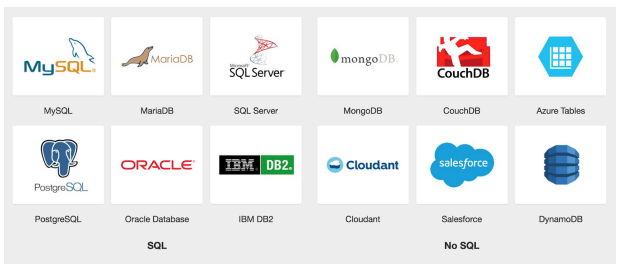
After installing your DreamFactory instance, you’ll naturally want to take the platform for a test drive. Most users desire to begin by generating a database API, because the advantages of doing so are so evident. By merely supplying a set of authentication credentials, DreamFactory will generate an API for any of an array of popular databases, including MySQL, SQL Server, Oracle, PostgreSQL, MongoDB, and others. Once generated, you can immediately beging issuing REST API calls to carry out record creation, retrieval, modification, and deletion tasks. You’ll also be able to perform advanced queries using the REST API, including filters, grouping, joins, limiting, and more.
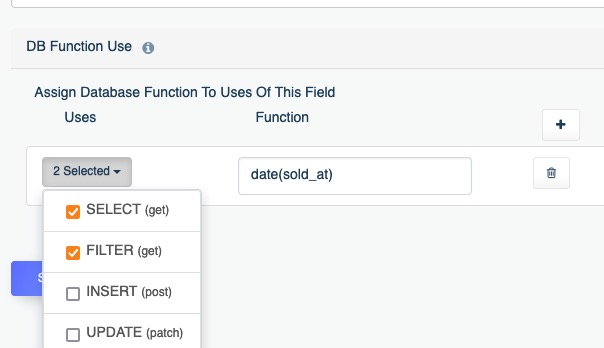
The ability to instantaneously generate a database API is a productivity game changer. However that alone won’t be enough to completely replace your use of SQL. In this chapter you’ll learn about DreamFactory’s advanced database API features, including transaction support, using database functions within API calls, and more.
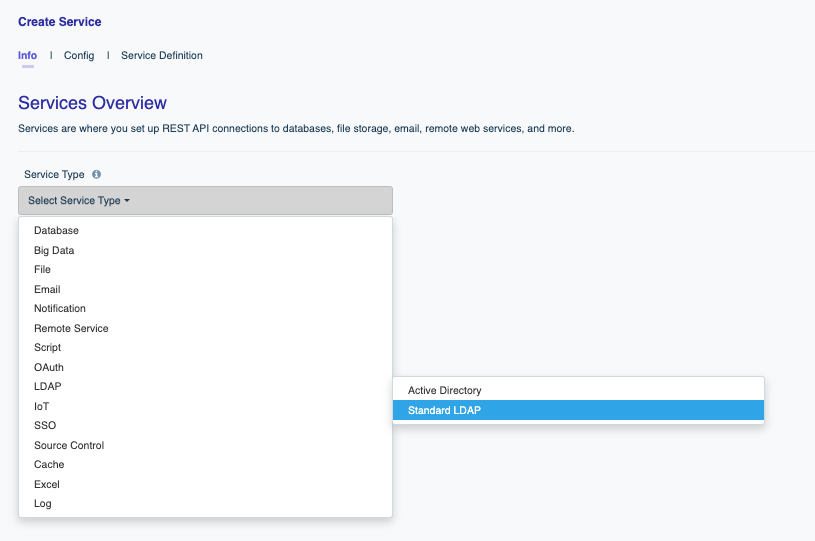
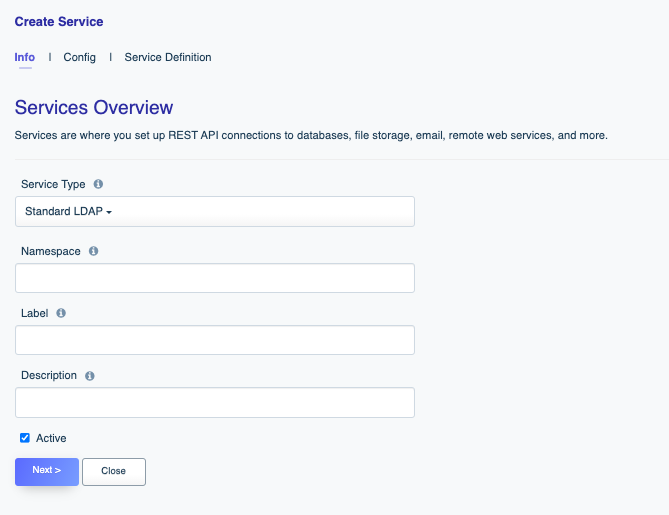
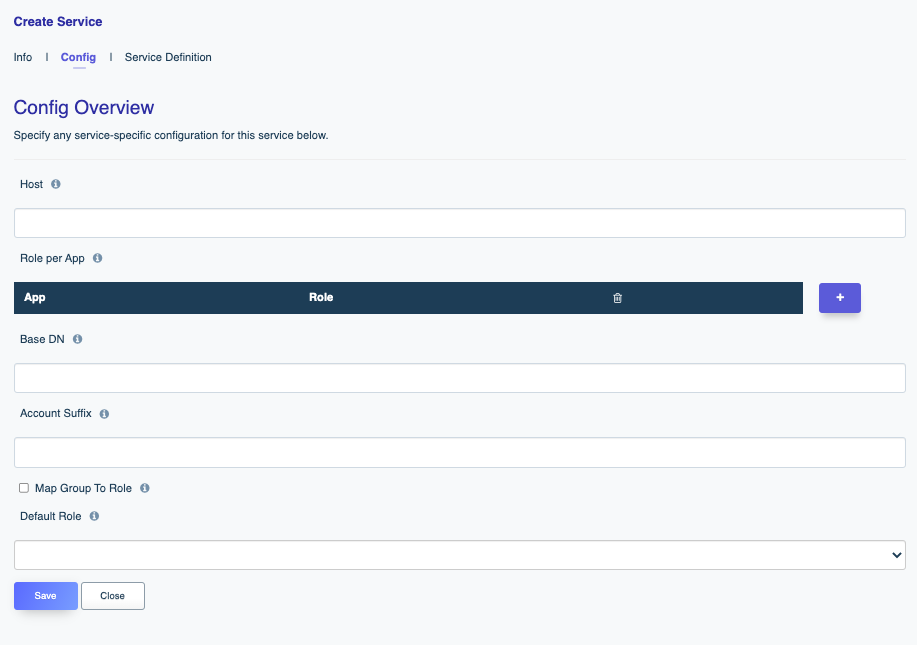
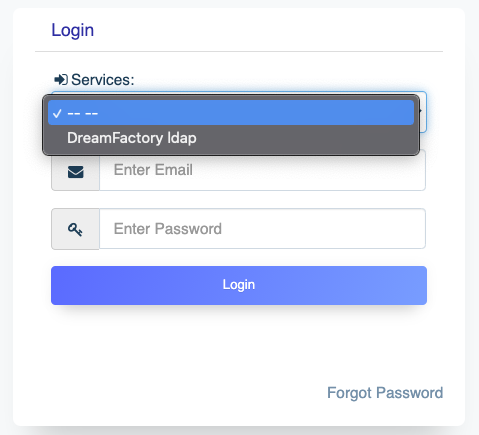
From the moment your API is generated, rest assured it is protected by at minimum a complicated API key. However this represents only the beginning in terms of your options regarding securing an API. You can use DreamFactory’s user authentication and authorization features to provide user-specific login via a variety of authentication solutions, including basic auth, LDAP, Active Directory, and SSO. In this chapter you’ll learn all about these solutions, and additionally learn how to use DreamFactory’s rate limiting and logging capabilities to closely monitor request volume and behavior.
DreamFactory offers an extraordinarily powerful solution for creating APIs and adding business logic to existing APIs using a variety of popular scripting languages including PHP, Python (versions 2 and 3), Node.js, and JavaScript. In this chapter we’ll walk you through several examples which will hopefully spur the imagination regarding the many ways in which you can take advantage of this great feature.
The ability to merely auto-generate a REST API is already going to produce an immediate productivity boost, however eventually you’re going to want to tweak one or more API endpoints' default behavior to accommodate more sophisticated project requirements. Most often this involves using DreamFactory’s scripting feature, which allows you to write custom code used to validating input parameters, call other APIs, and much more. In this chapter we’ll walk through several real-world examples which highlight how easy it is to extend your API endpoints with one of four supported scripting engines (NodeJS, PHP, and Python).
While DreamFactory is already secure, and relatively maintenance free, there are quite a few modifications you can make to enhance your instance. In this chapter we’ll provide a wide ranging overview of the many changes you can make to maintain, and secure your environment.
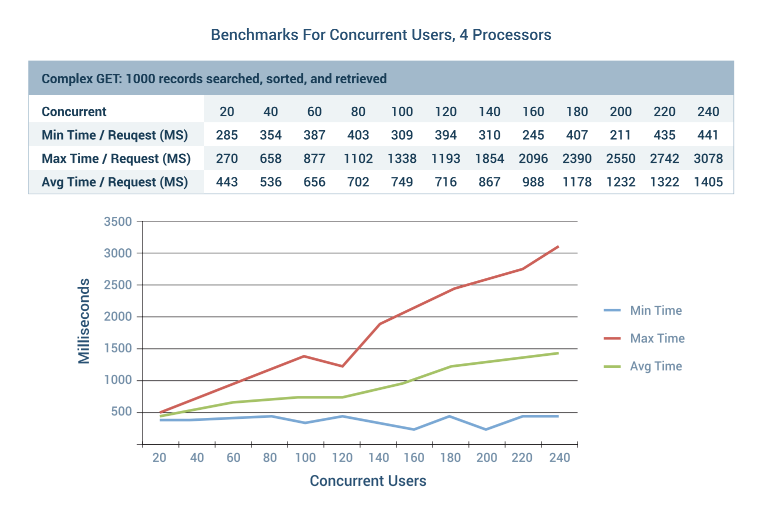
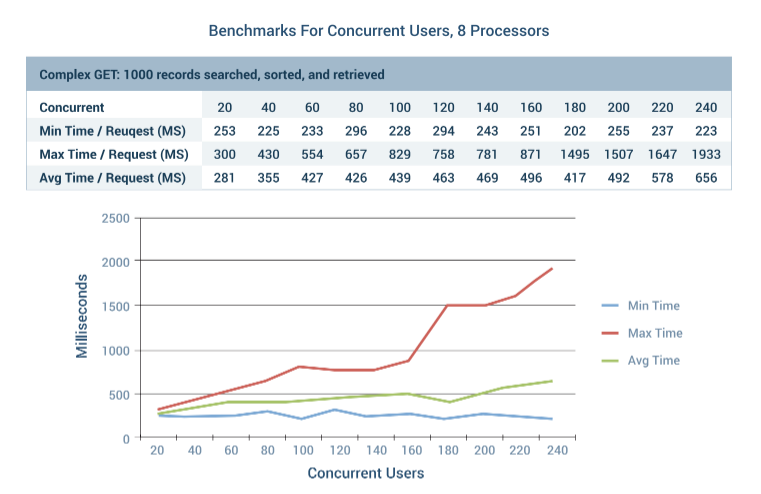
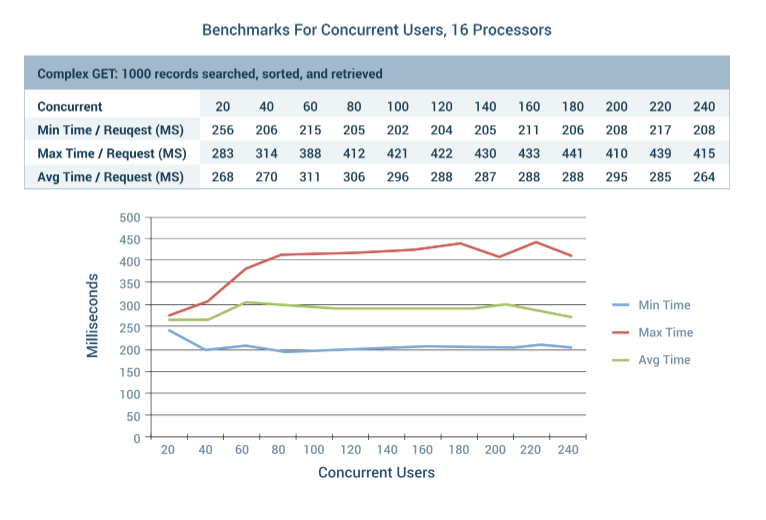
DreamFactory is already very performant out of the box, however logically you’ll want to do everything practical to ensure your instance can really fly. In this chapter we’ll provide some benchmarks, and guidance regarding how to properly tune your instance environment.
DreamFactory’s a really fascinating project in that its architecture is suitable for infinite horizontal and vertical scaling, yet can be run on small appliance-like devices such as the Raspberry Pi. In this chapter we’ll talk about a few configuration-related gotchas associated with installing DreamFactory’s prerequisites on the Raspberry Pi.
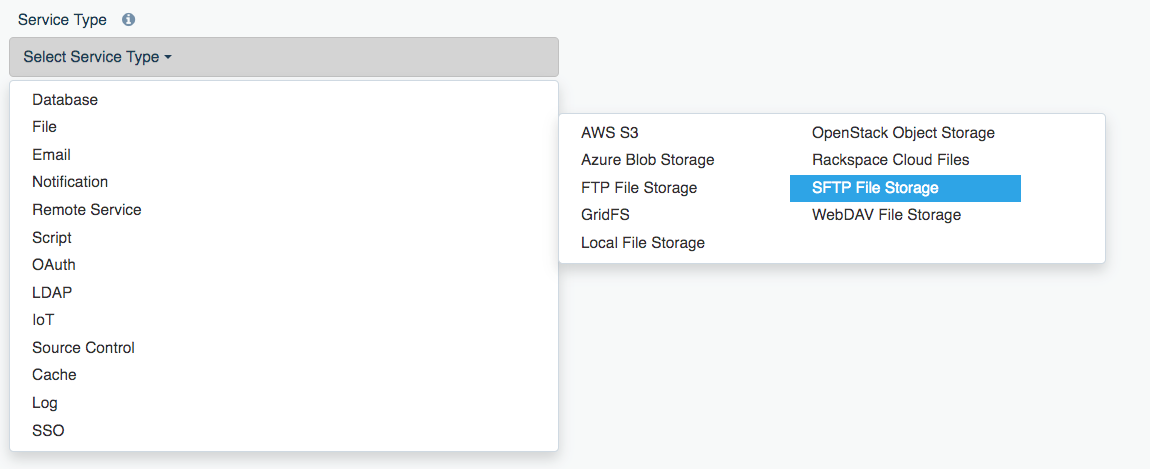
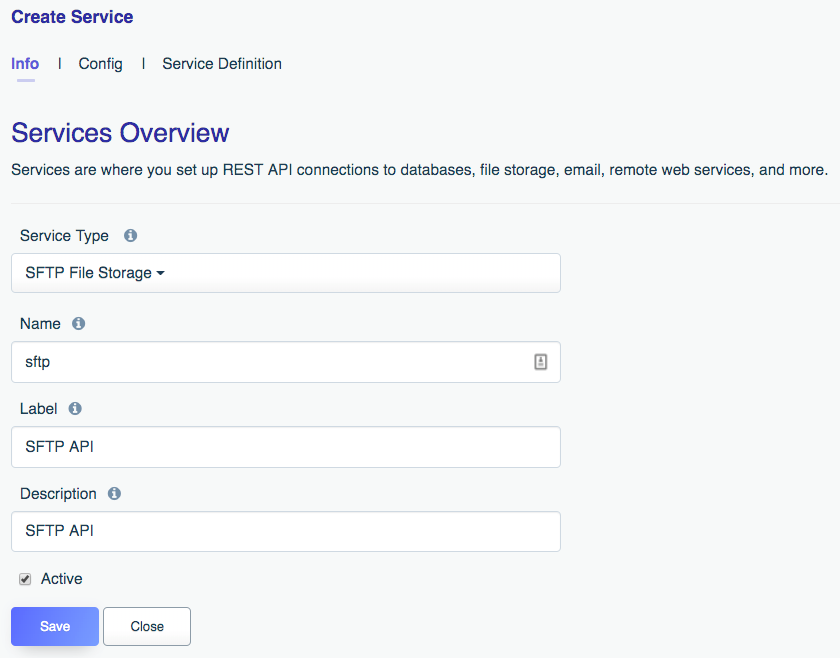
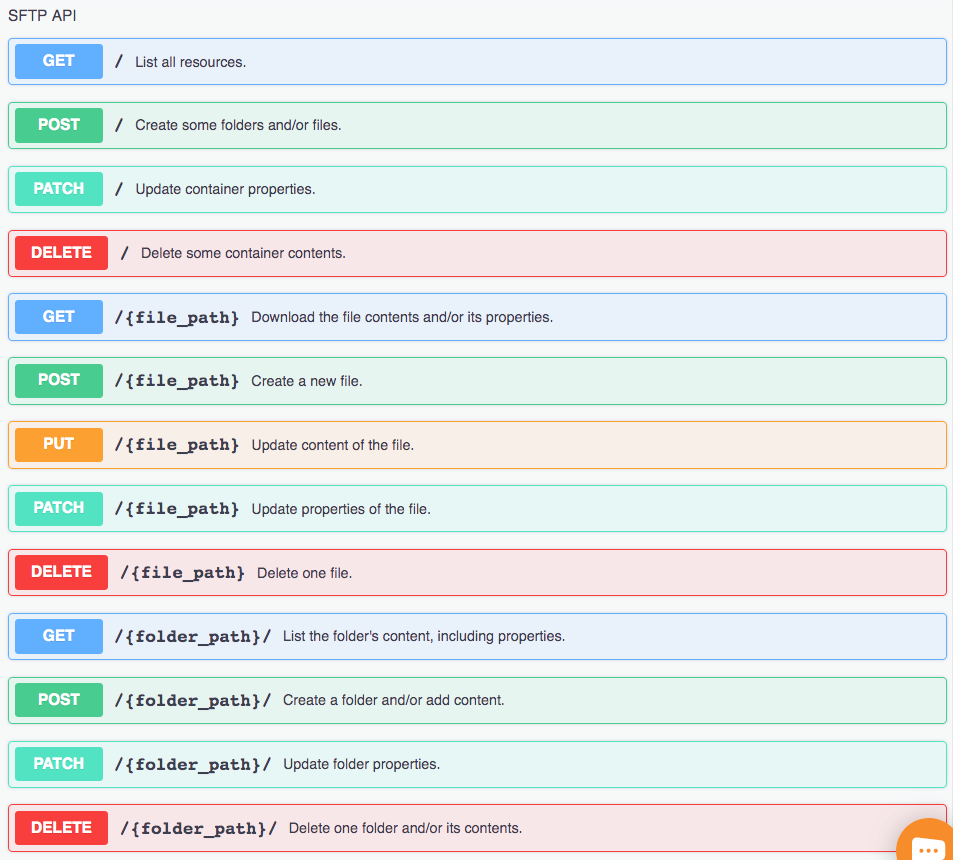
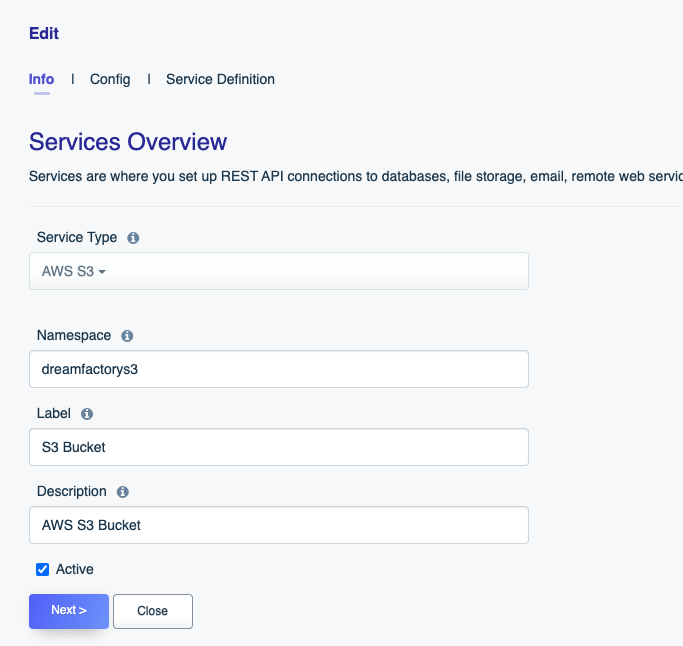
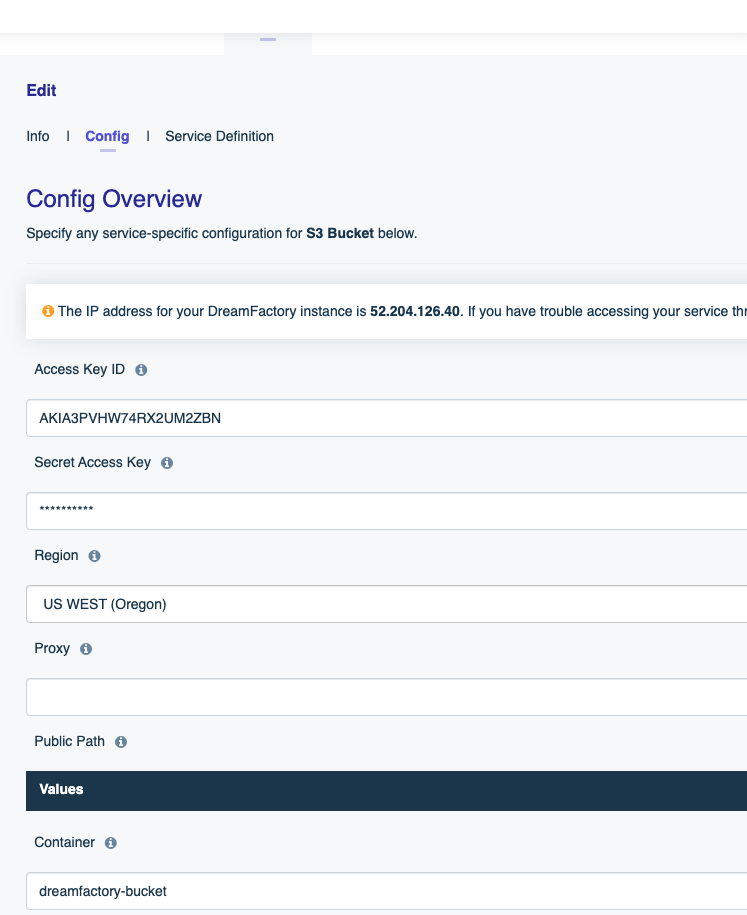
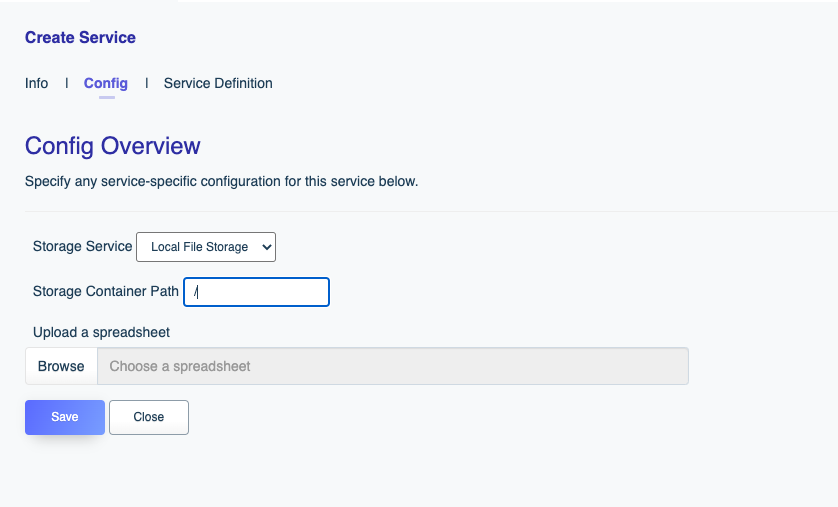
DreamFactory supports file system-based API generation, meaning you can create REST APIs for AWS S3, SFTP, local file storage, and more. In this chapter we’ll show you how.
In this chapter you’ll learn how to configure the connector, and then interact with your Salesforce database using the DreamFactory-generated REST API.
Although the DreamFactory Platform is best known for the ability to generate REST APIs, many also take advantage of the platform’s Remote Service connectors. In this chapter you’ll learn how to proxy third-party HTTP APIs through DreamFactory, and additionally mount an existing SOAP service to DreamFactory and interact with it using an auto-generated REST interface.
All DreamFactory versions include a web-based administration console used to manage all aspects of the platform. While this console offers a user-friendly solution for performing tasks such as managing APIs, administrators, and business logic, many companies desire to instead automate management tasks through scripting. In this chapter you’ll learn how to interact with the system APIs to easily manage multiple DreamFactory environments, and integrate DreamFactory features into third-party applications such as an API monetization SaaS.
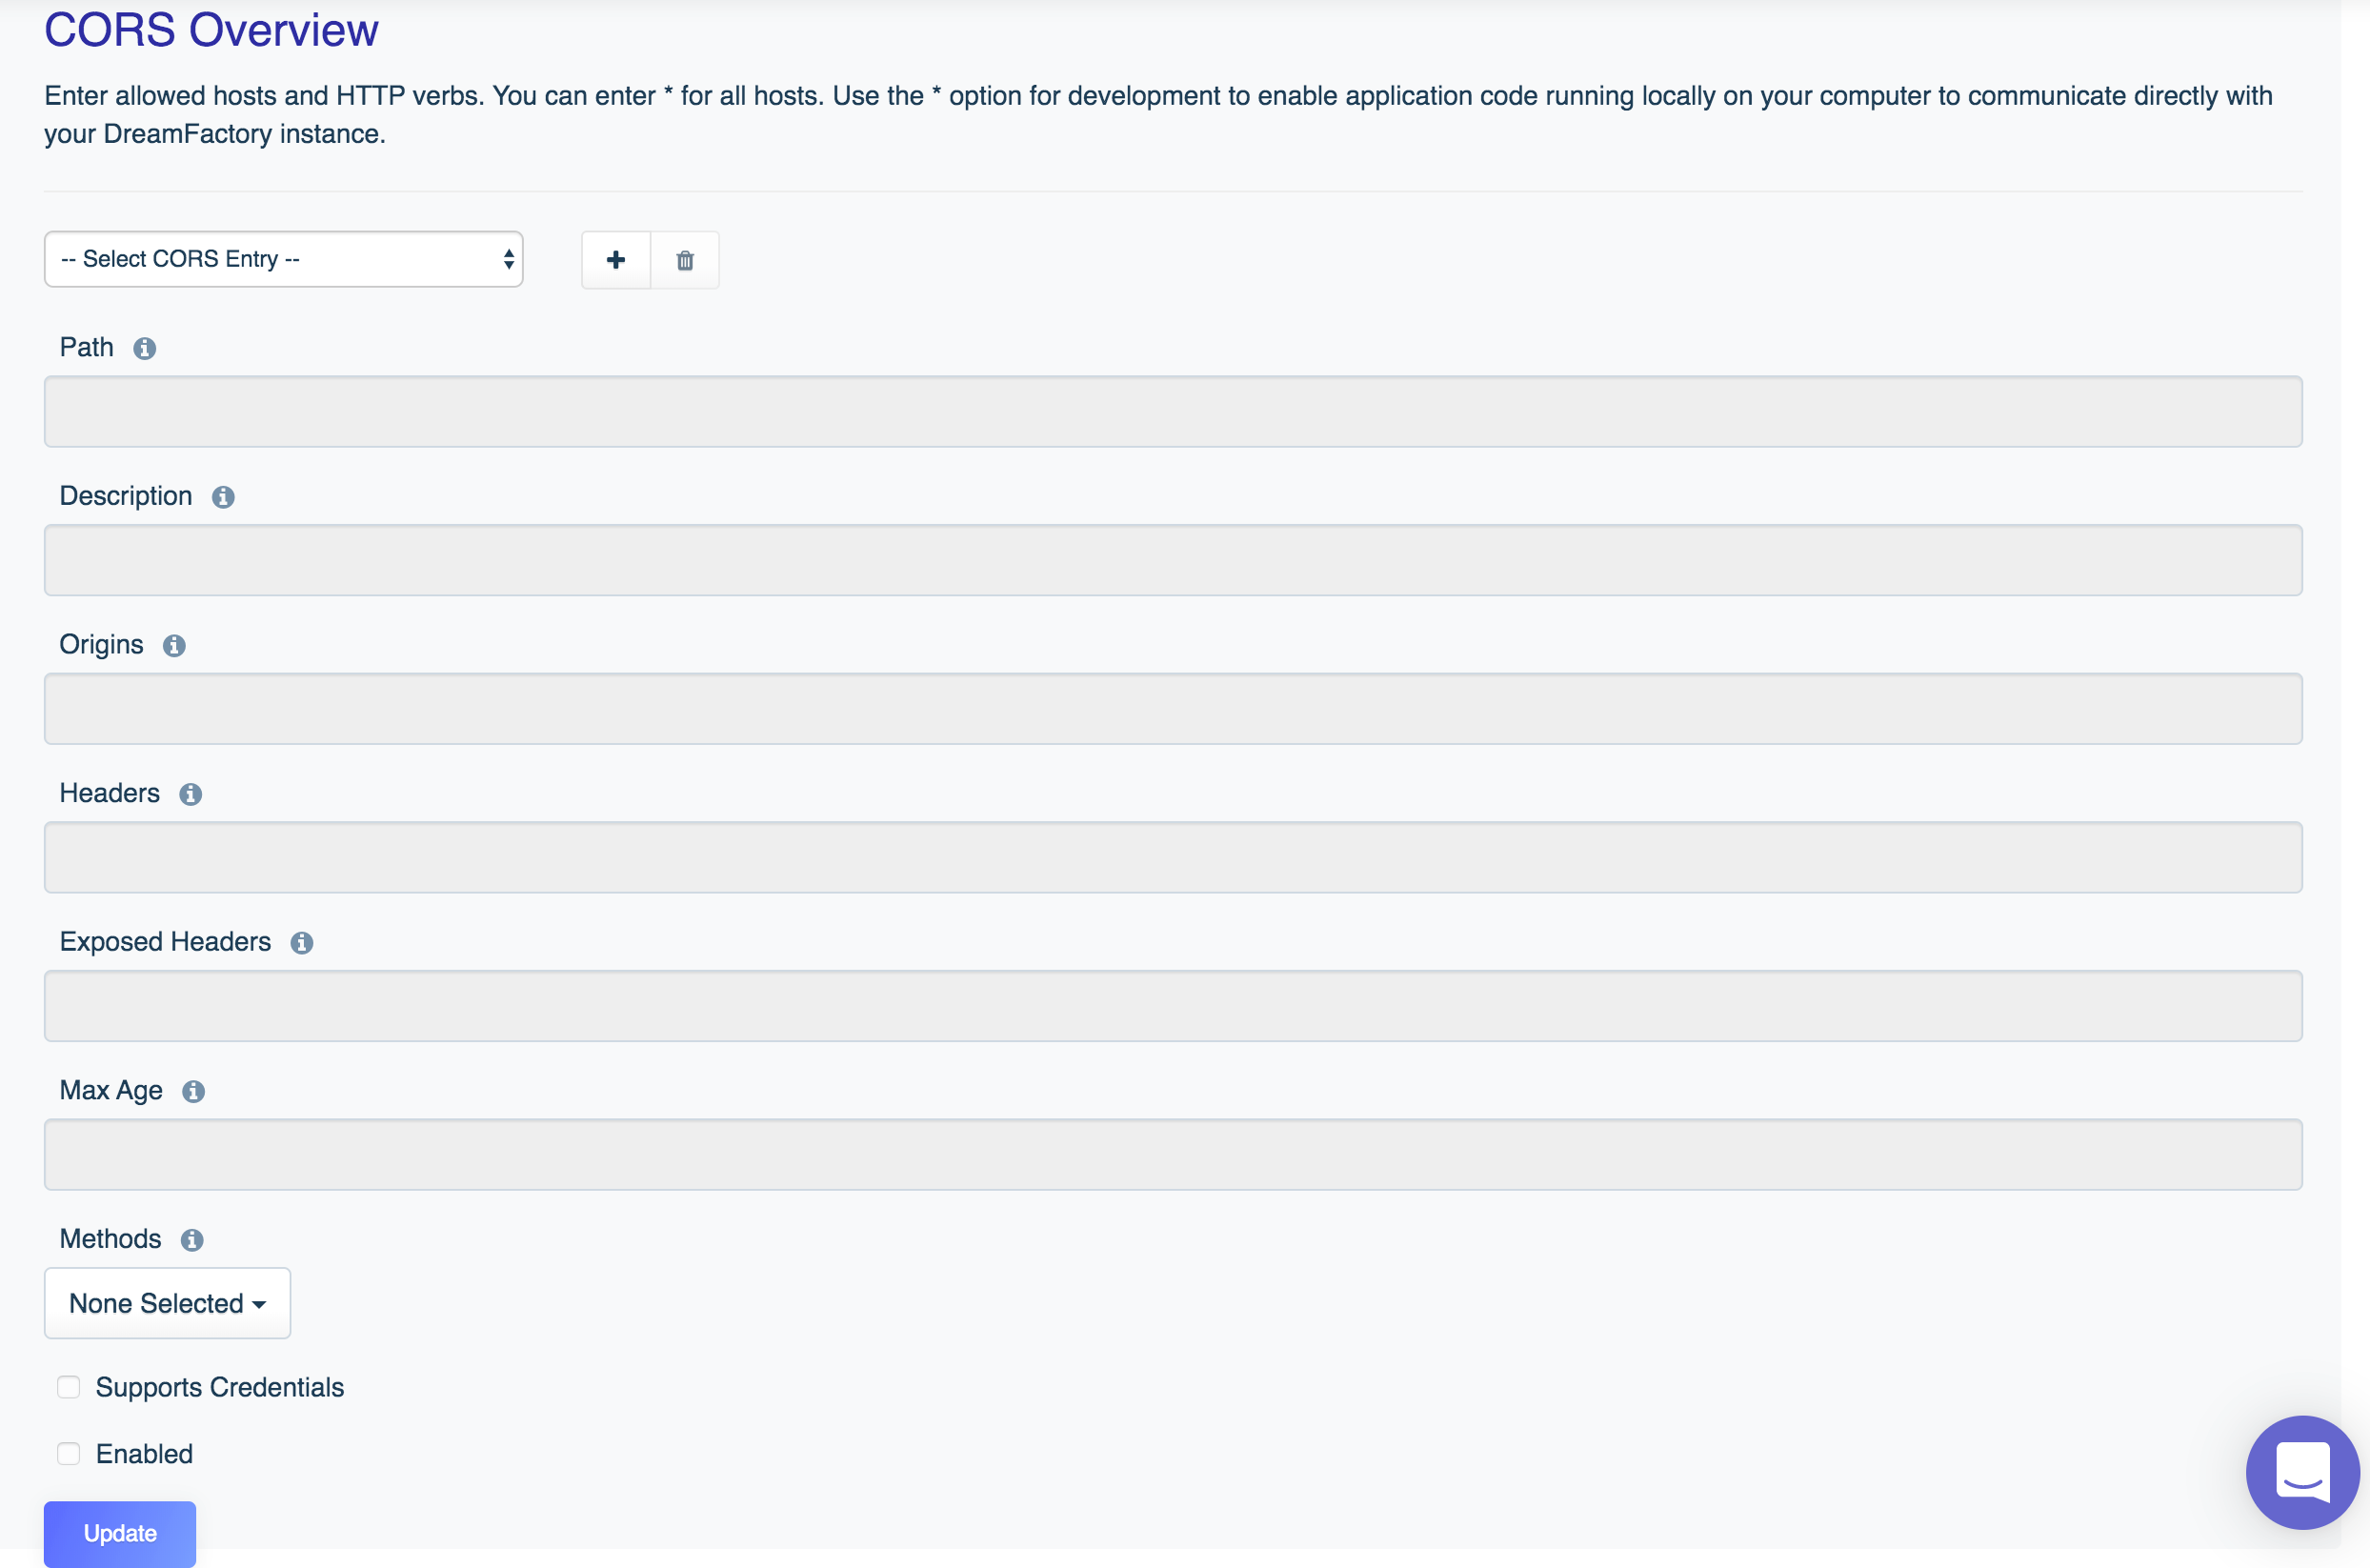
DreamFactory is packed with features capable of being tweaked via configuration parameters. These parameters can be managed as server environment variables or within a .env file found in the platform’s root directory. This appendix defines all available parameters.
This paper outlines how to leverage an API platform to retrofit existing infrastructure for
“GDPR readiness”, essentially as a byproduct of implementing a modern architecture for digital
transformation.
This paper answers frequently asked questions pertaining to Dreamfactorys system and an anatomy of various API calls as they travel
through the system.
This paper is designed to provide information to enterprise customers about how to scale a DreamFactory Instance. The sections below talks about horizontal, vertical, and cloud scaling capabilities.
More Ways to Learn
Hopefully you’ll find this guide indispensable, however it’s just one of several learning resources at your disposal. Check out the following links to learn more about what else is available!
The DreamFactory Wiki
The DreamFactory wiki is our definitive reference guide, providing a terse but comprehensive summary of the platform’s key features. Here you’ll find installation instructions, scripting examples, and a great deal of other information.
Volunteers and DreamFactory staff alike regularly patrol our community forum. If Stack Overflow is preferred, be sure to tag the question using the dreamfactory tag!
API Cost Calculator
Wondering how much it costs to build an API? Check out our API calculator, which calculates API development costs based on numerous research studies and our own interactions with thousands of customers around the globe.
Contact us
Do you have any input or questions about this guide, or the DreamFactory platform? We’d love to hear from you! E-mail our support team with your feedback.
1 - Introducing REST and DreamFactory
No matter your role in today’s IT industry, APIs are an inescapable part of the job. Marketers regularly integrate Salesforce, Pipedrive, and MailChimp APIs into campaigns, while software developers rely upon Stripe, Google Maps, and Twitter APIs to build compelling web applications. Data scientists down the hall are grappling with an increasingly unwieldy avalanche of company metrics using Amazon Machine Learning, Elasticsearch, and IBM EventStore APIs. Meanwhile, the executive team relies upon Geckoboard, Google Analytics, and Baremetrics to monitor company progress and future direction.
In addition to integrating third-party APIs, your organization is likely deeply involved in the creation of internal APIs used to interact with proprietary data sources. But unlike the plug-and-play APIs mentioned above, manual API development is anything but a walk in the park. This process is incredibly time-consuming, error-prone, and ultimately a distraction from the far more important task of building compelling products and services.
This chapter introduces you to DreamFactory, an automated REST API generation, integration, and management platform. You can use DreamFactory to generate REST APIs for hundreds of data sources, including databases such as MySQL and Microsoft SQL Server, file systems including Amazon S3, e-mail delivery providers like Mandrill. You can also integrate third-party APIs, including all of the aforementioned services mentioned in this chapter’s opening paragraph. This opens up a whole new world of possibilities in terms of building sophisticated workflows. But before we jump into this introduction, some readers might be wondering what a REST API is in the first place, let alone why so many organizations rely on REST for their API implementations.
Introducing REST
If you were to design an ideal solution for passing data between computers (“computers” being an umbrella term used to represent servers, laptops, mobile phone, and any other Internet-connected device), what would it look like?
For starters, we might consider HTTP for the transport protocol since applications can quickly be created that communicate over HTTP and HTTPS. Further, HTTP supports request URLs, which can be constructed to easily identify a particular target resource (e.g. https://www.example.com/employees/42 ), request methods, which identify what we’d like to do in conjunction with the target resource (e.g. GET (retrieve), POST (insert), PUT (update), DELETE (destroy)), and request payloads in the form of URL parameters and message bodies.
We’d also want to incorporate an understandable and parseable messaging format such as XML or JSON; not only can programming languages easily construct and navigate these formats, but they’re also relatively easy on the eyes for us humans.
Finally, we would want the solution to be extensible, allowing for integration of capabilities such as caching, authentication, and load balancing. In doing so, we can create secure and scalable applications.
If such a solution sounds appealing, then you’re going to love working with REST APIs. Representational State Transfer (REST) is a term used to define a system that embodies several characteristics (see here for more details):
Client-server architecture: By embracing the client-server model, REST API-based solutions can incorporate multiple application and database servers to create a distributed, secure, and maintainable environment.
Uniform interface: REST’s use of HTTP URLs, HTTP methods, and media type declarations not only contribute to an environment that is easily understandable by both the implementers and end users.
Statelessness: All REST-based communication is stateless, meaning each client request includes everything the server requires to respond to the request. The target URL, requeset method, content type, and API key are just a few examples of what might be included in the request.
Layered system: Support for system layering is what allows middleware to be easily introduced, allowing for user authentication and authorization, data caching, load balancing, and proxies to be introduced without interfering with the implementation.
Cache control: The HTTP response can include information indicating whether the response data is cacheable, ensuring intermediary environments don’t erroneously serve stale data while also allowing for scaleability.
Now that you understand a bit more about REST architecture, let’s review a number of typical REST requests and responses.
TIP
Throughout this book you’ll often come across the term resource. In the REST context, a resource is any bit of data that can be named. For instance, an image, employee, classroom, or vehicle would all be referred to as a resource. Further, a resource can be a single instance of this named data, or can be a collection. In other words, an employee would be a singleton resource, whereas a set of employees would be a collection resource.
Dissecting REST Requests and Responses
REST API integrators spend a great deal of time understanding how to generate proper REST requests, and how to parse REST responses. As has already been discussed, these requests and responses revolve around HTTP URLs, HTTP methods, request payloads, and response formats. In this section you’ll learn more about the role of each. If you’re not familiar with these REST concepts, then spending a few minutes learning about them will dramatically reduce the amount of time and effort you’ll otherwise have to spend when later getting acquainted with DreamFactory.
Retrieving Resources
A proper REST API URL pattern implementation is one which is centered around the resource (the noun), and leaves any indication of the desired action (the verb) to the accompanying HTTP method. Consider the following request:
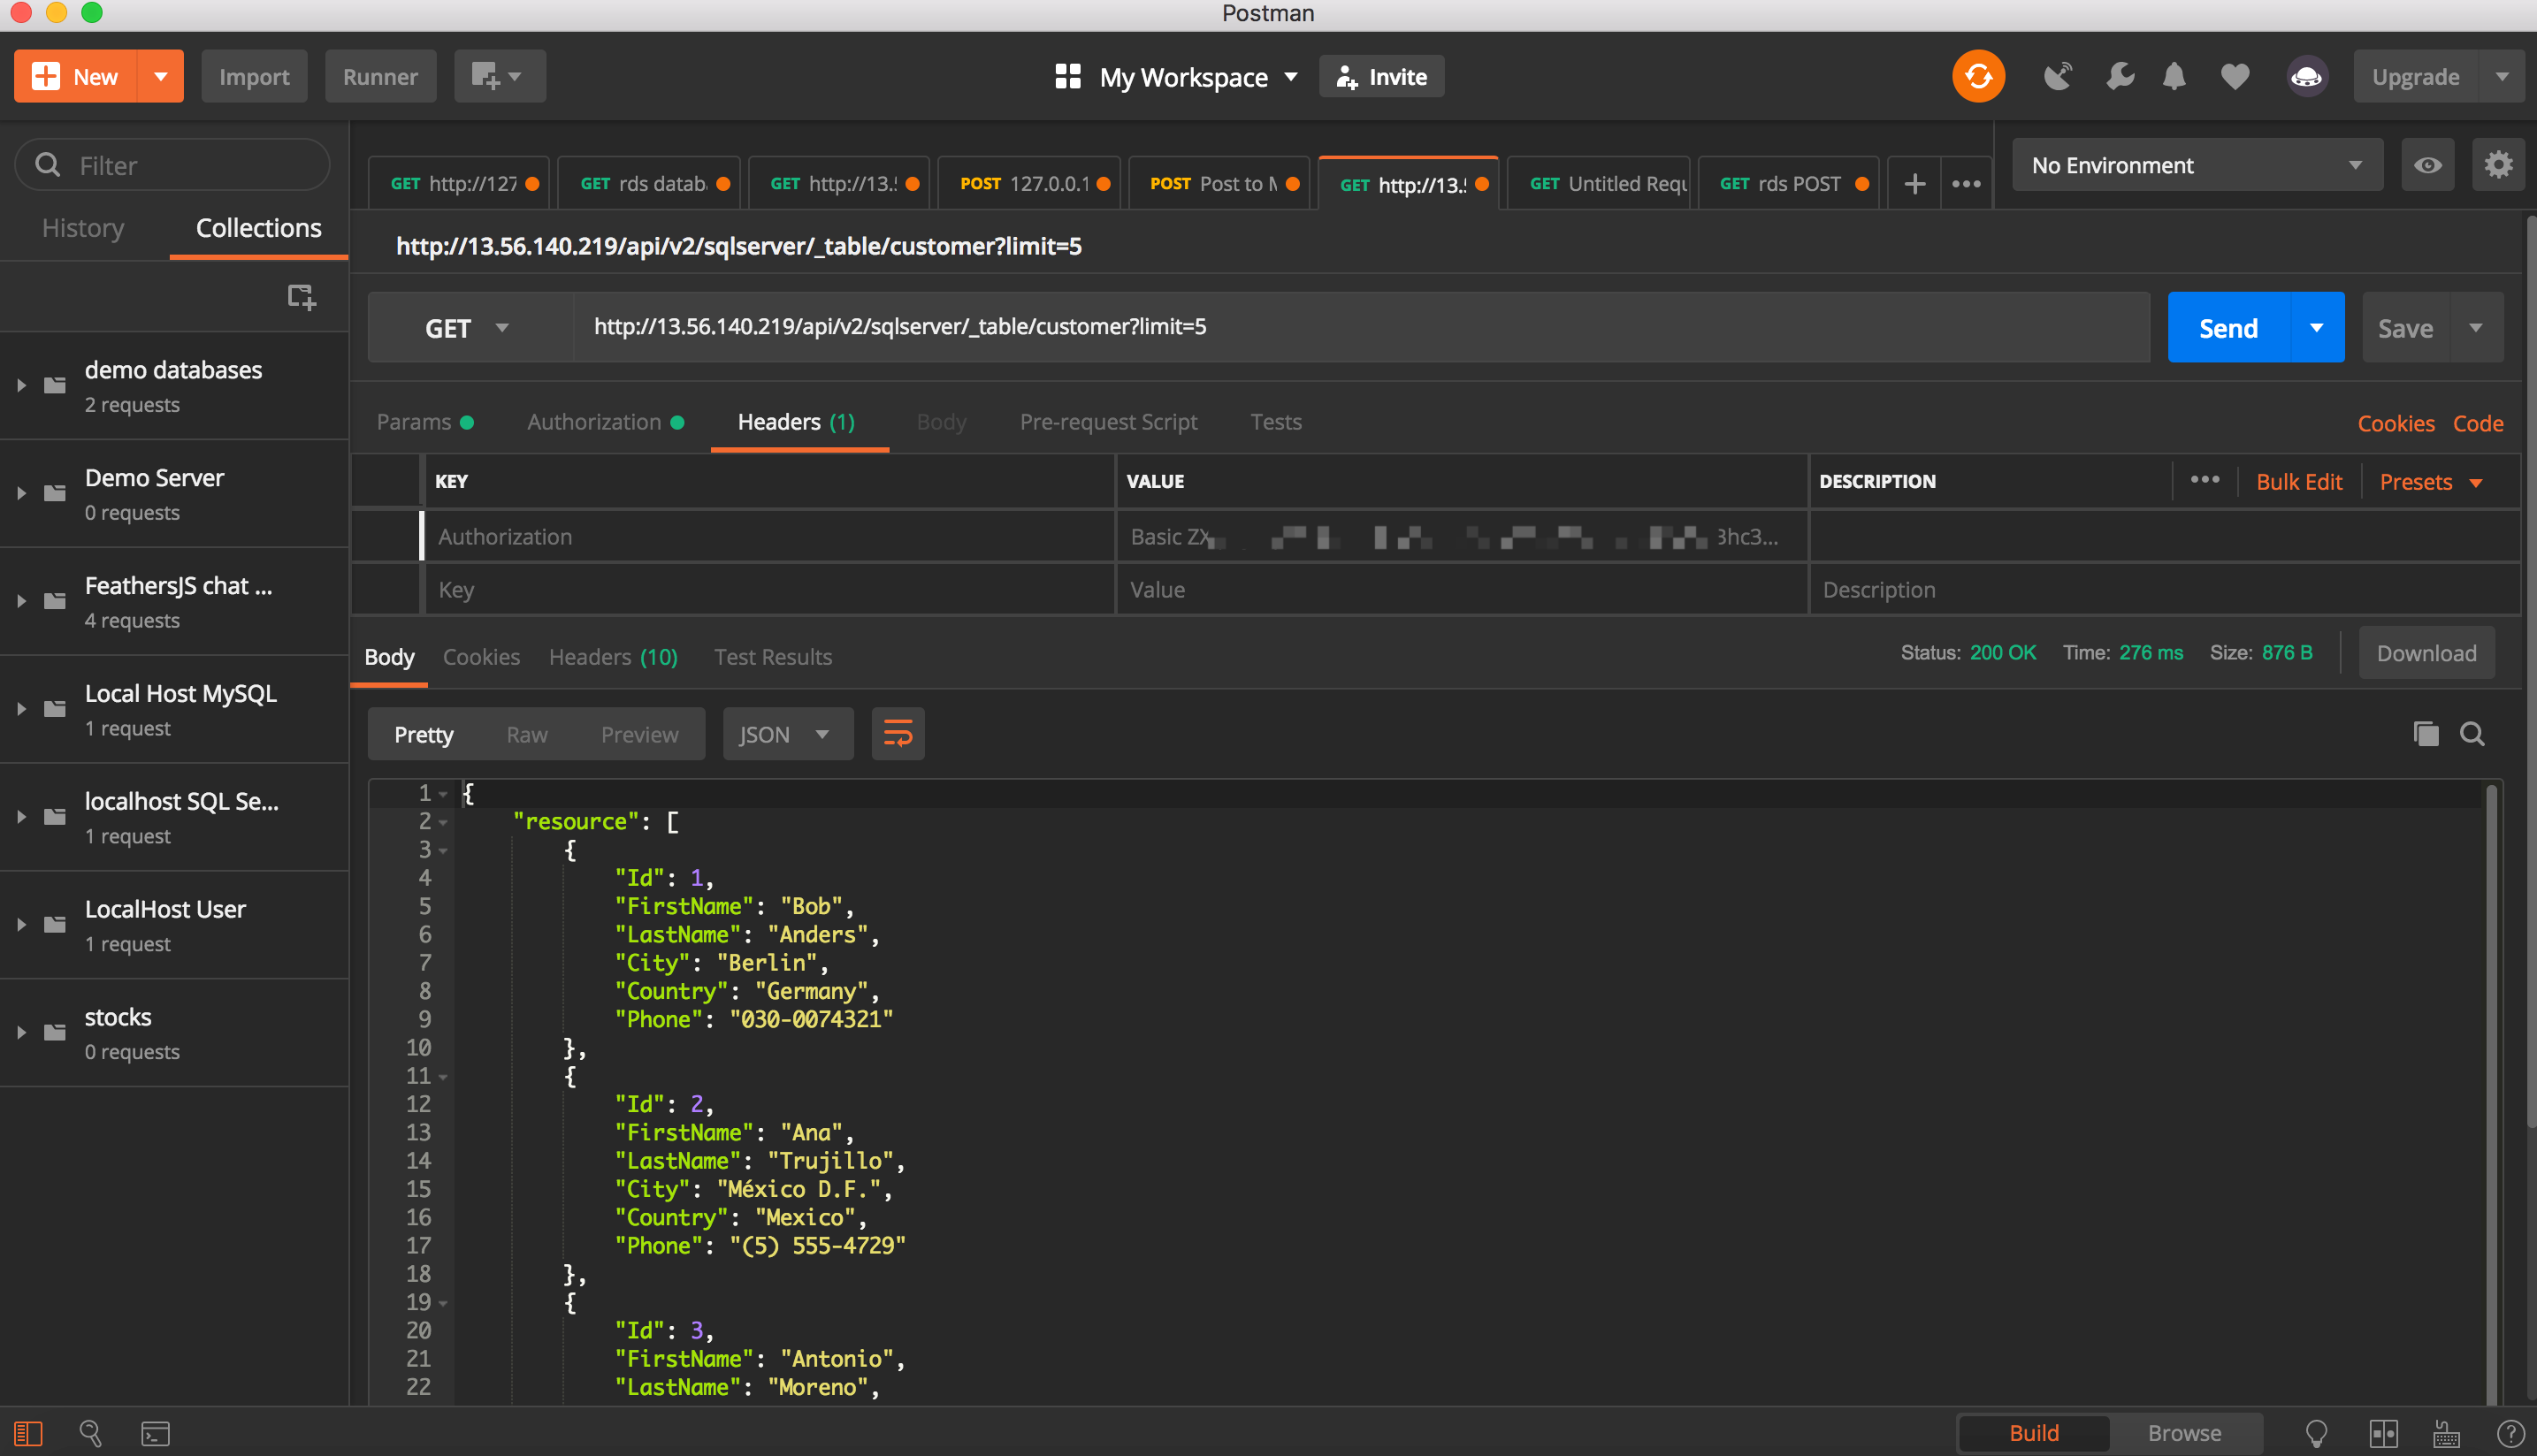
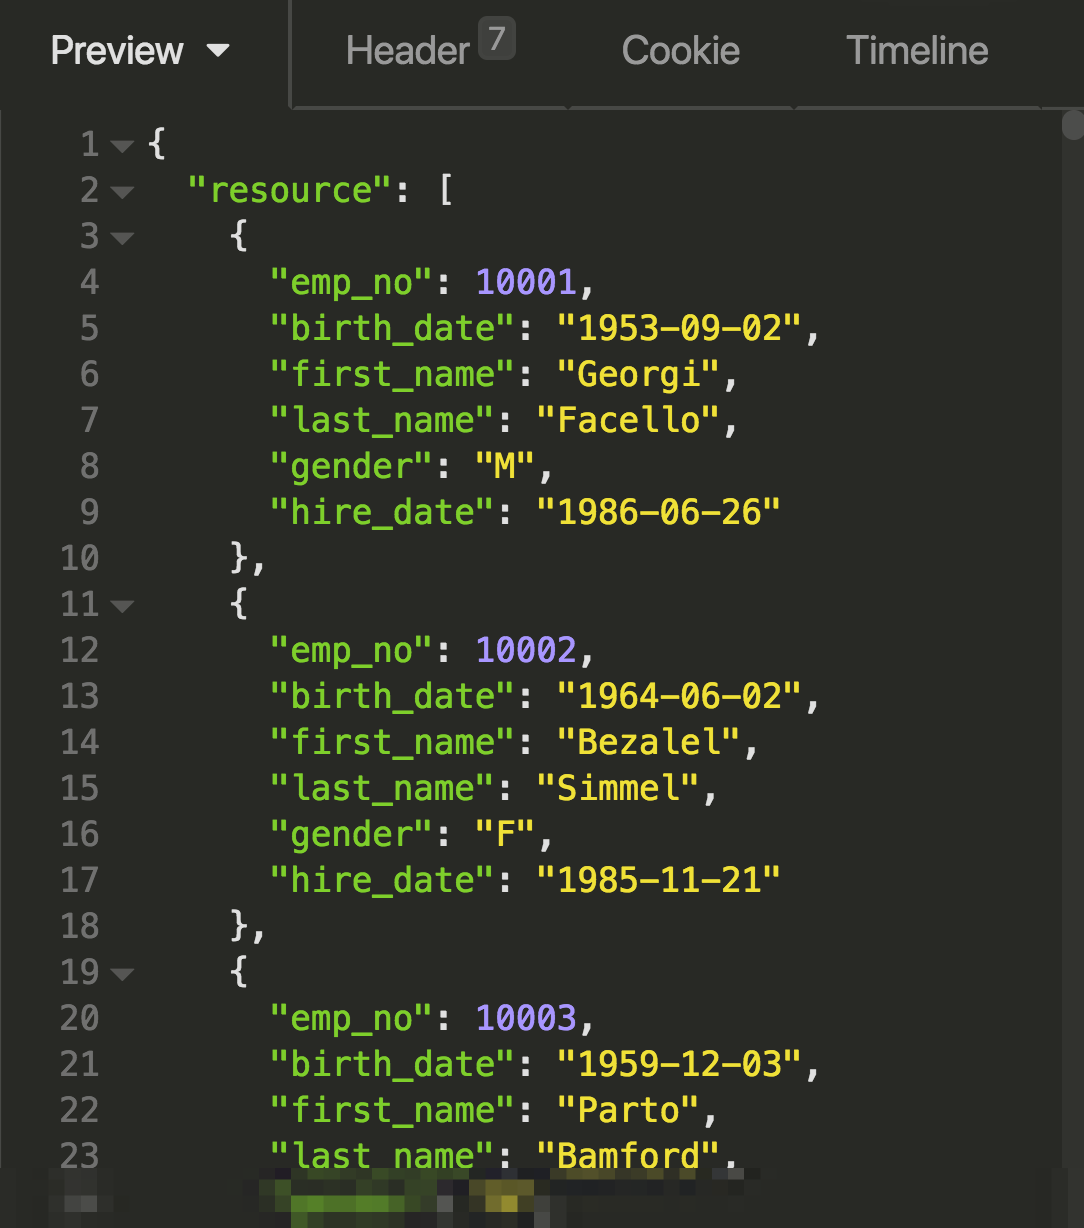
GET /api/v2/employees
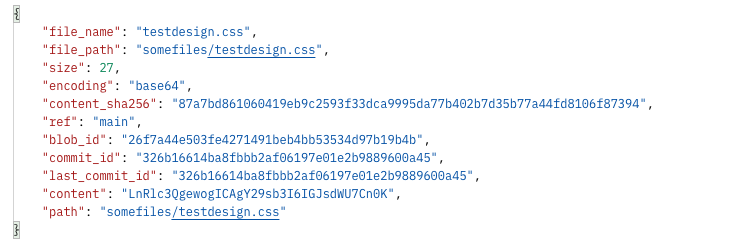
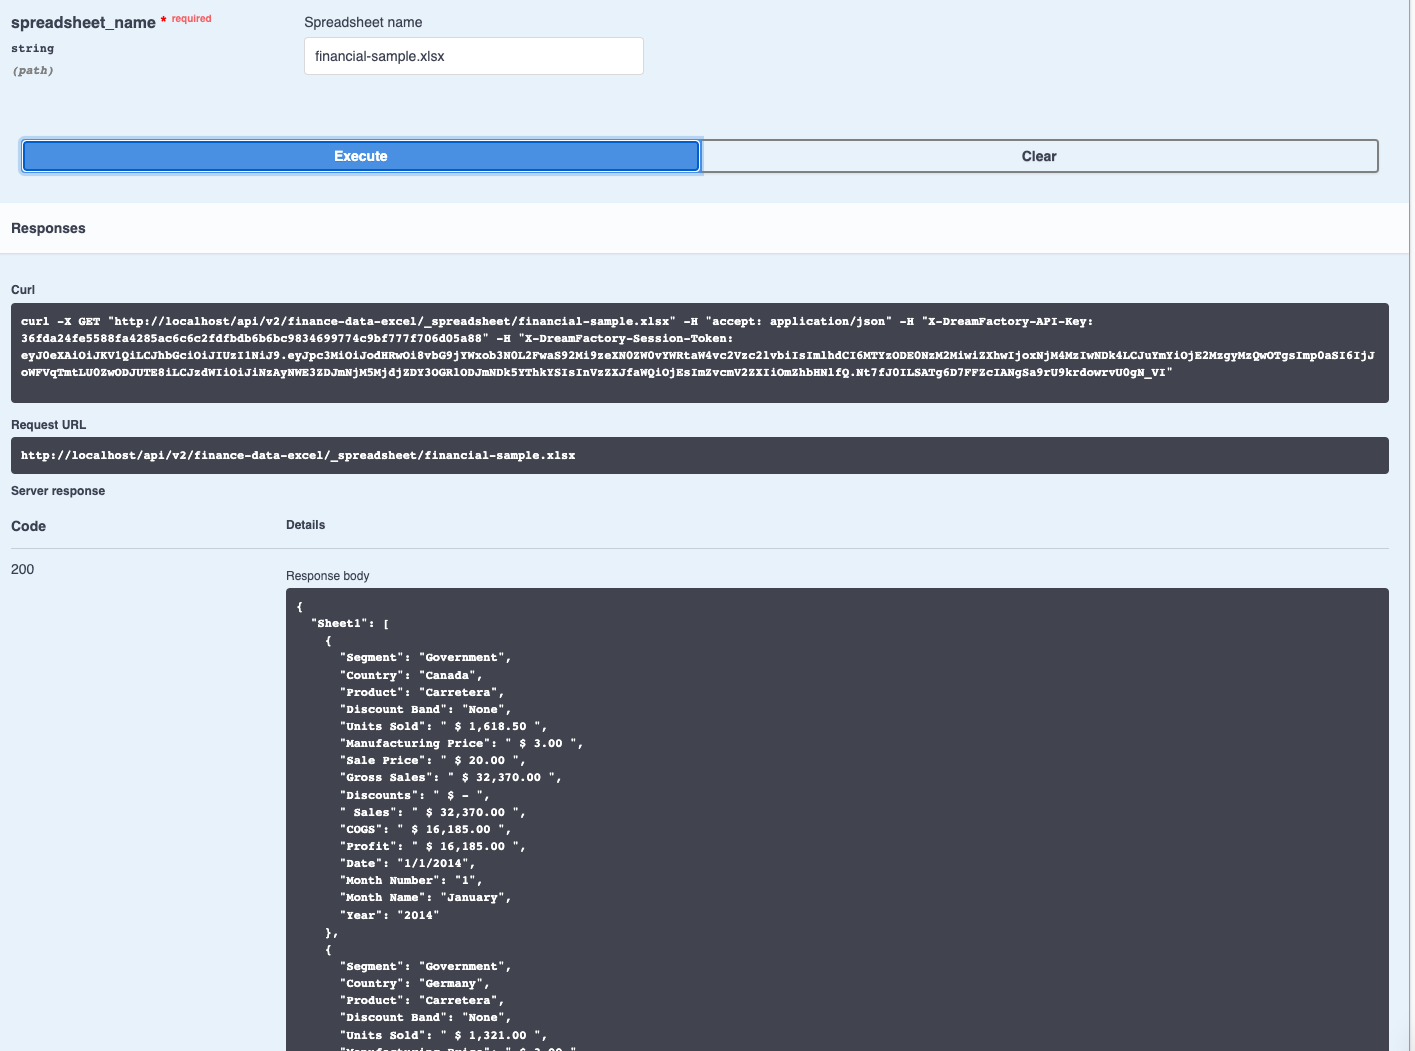
If the endpoint exists and records are found, the REST API server would respond with a 200 status code and JSON-formatted results. For instance, here’s an example response returned by DreamFactory:
This clarity is representative of a typical REST request; based on the method and URL, it is abundantly clear the client is requesting a list of employees. We know the client wants to retrieve records because the request is submitted using the GET method. Contrast this with the following request:
GET /api/v2/employees/find
This will not be RESTful because the implementer has incorporated an action into the URL. Returning to the original pattern, consider how a specific employee might be requested:
GET /api/v2/employees/42
The addition of an ID (often but not always a resource’s primary key) indicates the client is interested in retrieving the employee record associated with a unique identifier which has been assigned the value 42. The JSON response might look like this:
Many REST API implementations, DreamFactory included, support the passage of query parameters to modify query behavior. For instance, if you wanted to retrieve just the first_name field when retrieving a resource, then DreamFactory supports a fields parameter for doing so:
GET /api/v2/employees/42?fields=first_name
The response would look something like this:
{
  "first_name": "Claudi"
}
GET requests are idempotent, meaning no matter how many times you submit the request, the same results can be expected, with no unintended side effects. Contrast this with POST requests (introduced next), which are considered non-idempotent because if you submitted the same resource creation request more than once, chances are duplicate resources would be created.
Creating Resources
If the client desired to insert a new record into the employees table, then the POST method will be used:
POST /api/v2/employees
Of course, the request will need to be accompanied by the data to be created. This would be passed along via the request body and might look like this:
HTTP supports two different methods for updating data:
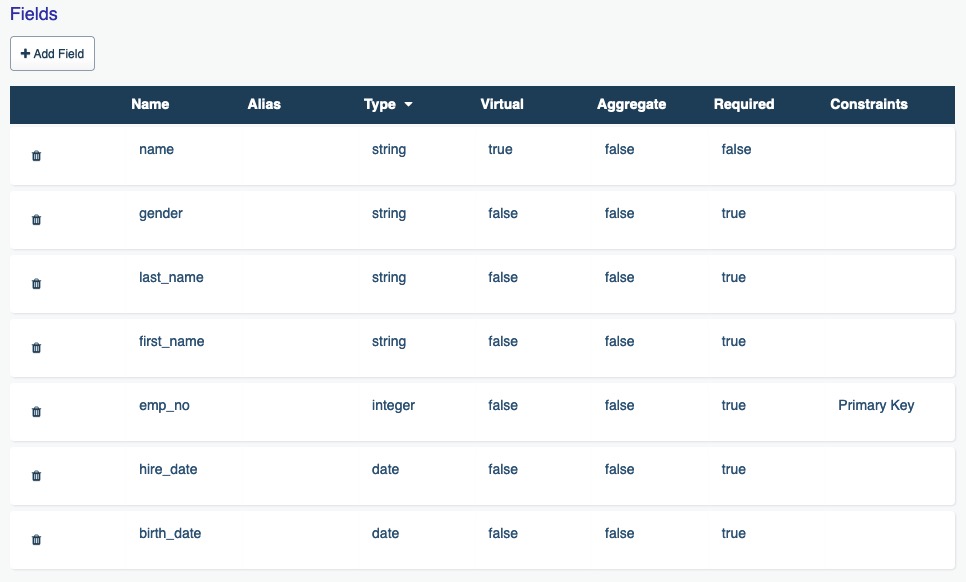
PUT: The PUT method replaces an existing resource in its entirety. This means you need to pass along all of the resource attributes regardless of whether the attribute value is actually being modified.
PATCH: The PATCH method updates only part of the existing resource, meaning you only need to supply the resource primary key and the attributes you’d like to update. This is typically a much more convenient update approach than PUT, although to be sure both have their advantages.
When updating resources with PUT you’ll send a PUT request like so:
PUT /api/v2/employees
You’ll send along all of the resource attributes within the request payload:
To instead update one or more (but not all) attributes associated with a particular record found in the employees resource, you’ll send a PATCH request to the employees URL, accompanied by the primary key:
/api/v2/employees/42
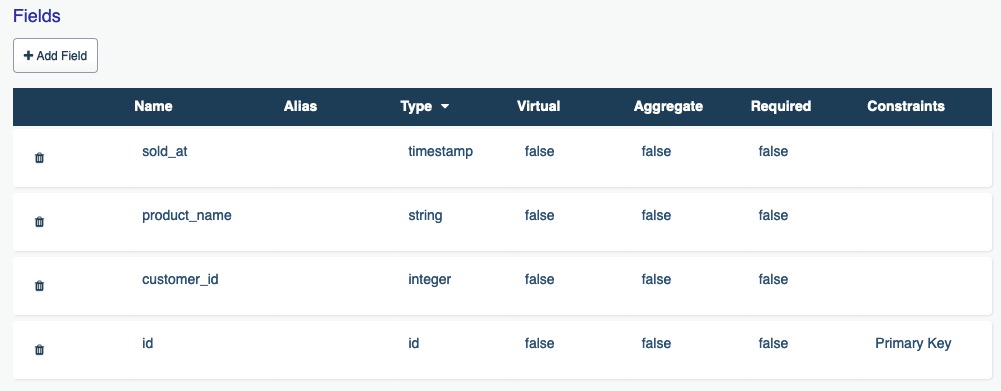
Suppose the employees table includes attributes such as first_name, last_name, and employee_id, but we only want to modify the first_name value. The JSON request body would look like this:
{
  "resource": [
    {
      "first_name": "Paul"
    }
  ]
}
Deleting Resources
To delete a resource, you’ll send a DELETE request to the endpoint associated with the resource you’d like to delete. For instance, to delete an employees resource you’ll reference this URL:
DELETE /api/v2/employees/42
Introducing DreamFactory
In light of everything we’ve discussed thus far with regards to implementing a REST API, the idea of implementing one yourself probably sounds pretty daunting. It should, because it is. In doing so, not only would you be responsible for building out the logic required to process the request methods and URLs, but you’d also be on the hook for integrating authentication and authorization, generating and maintaining documentation, and figuring out how to sanely generate working APIs for any number of third-party data sources.
And this is really only the beginning of your challenges. As your needs grow, so will the complexity. Consider the amount of work required to add per-endpoint business logic capabilities to your API. Or bolting on API limiting features. Or adding per-service API logging. The amount of work required to build and maintain these features can be staggering, and will surely distract you and your team from the far more important goal of satisfying customers through the creation of superior products and services.
Fortunately, an amazing alternative exists. DreamFactory is an API automation solution that handles all of these challenges for you, and for the most part does so through an easy point-and-click web interface. We’ll conclude this chapter with a survey of DreamFactory’s key features, giving you all of the information you need to determine whether DreamFactory is a worthy addition to your organization’s development toolkit.
Automated REST API Generation
Although DreamFactory is packed with dozens of features, everything revolves around the platform’s automated REST API generation capabilities. This feature alone can have such a tremendous impact that by itself it will save your team weeks if not months of development time on future API projects!
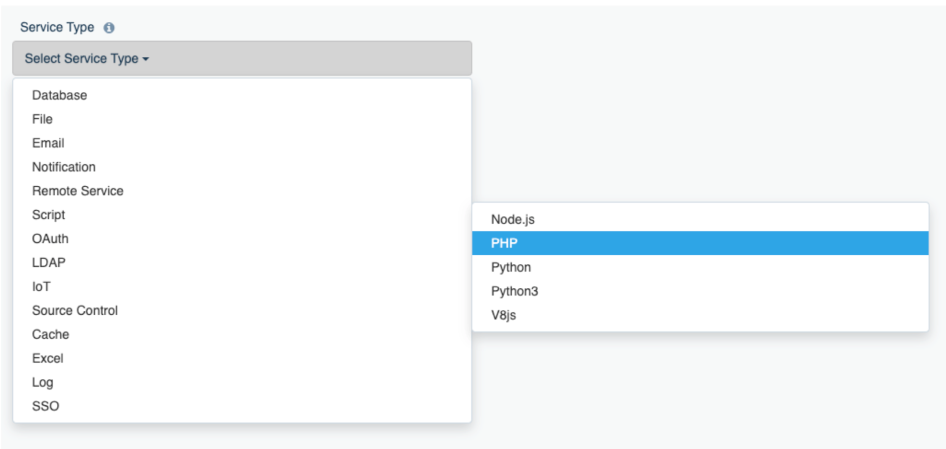
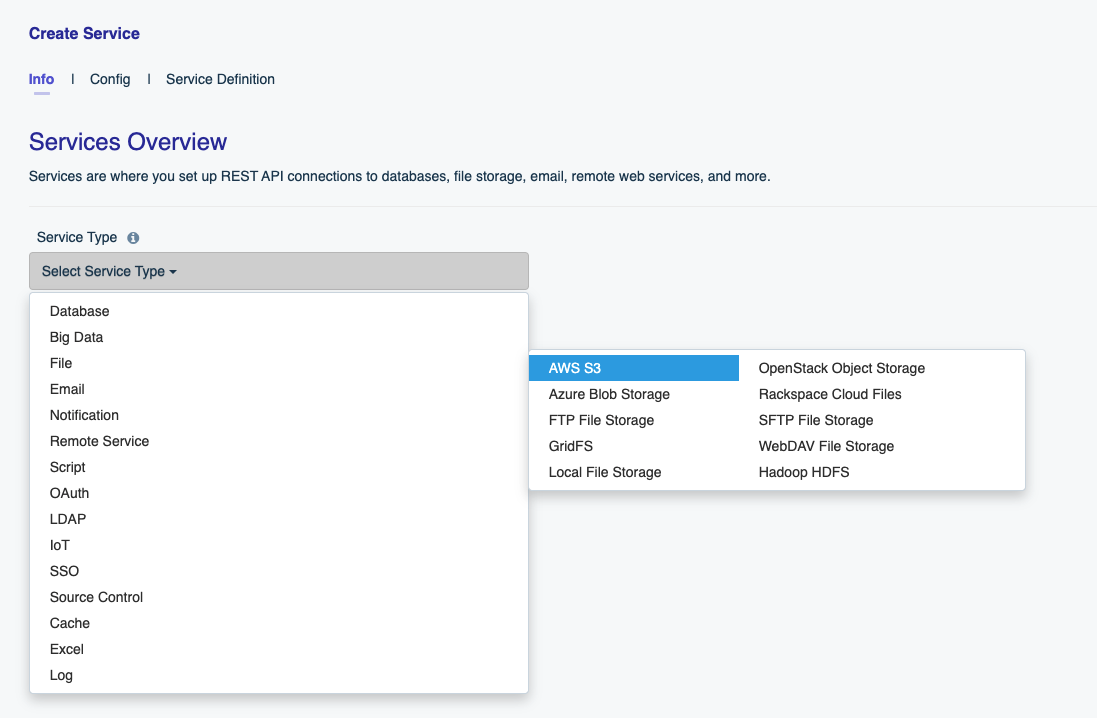
DreamFactory natively supports automated API generation capabilities for several dozen databases (among them Oracle, MySQL, MS SQL Server, and MongoDB), file systems, e-mail delivery providers, mobile notification solutions, and even source control services. Additionally, it can convert SOAP services into REST with no refactoring whatsoever required to the SOAP code, create REST APIs for caching solutions such as Memcached and Redis, and even supports the ability to script entirely new services from scratch using one of four supported scripting engines (NodeJS, PHP, Python, and V8).
The structure and number of REST endpoints exposed through each generated API varies according to the type of data source, however you can count on them being “feature complete” from a usability standpoint. For instance, REST APIs generated for one of the supported databases include endpoints for executing stored procedures, carrying out CRUD (Create, Retrieve, Update, Delete) operations, and even managing the database!
Secured APIs from the Start
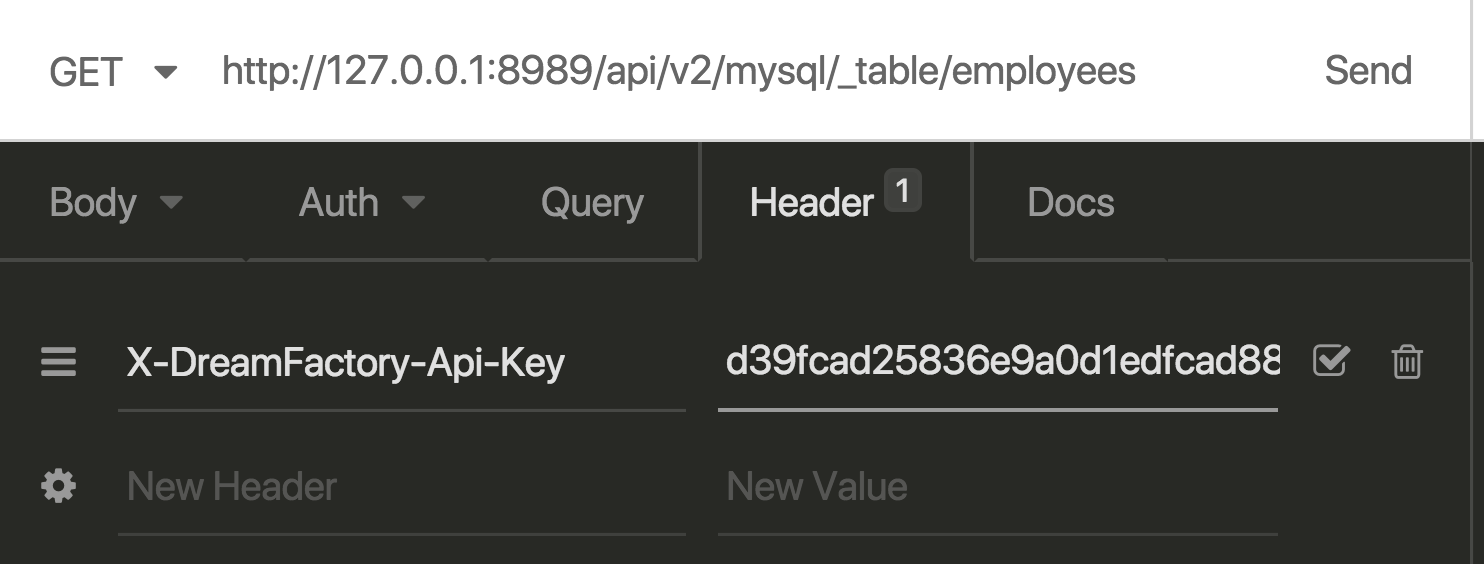
All DreamFactory REST APIs are secured by default, leaving no chance whatsoever for your valuable data to be exposed or even modified by a malicious third-party who happened across the API. At a minimum all clients are required to provide an API key which the DreamFactory platform administrator will generate via the administration console.
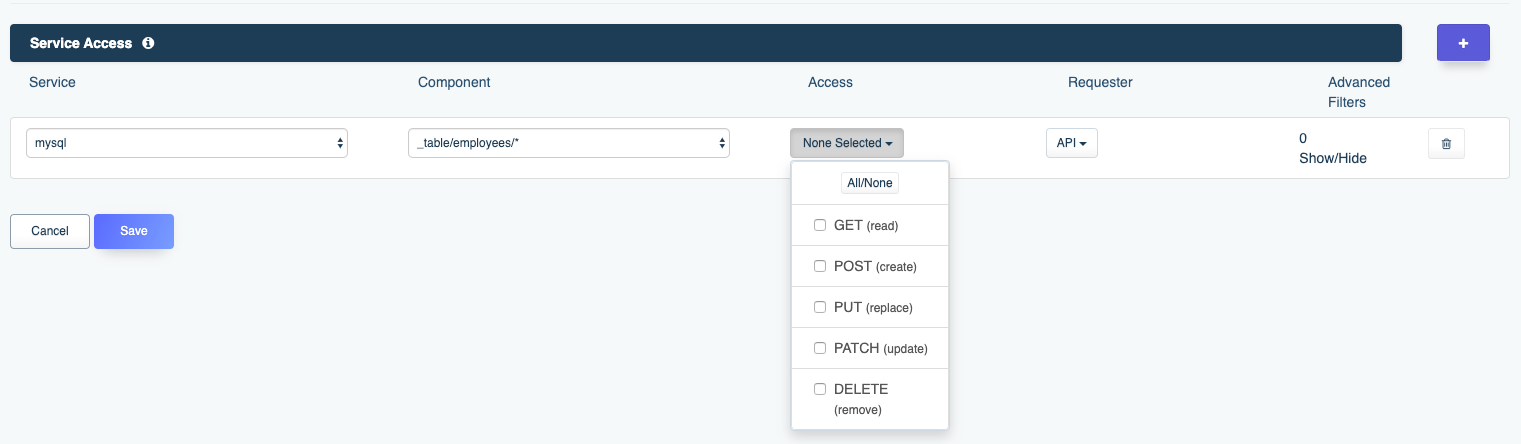
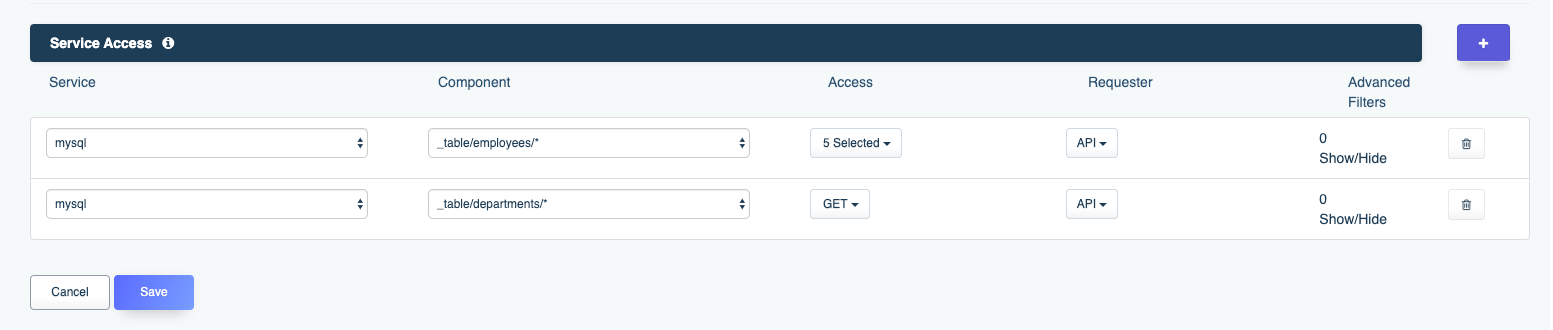
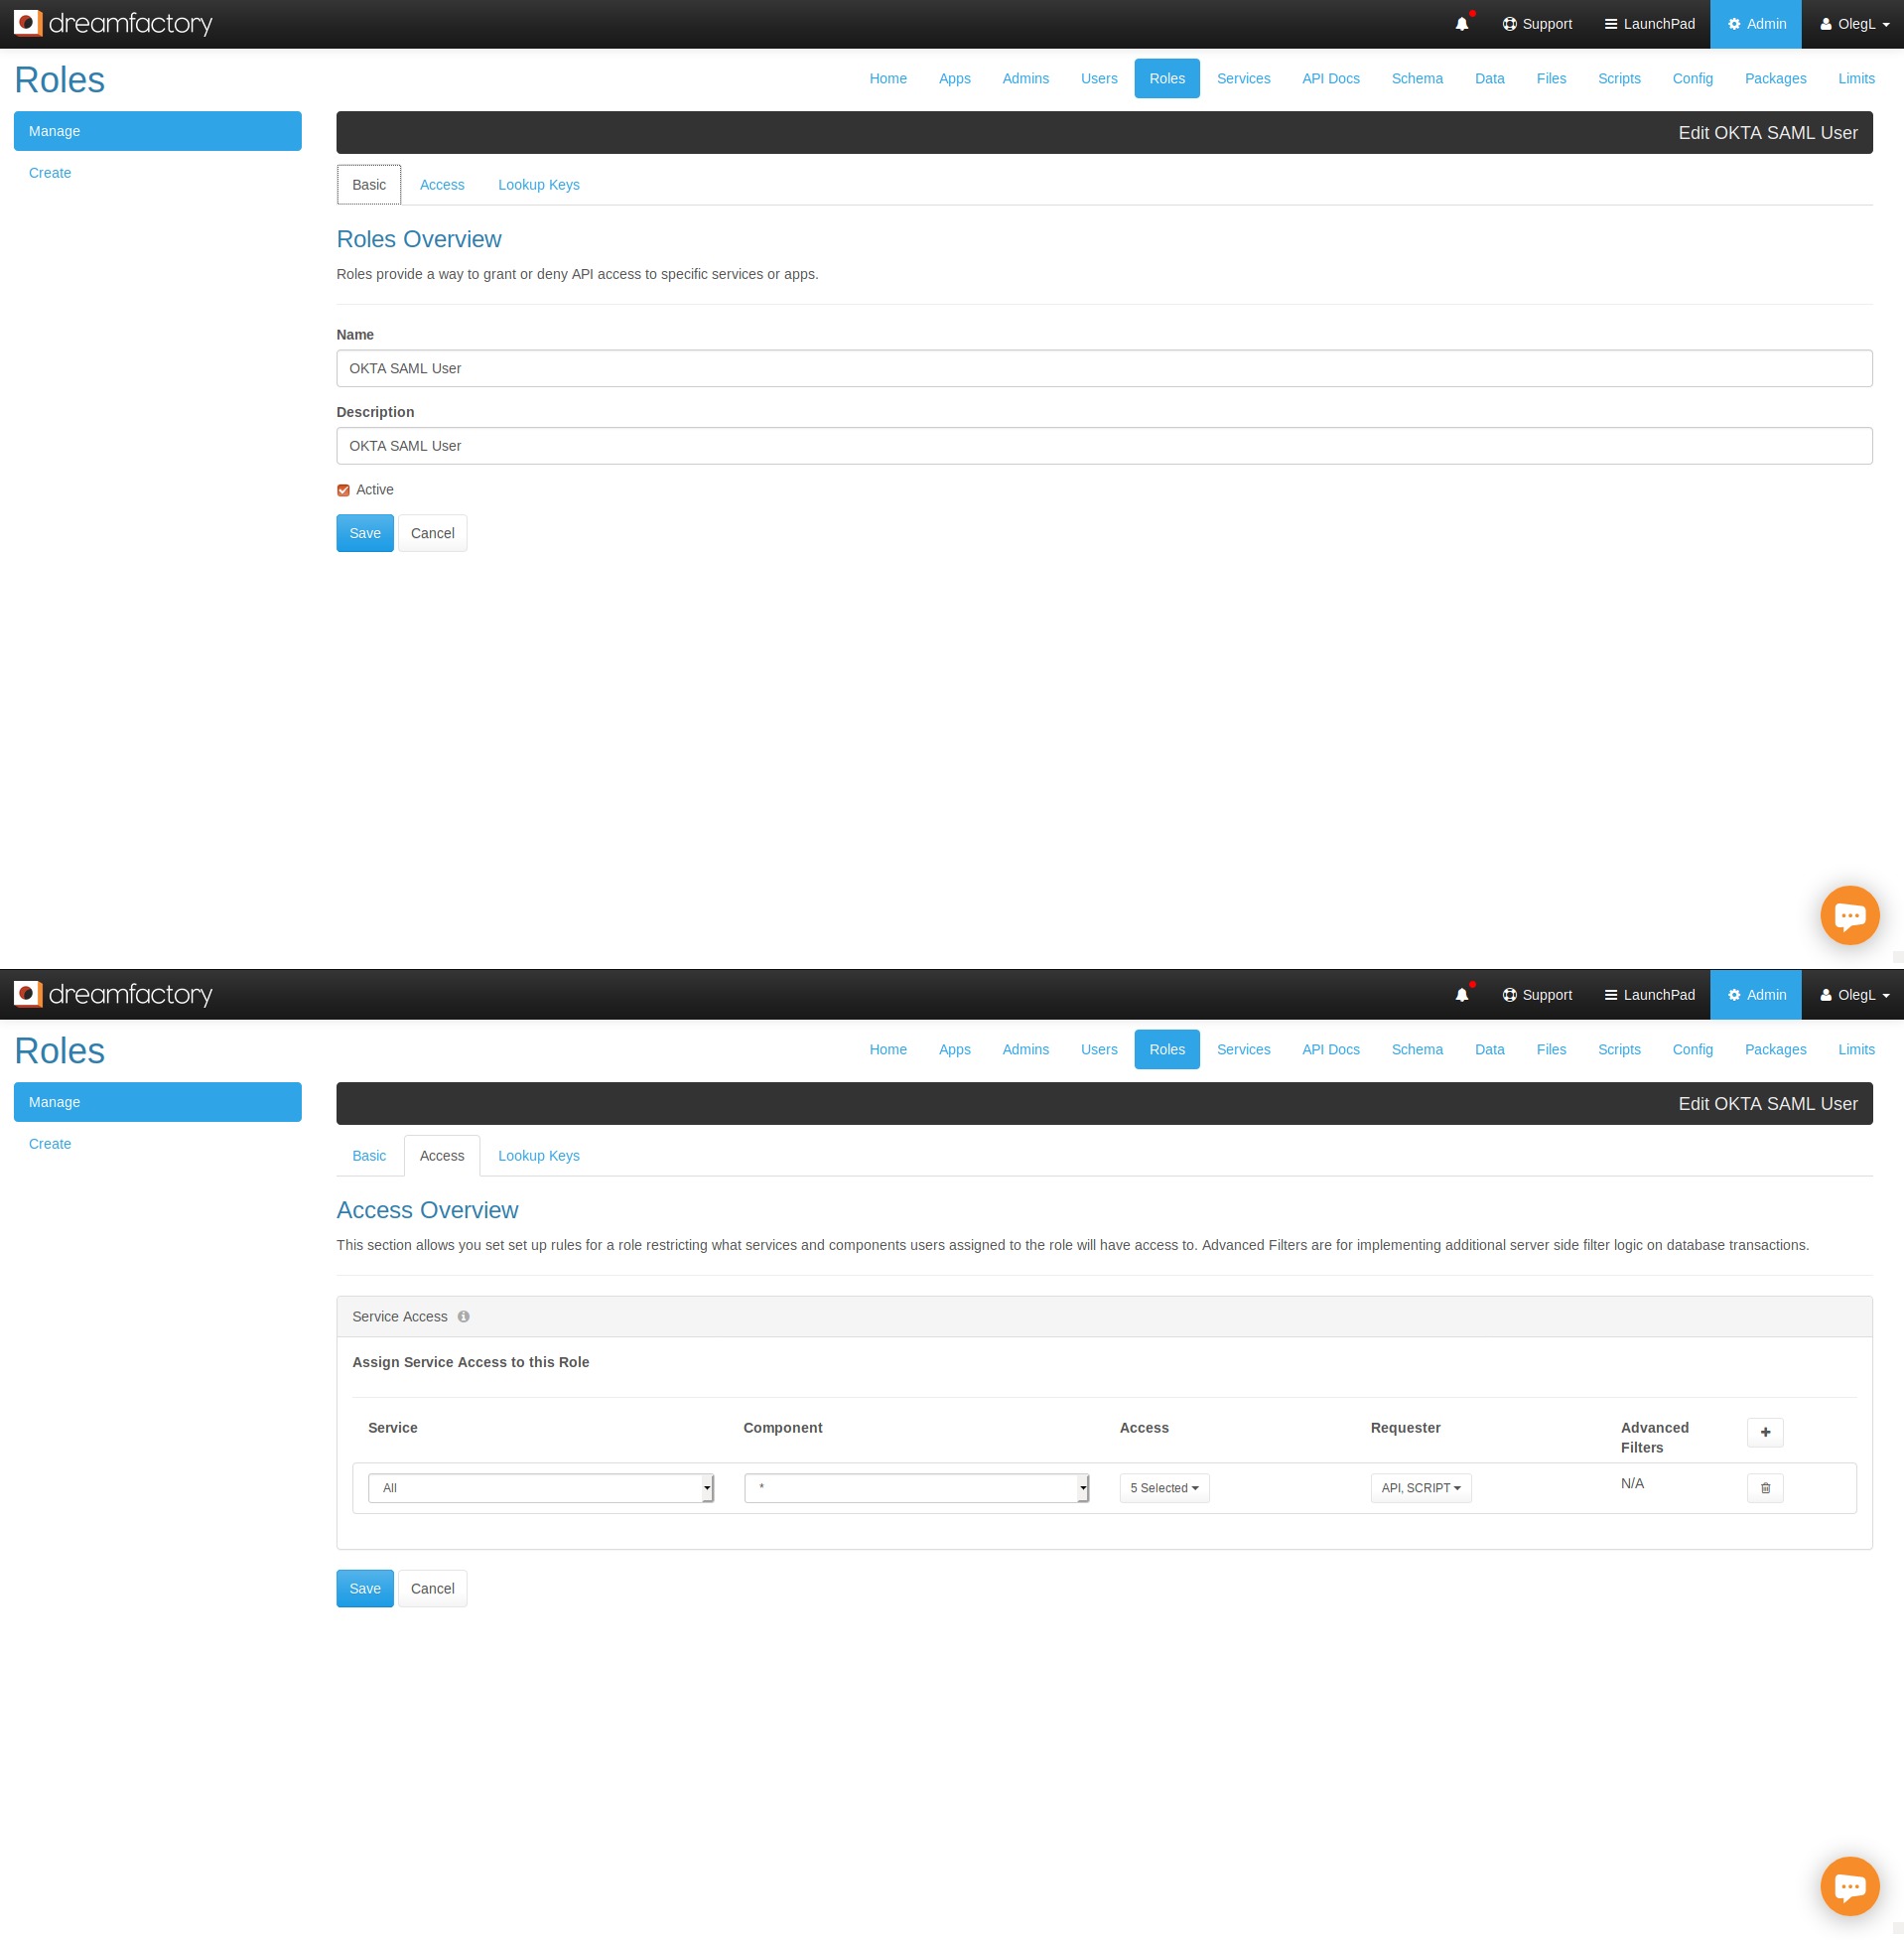
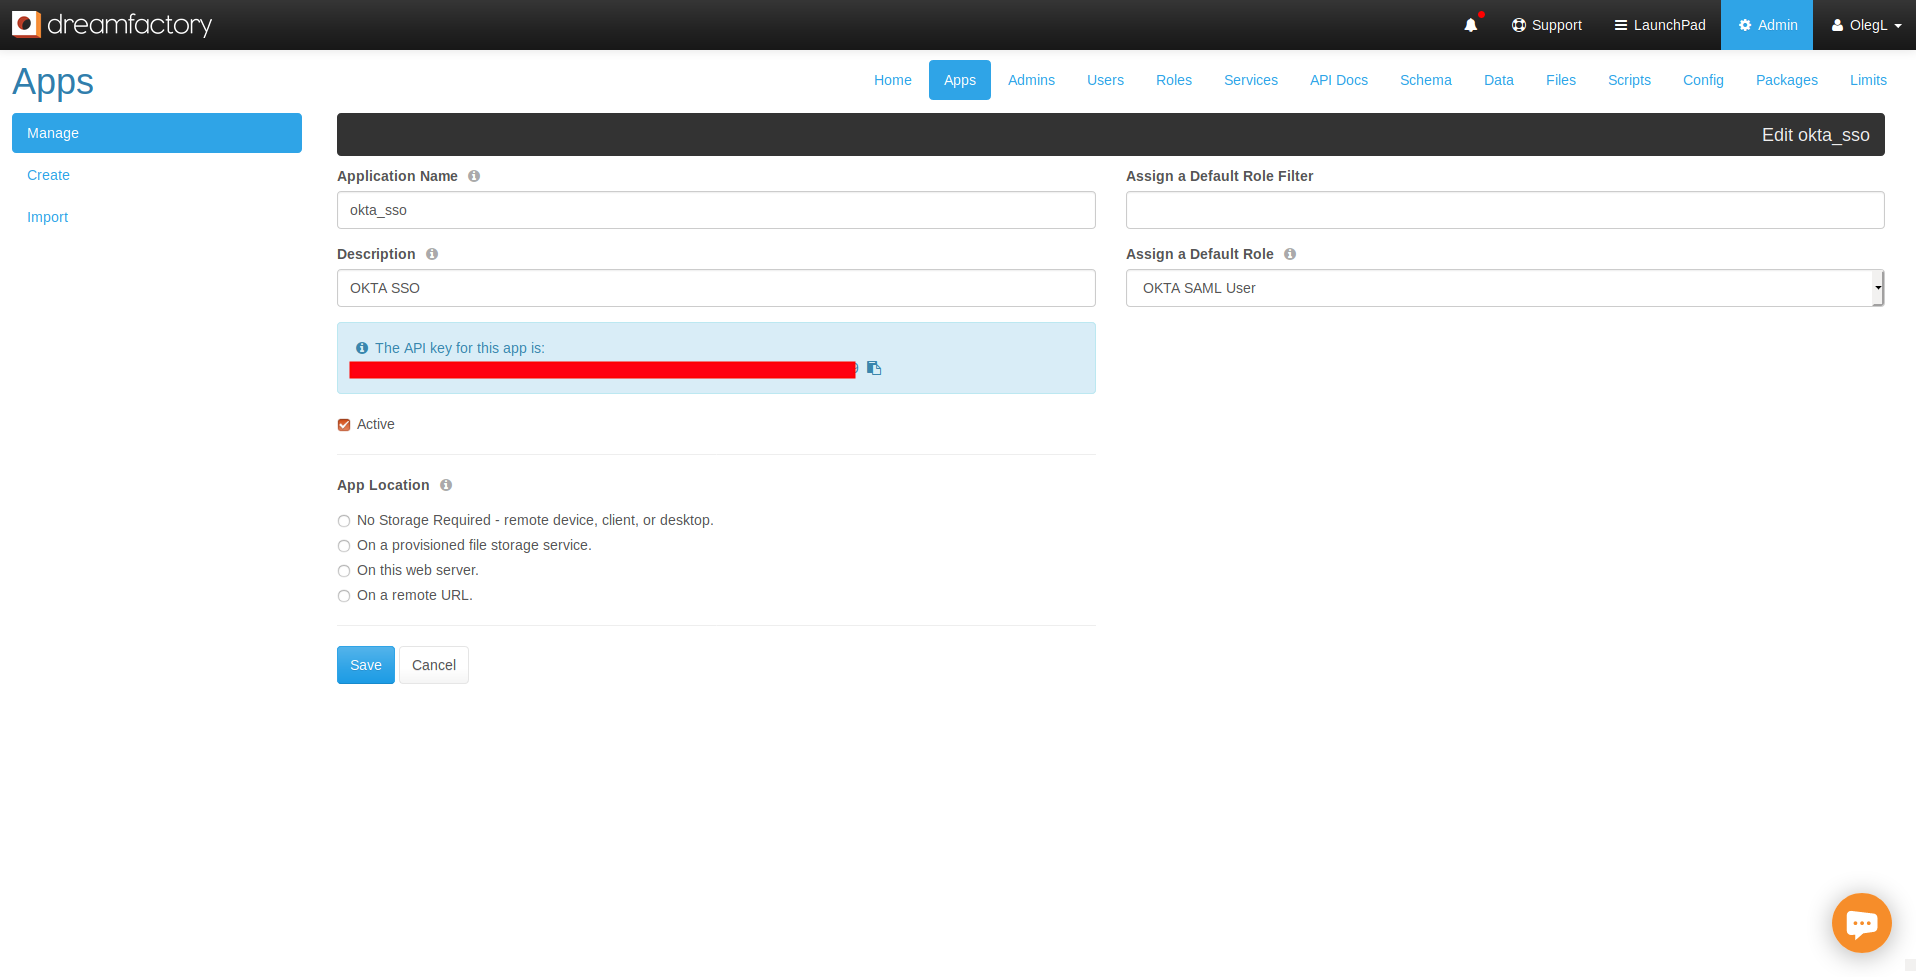
Further, it’s possible to lock down API key capabilities using DreamFactory’s roles feature. Using the role management feature, you can restrict an API key’s ability to interact with an API, allowing access to only a few select endpoints, or limiting access to exclusively GET methods (meaning you can create a read-only API).
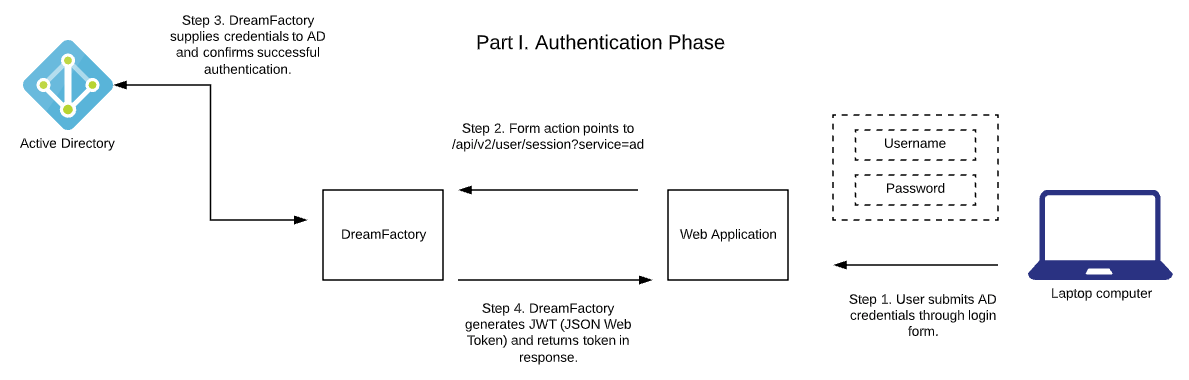
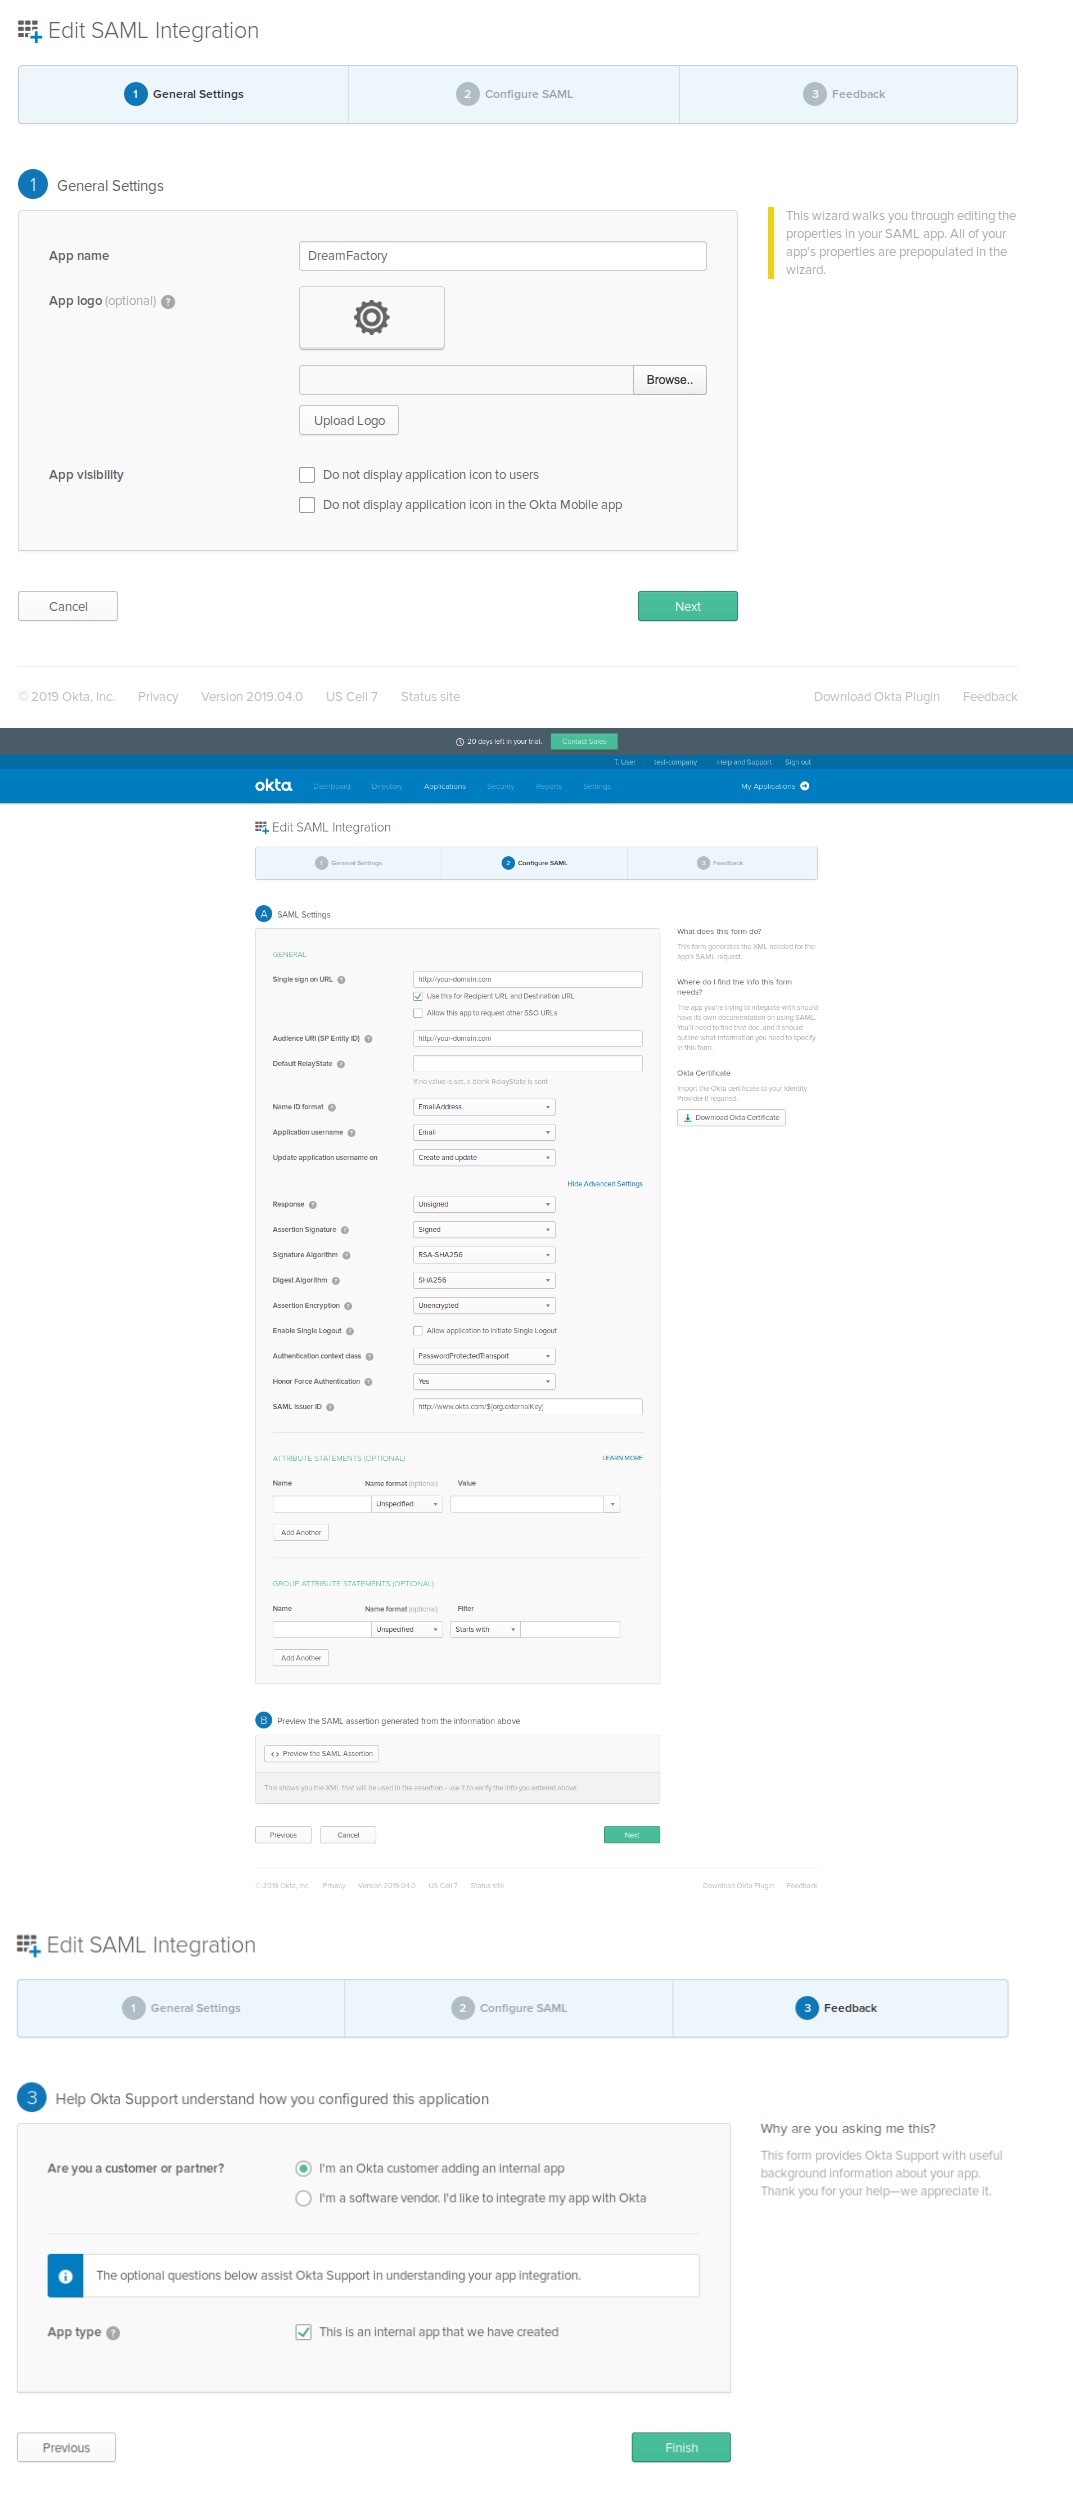
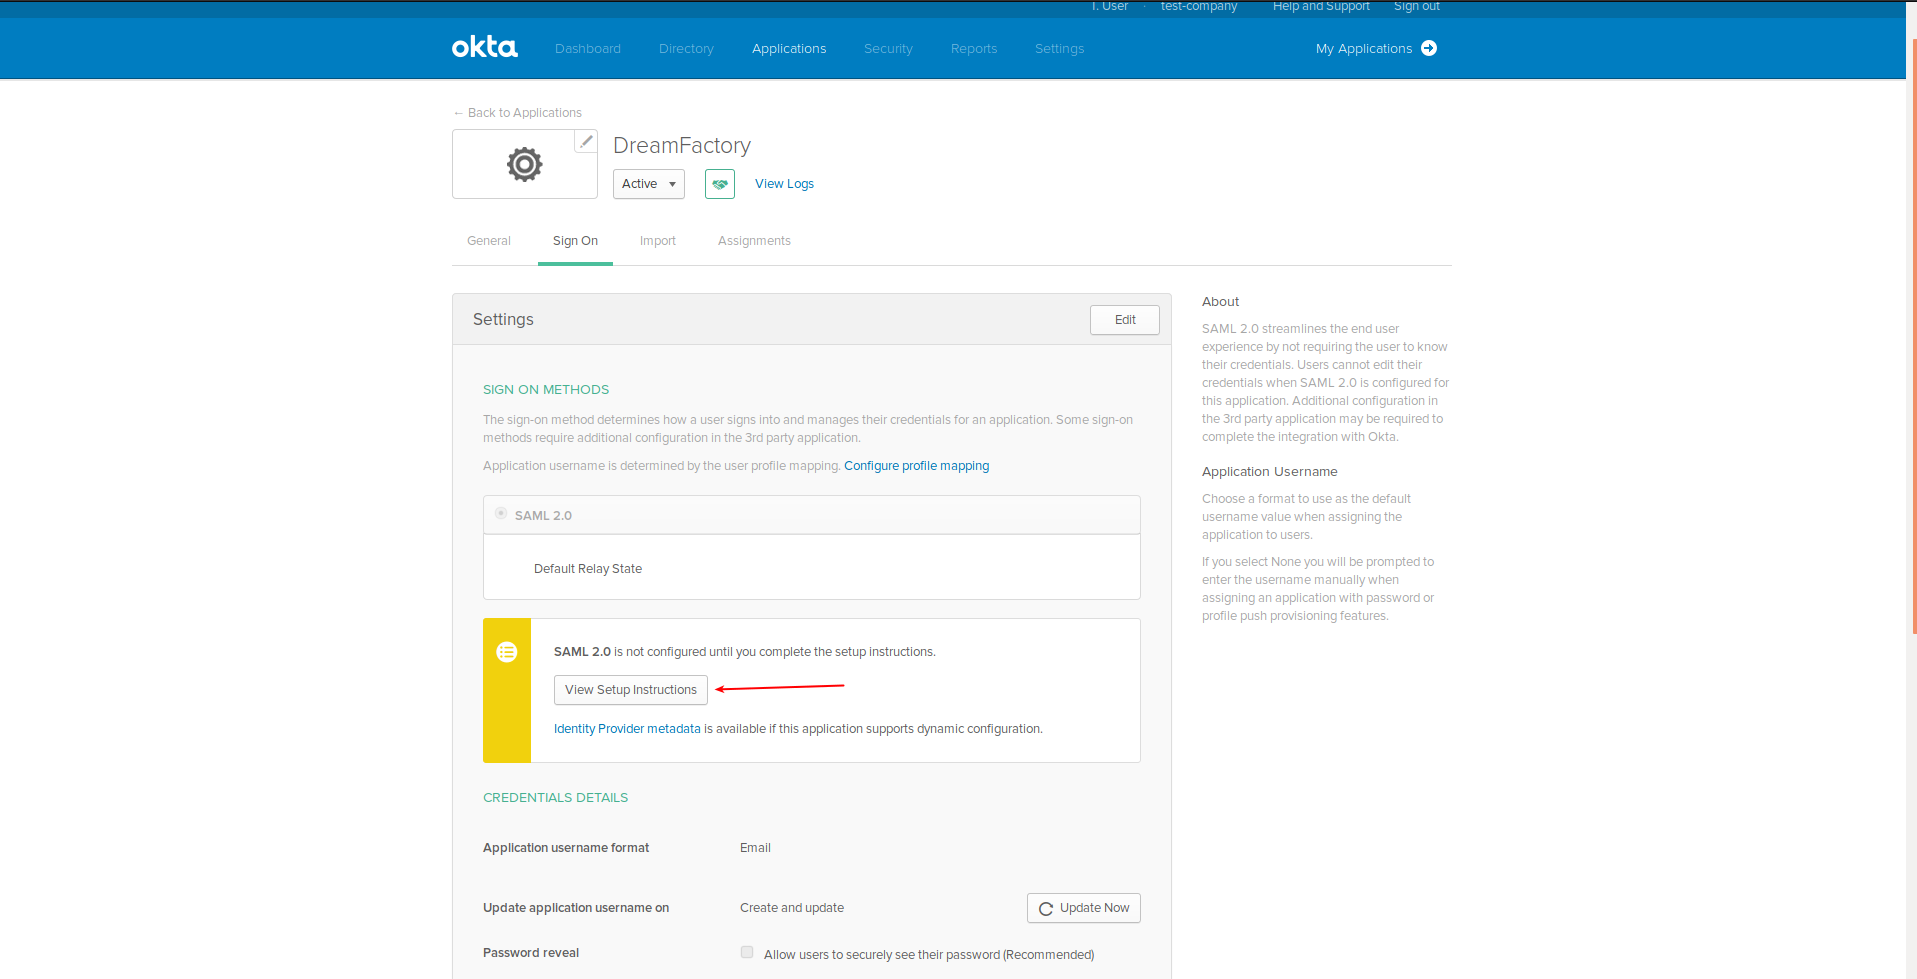
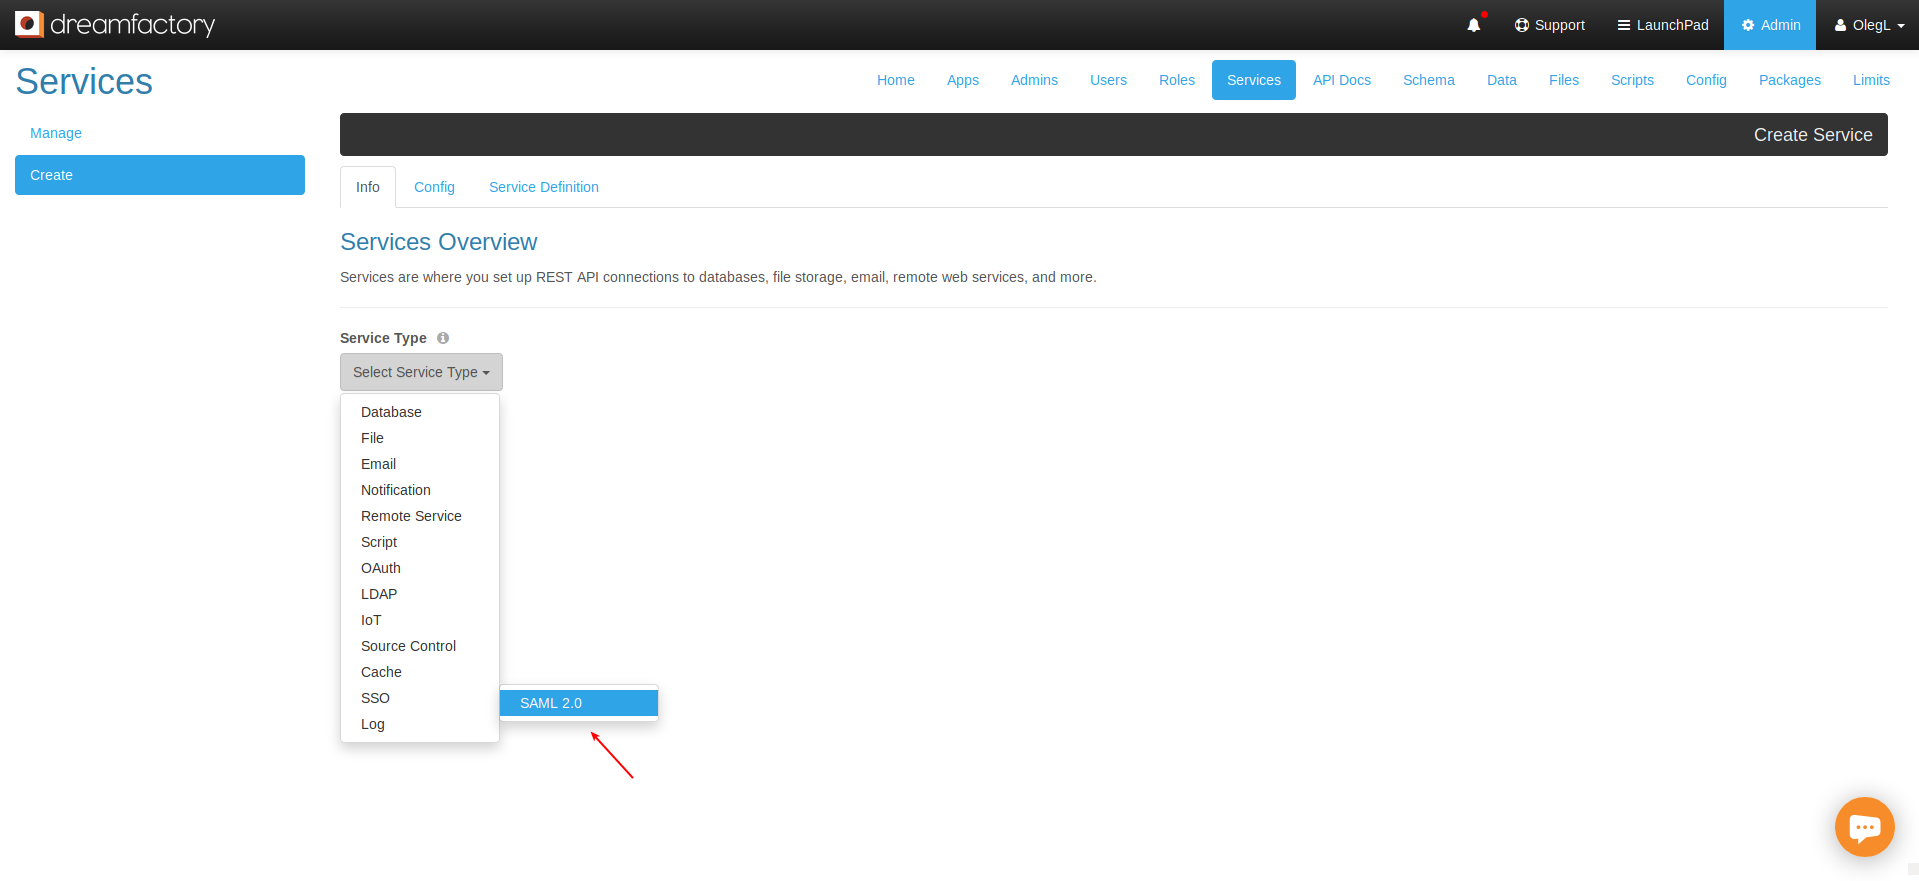
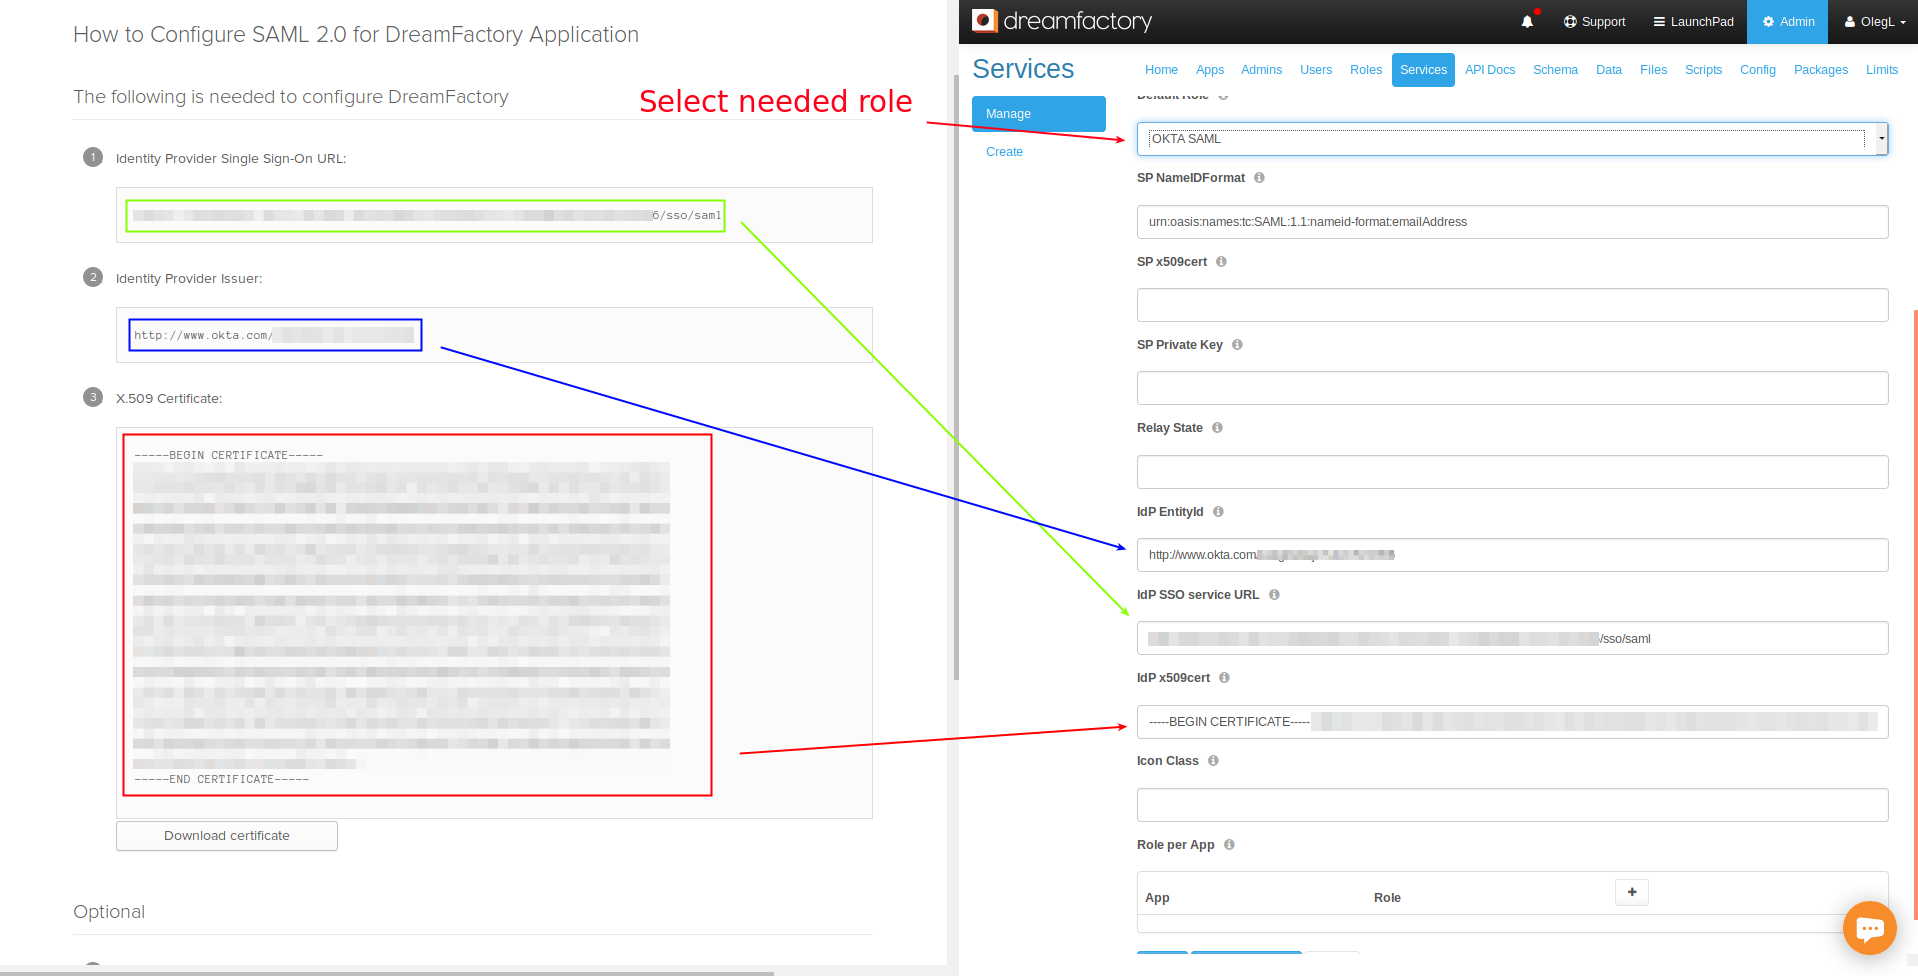
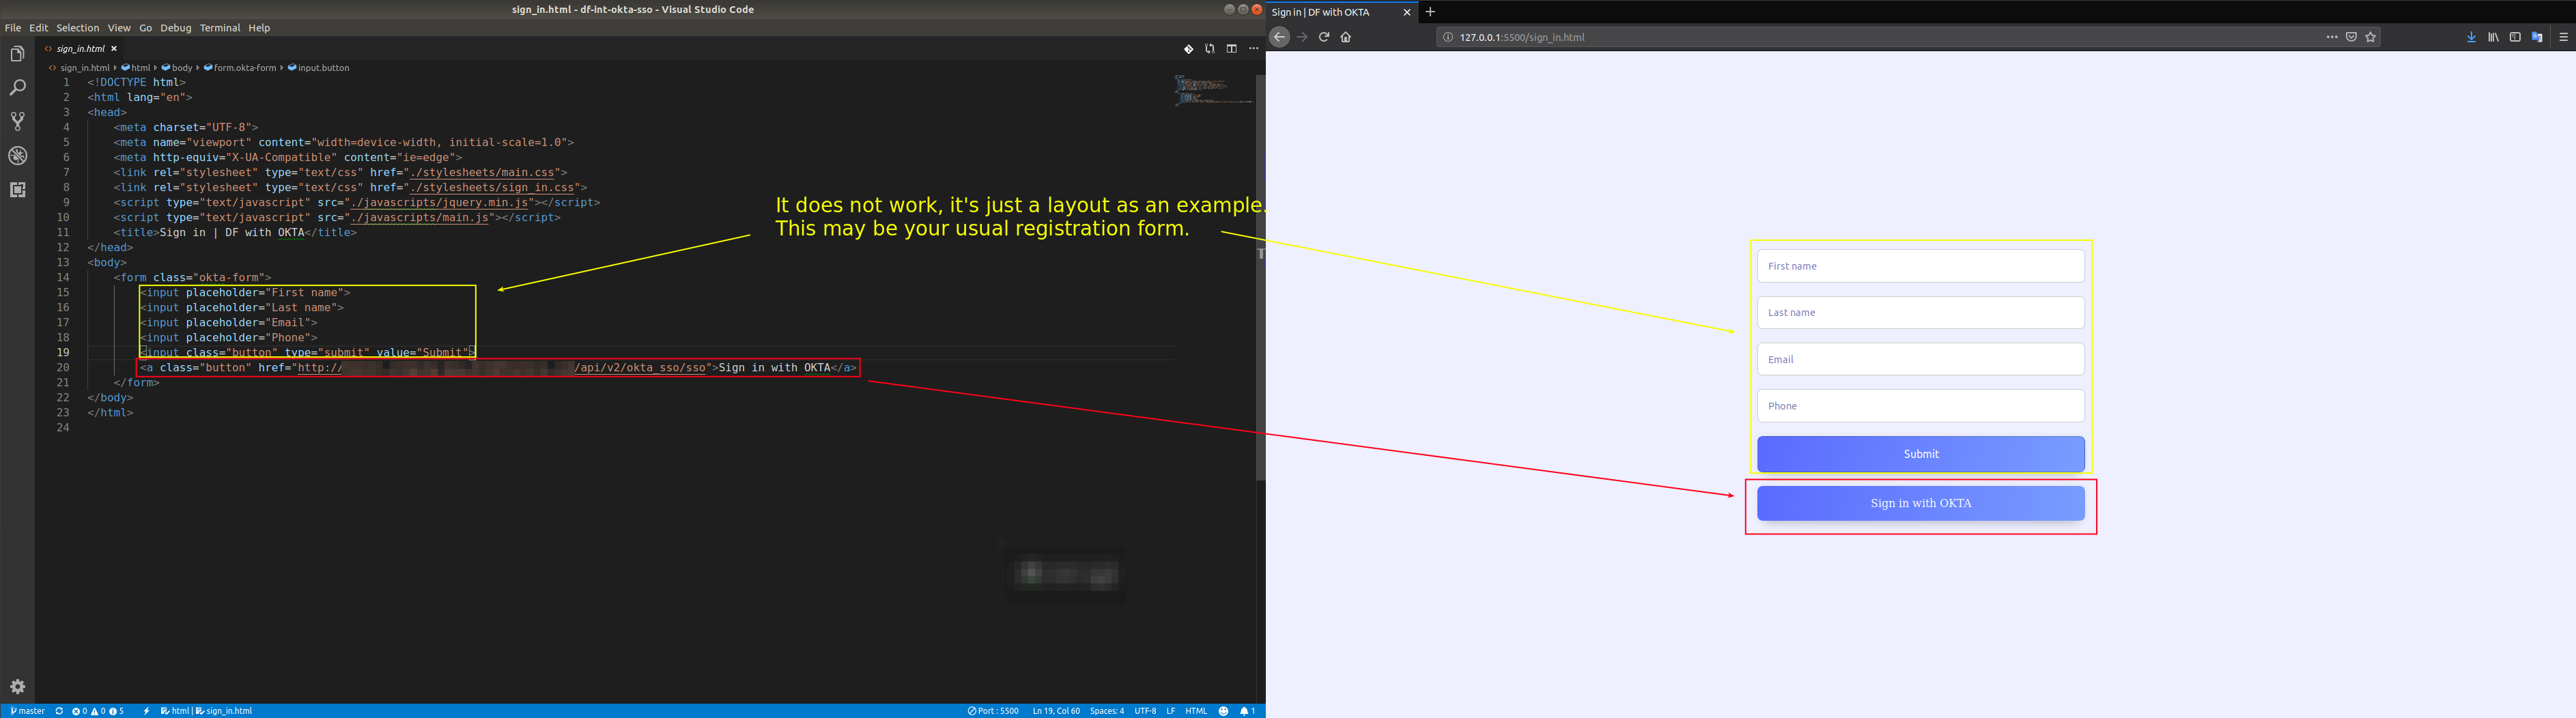
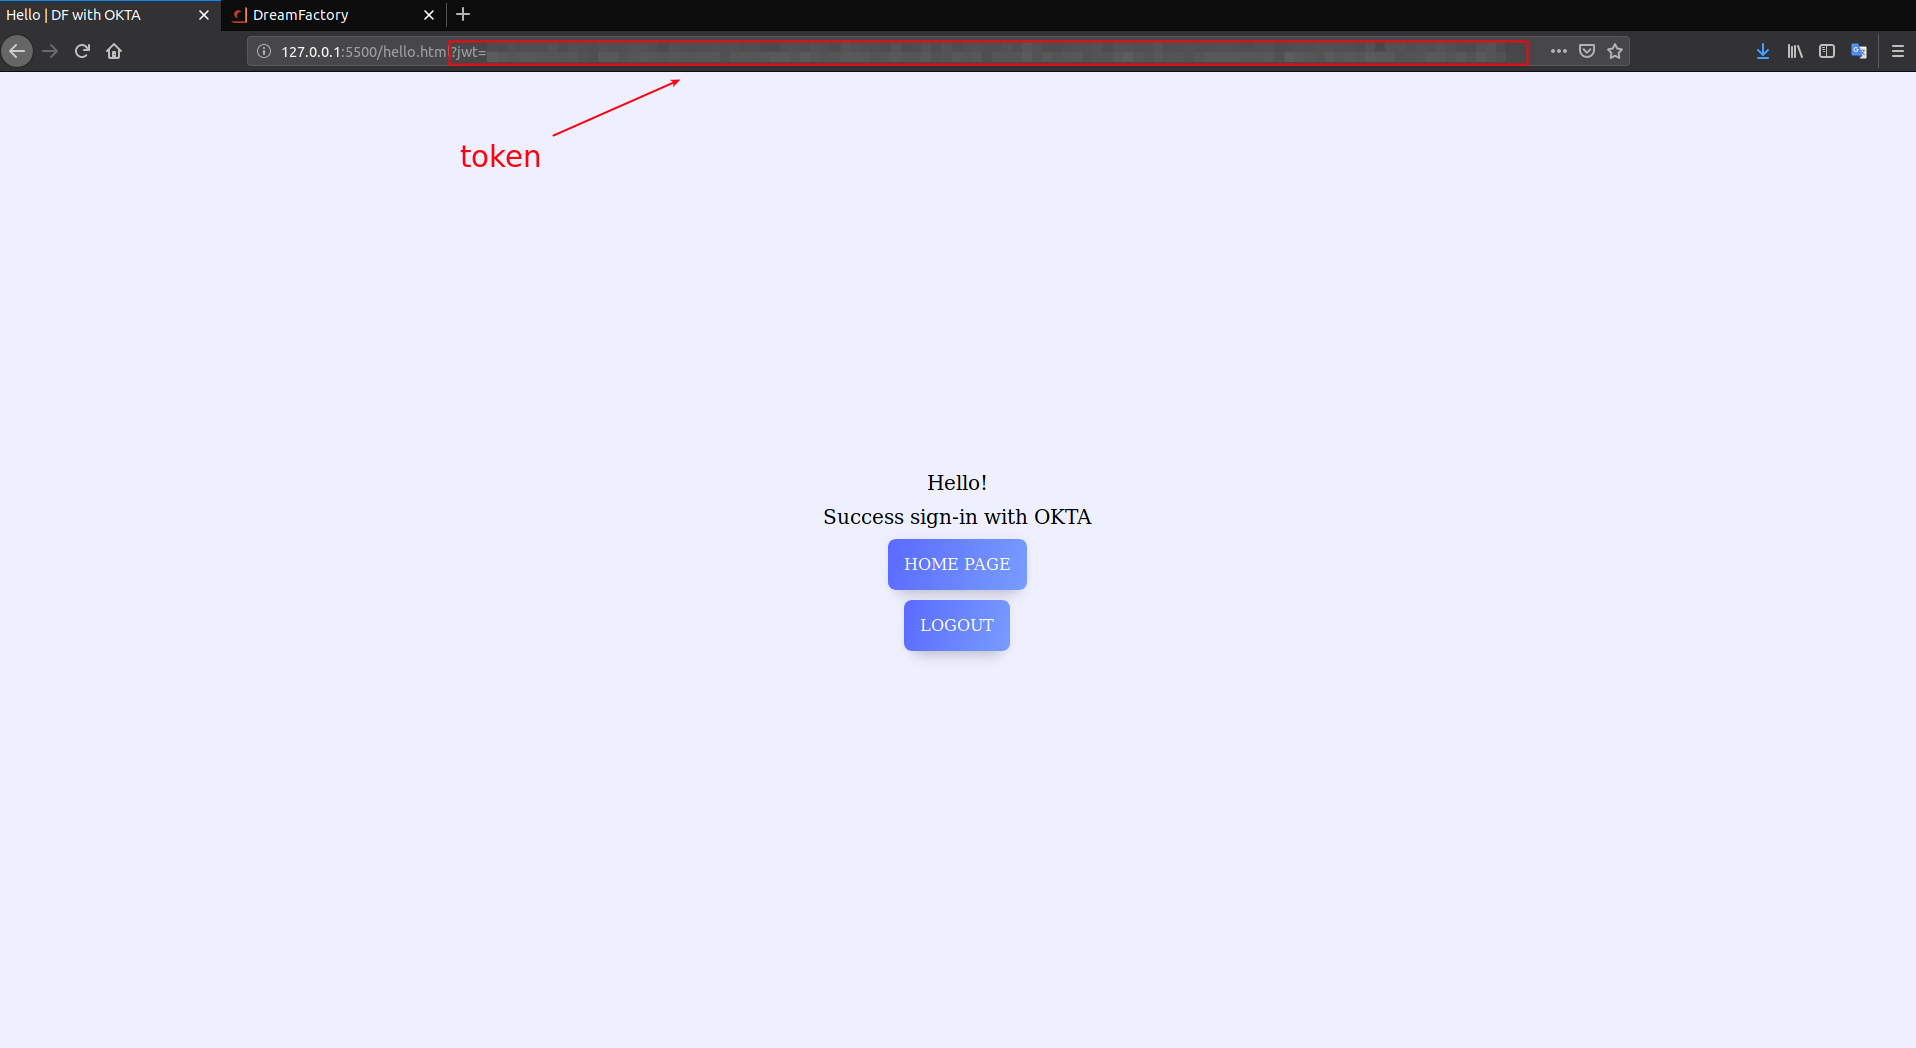
DreamFactory’s security features go well beyond API key-based authentication. You can require users to login via a variety of solutions, including basic authentication, LDAP, Active Directory, and single sign-on (SSO). Once successfully signed in, users are assigned a session token which will be used to verify authentication status for all subsequent requests.
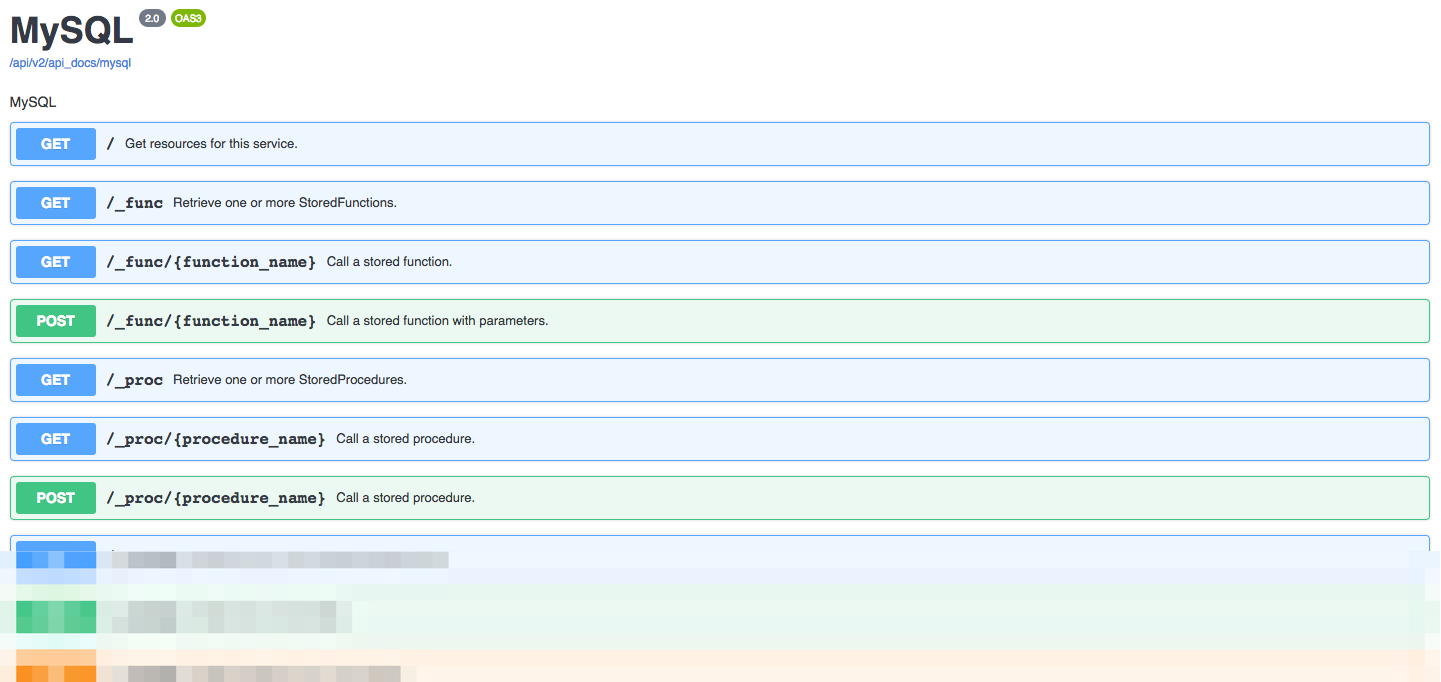
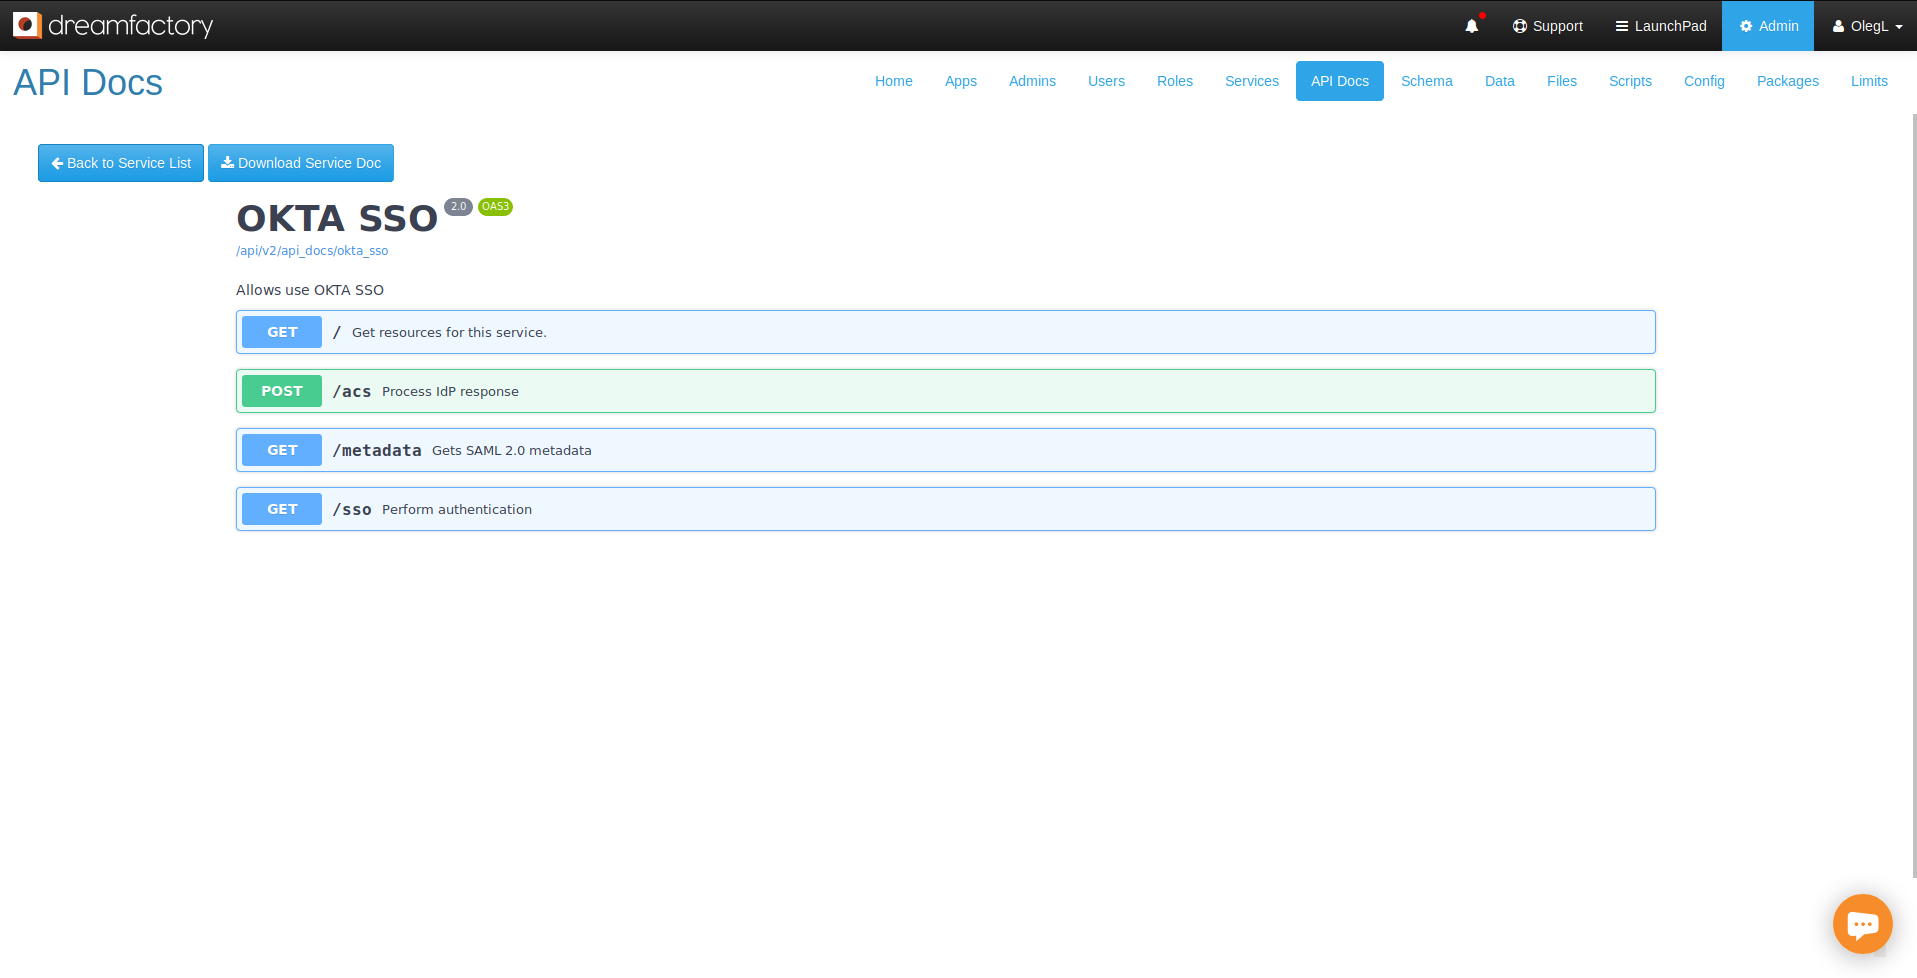
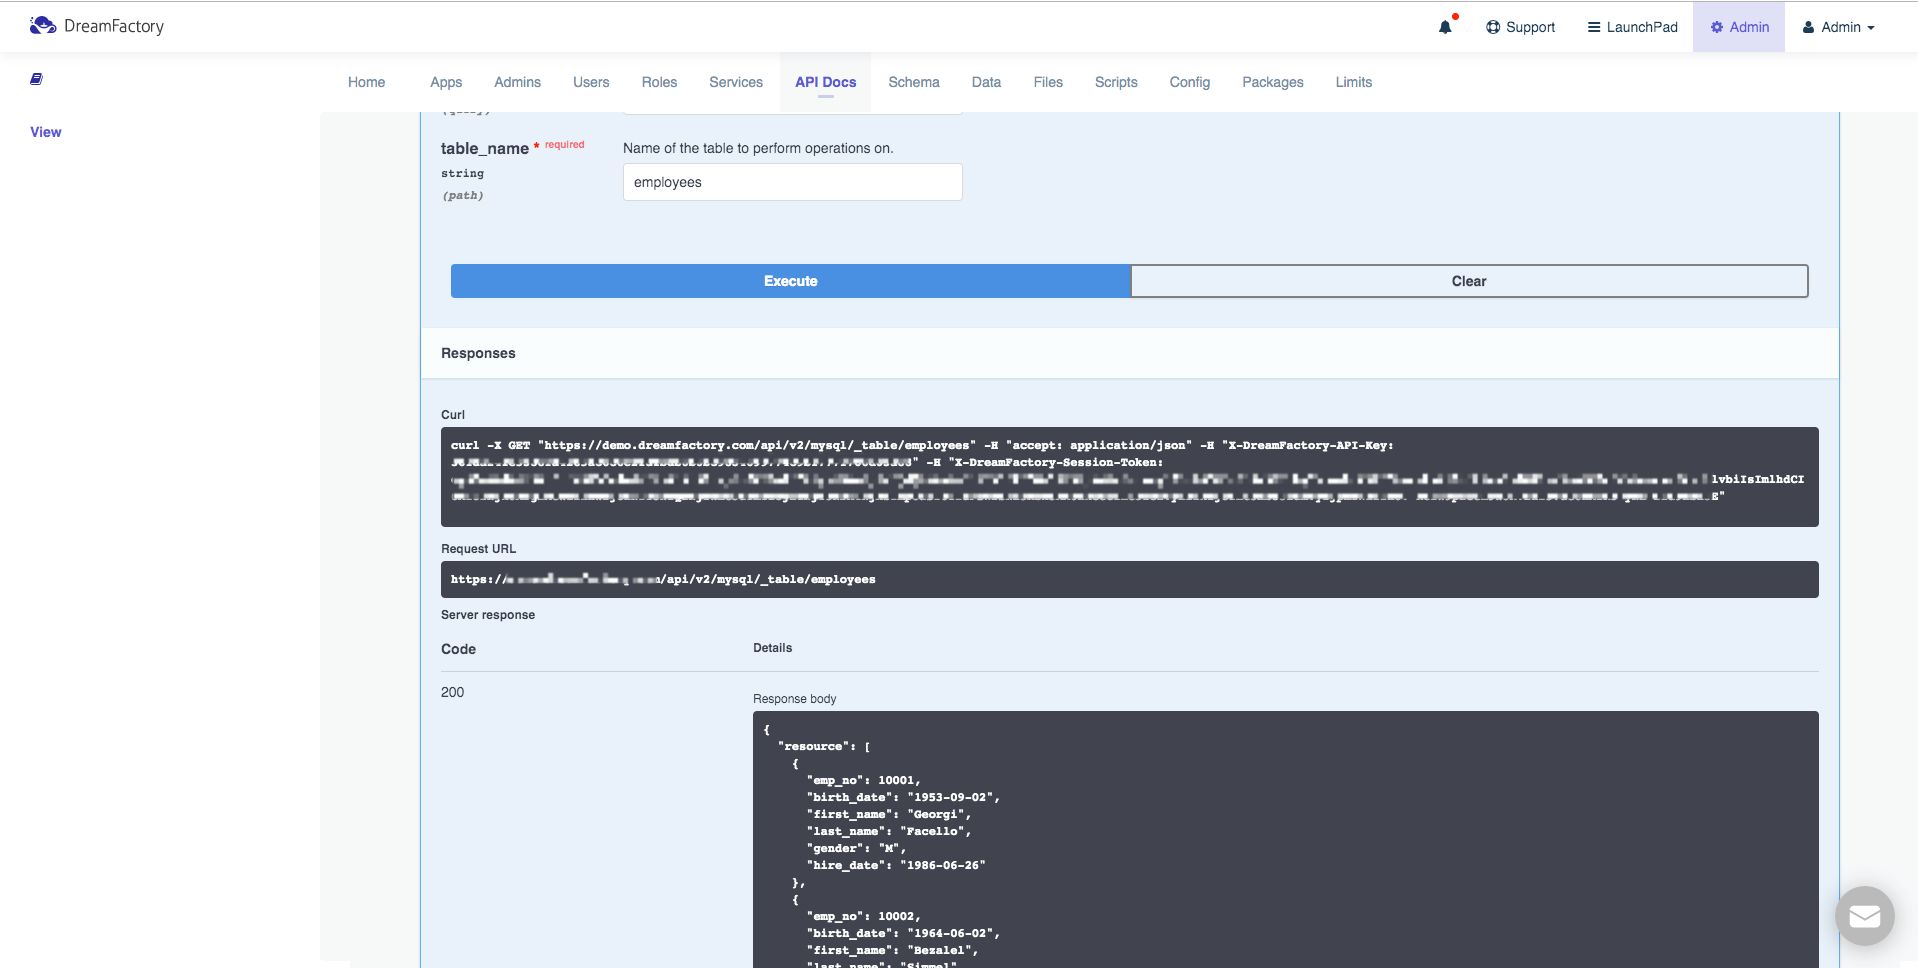
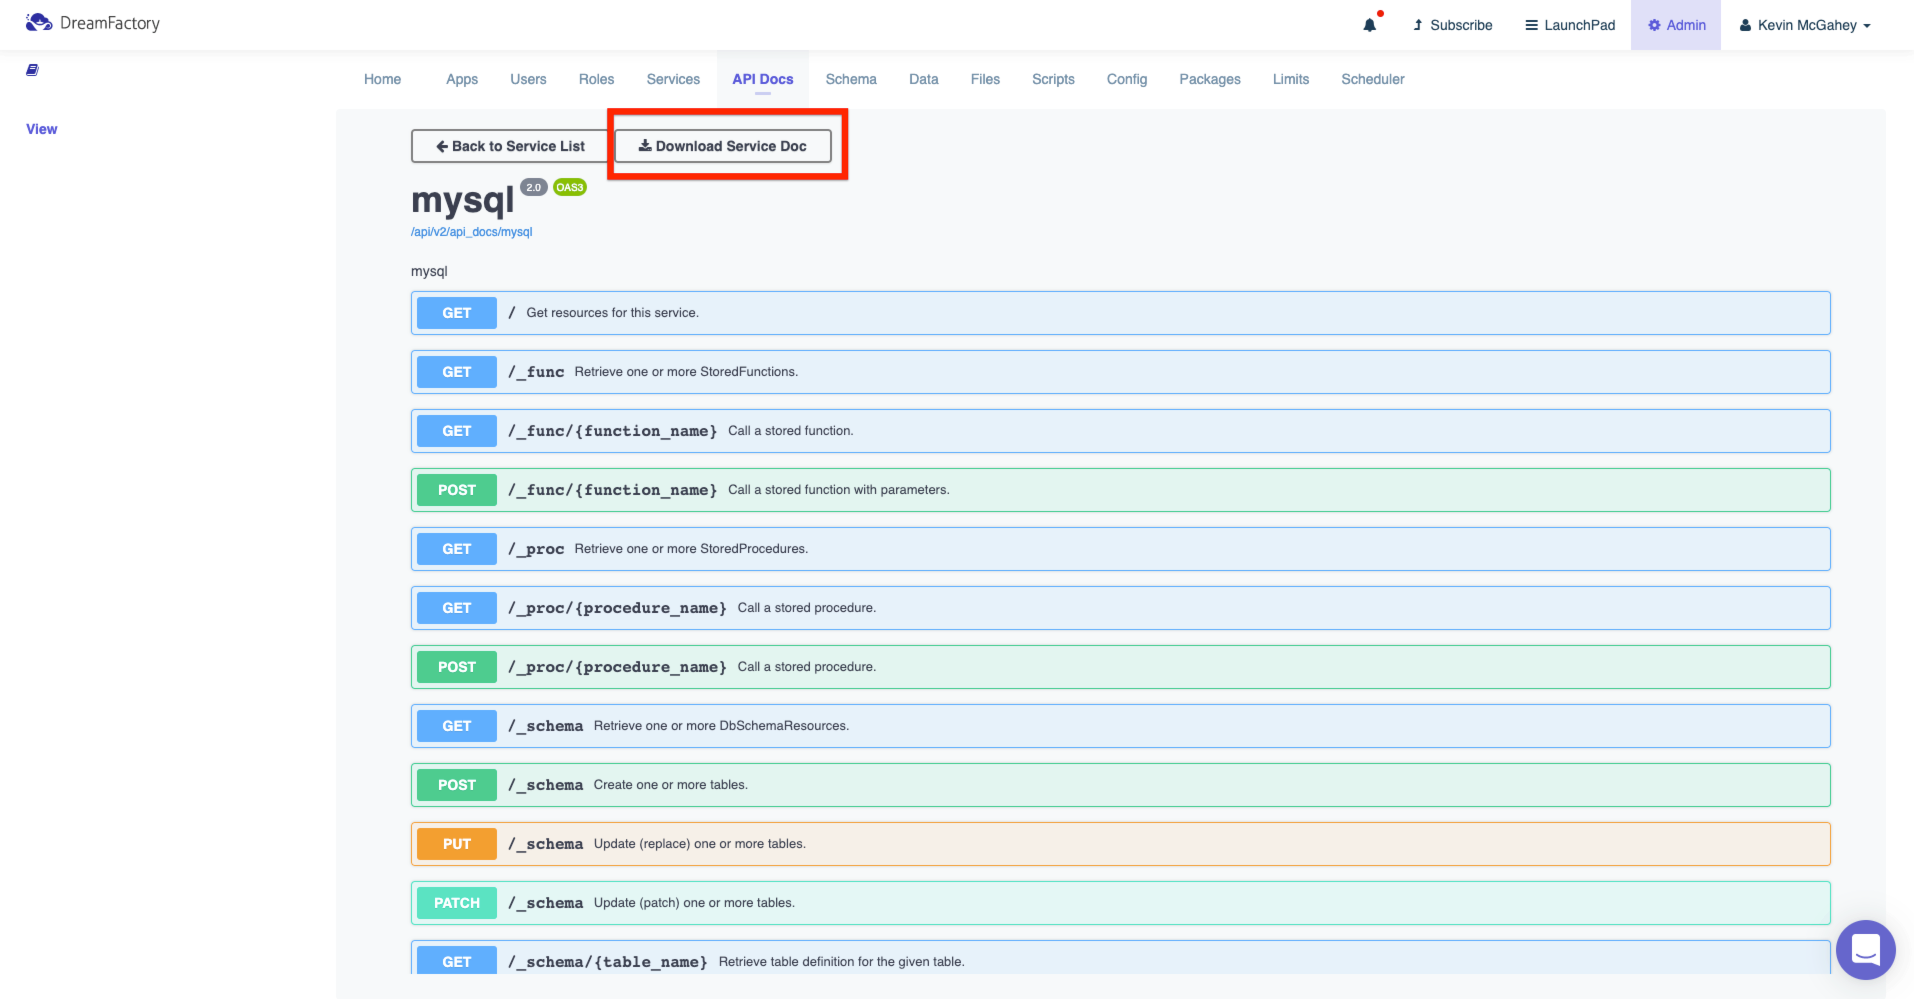
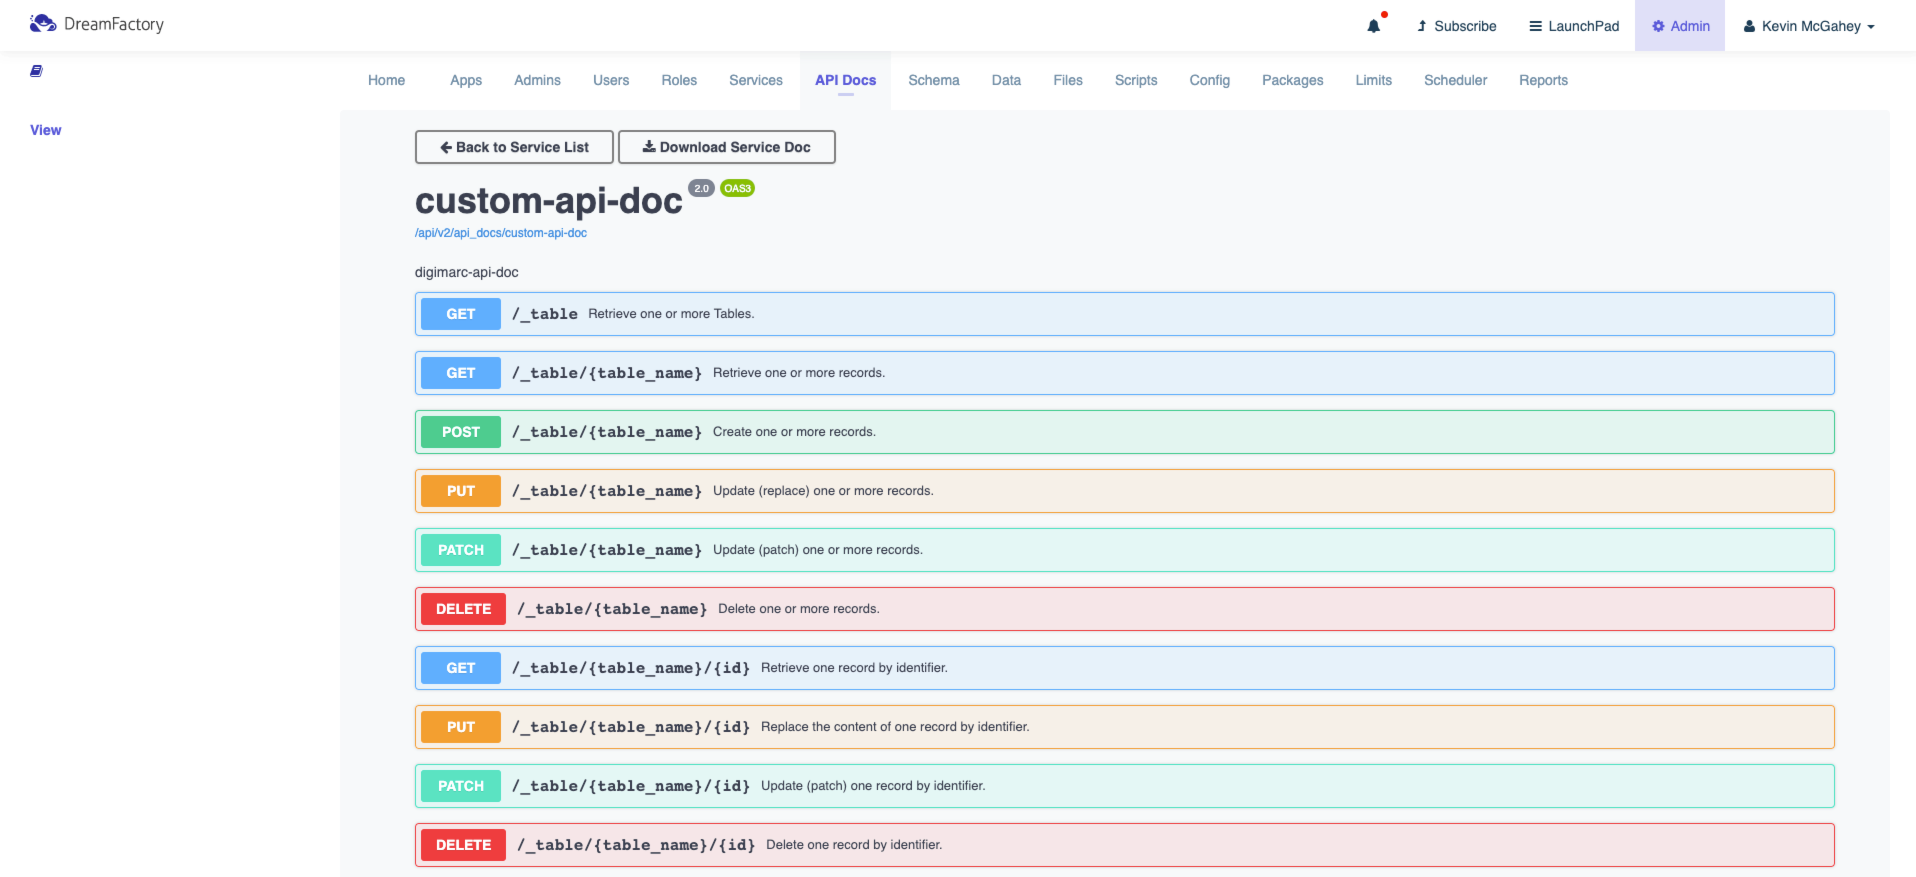
Interactive OpenAPI Documentation
Your developers will of course want to begin integrating the API into new and existing applications, and therefore need a thorough understanding of the endpoints, input parameters, and responses. DreamFactory automates the creation of this documentation for you by generating it at the same time the API is automated. The following screenshot presents an example set of documentation generated by DreamFactory in association with a MySQL REST API:
The documentation goes well beyond merely presenting a list of endpoints. As you’ll learn in later chapters, you can click on any of these endpoints and interact with the API! Further, your DreamFactory administrator can create user accounts which grant access to exclusively the documentation, while preventing these accounts from carrying out other administrative tasks.
Business Logic Integration
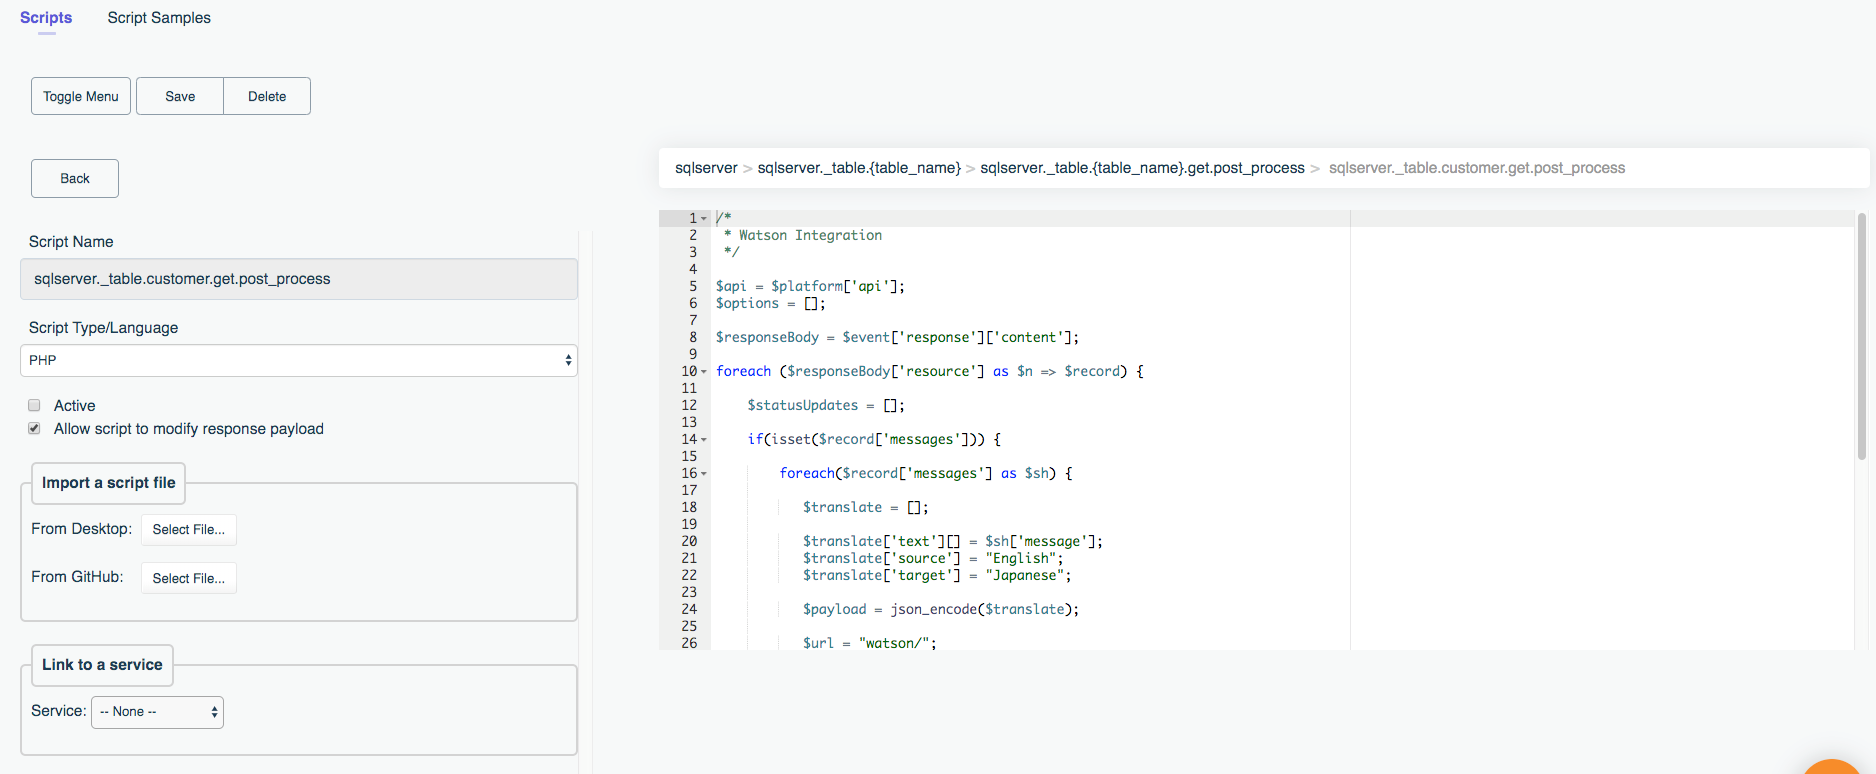
It’s often the case that you’ll want to tweak the behavior of your APIs, for instance validating incoming input parameters, calling other APIs as part of the request/response workflow, or transforming a response structure prior to returning it to the client. DreamFactory’s scripting feature allows you to incorporate logic into any endpoint, running it on the request or response side of the communication (or both!). You can use any of four supported scripting engines, including NodeJS, PHP, Python, or the V8 scripting engine. Using these scripting engines in conjunction with a variety of DreamFactory data structures made available to these endpoints, the sky really is the limit in terms of your ability to tweak your API behavior.
API Limiting
Your organization has spent months if not years aggregating and curating a valuable trove of data, and lately your customers and other organizations have been clamoring for the ability to access it. This is typically done by monetizing the API, assigning customers volume-based access in accordance with a particular pricing plan.
DreamFactory’s API limiting features allow you to associate volume-based limits with a particular user, API key, REST API, or even a particular request method. Once enabled, DreamFactory will monitor the configuration in real-time, returning an HTTP 429 status code (Too Many Requests) to the client once the limit is reached. While a convenient web interface is provided for managing your API limits, it’s also possible to programmatically manage these API limits, meaning you can integrate limit management into your SaaS application!
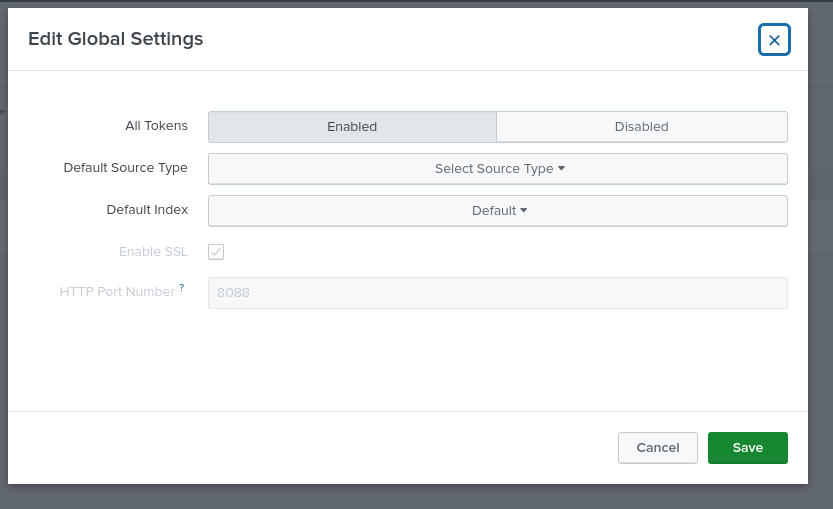
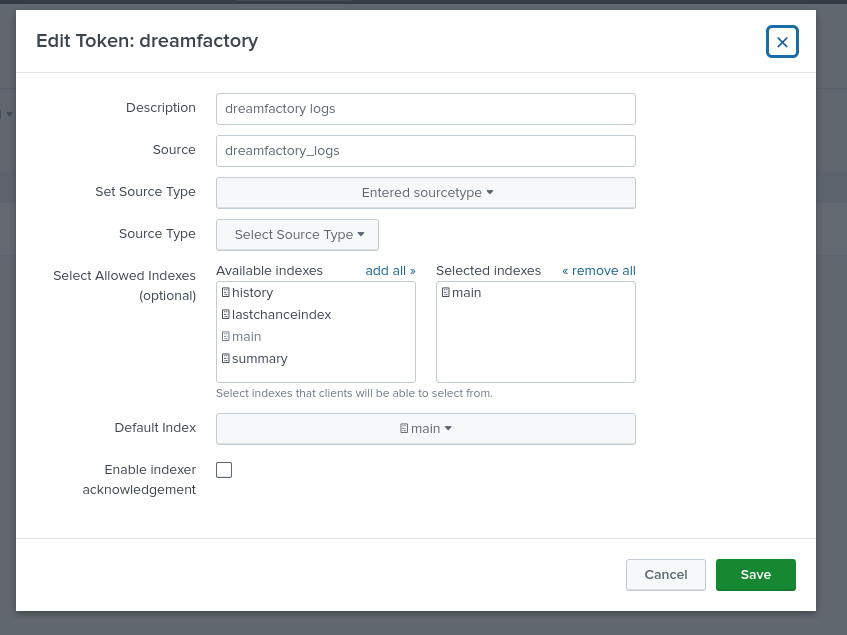
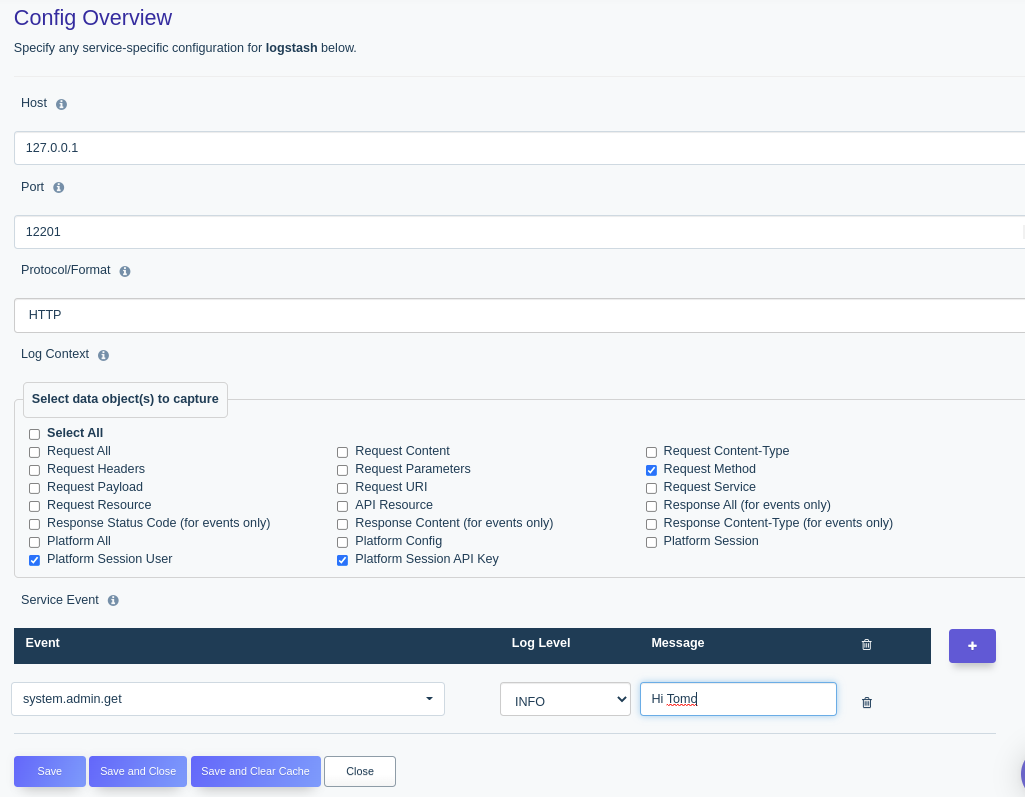
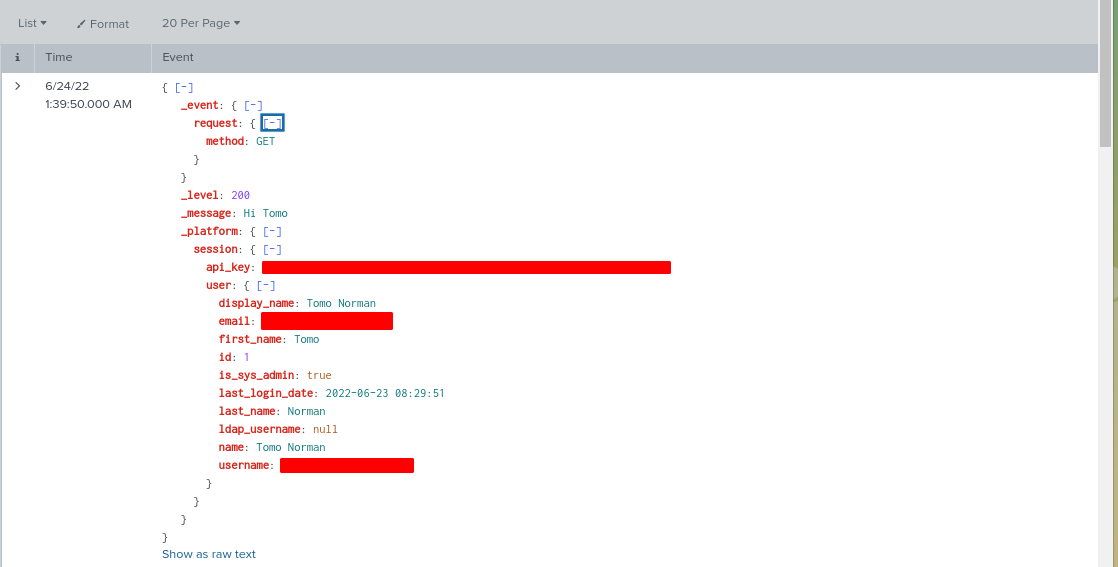
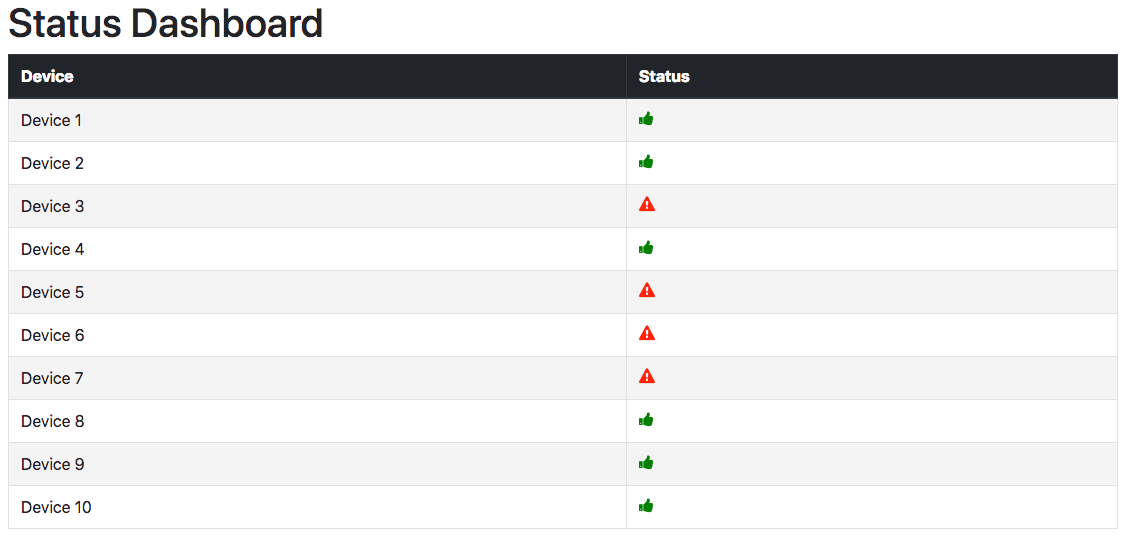
API Logging and Reporting
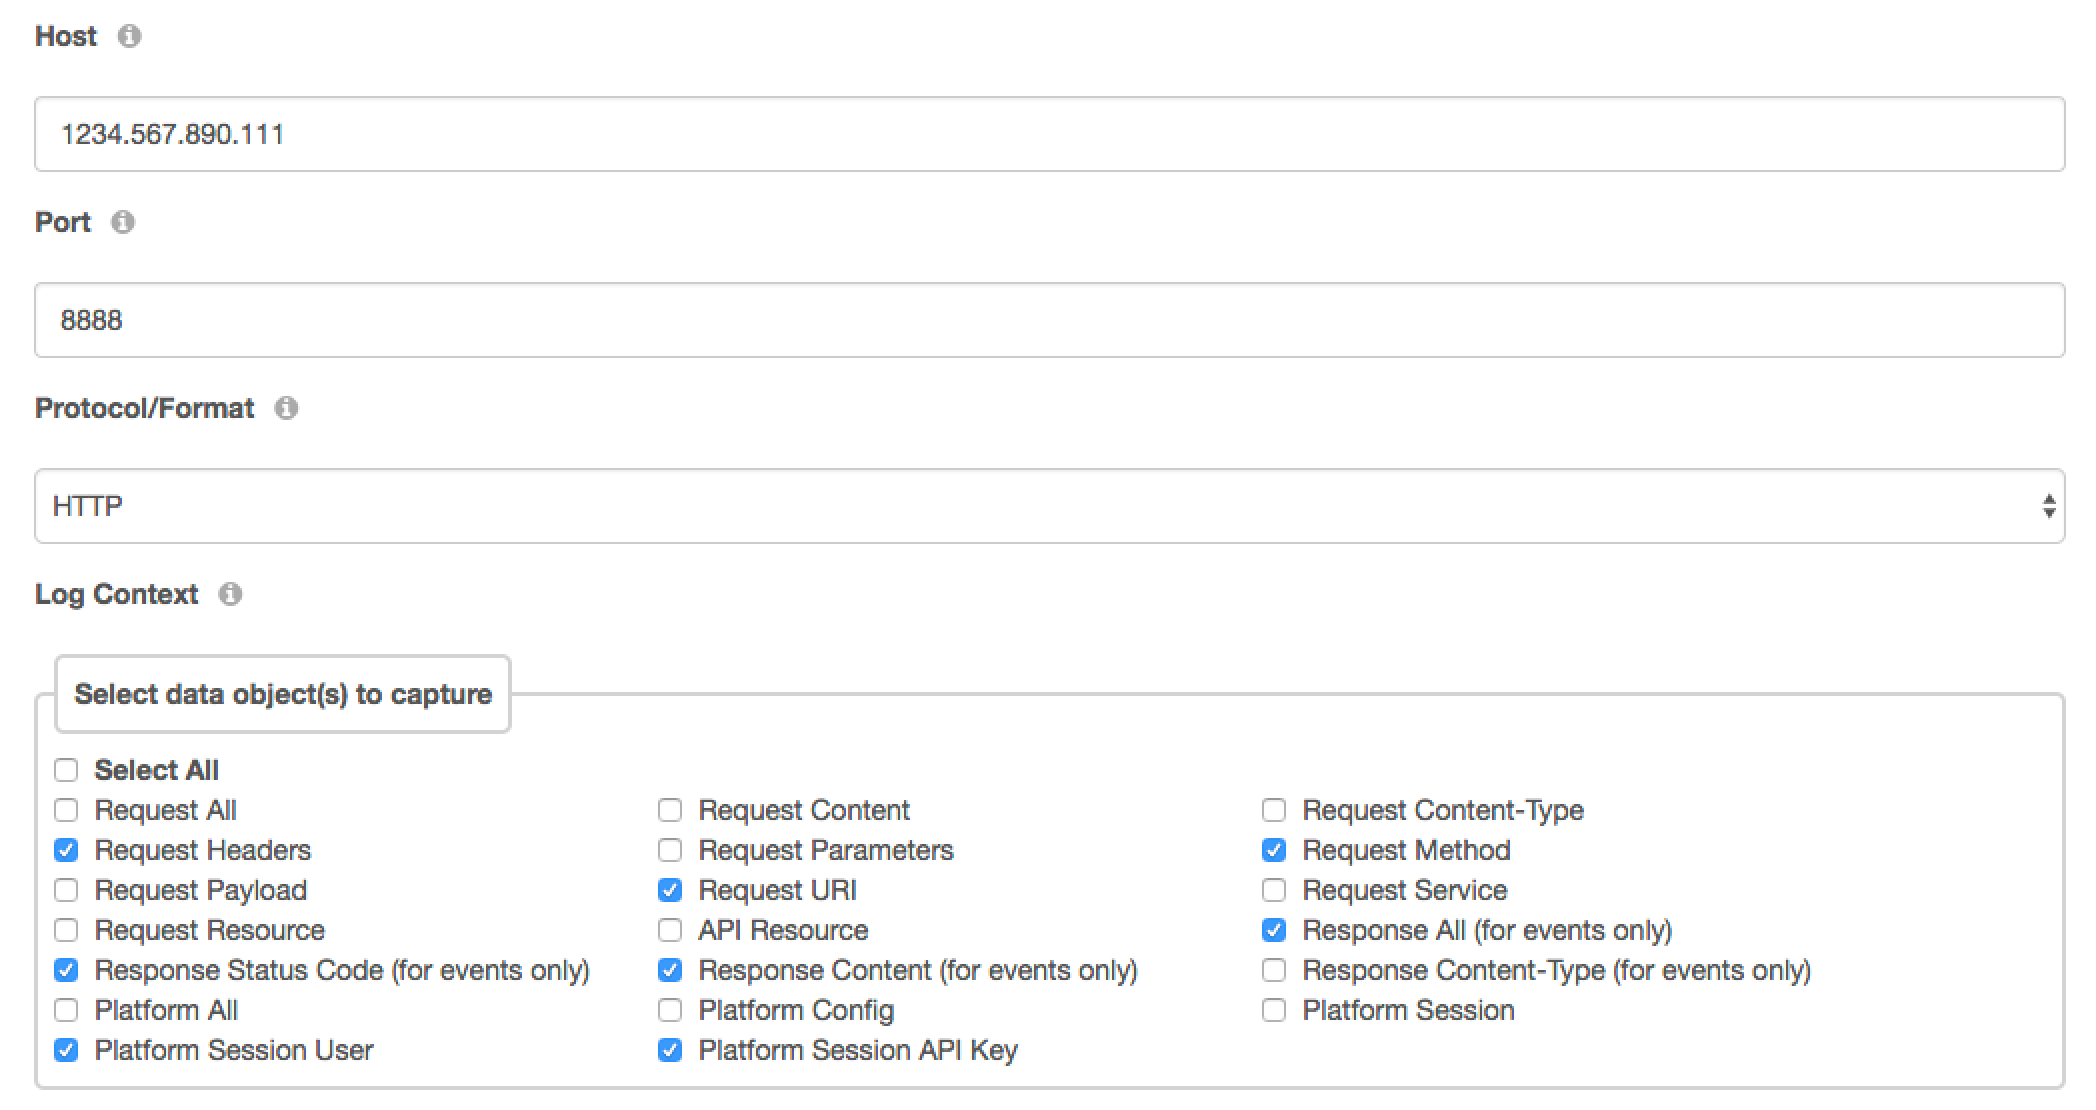
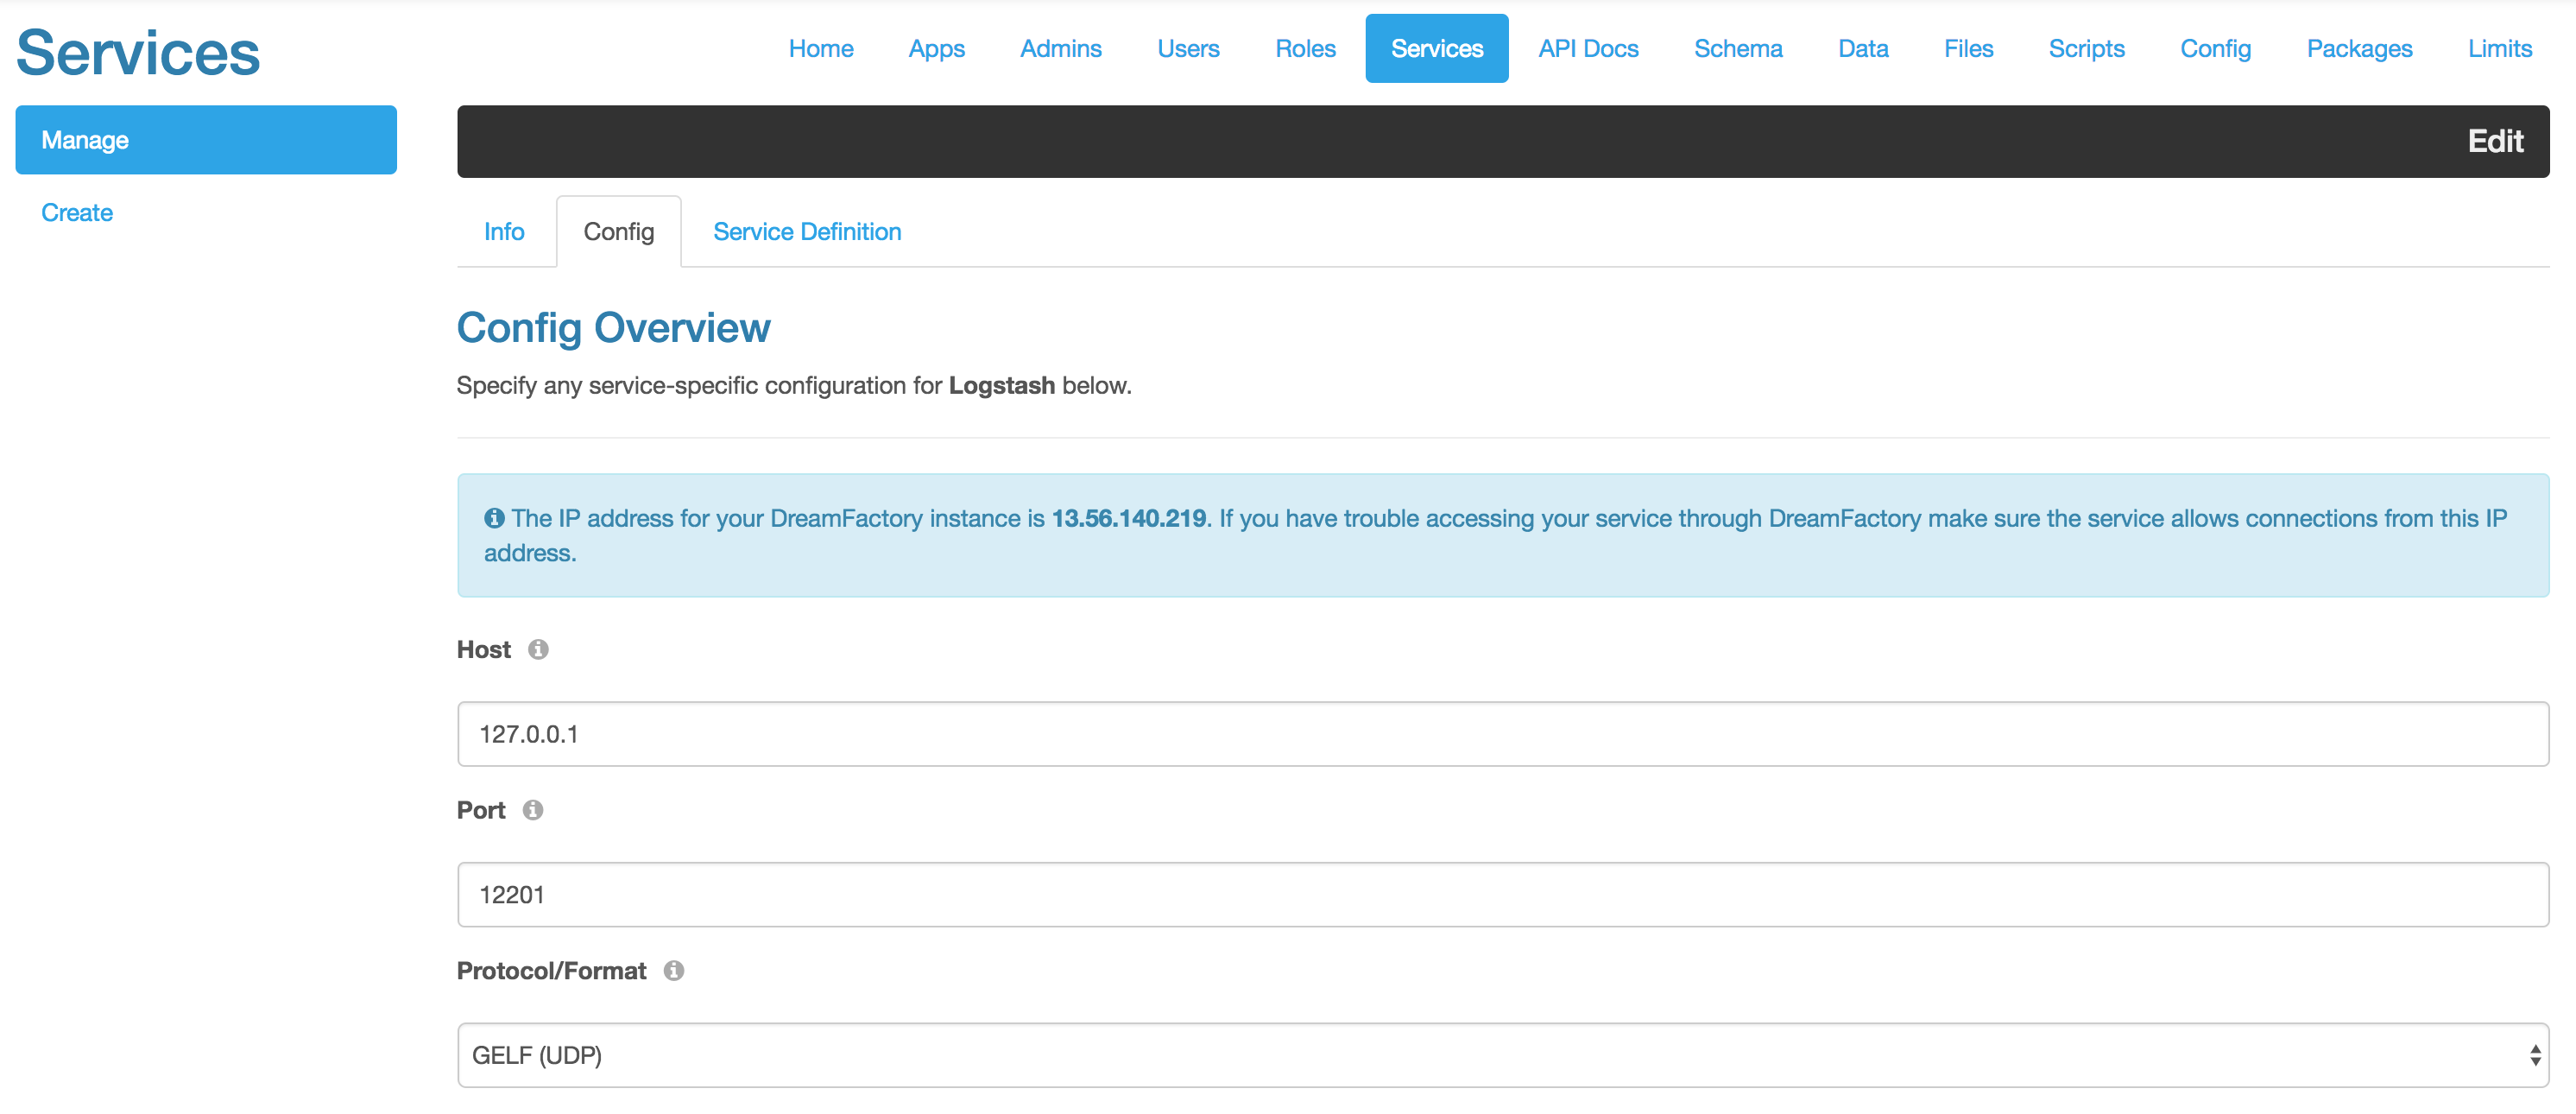
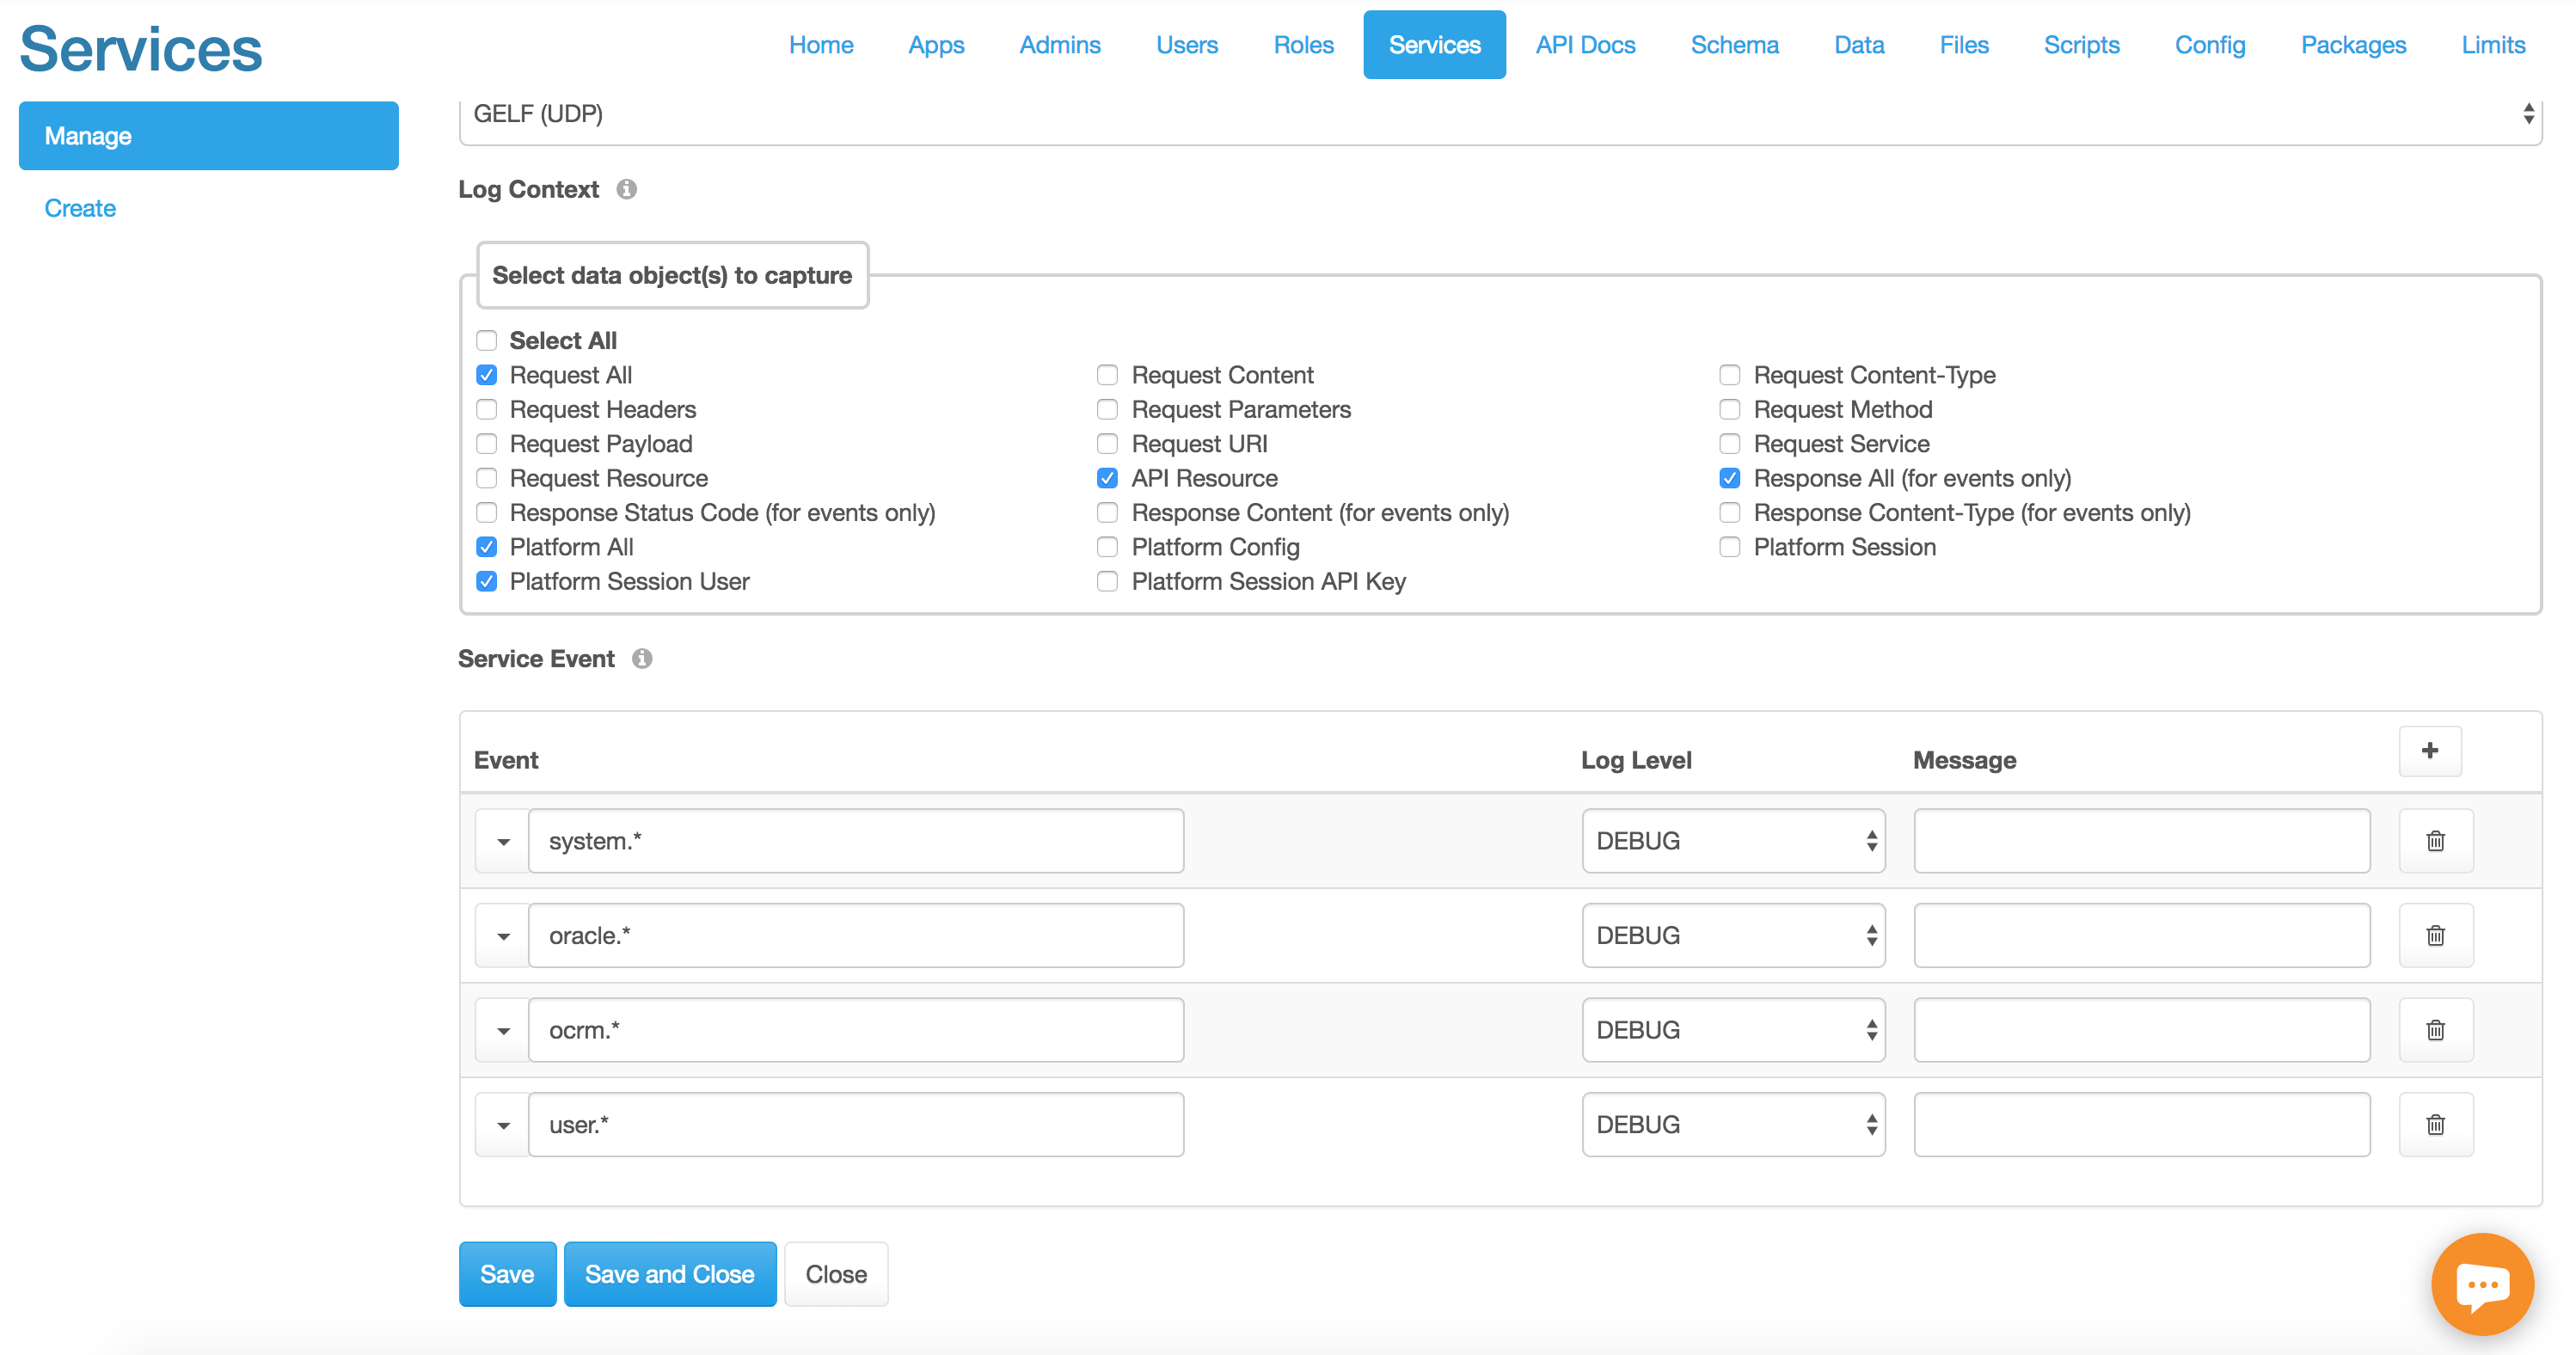
Whether your organization is required to follow the European Union’s General Data Protection Regulation (GDPR), or you’d just like to keep close tabs on the request volume and behavior of your REST APIs, you’ll want to integrate a robust and detailed API logging and reporting solution. Fortunately, DreamFactory plugs into Logstash, which is part of the formidable ELK (Elasticsearch, Logstash, Kibana) stack. This amazing integration allows you to create dashboards and reports which can provide real-time monitoring of API key activity, HTTP status codes, and hundreds of other metrics.
Conclusion
There you have it; a thorough overview of REST APIs and the DreamFactory platform, neatly packaged into this guide’s opening chapter. If this approach to REST API generation and management sounds too appealing to pass up, forge ahead to chapter 2 where you’ll learn how to download, install, and configure your DreamFactory platform!
2 - Installing and Configuring DreamFactory
In this chapter you’ll learn how to install and configure DreamFactory. A number of installation solutions are available, including GitHub repository, point-and-click installers, Docker container, and cloud-specific installers. Be sure to carefully read through the set of options before making a decision, because some might be more suitable than others for your particular situation.
Choosing a DreamFactory Version
Regardless of whether you’d like to spin up a DreamFactory instance on your local laptop, within a cloud environment such as AWS or Google Cloud, or Docker, we have a ready-made solution for you!
The DreamFactory GitHub Repository
Cloning DreamFactory’s OSS repository has long been by far the most popular way to access the software. To clone the repository you’ll need to install a Git client on your local machine or a server, at which point you can clone it using the following command:
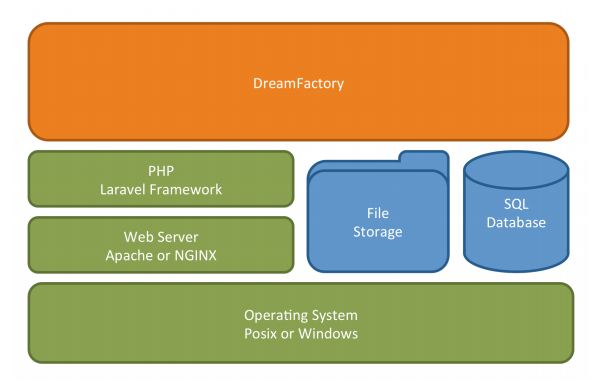
DreamFactory is built atop the very popular Laravel Framework, which is in turn built atop PHP. This means DreamFactory is almost ubiquitously supported in all hosting environments; you’ll just need to make sure your hosting environment is running PHP 8.1 or greater, a recent version of a web server such as Apache or NGINX, access to one of four databases for storing configuration data (MySQL/MariaDB, PostgreSQL, SQLite, and MS SQL Server are supported), and that you have adequate permissions to install a few requisite PHP extensions. You can learn more about the required software and extensions via our wiki:
Our Docker container is increasingly popular, and includes everything you need to run DreamFactory including Ubuntu 22.04, PHP 8.1, and the NGINX web server. It also includes all of the required PHP extensions, meaning you should be able to begin experimenting with the latest DreamFactory version as quickly as you can spin up the container! To learn more about the container, head over to our df-docker repository:
Many users simply want to evaluate DreamFactory without putting any time or effort whatsoever into procuring a test server or fiddling with configuration issues. If you fall into this category then our Bitnami point-and-click installers are for you! These virtual machines include everything you need to begin running DreamFactory, and include a built-in database server, web server, PHP runtime, and a bunch of other useful software.
Installers are available for Linux, Windows, and Mac OS X. Download your desired version via the following link:
Cloud environments are the hosting solution of choice these days, and for good reason. Cloud service providers offer unsurpassed levels of stability, performance, and security, and countless additional features capable of maximizing IT teams' efficiency while minimizing costs. DreamFactory offers Bitnami images targeting all of the major cloud providers, including AWS, Azure, Google, and Oracle Cloud. Download your desired version via the following link:
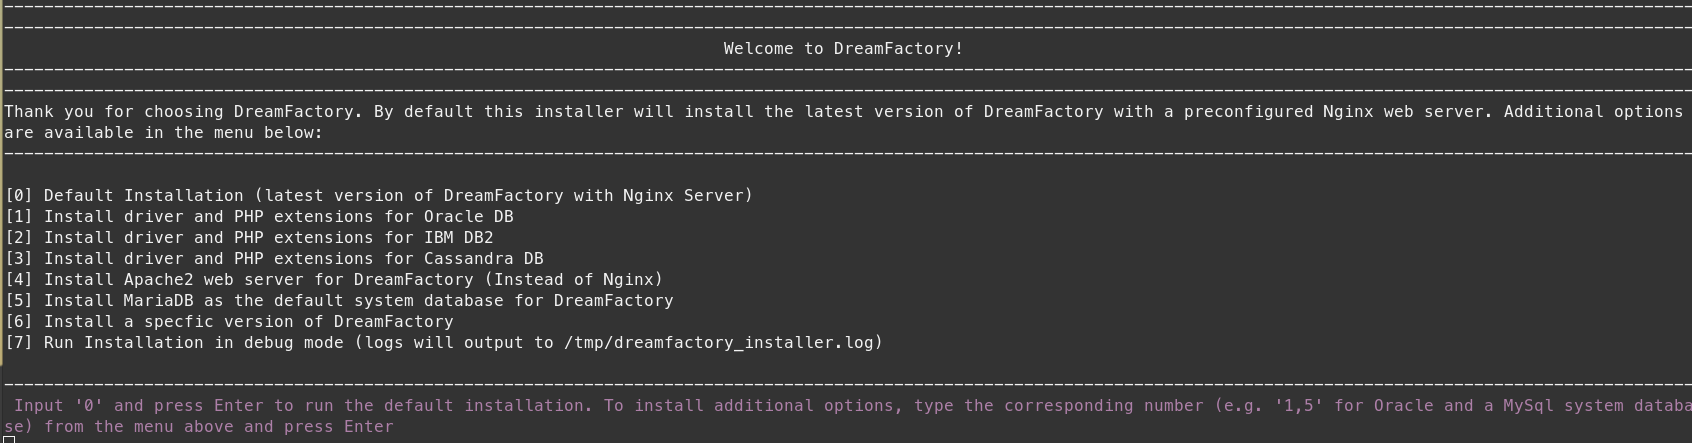
By far the simplest method of installing DreamFactory on Linux is by using our installer which can be found here. The installer will determine your OS, and install all the necessary packages that DreamFactory requires to run, as well as a webserver (Nginx or Apache), and DreamFactory itself.
To start we will download our installer dfsetup.run. You can do so either directly from the GitHub page and clicking download, or with wget:
Now that we have the script on our server, let’s make it executable.
chmod +x dfsetup.run
Now we can run the script!
sudo ./dfsetup.run
You will be greeted by an interactive menu, where if you wish you can choose additional installation options (such as with an Apache webserver) by pressing the corresponding number.
A default installation (0) will install the Nginx web server, DreamFactory, and the required system and PHP extensions, but will not install a database server (unless you choose sqlite as your database). To see a full list of installation options check it our here. If you select option 5, then the installer will also setup a MySql Database to be used as the system database.
After choosing your additional options (if any), hit enter and the installer will go about getting everything ready.
Fill out any prompts and then upon completion you can now go to your browser and access your instance!
Installing and Configuring DreamFactory from Source
If you’ve cloned the GitHub repository, you’ll need to carry out a few additional steps before launching your DreamFactory instance. The first step involves ensuring your server requirements have been met. Let’s tackle those first, followed by an overview of software installation.
Configuring Your Server
This guide is under heavy development, and certain parts are incomplete. We suggest reading through the current installation documentation, available here.
Server configuration is going to vary according to your operating system. To ensure the instructions are as specific and straightforward as possible, we’ve broken them out into subchapters:
If you plan on running scheduled tasks, please make sure that crond is installed and running on your OS. You can check with systemctl status crond, start with systemctl start crond, and enable it (so it starts up on boot) with systemctl enable crond. If you do not have it installed, you can do so from your package manager (cronie on RHEL systems and cron on debian systems).
Server Hardware Requirements
DreamFactory is surprisingly performant even under minimally provisioned servers, you’ll want to install DreamFactory on a 64-bit server with at least 4GB RAM. If you’re planning on hosting the system database on the same server as DreamFactory, then we recommend at least 8GB RAM. This server will house not only the operating system and DreamFactory, but also a web server such as Nginx (recommended) or Apache, and PHP-FPM. Keep in mind these are the minimum RAM requirements; many customers can and do run DreamFactory in far larger production environments.
Under heavier loads you’ll want to load balance DreamFactory across multiple servers, and take advantage of a shared caching (Redis or Memcached are typically used) and database layer (which houses the system database).
Cloud Environment
Minimum Server
AWS
t2.large
Azure
D2 v3
Oracle Cloud
VM.Standard.E2.1
Digital Ocean
Standard 8/160/5
Google Cloud
n1-standard-2
Although DreamFactory can run on Windows Server and IIS, we recommend instead using a popular Linux distribution such as Ubuntu, Debian, or CentOS in order to take advantage of our automated installers targeting those specific operating systems.
Prior to launching your project, we recommend thoroughly testing your APIs under estimated production loads using a tool such as loader.io.
Installing DreamFactory
The first step involves installing the required PHP packages using Composer:
$ composer install --no-dev
The --no-dev option tells Composer to not install the development-specific dependencies. These development dependencies are used by our OSS community and internal developers alike to assist in software development. You can review the list of both required and developmental dependencies by opening the composer.json file found in the project’s root directory.
If you receive an error regarding Your requirements could not be resolved to an installable set of packages, and you don’t require MongoDB, then you can quickly hurdle the issue by additionally supplying the --ignore-platform-reqs option when running Composer.
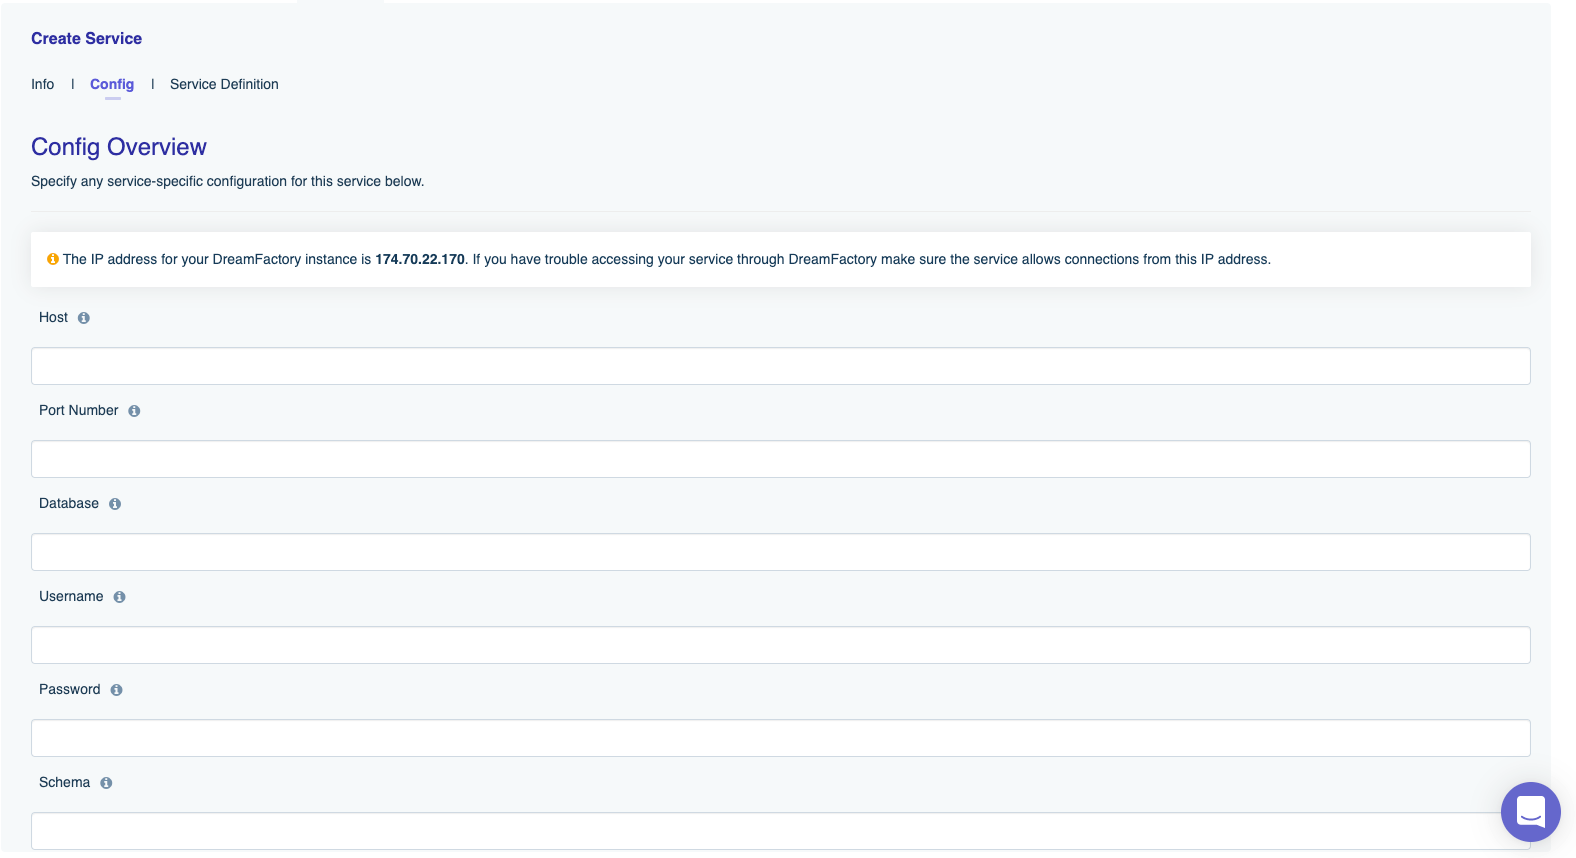
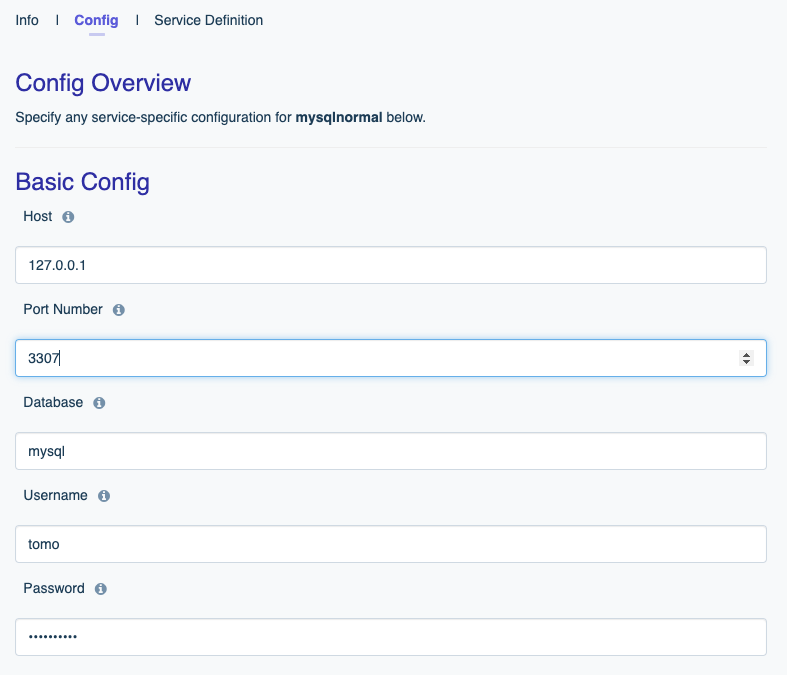
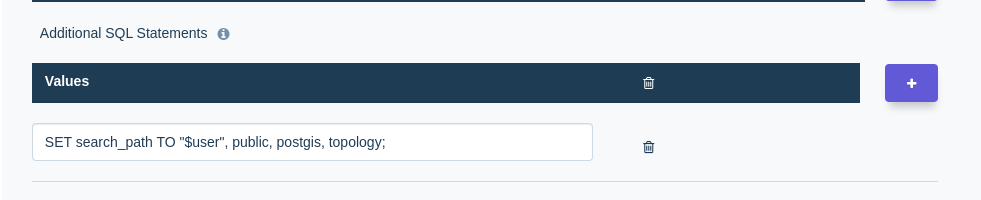
With the packages installed, you’ll next need to configure your system database. This database will house various configuration settings associated with your instance. DreamFactory supports four databases for this purpose, including Microsoft SQL Server, MySQL, PostgreSQL, and SQLite. Keep in mind you’ll need to first create this database along with an account DreamFactory will use to connect to it.
Example: PostgreSQL
Once you have a PostgreSQL instance setup and the server running, you will need to create a user (“Role”) for DreamFactory to login with, and a database to use. The simplest was to do so is to first switch over to the postgres user that will automatically have been created upon installation of PostgresSQL:
sudo -i -u postgres
Now open up psql and create your new Role and Database for DreamFactory to use.
(Note that If you are connecting remotely to your database server you can use psql -h <host> -U <ASuperUser> -p 5432 to directly get into psql):
CREATE ROLE dfadmin LOGIN PASSWORD 'pghwosfg78';
CREATE DATABASE dreamfactory
Note The user must, at the very least, have LOGIN privileges
Finally, its best to double check that PostgreSQL is setup to accept IPv6 connections using md5 (i.e password) login. Go to your pg_hba.conf file and check (or amend as necessary) you have something along the lines of the following:
host all all ::1/128 md5
You’ll configure the system database by running a terminal command and answering a few prompts about your database configuration.
To do so, run the following command from inside your project’s root directory:
$ php artisan df:env
**************************************************
* Configuring DreamFactory...
**************************************************
Created .env file with default configuration.
Created phpunit.xml with default configuration.

 Which database would you like to use for system tables? [sqlite]:
  [0] sqlite
  [1] mysql
  [2] pgsql
  [3] sqlsrv
 > 1

 Enter your mysql Host:
 > 192.168.10.10

 Enter your Database Port [3306]:
 >

 Enter your database name:
 > dreamfactory

 Enter your database username:
 > dreamfactory_user

 Enter your database password:
 >

 Re-enter your database password:
 >

CACHE DRIVER  is not supported. Using default driver file.
Configuration complete!
************************* WARNING! **************************
*
* Please take a moment to review the .env file. You can make any
* changes as necessary there.
*
* Please run "php artisan df:setup" to complete the setup process.
*
*************************************************************
With the system database configured, it’s time to create the system tables and seed data and then create your first system administrator account. This is accomplished by running the df:setup command. Because multiple prompts are involved with this command, I’ll break the command output into a few parts. Immediately after running df:setup, the command will create the database tables and seed data:
$ php artisan df:setup
*********************************************
* Welcome to DreamFactory Setup.
*********************************************
Running Migrations...
Migration table created successfully.
Migration driver used: sqlite
Migrating: 2015_01_27_190908_create_system_tables
Migrated:  2015_01_27_190908_create_system_tables
Migrating: 2015_01_27_190909_create_db_extras_tables
Migrated:  2015_01_27_190909_create_db_extras_tables
...
Migration completed successfully.
*********************************************
*********************************************
Running Seeder...
Seeding: AppSeeder
App resources created: admin, api_docs, file_manager
Seeding: EmailTemplateSeeder
Email Template resources created: User Invite Default, User Registration Default, Password Reset Default
Service resources created: system, api_docs, files, logs, db, email
System service updated.
Service resources created: user
All tables were seeded successfully.
Next you’ll be prompted to create your first system administration account:
Creating the first admin user...
Enter your first name:
> Jason
Enter your last name:
> Gilmore
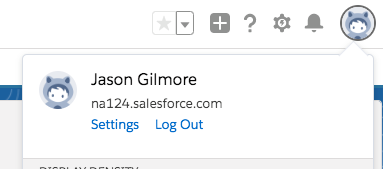
Enter your email address?:
> [email protected]
Choose a password:
>
Re-enter password:
>
Successfully created first admin user.
Finally, you’ll be prompted to make sure your application’s storage and bootstrap/cache directories are properly configured. This involves making sure the directory ownership and permissions are properly set using the chown and chmod commands:
* Please make sure following directories and all directories under
* them are readable and writable by your web server
*  -> storage/
*  -> bootstrap/cache/
* Example:
*  > sudo chown -R {www user}:{your user group} storage/ bootstrap/cache/
*  > sudo chmod -R 2775 storage/ bootstrap/cache/
The {www user} string is a placeholder for the owner of your web server daemon owner. The {your user group} string is a placeholder for the web server group daemon owner.
Immediately following this prompt you’ll be informed of successful setup:
**********************************************************
******************** Setup Successful! *******************
**********************************************************
* Setup is complete! Your instance is ready. Please launch
* your instance using a browser. You can run "php artisan serve"
* to try out your instance without setting up a web server.
**********************************************************
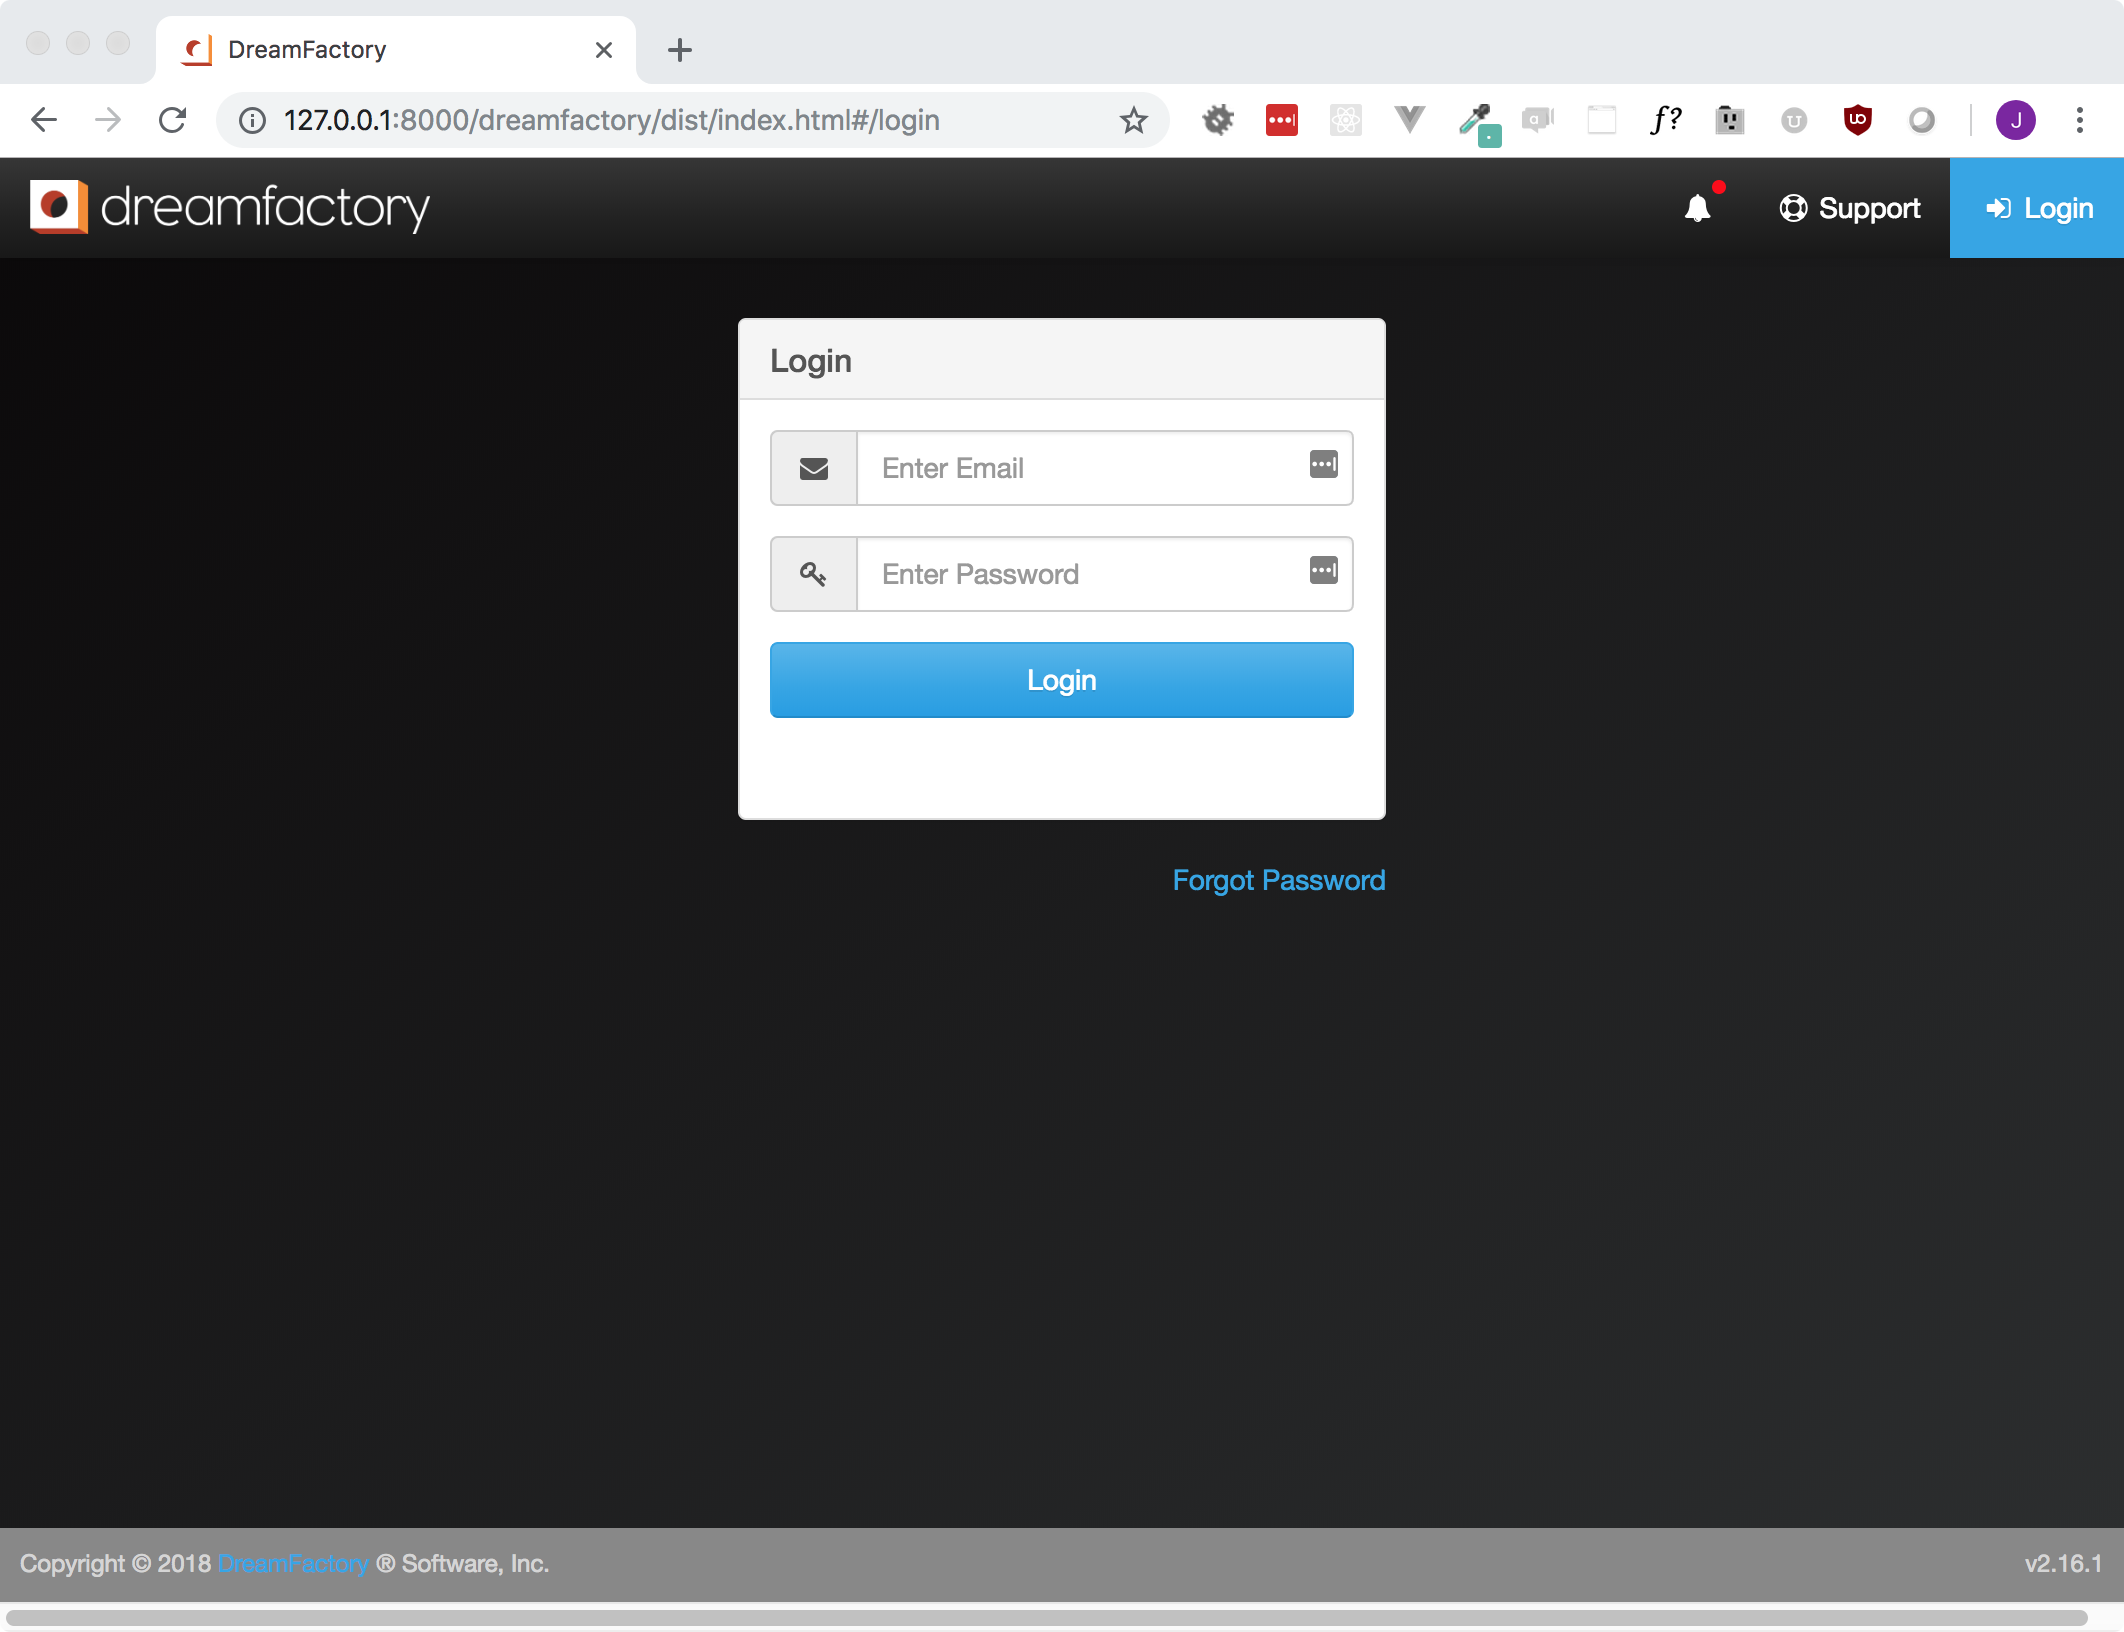
If you’ve installed and configured DreamFactory to run on a web server, then you can open your browser and navigate to the IP address or domain name. Otherwise, if you haven’t yet installed a web server, you can run php artisan serve:
$ php artisan serve
Laravel development server started: <http://127.0.0.1:8000>
This will start a simple PHP server running on 127.0.0.1 port 8000. Open your browser and navigate to http://127.0.0.1:8000 and you should see the following screen:
Using an Encrypted System Database
By default, credential fields (such as passwords) stored in the DreamFactory system database will be encrypted. In addition, DreamFactory is more than happy to use a fully-encrypted database as an additional security layer. In this section you will find a basic tutorial to setup and configure MySQL (we will use MariaDB) for Data-At-Rest Encryption:
Before installing DreamFactory, we will want to install MariaDB onto the server using the following commands:
Next, we will generate some random encryption keys using openssl rand (in this case, five of them):
mkdir /etc/mysql/encryption
for i in {1..5}; do openssl rand -hex 32 >> /etc/mysql/encryption/keyfile;  done;
Now, open the keyfile in /etc/mysql/encryption/keyfile with your preferred text editor and add some key ids. For the sake of simplicity in this tutorial, they will just be from one to five. The ids will be added before the start of each our hex encoded keys, followed by a semi-colon. You will end up with something looking like this:
Our encyption folder should now contain a keyfile, keyfile.enc, and keyfile.key files.
We will add the following variables to the mysql configuration file, which can be found in /etc/mysql/my.cnf. These should be added in the daemon section, i.e [mysqld]:
[mysqld]
...
plugin_load_add = file_key_management
file_key_management_filename = /etc/mysql/encryption/keyfile.enc
file_key_management_filekey = FILE:/etc/mysql/encryption/keyfile.key
file_key_management_encryption_algorithm = aes_cbc
encrypt_binlog = 1

innodb_encrypt_tables = ON
innodb_encrypt_log = ON
innodb_encryption_threads = 4
innodb_encryption_rotate_key_age = 0 # Do not rotate key
innodb_encrypt_tables = FORCE
The last variable innodb_encrypt_tables = FORCE will make all tables encrypted.
Then start up mysql with systemctl start mysql.
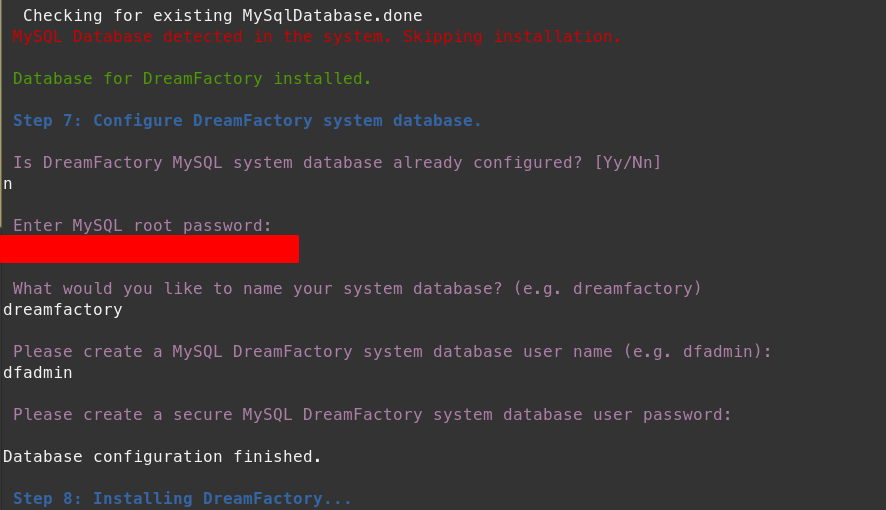
Now we will install DreamFactory. If using the installer, you can select option 5 at the start, and it will detect that mysql is already running. It will prompt you for the root password, and then create the database and the DreamFactory user on your behalf.
Alternatively, if using php artisan df:env, or not selecting option 5 with the installer, you may create a database and a user beforehand (e.g a database named dreamfactory and a user called dfadmin with privileges to that that database). The installer, (or running php artisan df:env) will then prompt you for those details:
The installation will then complete, ask you for the first user, and you will have an encrypted system database.
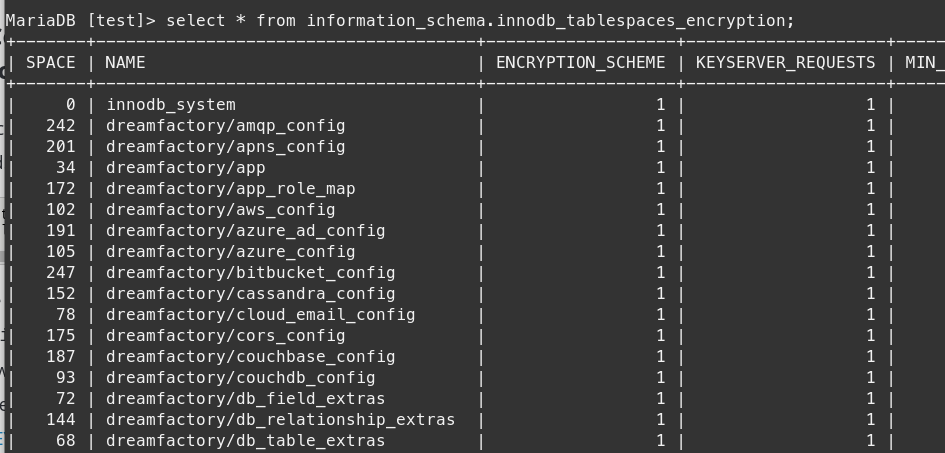
This can be tested and confirmed by logging into the MySQL cli and running the following command:
select * from information_schema.innodb_tablespaces_encryption;
which will return something similar to the following:
We can also grep the tables using strings for, e.g., the first user we just created with the following:
It is often helpful to have different configuration values based on the environment where the application is running. For example, you may wish to use a different cache driver locally than you do on your production server.
To make this a cinch, Laravel utilizes the DotEnv PHP library by Vance Lucas. In a fresh Laravel installation, the root directory of your application will contain a .env.example file. If you install Laravel via Composer, this file will automatically be renamed to .env. Otherwise, you should rename the file manually. For more information, please see the official Laravel documentation
Enabling Debugging and Logging
By default, DreamFactory does not enable debugging due to performance issues. However, it can easily be enabled. In the example .env file below you can see where these options live.
##==============================================================================
# Environment Settings
##==============================================================================
# Use the installer.sh file in this directory to easily edit these settings.
# By default each setting is set to its internal default and commented out.
##------------------------------------------------------------------------------
# Application Settings
##------------------------------------------------------------------------------
# Application name used in email templates and other displays
#APP_NAME=DreamFactory
# Encryption cipher options are AES-128-CBC or AES-256-CBC (default)
#APP_CIPHER=AES-256-CBC
# Return debugging trace in exceptions: true or false (default)
#APP_DEBUG=false
# Environment this installation is running in: local, production (default)
APP_ENV=local# Use 'php artisan key:generate' to generate a new key. Key size must be 16, 24 or 32.
APP_KEY=base64:YOUR_APP_KEY#APP_LOCALE=en
# LOG setting. Where and/or how the log file is setup. Options are single (default), daily, syslog, errorlog
APP_LOG=daily# LOG Level. This is hierarchical and goes in the following order.
# DEBUG -> INFO -> NOTICE -> WARNING -> ERROR -> CRITICAL -> ALERT -> EMERGENCY
# If you set log level to WARNING then all WARNING, ERROR, CRITICAL, ALERT, and EMERGENCY
# will be logged. Setting log level to DEBUG will log everything.
APP_LOG_LEVEL=debug# When APP_LOG is set to 'daily', this setting dictates how many log files to keep.
APP_LOG_MAX_FILES=5# PHP Date and Time function timezone setting
#APP_TIMEZONE=UTC
# External URL representing this install
#APP_URL=http://127.0.0.1:8000
# The starting point (page, application, etc.) when a browser points to the server root URL,
#DF_LANDING_PAGE=/dreamfactory/dist/index.html
DF_LICENSE_KEY=YOUR_LICENSE_KEY
When working to get your environment up and running, DreamFactory recommends turning debugging on, as well as increasing the sensitivity of the logging environment. In order to turn the application debugging on, please uncomment and change the following value:
APP_DEBUG=true
To modify your logging values you will need to uncomment and modify the following snippets of code:
When creating new users and admins it is not ideal nor secure to manually set a password for each one. You can instead enable email registration which will allow you to instead send e-mail invitations by checking the Send email invite option. This will send an email invite to the new user containing a link to your instance and allow them to set a password.
To enable e-mail support, you will need to add the below lines to your .env file and then you can send new users registration notifications!
Keep in mind smtp is but one of several available delivery options.
Increasing Your Session Lifetime
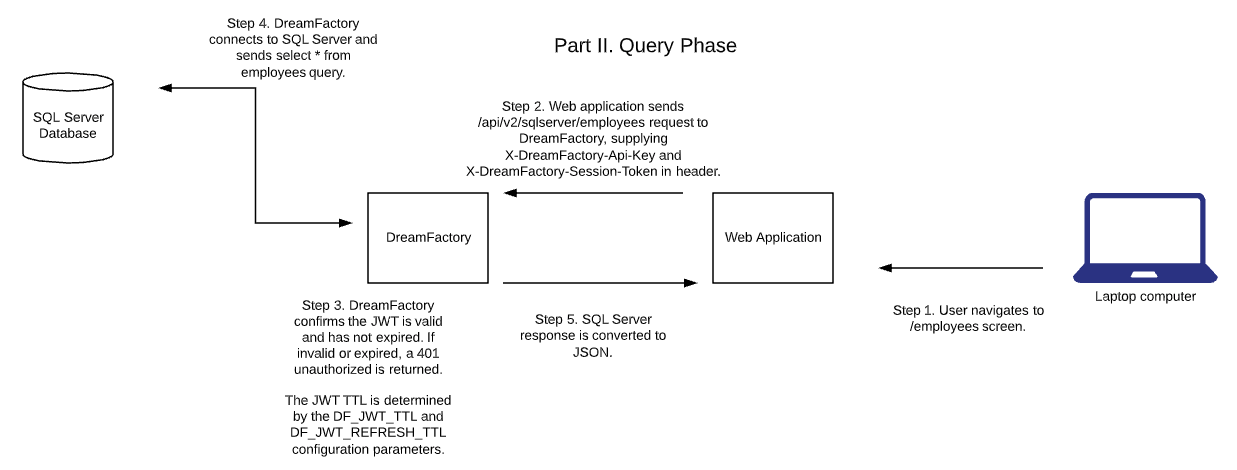
For security reasons DreamFactory sessions are limited to 60 minutes. You can however change the lifetime to any desired duration by opening your .env file and finding the following variable:
#DF_JWT_TTL=60
Change DF_JWT_TTL to any duration you please, defined in minutes. For instance, the following settings will persist your session for a week:
DF_JWT_TTL=10080
Updating Your DreamFactory Docker Environment
Our DreamFactory environment is still a work-in-progress, however many users are actively using it thanks to Docker’s streamlined configuration and deployment options. Occasionally you’ll want to update to a newer version of DreamFactory so we’ve assembled the following instructions as a guide.
You are presumably reading this section with the intention of upgrading a DreamFactory production environment. As with any software, things can and do go wrong with upgrading production environments, and therefore you are urged to possess a readily accessible file and system database backup and recovery plan before attempting an upgrade. You have been warned!
Begin by opening a terminal and entering your DreamFactory instance’s root directory. Then execute this command:
A couple of lines of output will be returned, however you should only copy the line beginning with APP_KEY into a text file. Keep in mind at a minimum you’ll need to copy down the APP_KEY value. If you’ve overridden other defaults, such as the type, location, and credentials associated with the system database, you’ll need to copy those too. It is very important you perform this step otherwise you’ll run into all sorts of upgrade-related issues.
Next, run the following command:
$ git tag --list
2.1
2.14.1
2.2
2.2.1
...
This displays all of the tagged versions. Begin by stopping the running DreamFactory container without deleting it. Keep in mind that when you run this command, your DreamFactory instance will go offline until the upgrade process is completed:
For the purposes of this example we’ll presume you’re running 2.12 and want to upgrade to 2.14.1. To do so you’ll first want to checkout the 2.14.1 tag:
$ git checkout tags/2.14.1
Next, you’ll need to add that APP_KEY to the docker-compose.yml file. Open docker-compose.yml in your code editor, scroll down to the web service, and add the APP_KEY property and associated value alongside the other environment variables:
It is crucial that you encapsulate the APP_KEY value within single quotes, and additionally escape with a backslash any forward slashes appearing in your key! As an example, compare the APP_KEY entry found above with the output displayed earlier.
Save these changes, and then rebuild your container using the following command:
$ docker-compose up -d --build
Once complete, you can run the following command to confirm the containers are up and running:
$ docker-compose ps
      Name                     Command               State          Ports
--------------------------------------------------------------------------------
df-docker_mysql_1   docker-entrypoint.sh mysqld      Up      3306/tcp, 33060/tcp
df-docker_redis_1   docker-entrypoint.sh redis ...   Up      6379/tcp
df-docker_web_1     /docker-entrypoint.sh            Up      0.0.0.0:80->80/tcp
If something has gone wrong, and one of the containers indicates it has exited, you can view the logs for that container:
$ docker-compose logs web
Presuming the containers are up and running, you’ll next want to determine whether the DreamFactory system database schema has changed. To do so run this command:
$ docker-compose exec web php artisan migrate:status
If you see Y in the tabular output’s Ran? column, then the schema has not changed. If you see N at any point, then you’ll need to run the following command to update your system database schema:
$ docker-compose exec web php artisan migrate
Finally, you’ll want to clear your application and configuration caches by executing the following commands:
$ docker-compose exec web php artisan config:clear
Configuration cache cleared!

$ docker-compose exec web php artisan cache:clear
Cache cleared successfully.
With that done, open your DreamFactory instance in the browser, and confirm the environment is operational.
Installing and Configuring DreamFactory on CentOS
First pull in the CentOS Docker image.
$ docker pull centos
Then I start the image in a detached state.
$ docker run -itd {Container_ID}
Once the image is running we can enter it and begin installing DreamFactory.
$ docker exec -it {Container_ID} /bin/bash
From here, rather than copying and pasting a lengthy list of commands, we can use the DreamFactory Installer as described above.
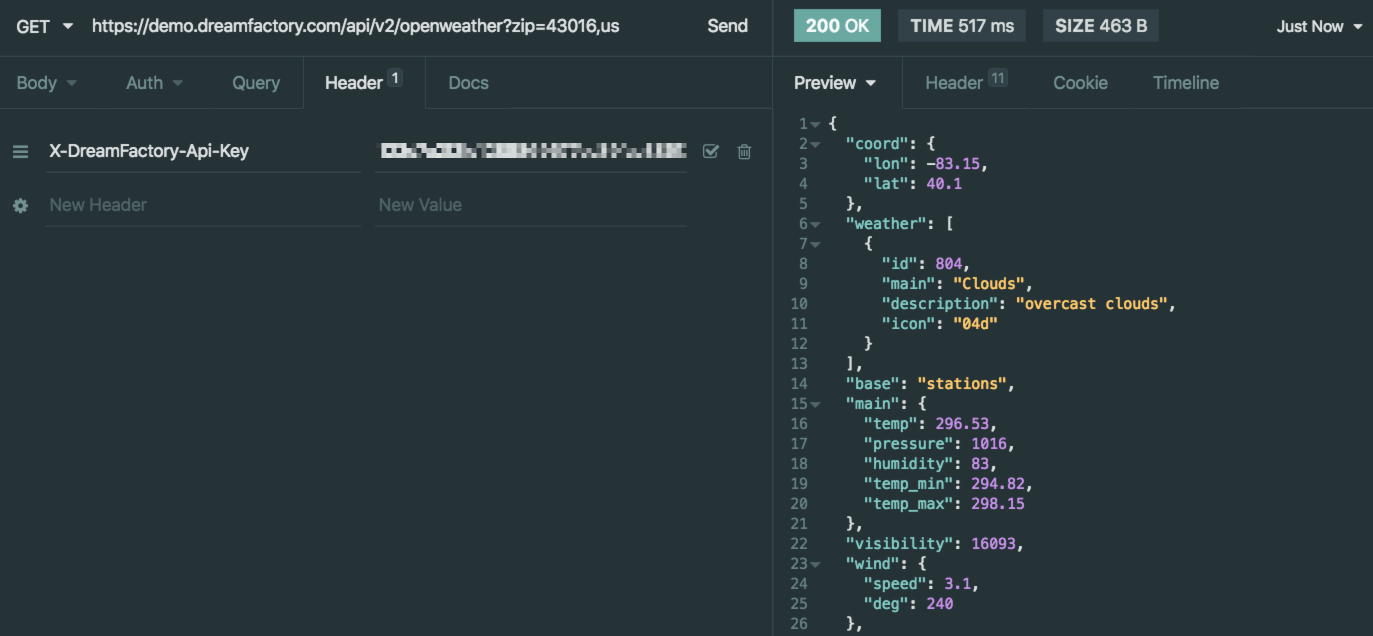
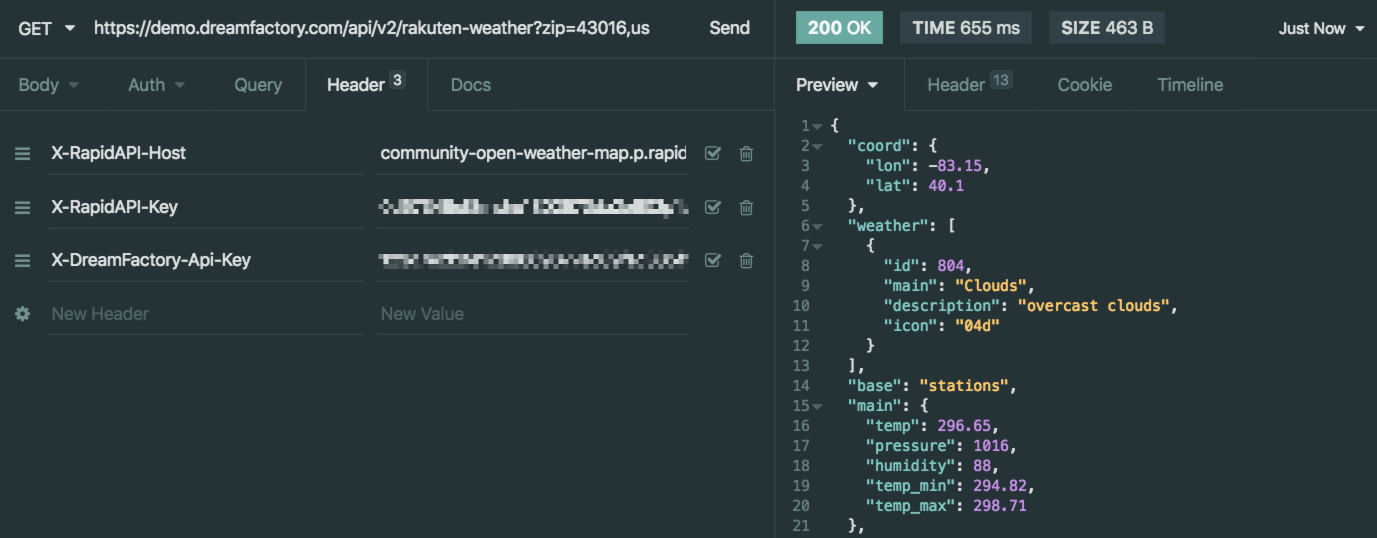
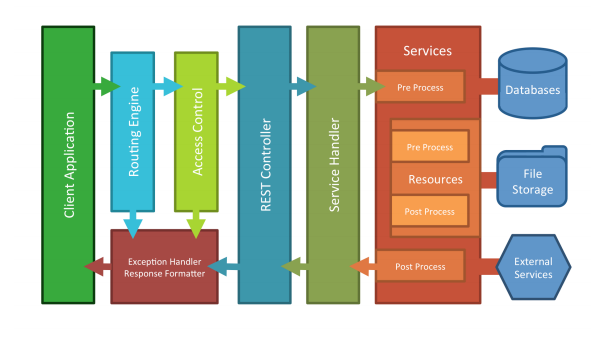
Whether your API consumer is an iPhone or Android application, a SPA (Single Page Application), or another server altogether, that consumer is often referred to as the client. The client issues HTTP requests to the REST API, parsing the responses and reacting accordingly. Although in most cases your team will use libraries such as Alamofire or Axios to manage these requests, you’ll often want to interact with the APIs in a much more fluid manner during the investigatory and learning phase. The API Docs feature serves this need well, however the API Docs interface lacks the ability to bookmark and otherwise persist queries, manage parameters programmatically using variables, and other features useful for maintaining a set of easily accessible configurations.
Fortunately, there are a number of HTTP clients which fill this void very well. Two of the most popular are Insomnia and Postman, which are available on OSX and multiple operating systems, respectively. In this section we’ll introduce you to both HTTP clients, and as an added bonus talk about the ubiquitous cURL client which is quite possibly the most popular piece of software you’ve never heard of.
Insomnia
Insomnia is a cross-platform REST client, built on top of Electron. Insomnia is realtively new on the scene compared to cURL and Postman but offers a bevy of features that certainly make it competitive. They have a very slick UI, and a ton of features, including a team option.
Postman
Postman is a tried and true GUI interface with great docs to help you set up your testing environment. They have plans for everyone, from free solo users to large, enterprise teams. Postman also has a great feature called API Network, which has sample API calls from all sorts of sources. It is definitely worth a look.
cURL
cURL’s lack of a polished interface may lead you to believe it’s inferior to Insomnia and Postman. Not so! cURL is an incomparably capable bit of software. cURL is a command line tool and library for transferring data with URL syntax, supporting HTTP, HTTPS, FTP, FTPS, GOPHER, TFTP, SCP, SFTP, SMB, TELNET, DICT, LDAP, LDAPS, FILE, IMAP, SMTP, POP3, RTSP and RTMP.
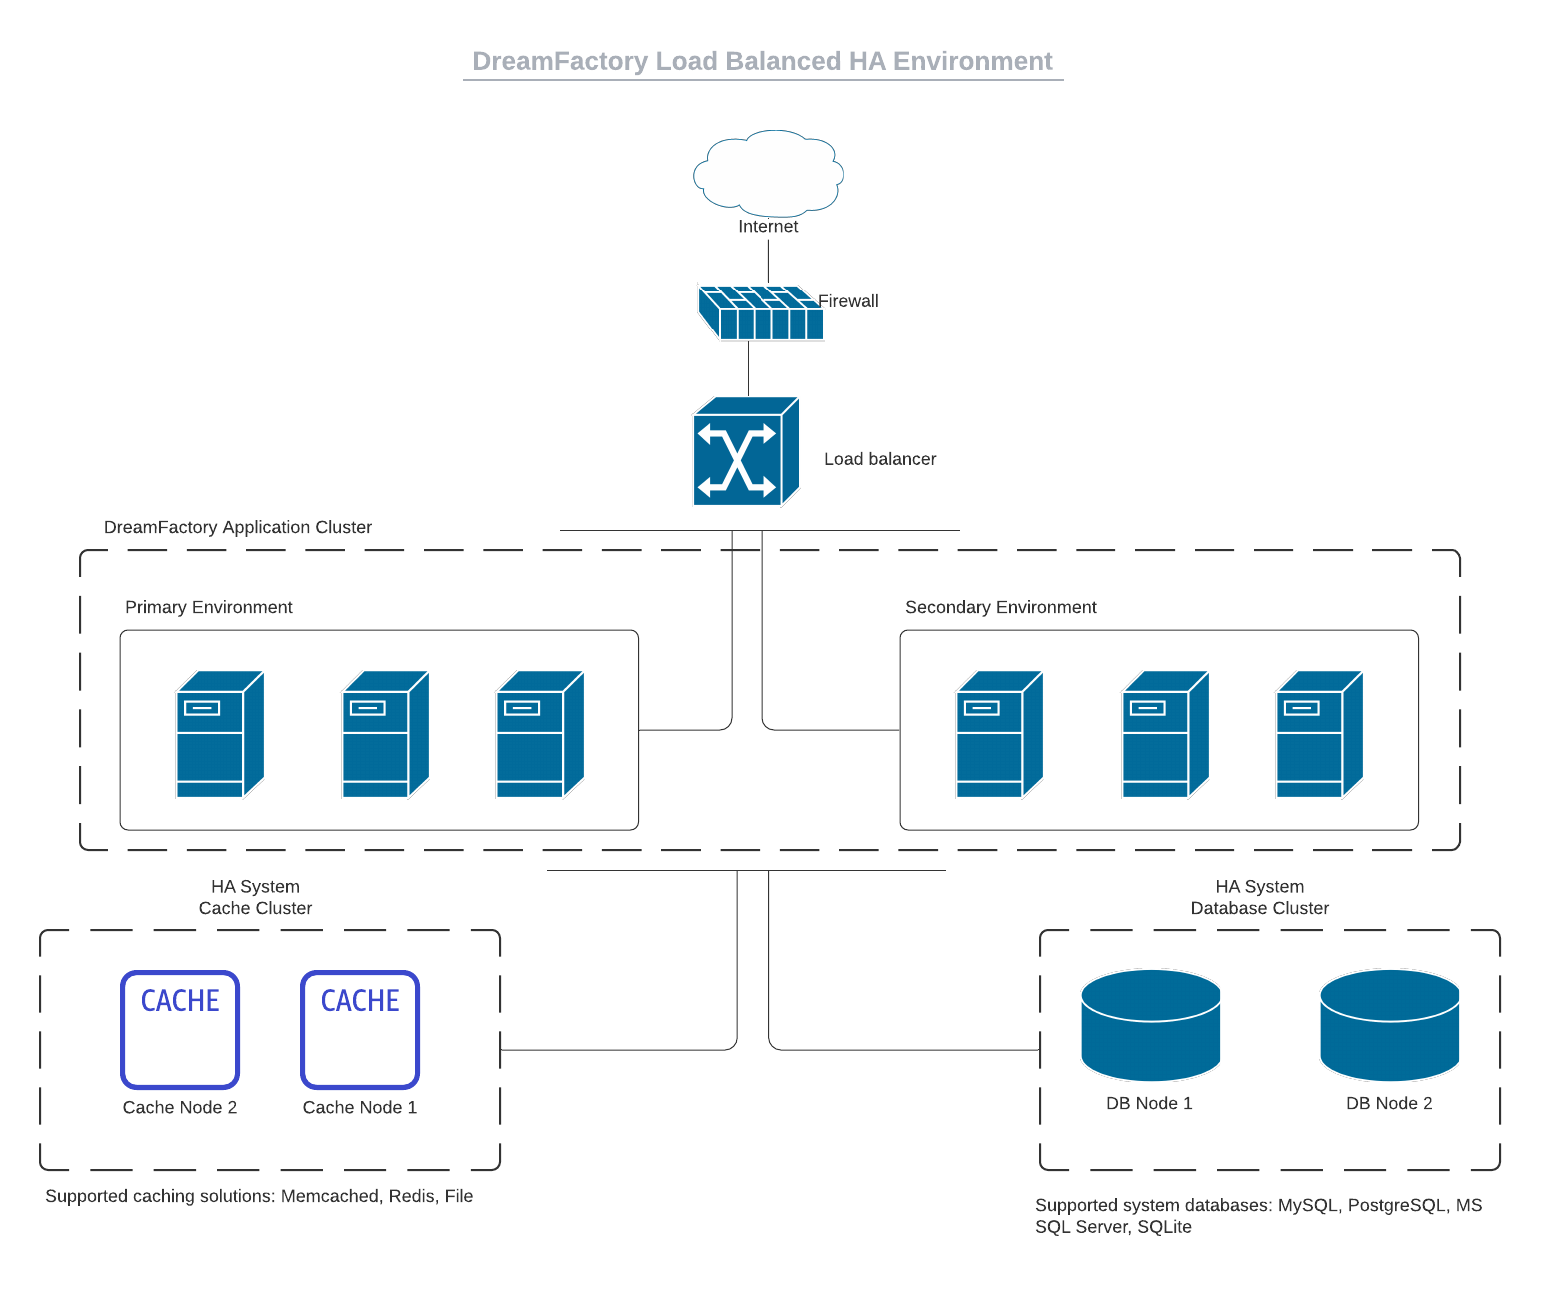
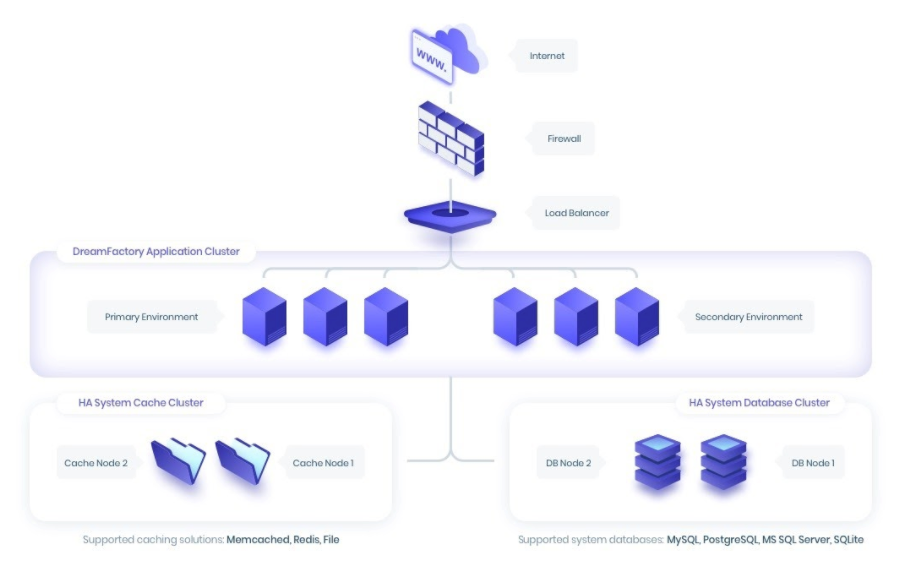
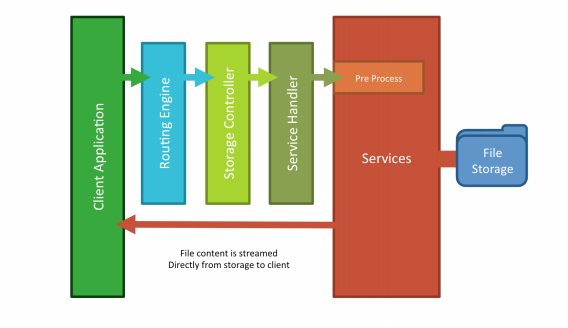
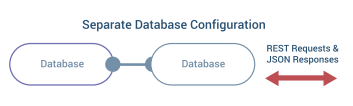
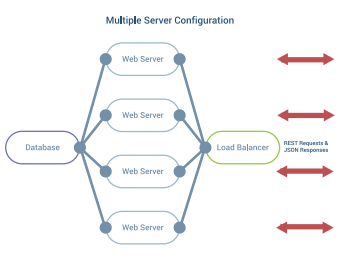
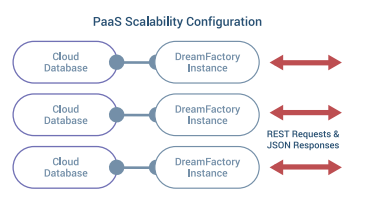
Running DreamFactory in a High Availability, Load Balanced Environment
Most high API volume request users are running DreamFactory in a highly-available, load balanced environment. The following diagram depicts this approach:
If you’re not interested in running the DreamFactory platform itself in an HA cluster then disregard the “Secondary Environment” found in the “DreamFactory Application Cluster” tier however the remainder of the diagram would still apply in a purely load balanced environment. In either case, the load balanced DreamFactory instances would be backed by a caching and system database tier. For caching DreamFactory supports Memcached and Redis. On the system database side, DreamFactory supports MySQL, PostgreSQL, and Microsoft SQL Server.
Using the Bitnami Installers
These instructions are for configuring the drivers to work with DreamFactory’s commercial Bitnami edition.
Bitnami Linux Oracle
To begin, follow steps 1-3 found in this section of the Bitnami documentation:
Once that’s done, you’ll want to complete one more step. SSH into the server where your DreamFactory Bitnami installation is hosted, and navigate to the /php/bin directory found inside the installation directory. For reference purposes, we’ll use the INSTALL_DIR placeholder to refer to this directory/
$ cd /INSTALL_DIR/php/bin
Next, run the following command, making sure you prefix the php command with ./:
The value of Loaded Configuration File identifies the location of Bitnami’s php.ini configuration file. Keep in mind your path might be different from the example presented above. Open this php.ini file with a text editor and search for this line:
;extension=oci8.so
Uncomment it by removing the semicolon and save the changes. Now restart Bitnami’s Apache server:
$ cd /INSTALL_DIR/
$ ./ctlscript restart apache
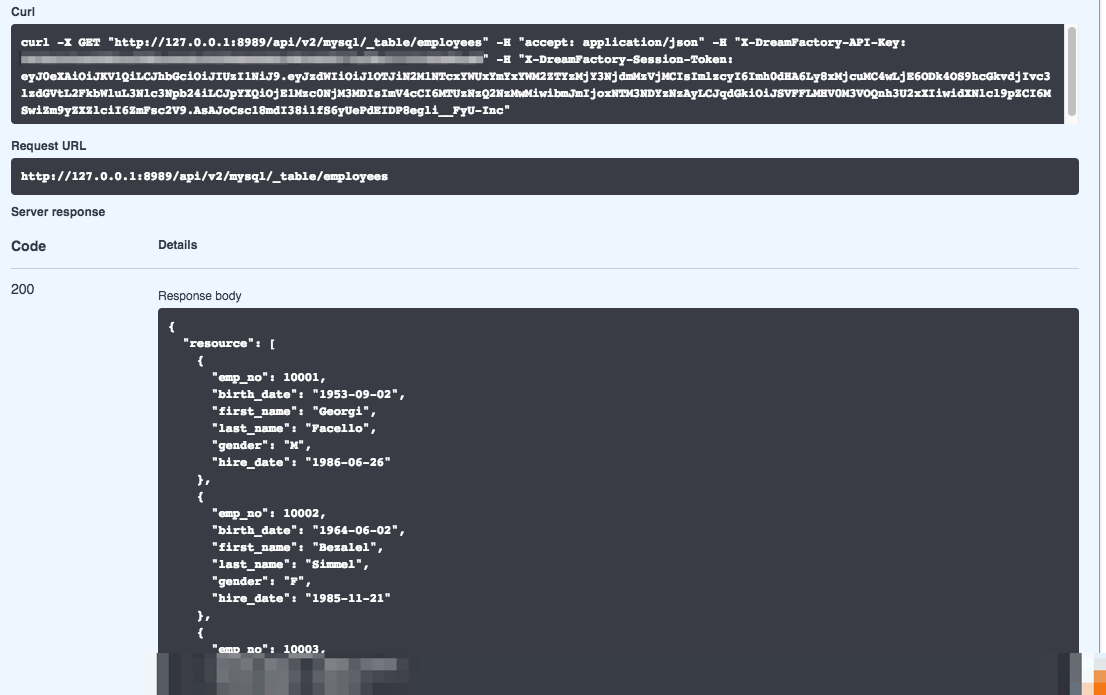
Once restarted your DreamFactory Bitnami instance is capable of connecting to an database. After configuring a new API using DreamFactory’s service connector, head over to the API Docs tab to confirm you can connect to the database. One of the easiest ways to do so is by executing the following endpoint:
GET /_table Retrieve one or more Tables.
Executing this endpoint will result in a list of tables being returned from the connected database.
Configuring Firebird for DreamFactory
These instructions are for installing the Firebird driver from its source code.
Install the Firebird driver
cd /tmp
git clone https://github.com/php/pecl-database-interbase.git
cd pecl-database-interbase/
apt-get install firebird-dev autoconf build-essential
phpize --clean
phpize
./configure
make
make install
Once downloaded, you will want to enable the driver in your php.ini file. After that, the extension will appear in the list of enabled extensions.
php -m
[PHP Modules]
Troubleshooting
If you receive a 500 error with the message of The Response content must be a string or object, make sure your database is configured for UTF8.
Configuring Microsoft SQL Server for DreamFactory on Windows
Download SQL Server driver package. Unpack downloaded .zip and move files php_sqlsrv_81_nts.dll , php_pdo_sqlsrv_81_nts.dll to your PHP extension directory. Get rid of the _81_nts sufix in both file names.
Note: To determine whether your installed version of PHP is thread-safe or not, you can execute the following command in your command prompt or terminal:
php -i|findstr "Thread"
This command will return one of the following lines:
Thread Safety => enabled: This means that your PHP installation is thread-safe.
Thread Safety => disabled: This means that your PHP installation is not thread-safe.
Lastly, in case of running PHP on a web server, it is recommended to restart the server. Afterwards, use the command php -m to retrieve a list of installed modules, and search for sqlsrv and pdo_sqlsrv within the list.
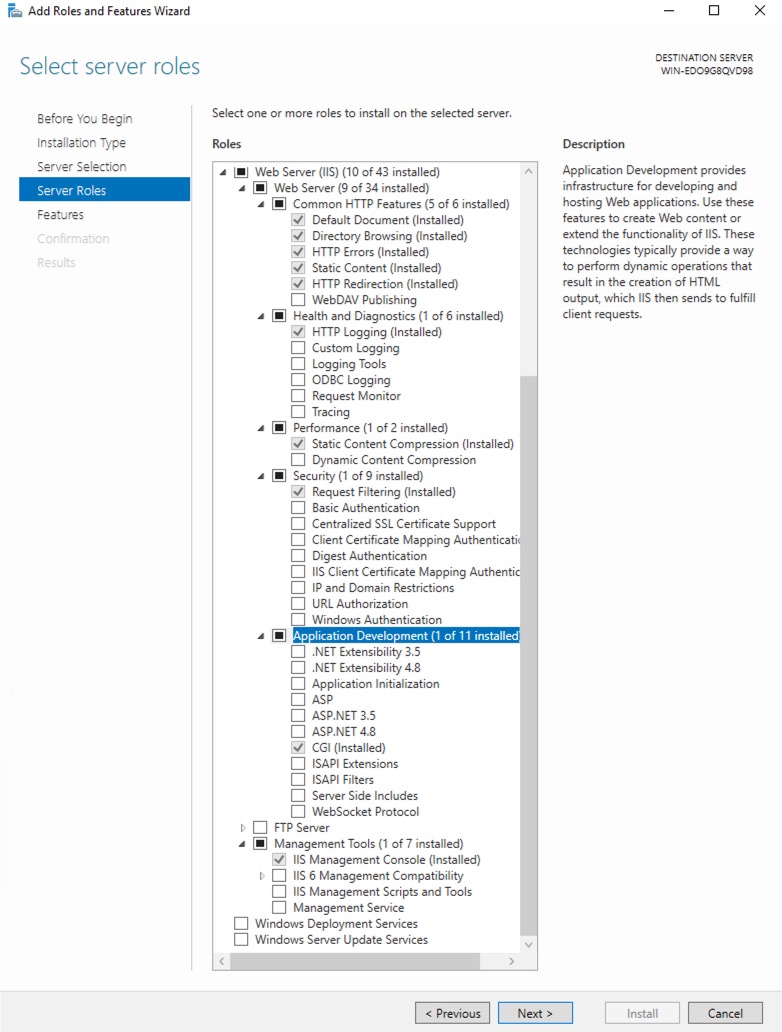
Installing DreamFactory on Windows Server with IIS10
Note: These installation instructions assume a “Clean Install” for IIS. There may be sections which have already been accomplished or installed. If so, skip the sections which no longer apply to your situation. These instructions are concerned only with the installation of DreamFactory. Please consult your Windows Administrator for hardening the web server and other security controls which are outside the scope of these instructions.
Installing DreamFactory on Windows Server 2022 with IIS10
Before proceeding, ensure that you have installed Visual C++ Redistributable. The download link can be found in the official documentation provided by Microsoft.
It is unfortunate that the Web Platform Installer has been retired. However, there is no need to worry as we will demonstrate a quick method for manually installing PHP 8.1.
Use this link to download the NTS PHP 8.1 package. Extract all files from downloaded .zip to the previously created folder e.g C:\PHP8.1\.
After extracting the files, you will need to choose either php.ini-development or php.ini-production and rename it to php.ini. This file is used to specify which extensions or settings to enable in PHP.
To configure PHP properly, you will need to open the php.ini file and modify the following settings:
Set extension_dir to the ext folder located in your PHP directory (e.g. C:\PHP8.1\ext).
Uncomment (i.e., remove the ; character from the beginning) some useful lines in the php.ini file. You can use the search function to locate these lines easily:
Once PHP has been successfully installed, it must be set up in IIS10.
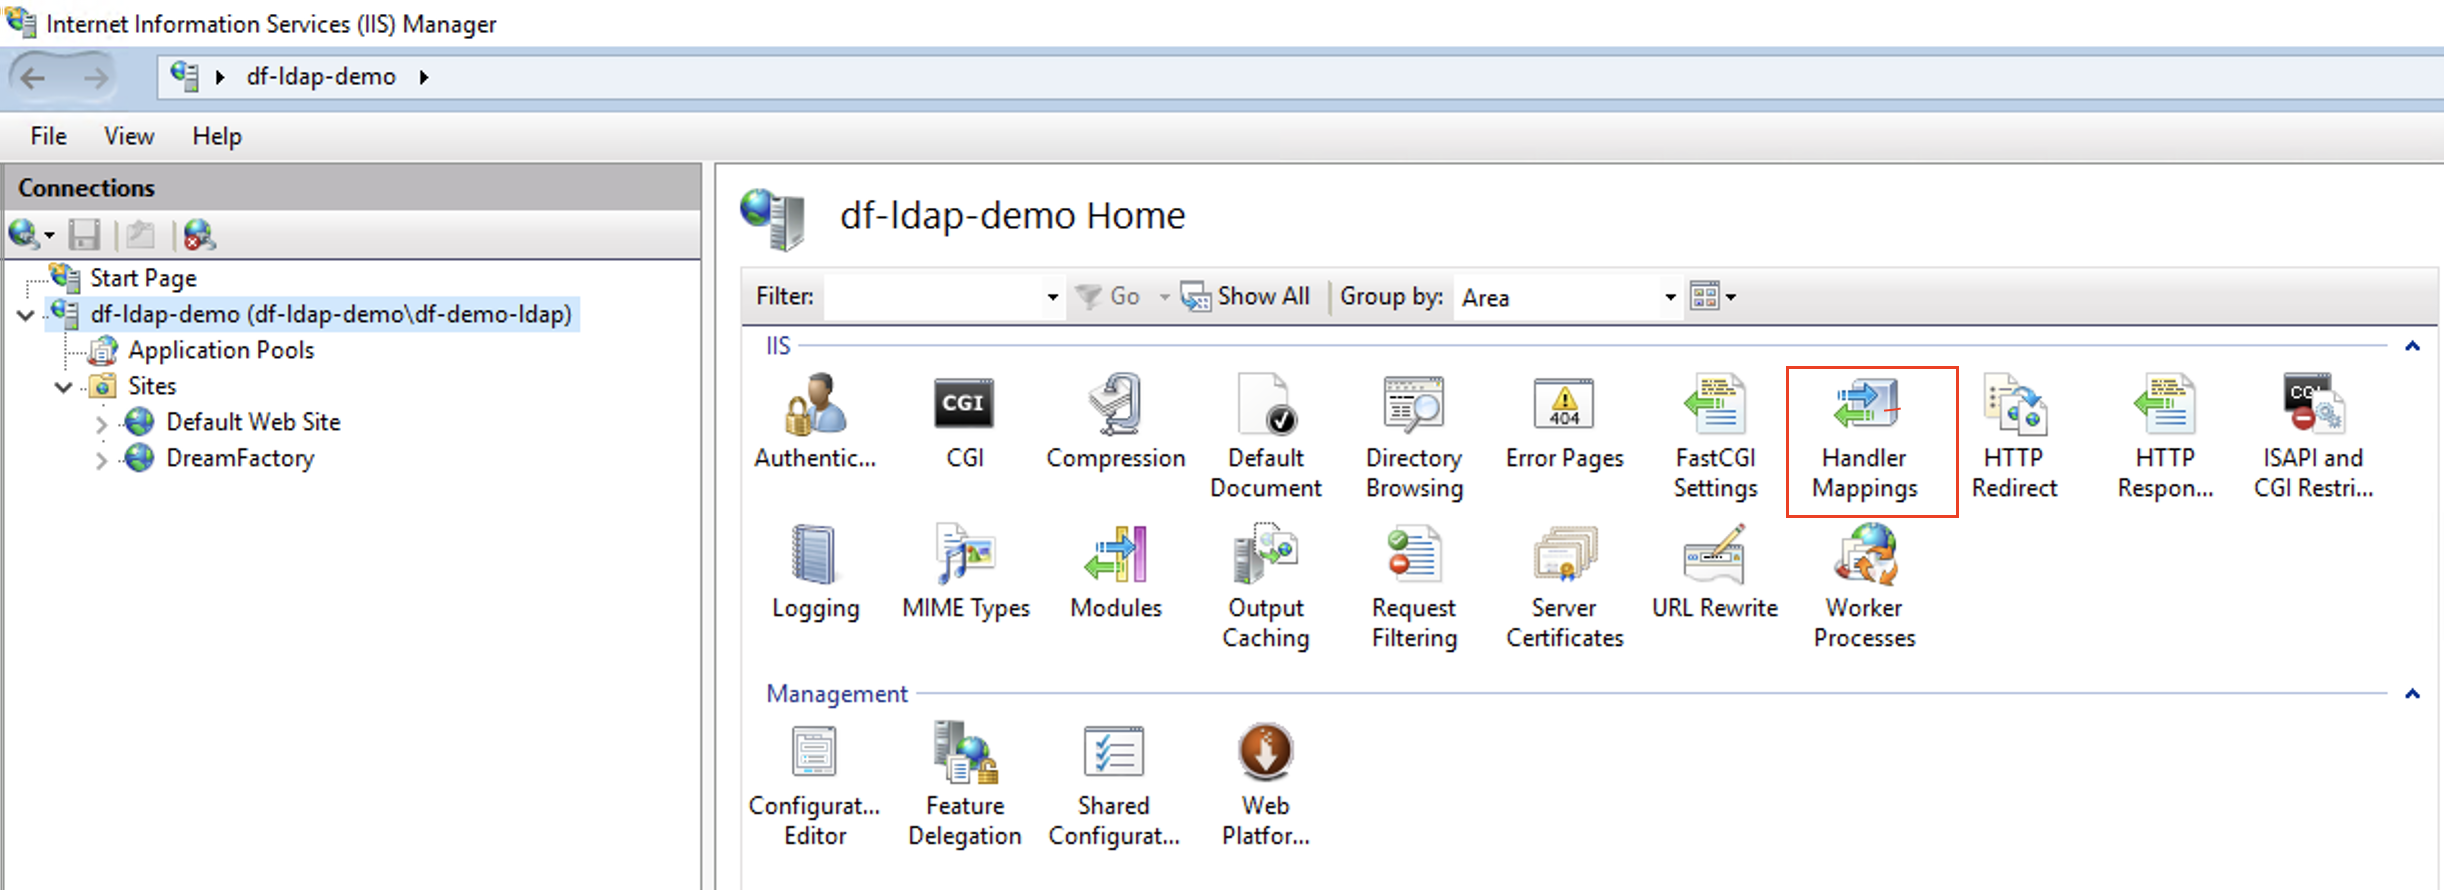
Open the IIS Services Manager and from the sidebar, click the server name.
Double-click Handler Mappings PHP needs to be associated with the FastCGI handler in your PHP directory.
Note: If PHP was installed using the Web Platform Installer the handler mappings should have the FastCGI associations already. Check that the associations are correct and correspond to your local server.In the list of handler mappings the name of the mapping defaults to PHP_via_FastCGI,this is the mapping you will need to doublecheck. Click OK.
If the default handler mapping for PHP FastCGI isn’t listed you will need to add it now:
In the features pane in your IIS manager, double click on the Handler Mappings feature.
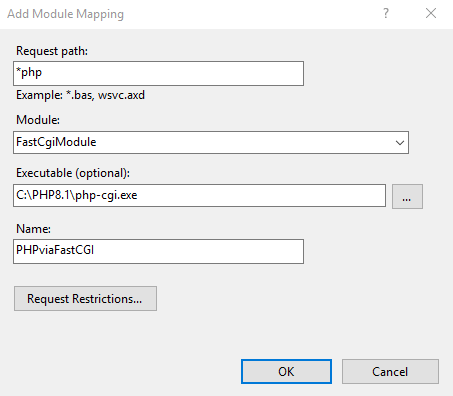
Once open, click Add Module Mapping on the right hand side. Enter the following information with the path to the php-cgi executable local to the server. Here is our case:
Variables
Values
Request Path
*.php
Module
FastCgiModule
Executable
“C:\PHP8.1\php-cgi.exe”
Name
PHPviaFastCGI
Click OK, then click Yes to confirm.
Using Internet Information Services (IIS) Manager click on the server you are working with and click Restart from the actions pane.
Note: Make sure that you added FastCgiModule while configuring your IIS web server.
Test PHP for IIS
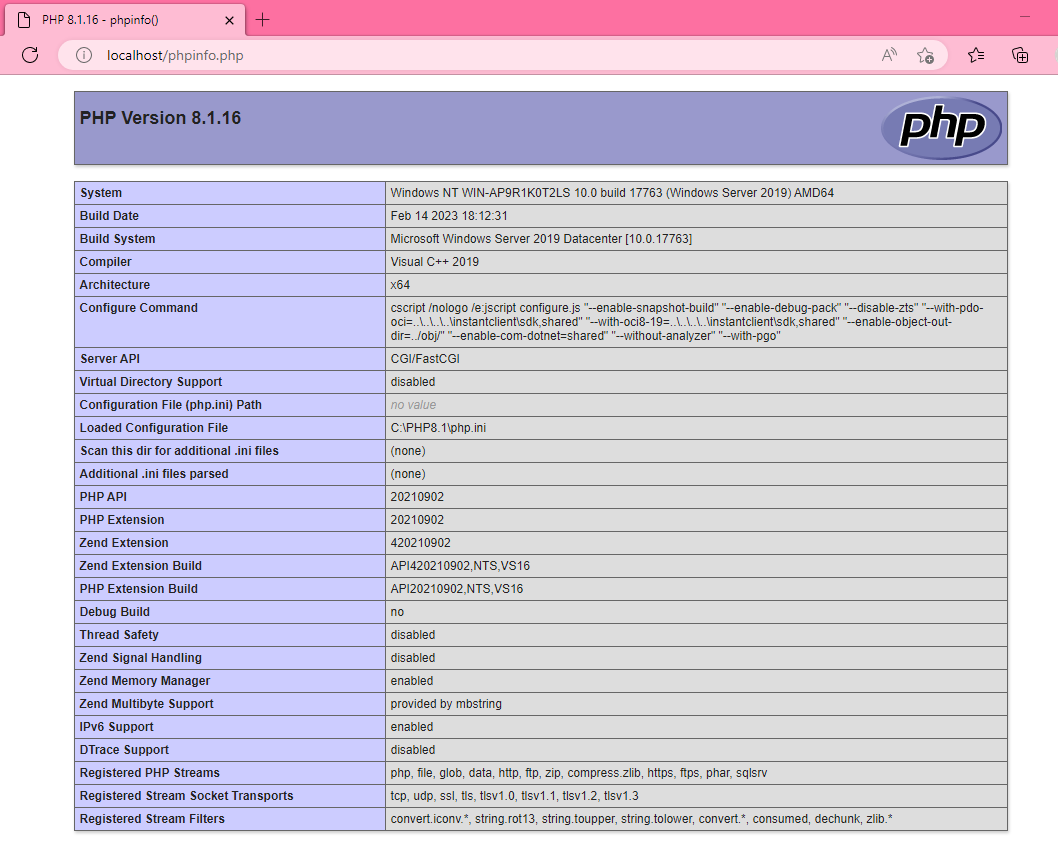
To test PHP, we are going to create a php info file within the web root directory. Typically, this directory is located in:
C:\inetpub\wwwroot
In the webroot directory, create an empty PHP file. At the top of file the type the following:
<?php phpinfo();
Save the file as info.php. Ensure the filename and extension are phpinfo.php, not phpinfo.php.txt. This would be not shown if Hide Extensions for known file types is enabled from Folder Options. Make sure this is unchecked, if need be from Folder Options:
From a browser, navigate to the phpinfo file you just created. Typically, on a fresh server install it will be http://localhost/phpinfo.php in your web browser.
If you receive a 404.0 error, typically the problem is either that the extension is not .php or that file permissions are set incorrectly. If you receive a 403.3 error with the following message, MIME types must be set up correctly for PHP, please ensure that you followed the IIS PHP setup section above. If you are seeing a blank page, you may need to enable errors for debugging purposes in your php.ini file. Alternately, you can view the output of the php error.log for more info.
If the install was successful, you should see a PHP Info page in your browser. Keep this file in place until you finish the rest of the configuration, then delete it afterwards, as this file contains system-specific information.
Once you have PHP set up and working with IIS, you are ready to install DreamFactory and add it as a site in IIS 10.
Install DreamFactory on IIS 10
You need ensure you have Git, Composer, and optionally the MongoDB Driver, if needed. After completing that, the following describes how to install Dreamfactory on IIS 10.
Note: We will be using SQL Server as an external service database for DreamFactory. If you haven’t already, you will need to purchase a DreamFactory subscription before installing, so the appropriate dependencies can be added to your installation. Please contact Support for additional information. If you decide to not upgrade, you can still install this by skipping the df:env command and go straight to the df:setup command. This will create an SQLite database as your system database (which is the default in all of our GitHub installs).
Next, open a command prompt, Power Shell, or Windows Git Client
From the prompt, navigate to the directory you want to install DreamFactory. Typically, this will be:
C:\inetpub\wwwroot\
However you can choose any location you want. We will add this as a site later in IIS. In this example, we’re choosing:
C:\inetpub\wwwroot\dreamfactory
Perform a Git clone into this directory for DreamFactory:
This will pull down the master branch of DreamFactory into a directory called ./dreamfactory.
Navigate to the dreamfactory directory and install dependencies using composer. For production environment, use --no-dev, otherwise discard that option for a development environment. If you are not running or plan to run MongoDB, add —ignore-platform-reqs:
composer update --ignore-platform-reqs --no-dev
Otherwise run the following command to install the dependencies:
composer install --no-dev
Run DreamFactory setup command-line wizard. This will set up your configuration and prompt you for things like database settings, first admin user account, etc. It will also allow you to change environment settings midway and then run it again to complete the setup.
As with our other installs, the first command lets you choose and configure your system database (SQLite, MySQL, PostgreSQL, or MSSQL). You can also change the environmental settings here.:
php artisan df:env
The second command enables you to finish the configuration, adding your first admin account, etc.
php artisan df:setup
Follow the on-screen prompts to complete the setup.
Add DreamFactory Site to IIS Manager
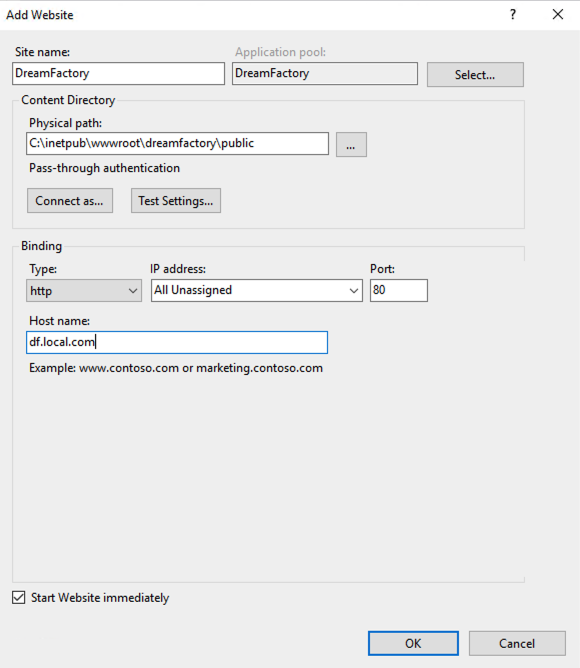
Open IIS Manager
From the Actions column, select Add Web Site
Enter in all pertinent information in the dialog. In the Physical Path field, enter the path to your DreamFactory installation’s public folder.
Enter your Host name as well for your instance.
Click OK to start the service.
Note: Make sure that your DreamFactory site is the default site. By default, there will be a site above your DreamFactory site call “Default Web Site”. If you are not able to access DreamFactory on the set URL, try deleting the “Default Web Site”
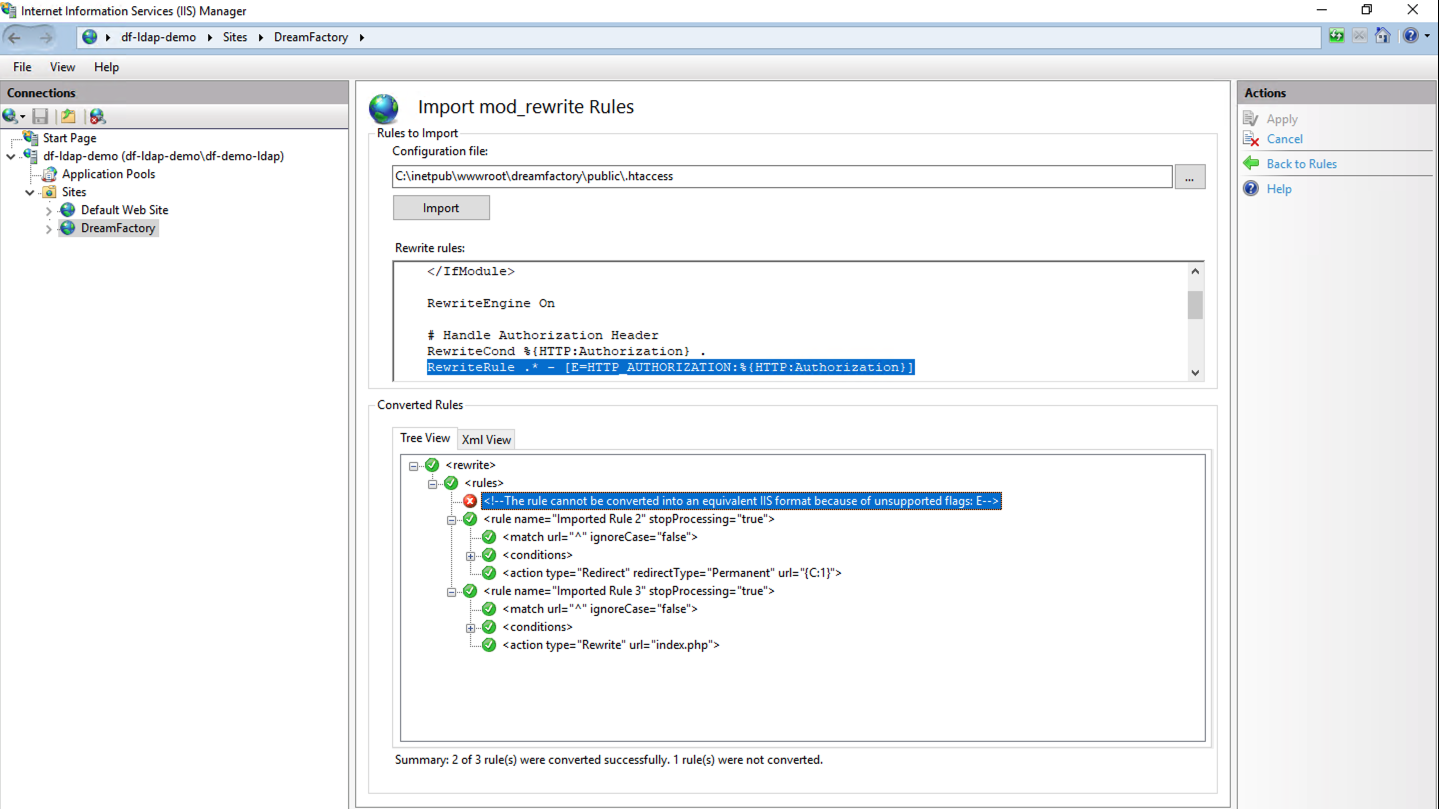
Add URL Rewrite Rules to IIS
You will need to add rewrite rules to IIS 10 manually. To accomplish this follow the below steps:
Click on the DreamFactory site and then choose URL Rewrite.
Note: If you clicked on the DreamFactory site but can’t see URL Rewrite icon you will need to install IIS URL Rewrite 2.1. Follow this link to download and install it.
From the Actions column, choose Import Rules.
Navigate to the .htaccess file in the /public directory of your DreamFactory installation in the Configuration File input, then click Import. The .htaccess file will automatically be converted to XML for you.
In Tree View, find any rules that have a red X icon. Click on that rule and it will be highlighted in the Rewrite Rules dialog box.
Remove that rule in the Rewrite Rules dialog box and repeat this for any additional rules until you see all green checkboxes.
Click Apply in the Actions column.
Add your IIS host to the hosts file
Once that is done, the last step is to add your host ( DreamFactory site in IIS) to your hosts file. The hosts file should be located here -
C:\Windows\System32\drivers\etc
Once you have located the file, edit it to add the entry to add the IP address and the hostname of your DreamFactory IIS setup - example
10.10.10.10. df.local.com
Ensure DreamFactory Cache and Log Directories are Writable
You will need to set permissions on the following directories to ensure they are writable within the DreamFactory installation folder. These are:
storage/framework/cache/
storage/framework/views/
storage/logs/
Please ensure that the Users group has full control of these directories to enable creation of log files, cache files, etc. Optionally, if you are using the included sqlite database for testing, please ensure the storage/databases/ directory also has write and modify permissions as well. Restart your web server and navigate to your DreamFactory installation. If you are testing in the local environment, you can add a FQDN in your hosts file to allow navigating to the Dreamfactory site locally.
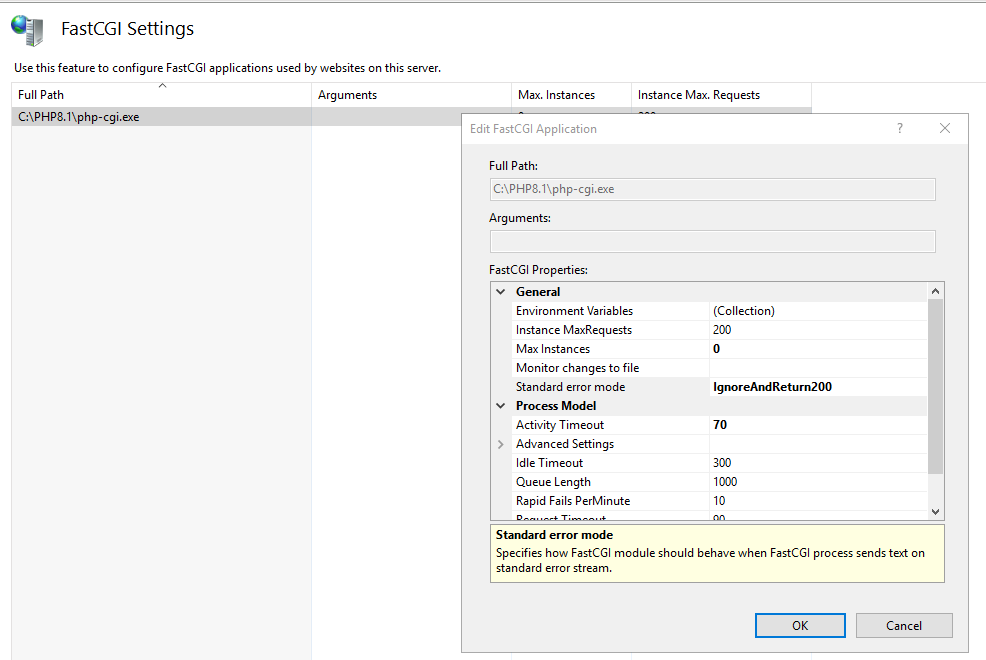
Reminder!
Please ensure that the FastCGI settings are configured with the Standard error mode set to “IgnoreAndReturn200” as shown in the screenshot below:
Configuring Apache on Windows with DreamFactory
Although DreamFactory’s handy linux installers include configurations for both nginx and Apache out of the box, for Windows (if you want to use Apache rather than IIS as explained above) we will need to do some configuration. Below is a basic guide to installing Apache on Windows. You should contact your Windows Administrator for security controls and specific configurations your organization may require.
Reminder!
Remember to run things (e.g. the command prompt) as an administrator when working with Windows.
Installing Apache
Installing Apache on Windows is a relatively painless task. A Win64 binary is available from Apache Lounge and after download can be extracted to c:\. (Actually you can put it where you like, you just need to change the pathing in the httpd.conf file). After you have extracted the file, download the Visual C++ Redistributable VC_redist.x64.exe, which is also available on the Apache Lounge website, and run the program.
Now, to test, open up a command prompt, go to c:\Apache24\bin and run the httpd command. If you go to localhost you should see “It Works!” in the browser window.
Configure PHP with Apache
We must use the thread safe version of php in order for it to work with Apache. This can be downloaded from the PHP Website and for the sake of simplicity should be extracted to c:\php.
The PHP .ini file, as a minimum, should have the following extensions uncommented:
PHP should then be added to to your path -> Search for “environment” in the Windows search box and then click “Edit the system environment variables”, go to the advanced tab, and click “Environment Variables”. Under System variables select “Path” and then “Edit” and then “New”. Add c:\php and save. The path should be at the bottom of the list.
Now we will tell Apache about PHP. Go to c:\Apache24\conf and open the httpd.conf configuration file. At the very bottom add the following:
# PHP 81 Module
# configure the path to php.ini
PHPIniDir "C:/php"
# before PHP 8.0.0 the name of the module was php7_module
LoadModule php_module "c:/php/php8apache2_4.dll"
<FilesMatch \.php$>
    SetHandler application/x-httpd-php
</FilesMatch>
and then uncomment the following modules in the LoadModule section:
We can test everything is working by creating a info.php file at Apache24/htdocs with the following line:
<?php phpinfo() ?>
Delete default index.html file, restart httpd and go to localhost. You should see the php information screen.
Configure DreamFactory with Apache
Finally, we need to get DreamFactory and Apache talking to each other. For this example, it assumed that DreamFactory has been installed to c:/dreamfactory.
First, go back to our httpd.conf file for Apache, and find the line DocumentRoot "${SRVRoot}/htdocs". Here we will change the DocumentRoot, the Directory, and the configuration.
Replace everything from ‘DocumentRoot’ to ‘</Directory>’ with the following:
DocumentRoot "c:/dreamfactory/public"
<Directory "c:/dreamfactory/public">
	AddOutputFilterByType DEFLATE text/plain text/css application/json application/javascript text/xml application/xml application/xml+rss text/javascript
	Options -Indexes +FollowSymLinks -MultiViews
	AllowOverride All
	AllowOverride None
	Require all granted
	RewriteEngine on
	RewriteBase /
	RewriteCond %{REQUEST_FILENAME} !-f
	RewriteCond %{REQUEST_FILENAME} !-d
	RewriteRule ^.*$ /index.php [L]

	<LimitExcept GET HEAD PUT DELETE PATCH POST>
		Allow from all
	</LimitExcept>
</Directory>
Save and run httpd -t from the command prompt (from c:\Apache24\bin) and you should not get any syntax errors. Start the server with httpd and go to localhost/dreamfactory/dist and you will be greeted by the login screen.
Setting up https on Apache
We can setup https on Apache using Virtual Hosts. For this example we will have dreamfactory run over http on port 80, and over port 443 at https://<yourservername>.
Go to your Apache httpd.conf file and first uncomment the module ssl_module in the LoadModule section.
Now, we will use our previous configuration, and assign it to a virtual host over port 80. Take the previous configuration and wrap it in a <VirtualHost *:443> ... </VirtualHost> tag and also provide a servername. It should end up looking like this:
Listen 80
<VirtualHost *:80>
	DocumentRoot "c:/dreamfactory/public"
	ServerName <yourservername>
	<Directory "c:/dreamfactory/public">
		AddOutputFilterByType DEFLATE text/plain text/css application/json application/javascript text/xml application/xml application/xml+rss text/javascript
		Options -Indexes +FollowSymLinks -MultiViews
		AllowOverride All
		AllowOverride None
		Require all granted
		RewriteEngine on
		RewriteBase /
		RewriteCond %{REQUEST_FILENAME} !-f
		RewriteCond %{REQUEST_FILENAME} !-d
		RewriteRule ^.*$ /index.php [L]

		<LimitExcept GET HEAD PUT DELETE PATCH POST>
			Allow from all
		</LimitExcept>
	</Directory>
</VirtualHost>
Now, copy everything and paste it below, changing the virtual host to 443, and adding the SSL configurations, so it ends up looking like the below:
Listen 443
<VirtualHost *:443>
	DocumentRoot "c:/dreamfactory/public"
	ServerName <yourservername>
	SSLEngine on
	SSLCertificateFile "<path to your certificate>"
	SSLCertificateKeyFile "<path to your key>"
	<Directory "c:/dreamfactory/public">
		AddOutputFilterByType DEFLATE text/plain text/css application/json application/javascript text/xml application/xml application/xml+rss text/javascript
		Options -Indexes +FollowSymLinks -MultiViews
		AllowOverride All
		AllowOverride None
		Require all granted
		RewriteEngine on
		RewriteBase /
		RewriteCond %{REQUEST_FILENAME} !-f
		RewriteCond %{REQUEST_FILENAME} !-d
		RewriteRule ^.*$ /index.php [L]

		<LimitExcept GET HEAD PUT DELETE PATCH POST>
			Allow from all
		</LimitExcept>
	</Directory>
</VirtualHost>
Restart the Apache server and you should now have two sites, one over localhost, and one over https://localhost
TIP
If you want to redirect anything coming in over http to https, then you can simply edit the port 80 virtual host to the following:
On Linux, our installer can handle the process of configuring Oracle with DreamFactory for you. On Windows, the process is a little more involved, but is not too taxing. You will need to download three things:
The Oracle “Basic” Instant Client Package from the Oracle Website (for example instantclient-basic-windows.x64-21.3.0.0.0.zip).
The Oracle “SDK” Instant Client Package from the Oracle Website (for example instantclient-sdk-windows.x64-21.3.0.0.0.zip).
The PHP oci8 extension (DLL) available at pecl.php.net. By default, DreamFactory runs on PHP 8.1 so you will want the x64 package of that (version 3.2.1). If you are running DreamFactory using IIS as your webserver you will most likely be using the non thread safe version of PHP.
Note: If you followed our guide “Install PHP for IIS” to configure PHP 8.1, the oci8 extension should already exist in your PHP extension directory. To activate it, just in your php.ini file find extension=oci8_19 and uncomment it.
TIP
On Windows you can run php -i|findstr "Thread" in a terminal to find out whether your PHP is the (Non) Thread Safe version.
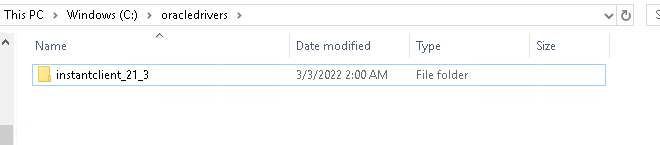
First create a folder where you would like to keep the oracle drivers, for example C:\oracledrivers and extract the Oracle “Basic” Instant Client there. The files will be extracted into a subdirectoy called instantclient_<version>. For example
C:\oracledrivers\instantclient21_3
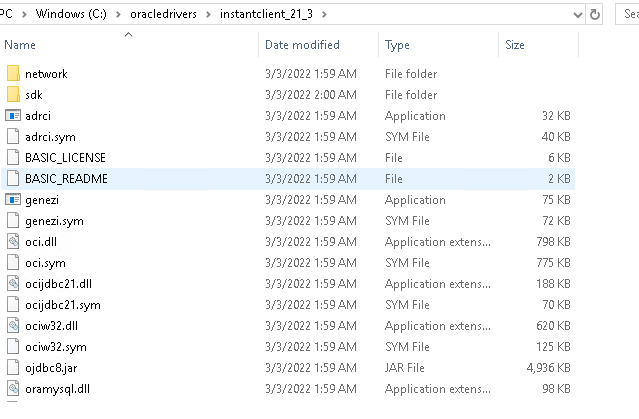
Next, we will extract our “SDK” Instant Client to the same folder i.e. in this example C:\oracledrivers. We want the SDK package to extract into the same subdirectory that was created in the step above, not a seperate one. As a result your drivers folder would end up looking like this:
and our subdirectory (instantclient_21_3 in this case) like this:
You will note that there is now a sdk folder inside.
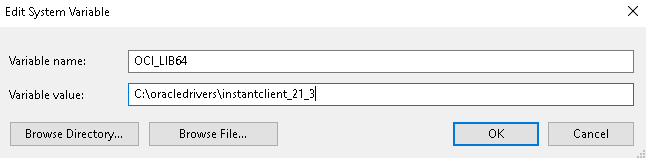
Next, we need to add the full path of the Instant Client to the environment variables OCI_LIB64 and PATH. In the Windows Control Panel go to “System and Security” -> “System” -> “Advanced System Settings”, click on Environment Variables and then:
Under System Variables, create OCI_LIB64 if it does not already exist. Set the value of OCI_LIB64 to the full path of the location of Instant Client.
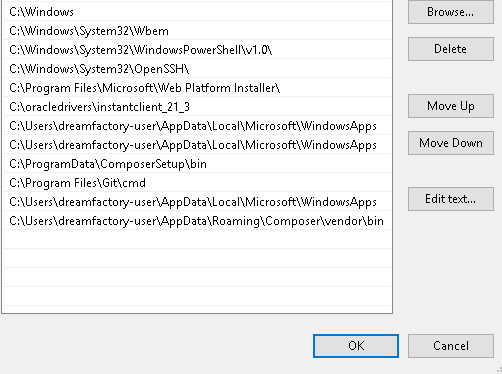
Under System Variables, edit PATH to include the same (C:\oracledrivers\instantclient_21_3)
Reminder!
When utilizing the IIS web server, it is essential to include a new variable PATH in your FastCGI environment.
For example, a new variable could be: %PATH%;C:\oracledrivers\instantclient_21_9.
Almost there! Now, the last thing to do is to extract our PHP OCI8 extension package (It will be named along the lines of php_oci8-3.2.1-8.1-nts-vc15-x64) and move the php_oci8.dll file to the ext directory where PHP is located on your system (e.g PHP\v8.1\ext). Once that is done add extension=php_oci8.dll to your php.ini file and then restart the server (use php -m to make sure that the oci8 extension is installed). Congratulations!
Troubleshooting Oracle Connections
DreamFactory uses PHP’s OCI8 library to connect to and interact with databases. Therefore successful installation of the client driver and SDK is a crucial part of the process. Sometimes it is useful to attempt a connection outside of DreamFactory in order to further isolate the problem. One way to do so is by placing the following PHP script on the same server where DreamFactory is installed:
<?php
    $conn=oci_connect("USERNAME","PASSWORD","HOST/DATABASE");
	if (!$conn) {
        $e = oci_error();
        echo 'Could not connect to :';
        echo $e['message'];

    } else {
        echo 'Successfully connected to ';
    }

oci_close($conn);
?>
Replace the USERNAME, PASSWORD, and HOST/DATABASE placeholders with your credentials, name the script .php or similar, and place it in the public directory of your DreamFactory installation. Then open a browser and navigate to https://YOUR_DOMAIN/.php. If the connection is successful you’ll see a corresponding message; otherwise you should see some additional details pertaining to the nature of the error.
Configuring SAP SQL Anywhere
SAP SQL Anywhere is the namesake commercial database solution offered by software giant SAP SE. If your organization relies upon SQL Anywhere, you’ll be pleased to know DreamFactory’s Silver and Gold editions include support for this powerful database! In this chapter we’ll walk you through the server configuration steps necessary to ensure your DreamFactory instance can interact with your SQL Anywhere database.
Installing the PDO and PDO_DBLIB Extensions
DreamFactory interacts with SQL Anywhere via the PHP Data Objects (PDO) extension. It works in conjunction with a database-specific PDO driver to interface with a wide variety of databases. Fortunately, the PDO extension and associated drivers are very easy to install. You can confirm whether PDO is already installed by running this command:
$ php -m
...
PDO
...
If PDO doesn’t appear in the list of installed extensions, just search your package manager to identify the PDO package. For instance on CentOS you would search for the PDO package like so:
With the desired PHP version identified you can then install it:
$ yum install php81-php-pdo.x86_64
Next you’ll want to install the SQL Anywhere driver. Confusingly enough, this driver is often identified as “Sybase” because SAP SQL Anywhere was known as Sybase SQL Anywhere prior to SAP’s 2010 Sybase acquisition, and the PHP community hasn’t gotten around to updating the extension’s name. On Debian/Ubuntu you can install the driver using this command:
$ sudo apt install php8.1-sybase
On CentOS this driver is identified “pdo-dblib”, because “dblib” is the name given to the library used to transfer data between the client and a database that supports a protocol known as tabular data stream (TDS - more about this in a bit). However as a convenience you can search the package manager for the term “sybase” and the desired drivers will be returned:
Now that you know the name you can install the desired version:
$ sudo yum install php81-php-pdo-dblib.x86_64
Once complete, run php -m again and confirm both PDO and the pdo_dblib extensions are installed:
$ php -m
...
PDO
pdo_dblib
...
With this step complete, let’s move on to installing and configuring FreeTDS.
Installing and Configuring FreeTDS
FreeTDS is an open source implementation of a protocol known as Tabular Data Stream (TDS). This protocol is used by both SQL Anywhere and Microsoft SQL Server as a means for passing data between the databases and their respective clients. Therefore your DreamFactory server requires a TDS library which allows it to talk to these databases, and FreeTDS suits that need nicely.
Open the /etc/freetds/freetds.conf
That said, DreamFactory will not work with the SAP-produced drivers. DreamFactory’s SAP SQL Anywhere support
One easy way to confirm the drivers are correctly installed and that your SQL Anywhere database can be reached is by running the following command inside your Linux shell. The SA_HOST, SA_PORT, SA_DB, SA_U, and SA_PWD are placeholders for your SQL Anywhere host IP or domain name, port, database name, username, and password, respectively:
TDSDUMP="tds.log" \
php -r "new PDO('dblib:host=SA_HOST:SA_PORT;dbname=SA_DB','SA_U','SA_PWD');"
Invoking PHP using the -r option will cause the command that follows to be executed using the PHP interpreter. We prefix the php call with creation of the the TDSDUMP environment variable. When this variable is set, it will result in all traffic sent to FreeTDS to be logged to the assigned file, which in this case is tds.log. Once this command completes, the tds.log file will be found in your current directory and will contain quite a bit of information about the communication workflow associated with attempting to connect to SQL Anywhere via PHP’s PDO extension.
Using the SAP PHP Extension
A few years ago SAP released their own native SQL Anywhere PHP extension, with little background information regarding why this extension should be used in preference of PHP’s PDO-based approach. To be clear, DreamFactory does not support the SAP PHP modules; instead we rely upon PHP’s longstanding support for SQL Anywhere via the PDO and PDO_DBLIB extensions.
That said, we recognize you might wish to use PHP to interact with a SQL Anywhere database outside of the DreamFactory-generated APIs and so because documentation on this matter is so woefully lacking we thought it might be useful to include some guidance on the matter for the benefit of all PHP users. To configure and test this module within your custom PHP application (not DreamFactory), follow these instructions:
Navigate to the following URL and download the PHP module matching your installed PHP version:
If your Linux server is a fresh instance, you may need to install the unzip package first. For instance on Ubuntu/Debian you’d do so running this command:
$ sudo apt install unzip
Move the module to the PHP extension directory
Next you’ll move the php7.1.0_sqlanywhere.so module to the PHP extension directory. You can learn the extension directory’s path via this command:
There are several versions of this module. You’ll find 32-bit versions in the /tmp/sqlanywhere-driver/bin32 directory, and 64-bit versions in the /tmp/sqlanywhere-driver/bin64 directory. Further, each of these respective directories contains a thread safe and non-thread module. If you’re using PHP’s CGI version or Apache 1.X, you’ll use the non-threaded module. If you’re using Apache 2.X or NGINX, you’ll use the threaded version, which is denoted by the _r filename postfix.
Update the php.ini file and restart the web server
Finally, you’ll need to update the php.ini file to ensure PHP recognizes the new modules. You can learn the location of this file using the following command:
Based on this output, the php.ini file is located in /etc/php/7.1/cli/. Keep in mind however that this php.ini file is only used in conjunction with PHP when running via the command line interface (the terminal). You’ll also want to modify the php.ini file used when PHP interacts with the web server. It’s location isn’t obvious when running php --ini, however if you navigate to the cli directory’s parent you’ll find the directory housing the web server-specific php.ini file:
$ cd /etc/php/7.1/
$ ls
apache2  cli  fpm  mods-available
$ ls apache2/
conf.d php.ini
Therefore you’ll want to update bothphp.ini files to ensure the SQL Anywhere modules are recognized in both environments. To do so, you’ll open up each file in a text editor and add one line:
extension=php-7.1.0_sqlanywhere_r.so
If you’re in the minority of users and require the non-threaded version, you’ll instead reference the non-threaded version:
extension=php-7.1.0_sqlanywhere.so
Keep in mind this reference must match the name of the file you copied into the PHP extensions directory!
Once done, save the changes and restart your web server. Confirm PHP’s CLI environment recognizes the module by running this command:
$ php -m | grep sqlanywhere
sqlanywhere
Next, confirm PHP’s web environment recognizes the module by creating a file named phpinfo.php in your web document root directory and adding the following.
Useful System Administration Notes
Creating a New Sudo User
It’s bad practice to run system commands as the root user unless absolutely necessary. You should instead create a Sudo user that can execute commands on behalf of another user, by default the root user. To do so, you’ll first create a new user (skip this step if you instead want to add sudo capabilities to an existing user:
$ adduser wjgilmore
Adding user `wjgilmore' ...
Adding new group `wjgilmore' (1000) ...
Adding new user `wjgilmore' (1000) with group `wjgilmore' ...
Creating home directory `/home/wjgilmore' ...
Copying files from `/etc/skel' ...
Enter new UNIX password:
Retype new UNIX password:
passwd: password updated successfully
Changing the user information for wjgilmore
Enter the new value, or press ENTER for the default
	Full Name []:
	Room Number []:
	Work Phone []:
	Home Phone []:
	Other []:
Is the information correct? [Y/n] Y
Next, you’ll add the user to the sudo group:
$ usermod -aG sudo wjgilmore
Once done, you can execute elevated commands by prefixing the command with sudo:
DreamFactory very much falls into the “set it and forget it” software category, often serving APIs in the background for months if not years without further human intervention. Nevertheless, we encourage users to regularly upgrade to take advantage of new features, not to mention enhanced performance and stability. Also, DreamFactory relies upon a great many dependencies such as PHP which are occasionally associated with security vulnerabilities. Accordingly, you’ll want to take care to ensure the operating system and dependecies are patched.
Fortunately, upgrading DreamFactory to the latest version is a pretty straightforward process. In this section we’ll walk you through the process.
Step #1. Back Up Your Current DreamFactory Configuration Settings
A file named .env resides in your current DreamFactory instance’s root directory. This file contains many key system settings, including database credentials, caching preferences, and other key configurations. To backup your .env file, navigate to the DreamFactory root directory and copy the file to another directory:
$ cd /opt/dreamfactory
$ cp .env ~/.env
Next, use SFTP or another available file transfer mechanism to move the .env copy to another location outside of the server. Please be sure to take this additional precaution to avoid losing any unforeseen issues which may result in file loss.
Step #2. Back Up Your DreamFactory System Database
Next we’ll create a backup copy of the production DreamFactory system database. Four system databases are supported, including MySQL, PostgreSQL, MS SQL Server, and SQLite. We will demonstrate backing up a MySQL database here, however rest assured similarly easy backup mechanisms exist for the other vendors. Just keep in mind you’ll want to backup both the data and data structures. To backup a MySQL database, you’ll use the mysqldump command:
You can use the MySQL credentials found in your .env file to perform the backup. If your database name is not dreamfactory then update the value passed to --databases accordingly. The --no-create-db flag tells the mysqldump command to not generate a create database command in the dump file. Finally, the redirection operator > is used to redirect the dump output elsewhere, which in this case is a file named dump.sql that resides in the executing user’s home directory. Note this file doesn’t need to exist before executing the mysqldump command.
Once complete, be sure to copy the dump.sql file to a safe place just as was done with the .env file.
Step #3. Prepare a New Host Serve and Run Installer
Tip
If you do not use our automated installers, please follow our Update to PHP 8.1 guide.
Earlier in this chapter we referred to the automated installers that are included with the platform learn more here. We recommend downloading one of these installers from the DreamFactory repository and running them in the manner previously described. Four operating systems are currently supported, including CentOS, Debian, Fedora, and Ubuntu. Ideally the operating system will be newly installed, ensuring the server is free of baggage.
At the installer’s conclusion you’ll be prompted to create the first administration account. Go ahead and create one, however we’ll soon be importing your existing administrator(s) from the production DreamFactory instance so ultimately the new account won’t hold any importance.
Step #4. Disable MySQL’s Strict Mode Setting
If your production DreamFactory instance uses MySQL for the system database, then you may need to disable something known as strict mode in the new MySQL database. This is because MySQL 5.7 changed how MySQL behaves in certain instances, such as whether 0000-00-00 can be treated as a valid date. Therefore if your production MySQL version is 5.6 or earlier, then you’ll almost certainly need to disable strict mode. Fortunately, this is easily done by navigating to your new DreamFactory instance’s root directory and opening config/database.php using a text editor like Nano or Vim. Scroll down to the mysql array and add this key/value pair:
'strict' => false
Step #5. Import the System Database Backup
Next we’ll import the MySQL database backup from your current production environment into the newly installed DreamFactory environment. Before doing so, we’ll first need to delete the contents (schema and data) of the new system database. To do so, navigate to your new DreamFactory installation’s root directory and run these commands:
Next, import the backup into the new database. Recall that this backup is found in the dump.sql file. Transfer the file to your new DreamFactory instance, and run this command:
$ mysql -u db_user -p dreamfactory_db < dump.sql
Enter password:
You’ll need to substitute db_user and dreamfactory_db with the database username and password you supplied to the installer. Next, we’ll run the migrations command to ensure the system database contains all of the latest table structures and seed data:
Congratulations, you’ve successfully upgraded your DreamFactory instance! Navigate to the designated domain, and login using administrative credentials associated with your old instance.
Conclusion
With DreamFactory installed and configured, it’s time to build your first API! In the next chapter we’ll do exactly that, walking through the steps necessary to generate a database-based API.
2.1 -
Installing DreamFactory on Windows Server 2022
The following instructions are geared to a Windows Server 2022 installation, however the steps are going to be nearly identical for Windows Server 2019.
This installation guide is meant for a “fresh” install of Windows Server 2022.
Windows Server Prep
Before beginning the DreamFactory installation, there are some general server preparation steps that should be completed. Most of the following must be done with a Windows Administrator account.
RDP
While not essential to install DreamFactory, having RDP active on the server will make access and use much easier. To turn on RDP:
Open the Server Manager (typically opens automatically on login)
Select “local server” on the left
click on “Remote Desktop” and enable it
You may need to restart the server to gain RDP functionality
Downloading files
IE Enhanced Security
By default, Windows Server 2022 comes with Microsoft Edge installed and downloads disabled with IE Enhanced Security. Within these instructions there will be multiple downloads of various tools and dependencies as well as the download of the DreamFactory code itself, to download these files on the Windows Server, IE Enhanced Security must be disabled. IE Enhanced Security can be disabled in the server manager under “Local Server”.
Transfering files
Alternatively, you can download files on a different machine, and transfer them to the Windows Server. One tool great for this is WinSCP
On Windows Server 2019, Edge may or may not be included, there are a few downloads in this guide that require a browser with Javascript functionality to download. It is recommended to either use another machine with a more modern browser, or download and install a different web browser on the Windows Server
Required Software
There are a few things that must be installed and configured before downloading and installing DreamFactory.
IIS Version 10
IIS version 10 comes pre-installed on Windows Server 2022, however it may need to be activated to function. While you are activating IIS, we will also activate other features we will need later.
To Enable:
Open Server Manager
Click on option 2 “Add roles and features”
Click Next
Ensure “Role based or feature based” is selected, click Next
Ensure the server you’re working on is selected, click Next
Check Web Server(IIS) on server roles, install any admin tools if asked
Your Web Server Role should look like (but will not say “installed”):
Click Next and then Install, and let the install run
Git
Installing Git is very straightforward. Simply get the installer here and run using the default options.
To install PHP, begin by making a directory in the C:\ for the PHP installation. For this example, we are making a directory: C:\PHP_8.1
Extract the contents of the PHP zip file into this directory. It will look something like:
Next, this directory must be added to your system path. To do so:
Open Environment Variables by searching “environment” in the start menu
Click “Environment Variables…”
Select the “Path” variable and click “Edit”
Click “New” and add the C:\PHP_8.1 directory
save and close
From here, it is a good idea to test that everything is working. Open a command prompt and run php -v in the terminal window. You should see the version you installed in the output.
If everything works, great! If not, here are some additional PHP installation resources:
Within the C:\PHP_8.1 directory, there are two sample .ini files. php.ini-development and php.ini-production . Take one of these and duplicate the file. Rename it to php.ini
Typically during initial installation, we will use the php.ini-development file, and change to the php.ini-production one at a later date. This is entirely up to you.
Open php.ini and add the following to the bottom of the file:
Handler mappings are necessary to tell IIS how to run PHP files. To configure the Handler Mappings:
Open IIS and click on the “Handler Mappings” icon.
Click on “add module mapping” on the right side
Fill in the module mapping:
Request Path: *.php
Module: FastCgiModule (will autofill, select that option)
Executable: Use the ... icon and select: C:\php_8.1\php-cgi.exe
You might have to change the “file type” selection when browsing
Name: PHP_via_FastCGI
Open “Request Restrictions” and:
Mapping: File or Folder
Verbs: all
Access: script
PHP Manager
The PHP Manager is an IIS utility that gives greater insight and easier configuration options for a PHP installation. To download and install the PHP Manager:
The download can be found at this link click the “download this extension” button to download the executable.
run the downloaded file
If IIS is opened, close and reopen it, you should see a PHP manager icon in the IIS dashboard
Final PHP configurations
Once the PHP manager is installed, open it. If you see a warning about “non optimal PHP configuration” open the warning and apply all recommendations.
Click on check phpinfo() , once the site opens, you should see a phpinfo() screen that displays the version of PHP and various configurations and installed extensions.
The PHP manager can be used to install, enable, and disable extensions. Keep this utility in mind when troubleshooting PHP issues.
Installing Composer
Composer is a dependency manager for PHP, download the installer by going here
Default options are fine for the composer install, you do NOT need to install development mode.
to ensure composer is working, once complete run composer --v in a new command prompt.
Installing DreamFactory
Now that all the dependencies are installed, and IIS is working, we can install DreamFactory itself. It is recommended to reboot the server at this point to ensure everything is fully installed and mapped.
Get DreamFactory code
Open a fresh command prompt window, navigate (cd) to the C:\inetpub\wwwroot\ directory. Run the git command:
This will create a dreamfactory directory and add the repo contents to it. This directory is referred to as “the dreamfactory directory” in documentation and support.
Once complete, open the dreamfactory directory in a new file explorer window.
If you need a different version of DreamFactory installed other than the lastest, now would be the time to use git to clone the correct branch/version. Versions older than DreamFactory V5 will need a different (older) version of PHP.
Move composer files
If running a licensed, commercial instance, you will have received 3 composer files (composer.json, composer-dist.json and composer.lock) Move these 3 files into the dreamfactory directory and overwrite the existing files if asked.
WinSCP is a great tool for getting these files from your local PC to the server.
composer command
In command prompt, navigate into the dreamfactory directory and run:
Sometimes this command can take quite a bit to run, if it feels like it’s “hung” hit enter a couple times. If the command fails, it sometimes just needs to be ran again, you can contact support if you run into issues.
DF setup commands
Once the composer command finishes, from the dreamfactory directory run:
php artisan df:env
The installer will ask which type of database should hold the DreamFactory system information. Sqlite is the easiest to get going the fastest, however multiple databases are supported. Choose a database that fits your needs and your use case.
When selecting a database name and user, we typically recommend “dreamfactory” and “dfadmin” respectively. However, these can be whatever you’d like. The user will need full permissions on that database.
A note about system databases:
The DreamFactory system database holds all of the configurations for your instance. Backups of this database are highly recommended when in production. You can also use a utility like mysql dump to pull down and later recreate the system database on another instance. This and the .env file will preserve all DreamFactory configurations.
Once the command finishes, run the setup command:
php artisan df:setup
This command will prompt you to create your first admin user. This will be the first account available to log in, and additional administrator accounts can be created later if desired.
Add license key
You will have received a license key, this key will need to be added to the .env file in the dreamfactory directory. At the bottom of the file add:
DF_LICENSE_KEY={YOUR LICENSE KEY}
without the curly braces
Testing
From here DreamFactory is installed, the next section will focus on configuring IIS to point to and serve DreamFactory’s content. However, testing is a great and easy step here.
From the dreamfactory directory, run:
php artisan serve
This will start a small development server, the output will tell you the IP address and port number to navigate to. Usually this is http://127.0.0.1:8000
Open your web browser to this address, and try to login with the user you created earlier. If you can see the DreamFactory UI and do NOT have a red banner at the top, you have done everything correctly. If not, go back and check your steps or contact support if you need help.
Adding DreamFactory to IIS
IIS must be configured to serve the DreamFactory content. The following section will walk through a simple configuration.
Creating the dreamfactory site
Open IIS, if there is a Default Site on the left hand side, right click and stop it.
Right click on the “Sites” folder on the left side and select “Add Website”. Fill out the Add Website dialogue:
site name: whatever you’d like can go here, we usually recommend “dreamfactory”
You may optionally select a different Application pool here
Physical path: {dreamfactory_directory}/public
Connect As/Test settings: Connect as “Specific User” it is recommended to start with the Administrator account, and complete the installation. Then later a service account with Admin rights can be used.
If you get green checks when selecting “Test Settings” you should be good to proceed.
optionally add a host name and IP configurations.
Checking and adding HTTP verbs
FastCGI for IIS by default doesn’t always have everything it needs configured correctly. Open the file: C:\Windows\System32\inetsrv\config\applicationHost.config
Look for a “handlers AccessPolicy” section (ctrl + f “handlers”, usually the second instance), make sure this section looks similar to:
This file does not always need changes, ensure that every handler is allowing every verb and that they are pointed to the correct php-cgi.exe (PHP 8.1)
Request filtering
From the IIS window, open the “Request Filtering” icon. Go to the “HTTP Verbs” tab. Click the “Allow Verb” option on the right side and add the following verbs:
GET
HEAD
POST
DELETE
PUT
PATCH
PROTIP: You can leave your mouse on the “Allow Verb” option and type each verb in and hit enter to confirm.
Double check web.config
Most of the time this file doesn’t need to be touched, however now is a great time to check and make sure. Open the file: {dreamfactory_dir}/public/web.config
This is a sample web.config file, yours may differ slightly, double check the requestFiltering and DefaultDocument sections.
In the IIS window, open the “URL Rewrite” icon. TO import url rewrite rules:
Click the “Import Rules” option on the right side
Using the ... icon, browse to {dreamfactory_dir}/public/.htaccess
Click “import”
If any of the imported rules have red X’s on them, select them and remove them until everything is green checks.
click “Apply” on the right side
Set directory permissions
Within the dreamfactory directory, there are storage and public directories. Set the permissions of these directories to “Full Control” for the IIS_USRS account type. Ensure these new permissions are applied recursively.
Restart IIS and browse DreamFactory
If everything was done correctly, from here you should be able to navigate in a web browser to localhost and see DreamFactory. Ensure that you can login with the account created earlier.
You can of course contact support if you have additional questions or issues with your installation.
DreamFactory debugging configuration
During the initial implementation phase of your instance, it might be useful to have debugging options on. These options are all found in the .env file within the dreamfactory directory.
APP_DEBUG=true
APP_LOG_LEVEL=debug
When you have changed anything within the .env file, run the following two commands to ensure the changes take effect:
php artisan config:clear
php artisan cache:clear
3 - Upgrade to PHP 8.1
# Estimated Upgrade Time: 1.5 Hours
We attempt to make the shift from PHP 7.2 to PHP 8.1 as simple as possible. Some services have undergone significant changes as a result of third-party API providers. We have compiled a list of all services that have experienced noticeable changes, which you can find below. While it’s not necessary to update all of these services, if you are using any of them, we recommend that you review the relevant section to expedite the development of your dream API.
Note
This article assumes that you are not using our automatic installers. However, if you have a different operating system or prefer not to handle the installation process manually, you can refer to the relevant guide here. Please note that these steps are intended that you are using the Supported Ubuntu Release.
Switch to PHP 8.1
This section will demonstrate an example of how to migrate from PHP 7.4 to PHP 8.1 on Ubuntu 20.04.
First, we need to add PPA:
sudo add-apt-repository ppa:ondrej/php -y
Then install PHP 8.1 and the required dependencies:
If you would like to know how to install the dependencies for the DreamFactory packages that you are interested in, you can refer to the table of contents below for guidance.
Command pecl install may fail with message like:
pecl/sqlsrv is already installed and is the same as the released version 5.10.1 install failed
In this case use force install: pecl install -f <extension_name>
Configure NGINX
If you are using FastCGI Process Manager (FPM) with NGINX or Apache, you will need to update your DreamFactory installation’s host configuration. To update the configuration for NGINX, you will need to modify the version of PHP specified in the Nginx server configuration file, which can be located at /etc/nginx/sites-available/default.
Now we want to update our DreamFactory instance to the latest version. Use git pull command from the DreamFactory root directory. After that run the composer install command. Finally restart fpm and nginx:
sudo service php8.1-fpm restart && service nginx restart
mkdir build       &&\
pushd build       &&\
cmake ..          &&\
make              &&\
sudo make install &&\
popd
Download the DataStax PHP Driver for Apache Cassandra. Make sure that you are on the 1.3.x branch. From the downloaded repository, run the following command:
# Currently, we are using a specific version of the repository that is still functional, # as the recent efforts to enhance the installation process do not work properly.
git checkout 1cf12c5ce49ed43a2c449bee4b7b23ce02a37bf0 &&\
pushd ext &&\
phpize &&\
popd&&\
mkdir build &&\
pushd build &&\
../ext/configure &&\
make &&\
sudo make install &&\
popd
Make sure cassandra.so is built.
find /usr/lib/php/20210902/cassandra.so
If cassandra.so exists, connect it to PHP’s modules.
echo 'extension=cassandra.so' | sudo tee /etc/php/8.1/mods-available/cassandra.ini
sudo phpenmod -v 8.1 -s ALL cassandra
Couchbase
Likelihood Of Impact: High
With the new release of DreamFactory, we removed the Couchbase from the list of supported services. There is a possibility that support for Couchbase may be reinstated in future releases.
Email
Likelihood Of Impact: Low
The Mandrill & SparkPost mail drivers have been removed from Laravel 6. These services are technically not been supported by DreamFactory since its migration to Laravel 6. From now on, these services will no longer be displayed in the “Services” tab.
Firebird
Likelihood Of Impact: High
If you are using Firebird with major version 3, then it must be at least version 3.0.4. This is due to usage of the LOCALTIMESTAMP parameter.
To use the Firebird service, you need to install/recompile a driver compatible with PHP 8.1. Use --with-pdo-firebird to install the PDO Firebird extension or install php81-interbase package from ppa:ondrej/php.
GitHub
Likelihood Of Impact: Medium
DreamFactory provided the ability to authenticate through the REST API using an account password or personal access token to perform authenticated API operations on GitHub.com. Beginning November 13th, 2020, GitHub announced that they will no longer accept account passwords when authenticating via the REST API and will require the use of token-based authentication. So if you have a registered DreamFactory GitHub service, ensure to specify a personal access token. For more information, please follow the link.
Mongo logs
Likelihood Of Impact: Low
DreamFactory supports a very simple solution for logging all requests. All records requested in the API will be written to the database. The implication is that DreamFactory relies on MongoDB PHP driver. You can easily install the required dependency with pecl. After that run this two commands:
echo'extension=mongodb.so'| sudo tee /etc/php/8.1/mods-available/mongodb.ini
sudo phpenmod -s ALL mongodb
Apache Hive
Likelihood Of Impact: High
In order to use the service, you will need to have both the PDO and ODBC PHP extensions installed, which are available for download from this PPA with the names php8.1-pdo and php8.1-odbc, respectively. Additionally, the MapR ODBC Driver must be installed, which you can obtain by downloading from this link or through the Amazon cloud, as we do. To install MapR ODBC Driver run:
Please note that it’s crucial to install the extension using a specific path. So the full path to the driver must be - /opt/mapr/hiveodbc/lib/64/libmaprhiveodbc64.so
Azure Active Directory
Likelihood Of Impact: Low
Microsoft announced that Azure AD Graph will continue to function until June 30, 2023. Based on that we migrated towards Microsoft Graph. For more information, please follow the link.
IBM Db2
Likelihood Of Impact: High
DreamFactory services that work with IBM databases use software that can be loaded from ibm.com. This section is appointed for a self-hosted environment. To make DreamFactory work with the IBM Db2, you need to take the following steps:
Sign in to your IBM account or create a new one. Download the client driver package:
source db2profile (for the Bash or Korn shell)
source db2cshrc (for the C shell)
Clone the PDO_IBM source code from GitHub. Please note that this must be done from the same terminal since db2profile | db2cshrc sets the environment variables in the current terminal session.
git clone https://github.com/php/pecl-database-pdo_ibm /opt/PDO_IBM &&\
cd /opt/PDO_IBM
From the cloned repository run:
exportCPATH=/opt/dsdriver/include
phpize \
&& ./configure --with-pdo-ibm=/opt/dsdriver \
&& make \
&& make install \
&&exit
Check for the presence of pdo_ibm.so:
find "/usr/lib/php/20210902/pdo_ibm.so"
If pdo_ibm.so exists, connect it to PHP’s modules.
echo'extension=pdo_ibm.so'| sudo tee /etc/php/8.1/mods-available/pdo_ibm.ini &&\
sudo phpenmod -v 8.1 -s ALL pdo_ibm
IBM Informix
Likelihood Of Impact: High
DreamFactory services that work with IBM databases use software that can be loaded from ibm.com. This section is appointed for a self-hosted environment. To make DreamFactory work with the IBM Informix, you need to take the following steps:
Previously, the MQTT service relied on the Mosquitto-PHP extension, which in turn relies upon the libmosquitto library. From now on, this service no longer depends on the system’s needs and contains everything you need to work in itself.
Oracle
Likelihood Of Impact: High
Tip
This section shows the minimum number of steps to set up required dependencies so that DreamFactory can work with Oracle. For a complete setup, follow the official guide.
To use the Oracle service, you need to install the new version of the oci8 extension compatible with PHP 8.1. You can seamlessly install the required extension version you need via pecl. But before installation, you need to go through a few more steps:
Download the desired Instant Client and the corresponding SDK Package. We will show the example of RPM packages.
Now we are good to install the oci8 extension. The latest version is compatible with PHP 8.1 at present, but you may need to specify the version explicitly.
sudo pecl install oci8 (php 8.1 exactly what we need)
sudo pecl install oci8-2.2.0 (php 7)
Once complete, make sure that OCI is loaded:
php -m | grep oci8

#oci8
If you do not see oci8 in PHP’s modules, ensure that the configuration file and the OCI shared library file are plugged in.
Check for the presence of osi8.so:
find "/usr/lib/php/20210902/oci8.so"
If osi8.so exists, connect it to PHP’s modules.
echo'extension=oci8.so'| sudo tee /etc/php/8.1/mods-available/oci8.ini &&\
sudo phpenmod -v 8.1 -s ALL oci8
SAP SQL Anywhere
Likelihood Of Impact: High
Tip
We have an article on installing the necessary dependencies for SQL Anywhere on CentOS.
Once complete, make sure that the driver is installed successfully. Confirm both PDO and the pdo_dblib extensions are present:
php -m
...
#PDO#pdo_dblib
...
Snowflake
Likelihood Of Impact: High
To use the Snowflake service, you need to recompile the pdo_snowflake driver using the new PHP version. After completion, make sure the module is installed into the proper extensions directory. See official guide: https://github.com/snowflakedb/pdo_snowflake
Microsoft SQL Server
Likelihood Of Impact: High
To use a Microsoft SQL Server database, you should ensure that you have the sqlsrv and pdo_sqlsrv PHP extensions installed as well as any dependencies they may require such as the Microsoft SQL ODBC driver.
If you are encountering issues with the unixodbc-dev package, it may be due to a recent release. As a workaround, you can lock the package version to a stable one (e.g. v2.3.7) until a fix is released. For more details, refer to the relevant issue.
Installation of the necessary dependencies can be quite an agonizing process, so concerned people make this process as painless as possible. Ondřej Surý maintains the repository with PHP packages and is a very well-respected contributor to the PHP community. See how you can install the required PHP dependencies in three easy steps.
Install the required dependency. In this example, we will demonstrate the installation of LDAP extension.
sudo apt install php8.1-ldap
4 - Advanced Database API Features
Generating a Database-backed API provides a solid introduction to carrying out CRUD operations in conjunction with a DreamFactory-generated API, however you’re going to need some additional firepower in order to successfully integrate these APIs into your projects. This chapter introduces several of DreamFactory’s advanced database API-related features, covering topics such as database transactions, calling database functions via API endpoints, and more.
Using Database Transactions in API Calls
Popular databases such as MySQL, PostgreSQL, and SQL Server support transactions, which allow you to treat a group of SQL operations as a single unit. Should any of the SQL statements in this unit fail, then all previously executed statements will be reverted, or rolled back. For instance, imagine several database tables are used to manage company supply inventory and the supply locations. The table creation statements might look like this:
CREATE TABLE `supplies` (
  id INT(11) UNSIGNED NOT NULL AUTO_INCREMENT PRIMARY KEY,
  name VARCHAR(100) DEFAULT NULL,
  PRIMARY KEY (`id`)
);
CREATE TABLE locations (
  id INT(11) UNSIGNED AUTO_INCREMENT PRIMARY KEY,
  name varchar(100) not null,
  supply_id INT unsigned,
  CONSTRAINT fk_supply
  FOREIGN KEY (supply_id)
     REFERENCES supplies(id)
);
Based on this configuration, each supply has one location. I’m purposefully keeping the schema simple; you might imagine for instance the supplies table includes a barcode field for tracking each piece of inventory.
When adding a new supply to the supplies table, it’s critical to also add the supply’s location otherwise we won’t know where it resides. Sounds like a perfect opportunity to use a database transaction, because of either query fails, we want the other query to be reverted (rolled back) so the query issue can be fixed. If it isn’t rolled back we run the risk of inserting an orphaned record.
DreamFactory supports nested inserts, allowing you to easily insert records into multiple tables via a single API call. If we wanted to insert a new supply and its location, we would issue a POST call to the .../_table/supplies endpoint, passing along the following JSON payload:
After executing the call, check your database and you’ll see new records in both the supplies and locations tables. Now change the payload, swapping out the locationsname field with title:
The database doesn’t recognize the title column, meaning it won’t accept the INSERT statement. That SQL statement would look like this:
INSERT INTO locations(id, title, supply_id) VALUES(NULL, "Closet", 55);
When the insertion fails, DreamFactory will return the following error:
Failed to update many to one assignment.
Batch Error: Not all requested records could be created.
Fair enough. It is however critical to understand that while the supply/location mapping failed, the stapler record was in fact added to the supplies table and is now orphaned due to lack of location. Fortunately, it’s very easy to remedy this by telling DreamFactory to encapsulate these INSERT requests in a transaction. This is done by appending rollback=true to the API call URI:
.../_table/supplies?rollback=true
Now call the endpoint again with the errant payload. You’ll still receive the specified error, however the designated supply wasn’t added to the supplies table because it was rolled back due to the failed locations table insertion attempt.
Using Database Functions in API Calls
All commonly used databases support a wide array of functions that can be used to manipulate result sets before returning data to the client as well as input before being written to the database. For instance, our demo MySQL database is based off the official MySQL example database. It includes tables containing employees, departments, salaries, sales data, and so forth. The sales table looks like this:
The sales table includes a sold_at field that has a timestamp datatype. Therefore when retrieving data from this table via an API call, you’ll receive JSON output like this:
However suppose you don’t need that level of granularity and just want the date a product was sold. When writing SQL, you can use MySQL’s date() function to convert the timestamp:
select product_name, date(sold_at) from sales;
Using the date() function is easy enough when writing standard SQL. But how would this be accomplished via an API call? Fortunately, DreamFactory’s Schema tab offers a very easy way to modify column formatting using a database function. Click on the Schema tab, select your database-based service, and then choose a table. You’ll see a section named Fields that itemizes each column found in that table:
Click on a field such as sold_at and scroll to the bottom of the column detail page. You’ll find a section named DB Function Use. Click the + button and you’ll be able to modify the column output via a database function:
You can use the select box to determine when the database function is applied, meaning you can use different functions according to which HTTP method is used in conjunction with the endpoint call.
Once configured the sales table API call will now return a response that looks like this:
There’s a second database function-related feature that can prove useful in certain situations. Suppose you didn’t want to modify an existing field value using a database function, but instead want to create a new virtual field for this purpose. As an example, consider the following employees table:
CREATE TABLE `employees` (
  `emp_no` int(11) NOT NULL,
  `birth_date` date NOT NULL,
  `first_name` varchar(14) NOT NULL,
  `last_name` varchar(16) NOT NULL,
  `gender` enum('M','F') NOT NULL,
  `hire_date` date NOT NULL,
  PRIMARY KEY (`emp_no`)
);
Note how it breaks each employee’s name into first and last fields. But what if you wanted to concatenate the employees’ first name and last names together before returning the results? You can use MySQL’s concat() function to do so:
select concat(`first_name`, " ", `last_name`) from employees;
You still probably want the option of retrieving the first and last name in some use cases, but also retrieving the concatenated name in others. To do so, you can create a virtual field. Click on the Schema tab and choose the service and table you’d like to modify. Then click the Add Field button:
On this screen you’ll define the virtual field. To do so, it is critically important that you click the Is Virtual? checkbox. Neglecting to do so will prompt DreamFactory to alter the actual database schema! In most cases this will fail due to the connecting user not possessing sufficient permissions, however if the connecting user is assigned alter privileges then the table will in fact be modified. Additionally assign a field name, label, and column type:
Next, scroll to the bottom of the screen and add a new database function entry. To concatenate the first_name and last_name fields together I’ve used the following function:
concat(`first_name`, " ", `last_name`)
After saving the changes, subsequent calls to the employees table endpoint will produce JSON that looks like this:
You can also nest functions. For instance we can convert the first and last names to all capital letters and subsequently concatenate them together using this statement:
DreamFactory’s capabilities are vast, however there is no more popular feature than its ability to generate a database-backed REST API. By embracing this automated approach, development teams can shave weeks if not months off the development cycle, and in doing so greatly reduce the likelihood of bugs or security issues due to mishaps such as SQL injection. This approach doesn’t come at the cost of trade offs either, because DreamFactory’s database-backed APIs are fully-featured REST interfaces, offering comprehensive CRUD (create, retrieve, update, delete) capabilities, endpoints for executing stored procedures, and even endpoints for managing the schema.
In this chapter you’ll learn all about DreamFactory’s ability to generate, secure, and deploy a database-backed API in just minutes. You’ll learn by doing, following along as we:
Generate a new database-backed REST API
Secure API access to your API using API keys and roles
Interact with the auto-generated Swagger documentation
Query the API using a third-party HTTP client
Synchronize records between two databases
We chose MySQL as the basis for examples throughout the chapter, because it is free, ubiquitously available on hosting providers and cloud environments, and can otherwise be easily installed on all operating systems. Therefore to follow along with this chapter you’ll need:
Access to a DreamFactory instance and a MySQL database.
If your MySQL database is running somewhere other than your laptop, you’ll need to make sure your firewall is configured to allow traffic between port 3306 and the location where your DreamFactory instance is running.
A MySQL user account configured in such a way that it can connect to your MySQL server from the DreamFactory instance’s IP address.
Before we begin, keep in mind MySQL is just one of DreamFactory supported 18 databases. The following table presents a complete list of what’s supported:
Databases
SQL and No SQL
AWS DynamoDB
IBM Informix
AWS Redshift
MongoDB
Azure DocumentDB
MySQL
Azure Table Storage
Oracle
Cassandra
PostgreSQL
Couchbase
Salesforce
CouchDB
SAP SQL Anywhere
Firebird
SQLite
IBM Db2
SQL Server
Best of all, thanks to DreamFactory’s unified interface and API generation solution, everything you learn in this chapter applies identically to your chosen database! So if you already plan on using another database, then by all means feel free to follow along using it instead!
Want to create a MySQL API but don’t have any test data? You can download a sample database from the MySQL website containing several million records of contrived employee-related data. Click here to learn more about and install the example database. If you’ve started a DreamFactory hosted trial then we’ve created this database for you! Your welcome e-mail includes the credentials.
Generating a MySQL-backed API
To generate a MySQL-backed API, login to your DreamFactory instance using an administrator account and click on the Services tab:
On the left side of the interface you’ll see the Create button. Click this button to begin generating an API. You’ll be presented with a single dropdown form control titled Select Service Type. You’ll use this dropdown to both generate new APIs and configure additional authentication options. There’s a lot to review in this menu, but for the moment let’s stay on track and just navigate to Databases and then MySQL:
After selecting MySQL, you’ll be presented with the following form:
Let’s review these fields:
Name: The name will form part of your API URL, so you’ll want to use a lowercase string with no spaces or special characters. Further, you’ll want to typically choose something which allows you to easily identify the API’s purpose. For instance for your MySQL-backed API you might choose a name such as mysql, corporate, or store.Keep in mind lowercasing the name is a requirement.
Label: The label is used for referential purposes within the administration interface and system-related API responses. You can use something less terse here, such as “MySQL-backed Corporate Database API”.
Description: Like the label, the description is used for referential purposes within the administration interface and system-related API responses.
Active: This determines whether the API is active. By default it is set to active however if you’re not yet ready to begin using the API or would like to later temporarily disable it, just return to this screen and toggle the checkbox.
After completing these fields, click on the Config tab located at the top of the interface. You’ll be presented with the following form (I’ll only present the top of the form since this one is fairly long):
This form might look a bit intimidating at first, however in most cases there are only a few fields you’ll need to complete. Let’s cover those first, followed by an overview of the optional fields.
Required Configuration Fields
There are only five (sometimes six) fields which need to be completed in order to generate a database-backed API. These include:
Host: The database server’s host address. This may be an IP address or domain name.
Port Number: The database server’s port number. For instance on MySQL this is 3306.
Database: The name of the database you’d like to expose via the API.
Username: The username associated with the database user account used to connect to the database.
Password: The password associated with the database user account used to connect to the database.
Schema: If your database supports the concept of a schema, you may specify it here. MySQL doesn’t support the concept of a schema, but many other databases do.
Keep in mind you’ll be generating an API which can in fact interact with the underlying database! While perhaps obvious, once you generate this API it means any data or schema manipulation requests you subsequently issue will in fact affect your database. Therefore be sure to connect to a test database when first experimenting with DreamFactory so you don’t wind up issuing a request that you later come to regret.
Optional Configuration Fields
Following the required fields you’ll find a number of optional parameters. These can and do vary slightly according to the type of database you’ve selected, so don’t be surprised if you see some variation below. Don’t worry about this too much at the moment, because chances are you’re not going to need to modify any of the optional configuration fields at this point in time. However we’d like to identify a few fields which are used more often than others:
Maximum Records: You can use this field to place an upper limit on the number of records returned.
Data Retrieval Caching Enabled: Enabling caching will dramatically improve performance. This field is used in conjunction with Cache Time to Live, introduced next.
Cache Time to Live (minutes): If data caching is enabled, you can use this field to specify the cache lifetime in minutes.
After completing the required fields in addition to any desired optional fields, press the Save button to generate your API. After a moment you’ll see a pop up message indicating Service Saved Successfully. Congratulations you’ve just generated your first database-backed API! So what can you do with this cool new toy? Read on to learn more.
A Note About API Capabilities
Most databases employ a user authorization system which gives administrators the ability to determine exactly what a user can do after successfully establishing a connection. In the case of MySQL, privileges are used for this purpose. Administrators can grant and revoke user privileges, and in doing so determine what databases a user can connect to, whether the user can create, retrieve, update, and delete records, and whether the user has the ability to manage the schema.
Because DreamFactory connects to your database on behalf of this user, the resulting API is logically constrained by that user’s authorized capabilities. DreamFactory will however display a complete set of Swagger documentation regardless, so if you are attempting to interact with the API via the Swagger docs or via any other client and aren’t obtaining the desired outcome, be sure to check your database user permissions to confirm the user can indeed carry out the desired task.
Further, keep in mind this can serve as an excellent way to further lock down your API. Although as you’ll later learn DreamFactory offers some excellent security-related features for restricting API access, it certainly wouldn’t hurt to additionally configure the connecting database user’s privileges to reflect the desired API capabilities. For instance, if you intend for the API to be read-only, then create a database user with read-only authorization. If API read and create capabilities are desired, then configure the user accordingly.
How to Setup a MySQL API Through an SSH Tunnel
If you prefer DreamFactory to connect to your MySQL database through an SSH tunnel, then this is a relatively easy process, and can be done by starting an SSH tunnel from within your DreamFactory server. First you will need to add your database server’s key to where your DreamFactory Instance is located. Then open up a terminal window and enter in the following command, replacing where necessary:
For example, if I want to use port 3307 on my DreamFactory server to connect to the default database port of my MySQL server (3306), and “admin” is the remote SSH user who has the necessary privileges, the command may look like:
Now, once the connection has been established, in the DreamFactory interface, we can create our service in the same manner as described above, but instead of pointing to the MySQL server, we will point it to the SSH tunnel (localhost).
And that’s it! You now have the same capabilties as you would with a standard MySQL-backed API, just connected through SSH.
Reminder!
Remember that your SSH user (which you will use when creating your tunnel from the command line) will most likely be different to your MySQL user (which you will add in DreamFactory when creating your service).
Interaction using Postman
Installation
Postman is a utility that allows you to quickly test and use REST APIs. To use the latest published version, click the following button to import the DreamFactory MYSQL API as a collection:
You can also download the collection file from this repo, then import directly into Postman.
Interacting with Your API via the API Docs Tab
The Service Saved Successfully message which appears following successful generation of a new REST API is rather anticlimactic, because this simple message really doesn’t convey exactly how much tedious work DreamFactory has just saved you and your team. Not only did it generate a fully-featured REST API, but also secured it from unauthorized access and additionally generated interactive OpenAPI documentation for all of your endpoints! If you haven’t used Swagger before, you’re in for a treat because it’s a really amazing tool which allows developers to get familiar with an API without being first required to write any code. Further, each endpoint is documented with details about both the input parameters and response.
To access your new API’s documentation, click on the API Docs tab located at the top of the screen:
You’ll be presented with a list of all documentation associated with your DreamFactory instance. The db, email, files, logs, system, and user documentation are automatically included with all DreamFactory instances, and can be very useful should you eventually desire to programmatically manage your instance. Let’s just ignore those for now and focus on the newly generated database documentation. Click on the table row associated with this service to access the documentation. You’ll be presented with a screen that looks like this:
Scrolling through this list, you can see that quite a few API endpoints have been generated! If you generated an API for a database which supports stored procedures, towards the top you’ll find endpoints named GET /_proc/{procedure_name} and POST /_proc/{procedure_name}. Scrolling down, you’ll encounter quite a few endpoints used to manage your schema, followed by a set of CRUD (create, retrieve, update, delete) endpoints which are undoubtedly the most commonly used of the bunch.
Querying Table Records
Let’s test the API by retrieving a set of table records. Select the GET /_table/{table_name} Retrieve one or more records entry:
A slideout window will open containing two sections. The first, Parameters, identifies the supported request parameters. The second, Responses, indicates what you can expect to receive by way of a response, including the status code and a JSON response template. In the case of the GET _/table/{table_name} endpoint, you have quite a few parameters at your disposal, because this endpoint represents the primary way in which table data is queried. By manipulating these parameters you’ll be able to query for all records, or a specific record according to its primary key, or a subset of records according to a particular condition. Further, you can use these parameters to perform other commonplace tasks such as grouping and counting records, and joining tables.
To test the endpoint, click the Try it out button located on the right. When you do, the input parameter fields will be enabled, allowing you to enter values to modify the default query’s behavior. For the moment we’re going to modify just one parameter: table_name. It’s located at the very bottom of the parameter list. Enter the name of a table you know exists in the database, and press the blue Execute button. Below the button you’ll see a “Loading” icon, and soon thereafter a list of records found in the designated table will be presented in JSON format. Here’s an example of what I see when running this endpoint against our test MySQL database:
Congratulations! You’ve just successfully interacted with the database API by way of the Swagger documentation. If you don’t see a list of records, be sure to confirm the following:
Does the specified table exist?
If you received a 500 status code, check the service configuration credentials. The 500 code almost certainly means DreamFactory was unable to connect to the database. If everything checks out, make sure you can connect to the database from the DreamFactory instance’s IP address via the database port. If you can’t then it’s probably a firewall issue.
The API Docs interface is fantastically useful for getting familiar with an API, and we encourage you to continue experimenting with the different endpoints to learn more about how it works. However, you’ll eventually want to transition from interacting with your APIs via the API Docs interface to doing so using a third-party client, and ultimately by way of your own custom applications. So let’s take that next step now, and interact with the new API using an HTTP client. In the last chapter you were introduced to a few such clients. We’ll be using Insomnia for the following examples however there will be no material differences between Insomnia, Postman, or any other similar client.
But first we need to create an API key which will be used to exclusively access this database API. This is done by first creating a role and then assigning the role to an application. Let’s take care of this next.
Creating a Role
Over time your DreamFactory instance will likely manage multiple APIs. Chances are you’re going to want to silo access to these APIs, creating one or several API keys for each. These API keys will be configured to allow access to one or some APIs, but in all likelihood not all of them. To accomplish this, you’ll create a role which is associated with one or more services, and then assign that role to an application. An application is just an easy way to connect an API key to a role.
To create a role, click on the Roles tab located at the top of the screen:
Presuming this is the first time you’ve created a role, you’ll be prompted to create one as depicted in this screenshot:
Click the Create a Role! button and you’ll be prompted to enter a role name and description. Unlike the service name, the role name is only used for human consumption so be sure to name it something descriptive such as MySQL Role. Next, click the Access tab. Here you’ll be prompted to identify the API(s) which should be associated with this service. The default interface looks like that presented in the below screenshot:
The Service select box contains all of the APIs you’ve defined this far, including a few which are automatically included with each DreamFactory instance (system, api_docs, etc). Select the mysql service. Now here’s where things get really interesting. After selecting the mysql service, click on the Component select box. You’ll see this select box contains a list of all assets exposed through this API! If you leave the Component select box set to *, then the role will have access to all of the APIs assets. However, you’re free to restrict the role’s access to one or several assets by choosing for instance _table/employees/*. This would limit this role’s access to just performing CRUD operations on the employees table! Further, using the Access select box, you can restrict which methods can be used by the role, selecting only GET, only POST, or any combination thereof.
If you wanted to add access to another asset, or even to another service, just click the plus sign next to the Advanced Filters header, and you’ll see an additional row added to the interface:
Use the new row to assign another service and/or already assigned service component to the role. In the screenshot you can see the role has been granted complete access to the mysql service’s employees table, and read-only access to the departments table.
Once you are satisfied with the role’s configuration, press the Save button to create the role. With that done, it’s time to create a new application which will be assigned an API key and attached to this role.
Creating an Application
Next let’s create an application, done by clicking on the Apps tab located at the top of the interface:
Click the Create tab to create a new application. You’ll be presented with the following form:
Let’s walk through each form field:
Application Name and Description: The application name and description are used purely for human consumption, so feel free to complete these as you see fit.
Active: This checkbox can be used to toggle availability of the API key, which will be generated and presented to you when the application is saved.
App Location: This field presents four options for specifying the application’s location. The overwhelming majority of users will choose No Storage Required because the API key will be used in conjunction with a mobile or web application, or via a server-side script.
Assign a Default Role Filter: Some of our customers manage dozens and even hundreds of role within their DreamFactory environment! To help them quickly find a particular role we added this real-time filtering feature which will adjust what’s displayed in the Assign a Default Role select box. You can leave this blank for now.
Assign a Default Role: It is here where you’ll assign the newly created role to your application. Click on this select box and choose the role.
Click the Save button and the new API key will be generated. Click the clipboard icon next to your new API key to select the key, and then copy it to your clipboard, because in the next section we’ll use it to interact with the API.
Interacting with the API
We’ll conclude this chapter with a series of examples intended to help you become familiar with the many ways in which you can interact with a database-backed API. For these examples we’ll be using the Insomnia HTTP client (introduced in chapter 2) however you can use any similar client or even cURL to achieve the same results.
Retrieving All Records
Let’s begin by retrieving all of a particular table’s records just as was done within the API Docs example. Open your client and in the address bar set the URL to /api/v2/{service_name}/{table_name}, replacing {service_name} with the name of your API and {table_name} with the name of a table found within the database (and to which your API key’s associated role has access). For the remainder of this chapter we’ll use mysql as the service nam, and in this particular example the table we’re querying is called employees so the URL will look like this:
http://localhost/api/v2/_table/employees
Also, because we’re retrieving records the method will be set to GET.
Next, we’ll need to set the header which defines the API key. This header should be named X-DreamFactory-Api-Key. You might have to hunt around for a moment within your HTTP client to figure out where this is placed, but we promise it is definitely there. In the case of Insomnia the header is added via a tab found directly below the address bar:
With the URL and header in place, request the URL and you should see the table records returned in JSON format:
The equivalent SQL query would look like this:
SELECT * FROM employees;
Limiting Results
The previous example returns all records found in the employees table. But what if you only wanted to return five or 10 records? You can use the limit parameter to do so. Modify your URL to look like this:
http://localhost/api/v2/_table/employees?limit=10
The equivalent SQL query would look like this:
SELECT * FROM employees LIMIT 10;
Offsetting Results
The above example will limit your results found in the employees table to 10, but what if you want to select records 11 - 21? You would use the offset parameter like this:
You can order results by any column using the order parameter. For instance to order the employees tab by the emp_no field, modify your URL to look like this:
Note the space separating emp_no and desc has been HTML encoded. Most programming languages offer HTML encoding capabilities either natively or through a third-party library so there’s no need for you to do this manually within your applications. The equivalent SQL query looks like this:
SELECT * FROM employees ORDER BY emp_no DESC;
Selecting Specific Fields
It’s often the case that you’ll only require a few of the fields found in a table. To limit the fields returned, use the fields parameter:
You can filter records by a particular condition using the filter parameter. For instance to return only those records having a gender equal to M, set the filter parameter like so:
SELECT * FROM employees where last_name LIKE 'G%';
Combining Parameters
The REST API’s capabilities really begin to shine when combining multiple parameters together. For example, let’s query the employees table to retrieve only those records having a last_name beginning with G, ordering the results by emp_no:
SELECT * FROM employees where last_name LIKE 'G%' ORDER BY emp_no;
Querying by Primary Key
You’ll often want to select a specific record using a column that uniquely defines it. Often (but not always) this unique value is the primary key. You can retrieve a record using its primary key by appending the value to the URL like so:
/api/v2/_table/supplies/45
The equivalent SQL query looks like this:
SELECT * FROM supplies where id = 5;
If you’d like to use this URL format to search for another unique value not defined as a primary key, you’ll need to additionally pass along the id_field and id_type fields like so:
One of DreamFactory’s most interesting database-related features is the automatic support for table joins. When DreamFactory creates a database-backed API, it parses all of the database tables, learning everything it can about the tables, including the column names, attributes, and relationships. The relationships are assigned aliases, and presented for referential purposes within DreamFactory’s Schema tab. For instance, the following screenshot contains the list of relationship aliases associated with the employees table:
Using these aliases along with the related parameter we can easily return sets of joined records via the API. For instance, the following URI would be used to join the employees and departments tables together:
To insert a record, you’ll send a POST request to the API, passing along a JSON-formatted payload. For instance, to add a new record to the supplies table, we’d send a POST request to the following URI:
/api/v2/mysql/_table/supplies
The body payload would look like this:
{
    "resource": [
        {
            "name": "Stapler"
        }
    ]
}
If the request is successful, DreamFactory will return a 200 status code and a response containing the record’s primary key:
{
    "resource": [
      {
        "id": 9
      }
    ]
}
Adding Records to Multiple Tables
It’s often the case that you’ll want to create a new record and associate it with another table. This is possible via a single HTTP request. Consider the following two tables. The first, supplies, manages a list of company supplies (staplers, brooms, etc). The company requires that all supply whereabouts be closely tracked in the corporate database, and so another table, locations, was created for this purpose. Each record in the locations table includes a location name and foreign key reference to a record found in the supplies table.
Note
We know in the real world the location names would be managed in a separate table and then a join table
would relate locations and supplies together; just trying to keep things simple for the purposes of demonstration.
Remember from the last example that DreamFactory will create convenient join aliases which can be used in conjunction with the related parameter. In this case, that alias would be locations_by_supply_id. To create the relationship alongside the new supplies record, we’ll use that alias to nest the location name within the payload, as demonstrated here:
With the payload sorted out, all that remains is to make a request to the supplies table endpoint:
/api/v2/mysql/_table/supplies
If the nested insert is successful, you’ll receive a 200 status code in return along with the primary key ID of the newly inserted supplies record:
{
    "resource": [
        {
            "id": 15
        }
    ]
}
Updating Records
Updating database records is a straightforward matter in DreamFactory. However to do so you’ll first need to determine which type of REST update you’d like to perform. Two are supported:
PUT: The PUT request replaces an existing resource in its entirety. This means you need to pass along all of the resource attributes regardless of whether the attribute value is actually being modified.
PATCH: The PATCH request updates only part of the existing resource, meaning you only need to supply the resource primary key and the attributes you’d like to update. This is typically a much more convenient update approach than PUT, although to be sure both have their advantages.
Let’s work through update examples involving each method.
Updating Records with PUT
When updating records with PUT you’ll need to send along all of the record attributes within the request payload:
To update one or more (but not all) attributes associated with a particular record found in the supplies table, you’ll send a PATCH request to the supplies table endpoint, accompanied by the primary key:
/api/v2/mysql/_table/supplies/8
Suppose the supplies table includes attributes such as name, description, and purchase_date, but we only want to modify the name value. The JSON request body would look like this:
{
  "name": "Silver Stapler"
}
If successful, DreamFactory will return a 200 status code and a response body containing the primary key of the updated record:
{
  "id": 8
}
The equivalent SQL query looks like this:
UPDATE supplies SET name = ‘Silver Stapler’ WHERE id = 8;
Deleting Records
To delete a record, you’ll send a DELETE request to the table endpoint associated with the record you’d like to delete. For instance, to delete a record from the employees table you’ll reference this URL:
/api/v2/mysql/_table/employees/500016
If deletion is successful, DreamFactory will return a 200 status code with a response body containing the deleted record’s primary key:
{
    "resource": [
        {
            "emp_no": 500016
        }
    ]
}
The equivalent SQL query looks like this:
DELETE FROM employees WHERE emp_no = 500016;
Synchronizing Records Between Two Databases
You can easily synchronize records between two databases by adding a pre_process event script to the database API endpoint for which the originating data is found. To do so, navigate to the Scripts tab, select the desired database API, and then drill down to the desired endpoint. For instance, if we wanted to retrieve a record from a table named employees found within database API named mysql and send it to another database API (MySQL, SQL Server, etc.) named contacts and possessing a table named names, we would drill down to the following endpoint within the Scripts interface:
mysql > mysql._table.{table_name} > mysql._table.{table_name}.get.post_process mysql._table.employees.get.post_process
Once there, you’ll choose the desired scripting language. We’ve chosen PHP for this example, but you can learn more about other available scripting engines within our wiki documentation. Enable the Active checkbox, and add the following script to the glorified code editor:
// Assign the $platform['api'] array value to a convenient variable
$api = $platform['api'];

// Declare a few arrays for later use
$options = [];
$record = [];

// Retrieve the response body. This contains the returned records.
$responseBody = $event['response']['content'];

// Peel off just the first (and possibly only) record
$employee = $responseBody["resource"][0];

// Peel the employee record's first_name and last_name values,
// and assign them to two array keys named first and last, respectively.
$record["resource"] = [
    [
        'first' => $employee["first_name"],
        'last' => $employee["last_name"],
    ]
];

// Identify the location to which $record will be POSTed
// and execute an API POST call.
$url = "contacts/_table/names";
$post = $api->post;
$result = $post($url, $record, $options);
Save the changes, making sure the script’s Active checkbox is enabled. Then make a call to the employees table which will result in the return of a single record, such as:
Of course, there’s nothing stopping you from modifying the script logic to iterate over an array of returned records.
Working with Stored Procedures
Stored procedure support via the REST API is just for discovery and calling what you have already created on your database, it is not for managing the stored procedures themselves. They can be accessed on each database service by the _proc resource.
As with most database features, there are a lot of common things about stored procedures across the various database vendors, with of course, some pretty big exceptions. DreamFactory’s blended API defines the difference between stored procedures and how they are used in the API as follows.
Procedures can use input parameters (‘IN’) and output parameters (‘OUT’), as well as parameters that serve both as input and output (‘INOUT’). They can, except in the Oracle case, also return data directly.
Database Vendor Exceptions
SQLite does not support procedures (or indeed functions).
PostgreSQL calls procedures and functions the same thing (a function) in PostgreSQL. DreamFactory calls them procedures if they have OUT or INOUT parameters or don’t have a designated return type, otherwise functions.
SQL Server treats OUT parameters like INOUT parameters, and therefore require some value to be passed in.
Listing Available Stored Procedures
The following call will list the available stored procedures, based on role access allowed:
GET http(s)://<dfServer>/api/v2/<serviceName>/_proc
Getting Stored Procedure Details
We can use the ids url parameter and pass a comma delimited list of resource names to retrieve details about each of the stored procedures. For example if you have a stored procedure named getCustomerByLastName a GET call to http(s)://<dfServer>/api/v2/<serviceName>?ids=getCustomerByLastName will return:
In the below example, there is a stored procedure getUsernameByDepartment which takes two input parameters, a department code, and a userID. Making the following call:
where AB is the department code and 1234 is the userID, will return:
{
  "userID": "1234",
  "username": "Tomo"
}
Using POST
If a payload is required, i.e. passing values that are not url compliant, or passing schema formatting data, include the parameters directly in order. The same call as above can be made with a POST request with the following in the body:
{
  "params": ["AB", 1234]
}
Formatting Results
For procedures that do not have INOUT or OUT parameters, the results can be returned as is, or formatted using the returns URL parameter if the value is a single scalar value, or the schema payload attribute for result sets.
If INOUT or OUT parameters are involved, any procedure response is wrapped using the configured (a URL parameter wrapper) or default wrapper name (typically “resource”), and then added to the output parameter listing. The output parameter values are formatted based on the procedure configuration data types.
Note that without formatting, all data is returned as strings, unless the driver (i.e. mysqlnd) supports otherwise. If the stored procedure returns multiple data sets, typically via multiple “SELECT” statements, then an array of datasets (i.e. array of records) is returned, otherwise a single array of records is returned.
schema - When a result set of records is returned from the call, the server will use any name-value pairs, consisting of “<field_name>": “<desired_type>”, to format the data to the desired type before returning.
wrapper - Just like the URL parameter, the wrapper designation can be passed in the posted data.
{
  "resource": [
    {
      "id": "3",
      "name": "Write an app that calls the stored procedure.",
      "complete": 1
    },
    {
      "id": "4",
      "name": "Test the application.",
      "complete": 0
    }
  ],
  "inc": 6,
  "count": 2,
  "total": 5
}
Response with formatting applied…
{
  "data": [
    {
      "id": 3,
      "name": "Write an app that calls the stored procedure.",
      "complete": true
    },
    {
      "id": 4,
      "name": "Test the application.",
      "complete": false
    }
  ],
  "inc": 6,
  "count": 2,
  "total": 5
}
Using Symmetric Keys to Decrypt Data in a Stored Procedure (SQL Server)
SQL Server has the ability to do column level encryption using symmetric keys which can be particular useful for storing sensitive information such as passwords. A good example of how to do so can be found here
Typically, you would then decrypt this column (assuming the user has access to the certificate) with a statement such as the below in your sql server workbench:
OPEN SYMMETRIC KEY SymKey
DECRYPTION BY CERTIFICATE <CertificateName>;

SELECT <encryptedColumn> AS 'Encrypted data',
CONVERT(varchar, DecryptByKey(<encryptedColumn>)) AS 'decryptedColumn'
FROM SalesLT.Address;
Now, we cannot call our table endpoint (e.g /api/v2/<serviceName>/_table/<tableWithEncryptedField>) and add this logic with DreamFactory, however we could put the same logic in a stored procedure, and have DreamFactory call that to return our decrypted result. As long as the SQLServer user has permissions to the certificate used for encryption, it will be able to decrypt the field. (You could then use roles to make sure only certain users have access to this stored procedure).
The stored procedure would look something like this:
CREATE PROCEDURE dbo.<procedureName>
AS
BEGIN
  SET NOCOUNT on;
  OPEN SYMMETRIC KEY SymKey
  DECRYPTION BY CERTIFICATE <CertificateName>;

  SELECT <oneField>, CONVERT(nvarchar, DecryptByKey(<encryptedField>)) AS 'decrypted'
  FROM <table>;
END
return;
and then can be called by DreamFactory in with /_proc/<procedureName>
Obfuscating a Table Endpoint
Sometimes you might wish to completely obfuscate the DreamFactory-generated database API endpoints, and give users a URI such as /api/v2/employees rather than /api/v2/mysql/_table/employees. At the same time you don’t want to limit the ability to perform all of the usual CRUD tasks. Fortunately this is easily accomplished using a scripted service. The following example presents the code for a scripted PHP service that has been assigned the namespace employees:
Issuing a GET request to this endpoint would return all of the records. Issuing a POST request to this endpoint with a body such as the following would insert a new record:
If you’d like to see what queries are being executed by your MySQL database, you can enable query logging. Begin by creating a file named query.log in your Linux environment’s /var/log/mysql directory:
$ cd /var/log/mysql
$ sudo touch query.log
Next, make sure the MySQL daemon can write to the log. Note you might have to adjust the user and group found in the below chmod command to suit your particular environment:
Finally, turn on query logging by running the following two commands:
mysql> SET GLOBAL general_log_file = '/var/log/mysql/query.log';
Query OK, 0 rows affected (0.00 sec)

mysql> SET GLOBAL general_log = 'ON';
Query OK, 0 rows affected (0.00 sec)
To view your executed queries in real-time, tail the query log:
$ tail -f /var/log/mysql/query.log
/usr/sbin/mysqld, Version: 5.7.19-0ubuntu0.16.04.1 ((Ubuntu)). started with:
Tcp port: 3306  Unix socket: /var/run/mysqld/mysqld.sock
Time                 Id Command    Argument
2019-03-28T14:50:19.758466Z	   76 Quit
2019-03-28T14:50:31.648530Z	   77 Connect	[email protected] on employees using TCP/IP
2019-03-28T14:50:31.648635Z	   77 Query	use `employees`
2019-03-28T14:50:31.648865Z	   77 Prepare	set names 'utf8' collate 'utf8_unicode_ci'
2019-03-28T14:50:31.648923Z	   77 Execute	set names 'utf8' collate 'utf8_unicode_ci'
2019-03-28T14:50:31.649029Z	   77 Close stmt
2019-03-28T14:50:31.649305Z	   77 Prepare	select `first_name`, `hire_date` from `employees`.`employees` limit 5 offset 0
2019-03-28T14:50:31.649551Z	   77 Execute	select `first_name`, `hire_date` from `employees`.`employees` limit 5 offset 0
2019-03-28T14:50:31.649753Z	   77 Close stmt
2019-03-28T14:50:31.696379Z	   77 Quit
Checking Your User Credentials
Many database API generation issues arise due to a misconfigured set of user credentials. These credentials must possess privileges capable of connecting from the IP address where DreamFactory resides. To confirm your user can connect from the DreamFactory server, create a file named mysql-test.php and add the following contents to it. Replace the HOSTNAME, DBNAME, USERNAME, and PASSWORD placeholders with your credentials:
If the MySQL version number isn’t returned, then the user is unable to connect remotely.
Logging Your Database Queries
If you wish to see the database queries being generated by DreamFactory, you can open the .env file, and in ‘Database Settings’ you will see the following:
#DB_QUERY_LOG_ENABLED=false
Uncomment and set this to true, and also set APP_LOG_LEVEL=debug. Whenever you make a database query, the statement will be sent to the log file (found in storage/logs/dreamfactory.log). A typical output to the log will look like the following:
[2021-05-28T05:47:10.965487+00:00] local.DEBUG: API event handled: mysqldb._table.{table_name}.get.pre_process
[2021-05-28T05:47:10.966765+00:00] local.DEBUG: API event handled: mysqldb._table.employees.get.pre_process
[2021-05-28T05:47:12.388272+00:00] local.DEBUG: service.mysqldb: select `emp_no`, `birth_date`, `first_name`, `last_name`, `gender`, `hire_date` from `xenonpartners`.`employees` limit 2 offset 0: 1385.25
[2021-05-28T05:47:12.392063+00:00] local.DEBUG: API event handled: mysqldb._table.{table_name}.get.post_process
[2021-05-28T05:47:12.393794+00:00] local.DEBUG: API event handled: mysqldb._table.employees.get.post_process
Adding a Custom Log Message to your Database Queries
When using a scripted service, and with DB_QUERY_LOG_ENABLED set to true, it is possible to add a custom log message using the following syntax:
use Log;

...

if (config('df.db.query_log_enabled')) {
    \Log::debug(<your message>);
}

...
PostgreSQL has a number of extensions to enhance database capabilities. One of the most popular is PostGIS and its topology functionality for representing vector data.
If your PostgreSQL database uses this (or any other) extension, when using DreamFactory to make an API call (especially a function or procedure), you may see this error, or something similar to it:
This is most likely occuring because the extension’s functions are located in a different schema to the schema to the one of the database, and the postgreSQL user that DreamFactory has been assigned, as a result, cannot see it.
In order for DreamFactory to be able to see the extension’s functions, you should add this line to the Additional SQL Statements setting (change to match the extensions and schemas you are using) which you can find in the “Optional Advanced Settings” of your postgres service’s config tab.
SET search_path TO "$user", public, postgis, topology;
This will allow DreamFactory to search through additional schemas to find the functions that the database requires when using any extensions.
Conclusion
Congratulations! In less than an hour you’ve successfully generated, secured, and deployed a database-backed API. In the next chapter, you’ll learn how to add additional authentication and authorization solutions to your APIs.
6 - Authenticating Your APIs
One of DreamFactory’s most popular features is the wide-ranging authentication support. While API Key-based authentication is suffice for many DreamFactory-powered applications, developers often require a higher degree of security through user-specific authentication. In some cases Basic HTTP authentication will get the job done, however many enterprises require more sophisticated and flexible approaches largely because of the growing adoption of Single Sign On (SSO)-based solutions such as Active Directory and LDAP, and use of third-party identity providers and solutions such as AWS Cognito, Auth0, and Okta.
You’ll be pleased to know DreamFactory supports all of these options through a comprehensive set of authentication connectors. These connectors include Active Directory, LDAP, OAuth through well-known identity providers such as Facebook, GitHub, and Twitter, OpenID Connect, and SAML 2.0. In this chapter we’ll walk you through all of the different authentication integration options at your disposal!
Authentication Fundamentals
All DreamFactory APIs are private by default, requiring at minimum an API key for authentication purposes. The API key is associated with a role-based access control (RBAC) which determines what actions the client responsible for supplying the API key can undertake with regards to the API. For instance, it’s possible to create a read-only RBAC which ensures the client can’t access the API’s insertion, modification, or deletion endpoints if they exist. If you’re interested in protecting a database-backed API, you could limit access to a specific table, view, or stored procedure.
Further, DreamFactory supports both anonymous and user-based authentication. The former pertains to the provision of solely an API key, meaning DreamFactory won’t possess any additional information regarding the user responsible for issuing API calls through the client. However in many cases you’ll want to identify the connecting user by requiring authentication via an authentication provider such as Active Directory, LDAP, or Okta. In fact, DreamFactory supports these providers and more, including:
Basic Authentication
Active Directory
LDAP
OpenID Connect
OAuth, including support for providers such as Facebook and GitHub
SAML 2.0
The Authentication Process
Regardless of whether the desired authentication approach is anonymous or user-based, you’ll always supply an API key. This API key is passed along with the request via the X-DreamFactory-Api-Key header. DreamFactory will confirm the key exists (all API keys are listed under the administration console’s Apps tab), and then review the associated RBAC to confirm the request method and URI are permissible according to the RBAC definition.
When user-based authentication is used, DreamFactory will additionally expect a JSON Web Token (JWT) be passed along via the X-DreamFactory-Session-Token header. This JWT is generated by DreamFactory following a successful authentication against the authentication service provider. The following diagram outlines the authentication flow when using a third-party authentication provider such as Active Directory:
Once successfully authenticated, DreamFactory will generate the JWT and return it to the client. This JWT should then be submitted along with each subsequent request. DreamFactory will check the token’s validity and signature, examine the associated user’s assigned RBAC (role-based access controls can be assigned on a per user-basis via the user’s Roles tab), and if everything checks out the API call will be processed. The following diagram outlines this process:
OpenID affords users the convenience of using an existing account for signing into different websites. Not only does this eliminate the need to juggle multiple passwords, but OpenID also gives users greater control over what personal information is shared with websites that support OpenID. OpenID has been widely adopted since its inception in 2005, with companies such as Google, Microsoft, and Facebook offering OpenID provider services. Additionally, several OpenID libraries are available for integrating with these providers. Commercial editions of DreamFactory (versions 2.7 and newer) also support OpenID, allowing you to use OpenID-based authentication in conjunction with your APIs.
Configuring OpenID Connect
To configure DreamFactory’s OpenID connector, you’ll first need to identify an OpenID provider. This provider manages the credentials your users will use for authentication purposes. For the purposes of this tutorial we’ll use Google’s OpenID implementation. If you want to follow along with this specific example you’ll first need to login to Google’s API Console to create a set of OAuth2 credentials. After logging in, use the search field at the top of the screen to search for OAuth. In the dropdown that appears choose Credentials (see below screenshot).
Next, click on the Create credentials dropdown and select OAuth client ID:
Next you’ll be prompted to configure your consent screen. This is the screen the user sees when initiating the authentication process. Click Configure consent screen, and you’ll be prompted to add or confirm the following items:
Application type: Will this OpenID integration be used solely for users of your organization, or could users outside of your organization also use it to authenticate?
Application name: The name of the application associated with OpenID integration.
Application logo: You can optionally upload your organization or project logo for presentation on the consent screen.
Support email: An organizational e-mail address which the user could contact with questions and issues.
Scopes for Google APIs: This settings determines what data your application will be able to access on behalf of the authenticated user. We’ll use the default scopes for this example (email, profile, and openid).
Privacy policy URL: Self-explanatory
Terms of service URL: Self-explanatory
After saving these changes, you’ll be prompted for two final pieces of information:
The application type: You can select between Web application, Android, Chrome App, iOS, or Other. What you choose here won’t affect DreamFactory’s behavior, so be sure to choose the type most suitable to your specific application.
Restrictions: This oddly-named field asks you to supply an authorized JavaScript origin URL and/or an authorized redirect URI. The redirect URI is crucial here because it is the destination where Google will send the authorization code following successful authentication. This code must be intercepted by your application and forwarded on to DreamFactory to complete the process and generate the session token (JWT). If you don’t yet understand exactly how this will work, I suggest just reading on and returning to this configuration screen after seeing an example later in this section.
After saving your changes, you’re ready to configure DreamFactory’s OpenID Connect connector!
Configuring DreamFactory
DreamFactory’s authentication connectors are found in the same location as the standard API connectors. To view them, login to your DreamFactory instance and navigate to the Services tab. Choose Create, and in the dropdown that appears, select OAuth and finally OpenID Connect. You’ll be presented with the following initial configuration screen:
Name: The name will form part of your API URL, so you’ll want to use a lowercase string with no spaces or special characters. Further, you’ll want to typically choose something which allows you to easily identify the API’s purpose. For instance for your Google-backed OpenID Connect authentication API you might choose a name such as google or openid. Keep in mind a lowercased, alphanumeric name is required.
Label: The label is used for referential purposes within the administration interface and system-related API responses. You can use something less terse here, such as “Google OpenID API”.
Description: Like the label, the description is used for referential purposes within the administration interface and system-related API responses.
Active: This determines whether the API is active. By default it is set to active however if you’re not yet ready to begin using the API or would like to later temporarily disable it, just return to this screen and toggle the checkbox.
With these fields completed, click the Config tab to finish configuration. On this screen you’ll be presented with a number of fields, including:
Default Role: DreamFactory can automatically assign a default role (learn more about roles here) to a user following successful login. You can identify that role here. If you want to more selectively grant roles, see the Role per App field, introduced below.
Discovery Document Endpoint: If your identity provider offers a discovery document endpoint, adding it here will be the fastest way to configure your OpenID Connect connector. This is because doing so will automatically configure the rest of the fields, requiring you to only additionally supply the client ID, client secret, and redirection URL.
Authorization Endpoint: This endpoint authorizes access to a protected resource such as the resource owner’s identity. It will be invoked following the resource owner’s successful login and authorization for the requester to access said protected resource.
Token Endpoint: The token endpoint is contacted by the client after receiving an authorization code from the authorization endpoint. The client passes this authorization code to the token endpoint where if validated, tokens are returned to the client.
User Info Endpoint: This endpoint can be contacted by the client for reason of retrieving information about the logged-in user’s claims (name, email, etc.).
Validate ID Token: By checking this field, DreamFactory will validate the ID token by performing tasks such as checking that the encryption algorithm used to encrypt the token matches that specified by the OpenID provider, validating the token signature, and validating the token claims.
JWKS URI: This identifies the JSON Web Key Set (JWKS) URI. The JWKS contains the set of public keys used for JWT verification. For instance Google defines this URI as https://www.googleapis.com/oauth2/v3/certs.
Scopes: Scopes identify the level of restricted access requested by the client. For instance this might be some user profile information such as the name and e-mail address, or it might be access to an otherwise private service such as the user’s Google Calendar. Using this field you’ll define your scopes in comma-delimited format, such as openid,email,profile.
Client ID: Along with the client secret (introduced next), the client ID forms one part of the credentials pair used by the client to interact with the identity provider. You’ll obtain the client ID when creating a developer’s account with the desired identity provider.
Client Secret: The client secret is used in conjunction with the client ID to authenticate with the identity provider. You’ll receive this secret along with the client ID when creating a developer’s account with the identity provider.
Redirect URL: Perhaps more than any other, the OpenID redirect URL causes considerable confusion amongst developers when creating an OpenID flow. This is because a bit of additional coding within the application is required in order to complete the OpenID flow. Upon successful authentication and authorization on behalf of the identity provider, this URL will be contacted with a set of parameters that the URL’s script must then forward on to DreamFactory. DreamFactory will contact the identity provider one last time to verify the parameters, and then return a session token (JWT) to the script that initiated the forwarding. Without this additional sequence it would not be possible for your custom application to obtain the JWT! Don’t worry though, later in this section we provide an example script demonstrating this process.
Role per App: If assigning a blanket role through the Default Role setting is not desired, you can instead use this setting to assign roles on a per application basis.
After configuring these settings, press Save to persist the changes. Next we’ll complete the configuration process by creating a script responsible for completing the OAuth callback and generating the session token (JWT)
The OpenID Authentication Process
Recall when configuring Google’s OpenID settings you added the redirection URI:
This endpoint is responsible for intercepting the OAuth callback parameters which need to be forwarded onto DreamFactory in order to generate the session token. The following example PHP script does exactly this, and then returns the JSON object containing the JWT and other user profile data such as the name and e-mail address. Here’s the script:
You’ll add a script like this to your application in order to retrieve the JWT (defined within the session_token attribute) and subsequently pass that JWT along with future API requests. So now that all of the pieces to the puzzle are in place, what does the authentication workflow look like? Let’s walk through the entire process.
Step #1. User clicks on authentication link
To create the authentication link, you’ll use this URL:
Of course you’ll need to replace YOUR_DREAMFACTORY_SERVER with your DreamFactory server’s domain name, and YOUR_SERVICE_NAME with the name of the OpenID service you created inside DreamFactory.
Step #2. Login Using the Designated Identity Provider
Once the user clicks on this link he will be redirected to the authentication form, which when using Google OpenID looks like this:
After entering your e-mail address and password, the user will next be prompted to confirm permission for the client to access a specified set of resources:
Step #3. DreamFactory Generates the Session Key
Once the user clicks Allow, the OpenID provider will return the authorization information to the redirect URL. At this point the script associated with the redirect URL will forward that information on to DreamFactory (see above script), and DreamFactory will return the session token to the script, at which point your application can persist it and include it with subsequent requests.
Authenticating with Okta
Okta is a powerful and popular identity management solution used by thousands of businesses across the globe. Many developers wish to integrate Okta into their application authentication infrastructure, and DreamFactory offers a straightforward solution for doing so. In this tutorial we’ll guide you through the configuration process.
Configuring OKTA
Begin by creating an Okta account at https://www.okta.com if you haven’t already done so. Once logged-in, open the Admin section:
Next, you’ll add a new application:
Be sure to select SAML 2.0:
Next, we’ll configure the application:
Open Setup instructions, making sure you don’t close the tab containing these instructions as we’ll return to them later:
Configuring DreamFactory
Next, we’ll configure DreamFactory to support the new OKTA application. Begin by signing into DreamFactory as an administrator, and then navigate to the Roles section and configure a role for the users who will sign in via Okta SSO. Here’s an example of a role defining access to all APIs (not typical but nonetheless illustrative):
With the role defined, navigate to the Apps tab and create a new API key which will be associated with this role:
Creating the SAML 2.0 Service
With the role and API key defined, it’s time to create the SAML 2.0 service that will connect your Okta application to DreamFactory. Navigate to Services > Create, choose SSO, and finally SAML 2.0:
Begin by configuring the Info tab:
Next, configure the Config tab, filling in the fields with the information found in Okta’s Setup instructions page:
Save these changes, and navigate to the API Docs tab. Here you can see new Okta endpoints:
Adding Okta Users to the DreamFactory Application
With your Okta application created and DreamFactory configured, return to Okta, and in the Admin app navigate to the Application page:
Select our DreamFactory application in the list:
Assign this application to the People and Groups who will use it:
Go to the General tab and click the Edit button:
Change Single sign on URL and Audience URI (SP Entity ID) to the values presented in DreamFactory’s Okta API documentation, and then save the changes:
Application configuration
We’re almost done! Now we can sign in via Okta by going to the service’s /sso endpoint. In our example application we assign Sign in with OKTA button to this endpoint. Clicking this button, DreamFactory can return the X-DreamFactory-Session-Token, which we have to use for comunication with DreamFactory:
But how does DreamFactory know where send the token? We have to configure our Relay State for this purpose. Open the Services tab and select your OKTA SSO service. Navigate to the Config tab and update the Relay State field URL which will contain the token returned from DreamFactory. Our example site hosted on http://127.0.0.1:5500 will pass token to the /hello.html page:
DreamFactory will replace the _token_ with a real X-DreamFactory-Session-Token. You might then use JavaScript to persist this token to local storage, or use server-side languages to do the same using cookies:
Now we can communicate with DreamFactory by including X-DreamFactory-Session-Token and X-DreamFactory-API-Key in the request header:
Don’t forget add your application to the CORS interface via Config > CORS. Our example CORS configuration allows any requests to all DreamFactory endpoints with any headers. You can configure it to be more secure:
Debugging SAML
You can use a browser extension to view SAML messages as they are passed from client to the authentication service provider.
The Users tab offers a convenient interface for managing user profiles, however it only provides a window for essential information such as e-mail address, password, and phone number. You can however extend the profile by adding custom user attributes. How exactly this is accomplished will depend upon whether the user is authenticated or unauthenticated.
The former would apply when the user is perhaps logged into a profile manager and actively maintaining his own profile via a web form, for instance. The latter would apply in cases where an administrator was editing profiles using an administrative interface, or perhaps a script was bulk updating user information. In this section we’ll show you how to update user profiles to suit both situations.
Adding Custom Attributes to Authenticated Users
If the user is authenticated and managing his own profile, you’ll use the POST /api/v2/user/custom endpoint, passing along the user’s session key and a payload containing the custom attributes. For instance if the user wanted to update his office building and number, then the following payload would be sent to the aforementioned endpoint:
Note how the payload itemizes each attribute using a name and value pair. Also, don’t forget to additionally send along the user’s session token using the X-DreamFactory-Session-Token header.
For more information about
Adding Custom Attributes to Unauthenticated Users
If you want to administratively modify an unauthenticated user’s custom attributes, you’ll use the PUT /api/v2/system/user/{ID} endpoint and additionally supply the related parameter. Here is an example URI:
For more information about managing custom user attributes, check out this wiki page.
LDAP Authentication with DreamFactory
Setting up LDAP-based authentication for your users into your DreamFactory workflow is a simple process, and even with LDAPS requires little configuration on the client (DreamFactory) side. In the following section we will guide you through setting up this process. If you would like to create an LDAP server to test, then we have also provided a tutorial below to setup a basic directory with two users.
Testing Your LDAP Connection
Before actually creating an LDAP service, the best way to test that DreamFactory is able to connect to your LDAP server is by creating the following script from within your DreamFactory environment.
The LDAP uri will be along the lines of ldap://host:port(if necessary)
The BaseDN will be, for example, dc=practice,dc=net
The uid can be any user you wish to test with.
Save and run php connection.php and, if succesful, you will get a return looking like:
`uid=tomo,ou=Employee,dc=practice,dc=net`
This shows that DreamFactory can see your LDAP server, and we will be able to configure our service.
Configuring LDAP
To configure LDAP, login to your DreamFactory instance using an administrator account and click on the Services tab:
On the left side of the interface you’ll see the Create button. Click this button to begin. You’ll be presented with a single dropdown form control titled Select Service Type. You’ll often use this dropdown to generate new APIs as well as configuring authenetication options. For now, lets navigate to LDAP and then Standard LDAP
After selecting Standard LDAP, you’ll be presented with the following form:
Let’s review these fields:
Name: The name will form part of the API URL, so use a lowercase string with no spaces or special characters. Further, you’ll want to typically choose something which alloways you to easily identify its purpose. For your LDAP authentication you might choose a name such as ldap, users, or developers. Lowercasing is a requirement.
Label: The label is used for referential purposes within the administration interface, and will also be used when selecting the authentication type when logging in (more on this later). Something less terse is ok here, such as “LDAP User Login”.
Description: Like the label, the description is used for referential purposes within the administration interface and system-related API responses.
After completing these fields, click on the Config tab localted at the top of the interface. You’ll be presented with the following form:
There are not too many fields here, so lets go through them:
Host: The directory server’s host address. This may be an IP address or domain name. Enter the port number here as well.
Default Role: DreamFactory can automatically assign a default role (see more here) to a user following successful login. You can identify that role here.
Role per App: If assigning a blanket role through the Default Role setting is not desired, you can instead use this setting to assign roles on a per application basis.
Base DN: i.e the starting point wher eyour LDAP server searches for users. For example dc=example,dc=com
Account Suffix: Usually the same as your Base DN, e.g. @example.com
Tip
Remember the default port for LDAP (ldap://) is 389, and for LDAPS (ldaps://) is 636.
After completion, press the save button to generate. After a moment you’ll see a pop up message indicating Service Saved Succesfully. Congratulations!
Now log out of DreamFactory, and you will notice that the login page now has a “Services” dropdown. The service will correspond to the label you assigned when creating the LDAP service.
Select your new ldap authentication method, and you will be able to login with a username (uid) and userPassword.
If you log out, and log back in as the administrator, you will now notice that in the Users Tab, the user you signed in with over ldap has been added.
Configuring LDAPS
For LDAPS, the process is much the same as described above, however you will need to go into your DreamFactory server, and make the following change / addition to /etc/ldap/ldap.conf
TLS_REQCERT allow
(you can also use TLS_REQCERT never)
If you are using a client certificate, then make sure the TLS_CACERT option is pointing to the right file also. (You can also use TLS_CACERTDIR to point to a directory rather than a specific file). Remember to also run sudo update-ca-certificates after installing your certificate.
API Authentication Using LDAP
You can make the following API call for your ldap service:
POST https://your-url/api/v2/user/session?service={ldap_service_name}
The only client side configuration change you will need to make (as mentioned previously) is having TLS_REQCERT allow in your ldap.conf file, and if you are using a client certificate, double checking the TLS_CACERT option is pointing to the right file, and that you have run sudo update-ca-certificates.
Server Side
As you are no doubt aware, configuring LDAPS can be somewhat of a nightmare. Given everyone’s setup is different, it can be difficult to offer any advice serverside, however we have found the following settings to work:
Check the certificate permissions and ownership (should be given to openldap):
dn: cn=config
add: olcTLSCipherSuite
olcTLSCipherSuite: NORMAL
-
add: olcTLSCRLCheck
olcTLSCRLCheck: none
-
add: olcTLSVerifyClient
olcTLSVerifyClient: never
Remember to add ldaps:/// to your /etc/default.slapd file. The SLAPD_SERVICES line should look like the following:
SLAPD_SERVICES="ldap:/// ldapi:/// ldaps:///"
Creating an LDAP Server
If you would like to have a try at creating an LDAP server, or just want something simple to test with, we have prepared the following tutorial to help setup a local LDAP server. The following has been made with Ubuntu as the OS.
Tip
Remember to have ports 389 and 636 open!
In your server, first run sudo apt update and sudo apt upgrade to make sure everything is up to date.
Now we can start the configuration process. sudo apt install slapd ldap-utils. This will then ask you to create your administrator password. Once you have done so run sudo dpkg-reconfigure slapd and follow the below instructions:
Omit OpenLDAP Server Configuration? -> No
DNS Domain Name: E.g. practice.net
Organization Name: E.g. Practice
Password -> The same that you previoulsy created
Database Backend -> use MDB
Database removed when slapd is purged? -> No
Move Old Database? -> Yes
You can check everything has installed correctly by running sudo tree /etc/ldap/slapd.d. You should get something back looking like this:
Lets create a couple of entries. We will need a distinguished name, object class, the organizational unit (attributes associated with the class), and the entries themselves. Whenever we add (or modify), we need to create a file in the .ldif format.
Create a file sudo vim add_entries.ldif and add the following (edit as you wish):
Notice we have created two organizational units; Employee, and Groups. We’ve then created a “Developers” group, and two employees who belong to the Employee organizational unit, and who are both “Developers” (through gidNumber). To add our new group and employees:
It will prompt you for your password, and then return the following:
adding new entry "ou=Employee, dc=practice, dc=net"

adding new entry "ou=Groups, dc=practice, dc=net"

adding new entry "cn=developers, ou=Groups, dc=practice, dc=net"

adding new entry "uid=tomo, ou=Employee, dc=practice, dc=net"

adding new entry "uid=alex, ou=Employee, dc=practice, dc=net"
We can confirm these entries are added by running ldapsearch -x -LLL -b dc=practice,dc=net.
And you should be good to go! You can now create an LDAP authentication service in DreamFactory using the guide above.
Setting up LDAPS
If you already have your own ssl certificate for your domain then you should use that. For the purposes of this excercise we will create our own self-signed certificate in order to get LDAPS up and running:
First lets get the tools required to create our ssl certificates:
and run sudo update-ca-certficates and you should get a return stating a certificate has been added to the list of trusted CAs. Something like the following:
Updating certificates in /etc/ssl/certs...
1 added, 0 removed; done.
Running hooks in /etc/ca-certificates/update.d...
done.
We need to then create a private key for the server. We can do so by running:
(Change the filename of the key to match your domain).
Moving on, we will create a template for our server certificate (again, change filenames and common names to match your domain). sudo vim /etc/ssl/localhost.info and add the following:
Almost there! Now we just need to tell slapd about our TLS configugration. Create a file sudo vim certinfo.ldif and point everything to the right place.
and then update: sudo ldapmodify -Y EXTERNAL -H ldapi:/// -f certinfo.ldif
Finally we just need to go to our slapd config file located at /etc/default/slapd and add ldaps to it. The SLAPD_Service line should end up looking like the below:
SLAPD_SERVICES="ldap:/// ldapi:/// ldaps:///"
Restarting slapd with sudo systemctl restart slapd will start our ldaps connection. If you run sudo lsof -i -P -n | grep LISTEN you should now see port 636 listening. The output will be similar to this:
DreamFactory offers an extraordinarily powerful solution for creating APIs and adding business logic to existing APIs using a variety of popular scripting languages including PHP, Python (versions 2 and 3), Node.js, and JavaScript. In this chapter we’ll walk you through several examples which will hopefully spur the imagination regarding the many ways in which you can take advantage of this great feature.
Supported Scripting Languages
DreamFactory has several scripting languages available for customized scripting of endpoints and services. To get a list of the currently supported and configured scripts on a particular instance, use the API endpoint:
The sandbox parameter means that the script execution is bound by memory and time and is not allowed access to other operating system functionalities outside of PHP’s context. Therefore, be aware that DreamFactory cannot control what is done inside scripts using non-sandboxed languages on a server.
The following languages are typically supported on most DreamFactory installations:
Node.js
PHP
Python
Places to use DreamFactory Scripting
Scripts can be used within two places in DreamFactory, Event Scripting and Scripted Services. Event Scripting is tied to and triggered by API calls, internal events or other scrips. The other way is through customize-able script services. There is a scripting service type for each supporting scripting language (above). For mor information see Script Services.
Programatic Resources Available to a Script
When a script is executed, DreamFactory passes the script(s) two primary resources to allow the script to access many parts of the system including the state, configuration and even the ability call other internal APIs (services) or external APIs. They are the event and platform resources and are described below.
The “resource” term is used generically in this context. Depending on the scripting language being used, the resource could be an object (Node.js, Python) or an array (PHP)
The Event Resource
The event resource holds data about the event triggering the script in question (Event Scripting) or from the API service call in the case of Scripted Services.
In order for a script to be able to modify the event resource, the script must be configured to allow modification to events. This is done by checking the “Allow script to modify request payload” checkbox in the script editing screen.
The following are the properties of the event resource. Below are similar tables for the properties of each property.
Property
Type
Description
request
resource
Represents the inbound REST API call, i.e. the HTTP request
response
resource
Represents the response to an inbound REST API call, i.e the HTTP response
resource
string
Any additional resource names typically represented as a replaceable part of the path, i.e. “table name” on a db/_table/{table_name} call.
event.request
The request resource contains all the components of the original HTTP request. This resource is always available, and is writeable during pre-process event scripting.
Property
Type
Description
api_version
string
The API version used for the request (i.e. 2.0)
Method
string
The HTTP method of the request (i.e. GET, POST, PUT)
Parameters
resource
An object/array or query string parameters received with the request, indexed by parameter name
headers
resource
An object/array of HTTP headers from the request, indexed by the lowercase header name
content
string
The body of the request in raw string format
content_type
string
The format type (i.e. “application/json”) of the raw content of the request
payload
resource
The body (POST body) of the request, i.e. the content converted to an internally useable object.array if possible
Any changes to this data will overwrite existing data in the request. Before further listeners are called and/or the request is handled by the called service.
event.response
The response resource contains all of the data being sent back to the client from the request.
This resource is only available on post-process event and script service scripts.
Property
Type
Description
status_code
integer
The HTTP status code of the response (i.e. 200, 404, 500 etc)
headers
resource
An object/array of the HTTP headers for the response back to the client
content
mixed
The body of the request as an object if the content_type is not set, or in raw string format
content_type
string
The content type (i.e. json) or the raw content of the request
Just like request, any allowed changes to response will overwrite existing data in the response, before it is sent back to the caller
The Platform Resource
The platform resource is used to access configuration and system states as well as the the actual REST API of your instance via inline calls. This makes internal requests to other services directly without requiring an HTTP call.
The platform resource has the following properties.
Property
Type
Description
api
resource
An array/object that allows access to the instance’s REST API
config
resource
An array/object consisting of the current configuration of the instance
session
resource
An array/object consisting of the current session information
platform.api
The api resource for the platform object contains methods for instance API access. The object contains a method for each type of REST verb.
Function
Description
get
GET a resource
post
POST a resource
put
PUT a resource
patch
PATCH a resource
delete
DELETE a resource
All of the methods above accept the same arguments:
service - Required. The service name (as used in APU calls) or an external URI
** resource_path** - Optional depending on your call. Resources of the service called
payload - Optional but must contain a valid object for the language of the script
options - Optional, may contain headers, query params and cURL options
When you are only calling internally, only the relative URL is required (without the /api/v2 portion). Absolute URLs ("https://example.com/my_api") can be passed to access external resources. See Scripting Tutorials and Examples for examples of calling platform.api methods from scripts.
platform.config
The config resource of the platform object contains configuration settings for the DreamFactory instance. There is one property of the config object:
The session resource of the platform object contains information about the state of the current session for the event.
Function
Description
api_key
DreamFactory API key
session_token
Session token, i.e. JWT
user
User information derived form the supplied session token, i.e. JWT
app
App information derived from the supplied API key
lookup
Available lookups for the session
8 - Integrating Business Logic Into Your DreamFactory APIs
DreamFactory does a very good job of generating APIs for a wide variety of data sources, including Microsoft SQL Server, MySQL, SFTP, AWS S3, and others. The generated API endpoints encompass the majority of capabilities a client is expected to require when interacting with the data source. However, software can rarely be created in cookie-cutter fashion, because no two companies or projects are the same. Therefore DreamFactory offers developers the ability to modify API endpoint logic using the scripting engine.
The scripting engine can also be used to create standalone APIs. This is particularly useful when no native nor third-party API exists to interact with a data source. For instance you might want to create an API capable of converting CSV files into a JSON stream, or you might wish to use a Python package to create a machine learning-oriented API. Such tasks can be accomplished with the scripting engine.
In this chapter you’ll learn how to both extend existing APIs and create standalone APIs using the scripting engine. Finally, the chapter concludes with a section explaining how to configure DreamFactory’s API request scheduler. First though let’s review DreamFactory’s scripting engine support.
Supported Scripting Engines
DreamFactory currently supports four scripting engines, including:
PHP: PHP is the world’s most popular server-side web development language.
Python: Python is a popular and multifaceted language having many different applications, including artificial intelligence, backend web development, and data analysis. Both versions 2 and 3 are supported.
Node.js: Node.js is a JavaScript runtime built atop Chrome’s V8 JavaScript engine.
Keep in mind these aren’t hobbled or incomplete versions of the scripting engine. DreamFactory works in conjunction with the actual language interpreters installed on the server, and allows you to import third-party libraries and packages into your scripting environment.
Configuring Python 3
DreamFactory 3.0 added support for Python 3 due to Python 2.X offically being retired on January 1, 2020. Keep in mind DreamFactory’s Python 2 integration hasn’t gone away! We just wanted to provide users with plenty of time to begin upgrading their scripts to use Python 3 if so desired.
Python 3 scripting support will automatically be made available inside all DreamFactory 3 instances. However, there is an important configuration change that new and upgrading users must consider in order for Python 3 scripting to function properly. Whereas DreamFactory’s Python 2 support depends upon Bunch, Bunch does not support Python 3 and so a fork of the Bunch package called Munch must be used instead.
You’ll install Munch via Python’s pip package manager. A Python 3-specific version of pip known as pip3 should be used for the installation. If your server doesn’t already include pip3 (find out by executing which pip3), you can install it using your server operating system’s package manager. For instance on Ubuntu you can install it like this:
Once installed, you’ll need to update your .env file (or server environment variables) to point to the Python 3 interpreter:
DF_PYTHON3_PATH=/usr/local/bin/python3
You can find your Python 3 interpreter path by executing this command:
$ which python3
After saving these changes, restart your PHP-FPM and Apache/Nginx service.
Resources Available to Scripts
When a script is executed, DreamFactory passes in two very useful resources that allow each script to access many parts of the system including system states, configuration, and even a means to call other services or external APIs. They are the event resource and the platform resource.
Note: The term “resource” is used generically here, based on the scripting language used, the resource could either be an object (i.e. Node.js) or an array (i.e. PHP).
The Event Resource
The event resource contains the structured data about the event triggered (Event Scripting) or from the API service call (Script Services). As seen below, this includes things like the request and response information available to this “event”.
Note: Determined by the type of event triggering the script, parts of this event resource are writable. Modifications to this resource while executing the script do not result in a change to that resource (i.e. request or response) in further internal handling of the API call, unless the event script is configured with the allow_event_modification setting to true, or it is the response on a script service. Prior to 2.1.2, the allow_event_modification was accomplished by setting a content_changed element in the request or response object to true.
The event resource has the following properties:
Property
Type
Description
request
resource
A resource representing the inbound REST API call, i.e. the HTTP request.
response
resource
A resource representing the response to an inbound REST API call, i.e. the HTTP response.
resource
string
Any additional resource names typically represented as a replaceable part of the path, i.e. “table name” on a db/_table/{tableName} call.
Event Request
The request resource contains all the components of the original HTTP request. This resource is always available, and is writable during pre-process event scripting.
Property
Type
Description
api_version
string
The API version used for the request (i.e. 2.0).
method
string
The HTTP method of the request (i.e. GET, POST, PUT).
parameters
resource
An object/array of query string parameters received with the request, indexed by the parameter name.
headers
resource
An object/array of HTTP headers from the request, indexed by the lowercase header name. Including content-length, content-type, user-agent, authorization, and host.
content
string
The body of the request in raw string format.
content_type
string
The format type (i.e. “application/json”) of the raw content of the request.
payload
resource
The body (POST body) of the request, i.e. the content, converted to an internally usable object/array if possible.
uri
string
Resource path, i.e. /api/v2/php.
service
string
The type of service, i.e. php, nodejs, python.
Please note any allowed changes to this data will overwrite existing data in the request, before further listeners are called and/or the request is handled by the called service.
Retrieving A Request Parameter
To retrieve a request parameter using PHP, you’ll reference it the parameter name via the $event[‘request’][‘parameters’] associative array:
This will return the key/value pair, such as “id=50”. Therefore you’ll want to use a string parsing function such as PHP’s explode() to retrieve the key value:
The response resource contains the data being sent back to the client from the request.
Note: This resource is only available/relevant on post-process event and script service scripts.
Property
Type
Description
status_code
integer
The HTTP status code of the response (i.e. 200, 404, 500, etc).
headers
resource
An object/array of HTTP headers for the response back to the client.
content
mixed
The body of the request as an object if the content_type is not set, or in raw string format.
content_type
string
The content type (i.e. json) of the raw content of the request.
The Platform Resource
This platform resource may be used to access configuration and system states, as well as, the REST API of your instance via inline calls. This makes internal requests to other services directly without requiring an HTTP call.
The platform resource has the following properties:
Property
Type
Description
api
resource
An array/object that allows access to the instance’s REST API.
config
resource
An array/object consisting of the current configuration of the instance.
session
resource
An array/object consisting of the current session information.
Platform API
The api resource contains methods for instance API access. This object contains a method for each type of REST verb.
The service name (as used in API calls) or external URI.
resource_path
optional
Resources of the service called.
payload
optional
Must contain a valid object for the language of the script.
options
optional
May contain headers, query parameters, and cURL options.
Calling internally only requires the relative URL without the /api/v2/ portion. You can pass absolute URLs like 'http://example.com/my_api' to these methods to access external resources. See the scripting tutorials for more examples of calling platform.api methods from scripts.
Node.js Platform API Example
var url = 'db/_table/contact';
var options = null;
platform.api.get(url, options, function(body, response) {
        var result = JSON.parse(body);
        console.log(result);
});
url = 'db/_table/contact'
result = platform.api.get(url)
data = result.read()
print data
jsonData = bunchify(json.loads(data))
Platform Config
The config object contains configuration settings for the instance.
Function
Description
df
Configuration settings specific to DreamFactory containing but not limited to the version, api_version, always_wrap_resources, resources_wrapper, and storage_path.
Platform Session
Function
Description
api_key
DreamFactory API key.
session_token
Session token, i.e. JWT.
user
User information derived from the supplied session token, i.e. JWT. Includes display_name, first_name, last_name, email, is_sys_admin, and last_login_date
app
App information derived from the supplied API key.
lookup
Available lookups for the session.
Adding HTTP Headers, Query Parameters, or cURL Options to API Calls
You can specify any combination of headers and query parameters when calling platform.api functions from a script. This is supported by all script types using the options argument.
Node.js
var url = 'http://example.com/my_api';
var payload = {"name":"test"};
var options = {
    'headers': {
        'Content-Type': 'application/json'
    },
    'parameters': {
        'api_key': 'my_api_key'
    },
};
platform.api.post(url, payload, options, function(body, response) {
        var result = JSON.parse(body);
        console.log(result);
}
For PHP scripts, which use cURL to make calls to external URLs, you can also specify any number of cURL options. Calls to internal URLs do not use cURL, so cURL options have no effect there.
cURL options can include HTTP headers using CURLOPT_HTTPHEADER, but it’s recommended to use $options[‘headers’] for PHP to send headers as shown above.
Modifying Existing API Endpoint Logic
The scripting interface is accessible via the Scripts tab located at the top of the DreamFactory administration console. Once entered, you’ll be presented with a list of APIs hosted within your DreamFactory instance. Enter one of the APIs and you’ll see a top-level summary of the endpoint branches associated with that API. For instance, if you enter a database-backed API you’ll see branches such as _func (stored function), _proc (stored procedure), _schema (table structure), and _table (tables). For instance, this screenshot presents the top-level interface for a Microsoft SQL Server API:
If you keep drilling down into the branch, you’ll find you can apply logic to a very specific endpoint. Additionally, you can choose to selectively apply logic to the request (pre-process) or response (post-process) side of the API workflow, can queue logic for execution outside of the workflow, and can specify that the logic executes in conjunction with a specific HTTP verb (GET, POST, etc.). We’ll talk more about these key capabilities later in the chapter.
If you continue drilling down to a specific endpoint, you’ll eventually arrive at the script editing interface. For instance in the following screenshot we’ve navigated to a SQL Server API’s customer table endpoint. Specifically, this script will execute only when a GET request is made to this endpoint, and will fire after the data has been returned from the data source.
Tip
DreamFactory’s ability to display a comprehensive list of API endpoints is contingent upon availability of corresponding OpenAPI documentation. This documentation is automatically generated for the native connectors, however for connectors such as Remote HTTP and Scripted, you can supply the OpenAPI documentation in order to peruse the endpoints via the scripting interface. One great solution for generating OpenAPI documentation is Stoplight.io.
Although the basic script editor is fine for simple scripts, you’ll probably want to manage more complicated scripts using source control. After configuring a source control API using one of the native Source Control connectors (GitHub, BitBucket, and GitLab are all supported), you’ll be able to link to a script by selecting the desired API via the Link to a service select box located at the bottom left of the interface presented in the above screenshot.
Examples
Let’s review a few scripting examples to get your mind racing regarding what’s possible.
Validating Input Parameters
When inserting a new record into a database you’ll naturally want to first validate the input parameters. To do so you’ll add a pre_process event handler to the target table’s post method endpoint. For instance, if the API namespace was mysql, and the target table was employees, you would add the scripting logic to the mysql._table.account.post.pre_process endpoint. Here’s a PHP-based example that examines the POST payload for missing values and also confirms that a salary-related parameter is greater than zero:
$payload = $event['request']['payload'];

if(!empty($payload['resource'])){
    foreach($payload['resource'] as $record){
        if(!array_key_exists('first_name', $record)){
            throw new \Exception('Missing first_name.');
        }

        if(!array_key_exists('hire_date', $record)){
            throw new \Exception('Missing hire_date.');
        }

        if($record['salary'] <= 0){
            throw new \Exception('Annual salary must be > 0');
        }
    }
}
Transforming a Response
Suppose the API data source returns a response which is not compatible with the destination client. Perhaps the client expects response parameters to be named differently, or maybe some additional nesting should occur. To do so, you can add business logic to a post_process endpoint. For instance, to modify the response being returned from the sample MySQL database API’s employees table endpoint, you’ll add a script to mysql._table.employees.get.post_process. As an example, here’s what a record from the default response looks like:
Specifically, we’ve combined the first_name and last_name parameters, and removed the hire_date parameter. To accomplish this you can add the following PHP script to the mysql._table.employees.get.post_process endpoint:
Just like in normal code execution, execution of a script is stopped prematurely by two means, throwing an exception, or returning.
// Stop execution if verbs other than GET are used in Custom Scripting Service
if (event.request.method !== "GET") {
    throw "Only HTTP GET is allowed on this endpoint."; // will result in a 500 back to client with the given message.
}

// Stop execution and return a specific status code
if (event.resource !== "test") {
    // For pre-process scripts where event.response doesn't exist yet, just create it
    event.response = {};
    // For post-process scripts just update the members necessary
    event.response.status_code = 400;
    event.response.content = {"error": "Invalid resource requested."};
    return;
}

// defaults to 200 status code
event.response.content = {"test": "value"};
Throwing An Exception
If a parameter such as filter is missing, you can throw an exception like so:
// PHP
if (! array_key_exists('filter', $event['request']['parameters'])) {
    throw new \DreamFactory\Core\Exceptions\BadRequestException('Missing filter');
}
(Note that “code” will return the status code of the exception unless you provide one).
The Following Exceptions are available to you:
Exception
Returned Status Code
Argument 1
Argument 2
Argument 3
BadRequestException
400 Bad Request
message (string)
code (integer)
BatchException
400 Bad Request
resources (array)*
message (string)
code (integer)
ConflictResourceException
409 Conflict
message (string)
code (integer)
DFException
500 Internal Server Error
Exception**
ForbiddenException
403 Forbidden
message (string)
code (integer)
InternalServerErrorException
500 Internal Server Error
message (string)
code (integer)
InvalidJsonException
400 Bad Request
message (string)
code (integer)
NotFoundException
404 Not Found
message (string)
code (integer)
NotImplementedException
501 Not Implemented
message (string)
code (integer)
RestException
Whatever you want***
status code (integer)
message (string)
code (integer)
ServiceUnavailableException
503 Service Unavailable
message (string)
code (integer)
TooManyRequestsException
429 Too Many Requests
message (string)
code (integer)
UnauthorizedException
401 Unauthorized
message (string)
code (integer)
and can be implemented with (php) throw new \DreamFactory\Core\Exceptions\<ExceptionFromAbove>(<arguments>)
* The array of resources given as the first argument for a batch exception can contain “regular” data (e.g. data from a succesful call or a string saying “success”) as well as instances of Exceptions. For example if we made a POST batch request, of which two failed, and one was succesful, you could use BatchException in the following manner (hardcoded but it should give you an idea):
Our Script:
//PHP
$errorOne = new \DreamFactory\Core\Exceptions\BadRequestException('Missing Name');
$errorTwo = new \DreamFactory\Core\Exceptions\BadRequestException('Missing Location');

$successfulCall = array("Name"=>"Tomo", "Location"=>"London");

$errorArray = array($errorOne, $successfulCall, $errorTwo);

throw new \DreamFactory\Core\Exceptions\BatchException($errorArray,'Some failed requests');
Here our “Error” array shows that the first (0) and third (2) “resource” failed, as can be seen in the “resource” object following.
** You can use the DFException if you want the status code to be a 500 internal error, but containing an instance of a seperate Exception. For example if we wanted to show our BadRequestException but throw it as a 500 our script may look something like:
\\PHP
$error = new \DreamFactory\Core\Exceptions\BadRequestException('Missing Location');
throw new \DreamFactory\Core\Exceptions\DFException($error);
Which would return a 500 status code response, but the response itself would contain the following, including the status code of our actual error (in this case 400):
*** By using a RestException, you can have the response be any accepted HTTP status code you like. It must be provided as the first argument, otherwise the Exception will simply return a 500.
For example, to throw a “I’m a teapot” Exception, the end of your script might well be:
//PHP
...
throw new \DreamFactory\Core\Exceptions\RestException(418, "Sorry Mate");
To create a standalone scripted service, you’ll navigate to Services > Create and then click the Select Service Type dropdown. There you’ll find a scripted service type called Script, and under it you’ll find links to the supported scripting engine languages (PHP, Python, and NodeJS):
After choosing your desired language you’ll be prompted to supply the usual namespace, label, and description for your API. Click the Next button and you’ll be presented with a simple text editor. You’re free to experiment by writing your script inside this editor, or could use the Link to a service option to reference a script stored in a file system, or within a repository. Keep in mind you’ll first need to configure the source control or file API in order for it to be included in the Link to a service dropdown.
In addition to taking full advantage of the scripting language syntax, you can also use special data structures and functionality DreamFactory injects into the scripting environment. For instance, you can listen for request methods using the $event['request']['method'] array value. For instance try adding the following code to a scripted service:
Save the changes, and then try contacting the scripted service endpoint with GET and POST methods. The dd() function will fire for each respective conditional block.
For more sophisticated routing requirements, we recommend taking advantage of one of the many OSS routing libraries. For instance bramus/router offers a lightweight PHP routing package that can easily be added to DreamFactory (see the next section, “Using Third-Party Libraries”). Once added, you’ll be able to create sophisticated scripted service routing solutions such as this:
set_include_path("/home/dreamfactory/libraries");

require_once('CustomResponse.php');

$router = new \Bramus\Router\Router();
$response = new \DreamFactory\CustomResponse();

$router->before('GET', '/.*', function () {
  header('X-Powered-By: bramus/router');
});

$router->get('/.*', function() use($response) {
  $response->setContent('Hello Router World!');
});

$router->set404(function() {
  header('HTTP/1.1 404 Not Found');
  $response->setContent('404 not found');
});

$router->run();

return $response->getContent();
Example Standalone Scripted Services
Obfuscate Table Endpoints (PHP)
This script allows you to obfuscate table endpoints to a more concise endpoint. For example, you might want to change service_name/_table/employees to just exployees.
Paste the script into the PHP scripted service and change api_path variable to be whatever service/_table/tablename you want to obfuscate. Save the service. It is now available using the standard DreamFactory table record API procedures, except the endpoint is shortened.
<?php

// Set up the platform object with shortcuts to each verb
$api = $platform['api'];
$get = $api->get;
$post = $api->post;
$put = $api->put;
$patch = $api->patch;
$delete = $api->delete;

$api_path = 'db/_table/todo'; // the service/_table/tablename you wish to obfuscate
$method = $event['request']['method']; // get the HTTP Method
$options['parameters'] = $event['request']['parameters']; // copy params from the request to the options object

// if there are additional resources in the request path add them to our request path
if ( $event['resource'] && $event['resource'] != '' ) {
  $api_path = $api_path . '/' . $event['resource'];
}

if ( $event['request']['payload'] ) { // if the payload is not empty assign it to the payload var
  $payload = $event['request']['payload'];
} else { //else make the payload null
  $payload = null;
}

switch ( $method ) { // Determine which verb to use when making our api call
case 'GET':
  $result = $get ( $api_path, $payload, $options );
  break;
case 'POST':
  $result = $post ( $api_path, $payload, $options );
  break;
case 'PUT':
  $result = $put ( $api_path, $payload, $options );
  break;
case 'PATCH':
  $result = $patch ( $api_path, $payload, $options );
  break;
case 'DELETE':
  $result = $delete ( $api_path, $payload, $options );
  break;
default:
  $result['message'] = 'Invalid verb.';
  break;
}

return $result; // return the data response to the client

?>
Using Third-Party Libraries
As mentioned earlier in this chapter, DreamFactory passes the scripts along to the designed scripting language that’s installed on the server. This means you not only have access to all of the scripting language’s syntax (as opposed to some hobbled version), but also the language community’s third-party packages and libraries!
Adding a Composer Package
DreamFactory is built atop the PHP language, and uses Composer to install and manage a number of internally built and third-party packages which are used throughout the platform. If you’d like to take advantage of a Composer package within your scripts, install it globally using the global modifier. For instance, suppose you wanted to send out a Tweet from a script. You can use the twitteroauth package to do so:
$ composer global require abraham/twitteroauth
Once installed, you can use the package within a DreamFactory script via it’s namespace as demonstrated in the following example:
You’ll want to install packages globally because the only other alternative is to install them locally via DreamFactory’s Composer files. The packages will behave identically to those installed globally, however you’ll eventually overwrite DreamFactory’s Composer files when it’s time to upgrade.
Adding a PHP Class Library
If you’d like to reuse custom code within scripts, and don’t want to manage the code within a Composer package, you could alternatively add the class to PHP’s include path using the set_include_path() function. Once included, you can use the require_once statement to import the class. This approach is demonstrated in the following example script:
The referenced Filter class is found in a file named Filter.php and looks like this:
<?php

namespace WJGilmore\Validate;

use Exception;

class Validate {

  public function username($username) {

    if (preg_match("/^[a-zA-Z0-9\s]*$/", $username) != 1) {
      throw new Exception("Username must be alphanumeric.");
    }

  return true;

  }

}
If you’d like to permanently add a particular directory to PHP’s include path, modify the include_path configuration directive.
Queued Scripting Setup
DreamFactory queued scripting takes advantage of Laravel’s built-in queueing feature, for more detailed information, see their documentation here. Every DreamFactory instance comes already setup with the ‘database’ queue setting with all necessary tables created (scripts and failed_scripts). The queue configuration file is stored in config/queue.php and can be updated if another setup is preferred, such as Beanstalkd, Amazon SQS, or Redis.
DreamFactory also fully supports the following artisan commands for configuration and runtime execution:
queue:failed                       List all of the failed queue scripts
queue:flush                        Flush all of the failed queue scripts
queue:forget                       Delete a failed queue script
queue:listen                       Listen to a given queue
queue:restart                      Restart queue worker daemons after their current script
queue:retry                        Retry a failed queue script
queue:work                         Process the next script on a queue
Specifying The Queue
You may also specify the queue a script should be sent to. By pushing scripts to different queues, you may categorize your queued scripts, and even prioritize how many workers you assign to various queues. This does not push scripts to different queue connections as defined by your queue configuration file, but only to specific queues within a single connection. To specify the queue, use the queue configuration option on the script or service.
Specifying The Queue Connection
If you are working with multiple queue connections, you may specify which connection to push a script to. To specify the connection, use the connection configuration option on the script or service.
Delayed Scripts
Sometimes you may wish to delay the execution of a queued script for some period of time. For instance, you may wish to queue a script that sends a customer a reminder e-mail 5 minutes after sign-up. You may accomplish this using the delay configuration option on your script or service. The option values should be in seconds.
Running The Queue Listener
Starting The Queue Listener
Laravel includes an Artisan command that will run new scripts as they are pushed onto the queue. You may run the listener using the queue:listen command:
php artisan queue:listen
You may also specify which queue connection the listener should utilize:
php artisan queue:listen connection-name
Note that once this task has started, it will continue to run until it is manually stopped. You may use a process monitor such as Supervisor to ensure that the queue listener does not stop running.
Queue Priorities
You may pass a comma-delimited list of queue connections to the listen script to set queue priorities:
php artisan queue:listen --queue=high,low
In this example, scripts on the high queue will always be processed before moving onto scripts from the low queue.
Specifying The Script Timeout Parameter
You may also set the length of time (in seconds) each script should be allowed to run:
php artisan queue:listen --timeout=60
Specifying The Queue Sleep Duration
In addition, you may specify the number of seconds to wait before polling for new scripts:
php artisan queue:listen --sleep=5
Note that the queue only sleeps if no scripts are on the queue. If more scripts are available, the queue will continue to work them without sleeping.
Processing The First Script On The Queue
To process only the first script on the queue, you may use the queue:work command:
php artisan queue:work
Dealing with Failed Scripts
To specify the maximum number of times a script should be attempted, you may use the --tries switch on the queue:listen command:
After a script has exceeded this amount of attempts, it will be inserted into a failed_jobs table.
Retrying Failed Scripts
To view all of your failed scripts that have been inserted into your failed_jobs database table, you may use the queue:failed Artisan command:
php artisan queue:failed
The queue:failed command will list the script ID, connection, queue, and failure time. The script ID may be used to retry the failed script. For instance, to retry a failed script that has an ID of 5, the following command should be issued:
php artisan queue:retry 5
To retry all of your failed scripts, use queue:retry with all as the ID:
php artisan queue:retry all
If you would like to delete a failed script, you may use the queue:forget command:
php artisan queue:forget 5
To delete all of your failed scripts, you may use the queue:flush command:
php artisan queue:flush
Scheduled Tasks
DreamFactory does not natively support scheduled tasks but you can setup a CRON job for this purpose. Let’s create an example that calls an API every minute of the day.
Creating the Script
First we will create the script to call the API. One easy way to do so is by navigating to the API Docs tab and copying the cURL command for the appropriate call we would like to make. In this case we have business logic attached to GET on _table/employees that is synchronizing data between two databases.
Once we have the cURL command we can convert it to PHP by using this useful tool. After we will create a file named cron.php in the public folder containing the generated PHP code.
This can be broken into 4 parts, the timing, execute PHP, path to script, and the output. In this example the * * * * * means it will run once every minute. The second portion is the path to PHP to allow it to be executed. The important part is now providing the full path to the file you would like to run. Finally you can write the output to a file or discard it, in this case I have set it to be discarded. If you would like to learn more about the structure, check out this article.
Next you will edit the crontab by running the following:
$ crontab -e
You will be put into the text editor where you can simply paste in your CRON job and save it. Now you have a scheduled task running every minute to call your API!
Example Scripts
This section contains example scripts in PHP, Python, and NodeJS. For additional examples please consult these resources:
This script monitors usage of a particular service, saving history in a database table. Each time a GET call is made on an API endpoint, write the transaction details to a ‘TransactionHistory’ table. Record the user name, application API key, and timestamp.
// To enable Node.js scripting, set the path to node in your DreamFactory .env file.
// This setting is commented out by default.
//
// DF_NODEJS_PATH=/usr/local/bin/node
//
// Use npm to install any dependencies. This script requires 'lodash.'
// Your scripts can call console.log to dump info to the log file in storage/logs.

var payload = {

    user_name: platform.session.user.email,
    api_key: platform.session.api_key,
    timestamp: (new Date()).toString()
};

platform.api.post("db/_table/TransactionHistory", {"resource": [payload]}, '', function(body, response){

    console.log(response.statusCode + " " + response.statusMessage);
    event.setResponse(JSON.parse(body), response.statusCode, 'applicaton/json');
});
PHP Dynamic Authorization Headers
This PHP script is retrieving the configuration details for a particular Service and modifying the authorization headers. It can be very useful to have a script automatically do this for you if you are maintaining many Services that rotate passwords. The $randomNum variable can even be replaced with a seperate API call to an OAuth endpoint for example that returns a JWT for authentication against your Service. Finally this script can be attached to our Scheduler feature to automatically run this script to ensure you are always authenticated.
// Configuring variables
$url = 'system/service/<service_id>';
$api = $platform['api'];
$get = $api->get;
$options = [];
$randomNum = rand(1000000000000,5000000000000000000);

// Retrieve the service details
$calling = $get($url);
$configAuth = $calling["content"];
// Set the new Auth Header for the Service
$configAuth["config"]["options"] = "abc".$randomNum;

// Setting the payload to have the new Auth Header
$payload = $configAuth;

// Execute a PATCH to replace the previous Auth Header of the Service
$postURL = 'system/service';
$patch = $api->patch;

$result = $patch($url, $payload, $options);

return $result;
More Information
We’re still in the process of migrating scripting documentation into this guide, so for the time being please consult our wiki for more information about scripting:
GitLab subgroups were introduced in GitLab 9.0, and are supported by DreamFactory. You will still have access to both repository lists, as well as the files and directories (and indeed branches) of a particular respository, however due to the nature of the GitLab API, our service creation process will slightly differ depending on what you wish to do.
Accessing the Repository List
To be able to access details of all repositories within your subgroup, proceed with creating your GitLab service in the usual manner(Services -> Source Control -> GitLab Service). However, for the Namespace/Group field, enter the ID of the subgroup you wish to connect (instead of the name).
Tip
If you’re using the hosted version of GitLab, you can go to https://gitlab.com/<groupname>/<subgroupname> and the ID will be listed under the subgroup name.
If you’re hosting yourself then you can make a GET request to http://<gitserver>/api/v4/groups?search=<subgroupname>&private_token=<token> to get the ID.
Your config tab will thus look similar to this:
Create your service, and assign a role and app in the usual manner (For more information on roles see here. For more about applications, see here). To interact with the API, we will make a GET request to ../api/v2/<gitlabservicename>/_repo
Reminder
Your application will generate an API Key for you. The header in your API call should be named X-DreamFactory-Api-Key. See more on API interaction here
You will get a response containing details of all the repositories within your subgroup in JSON format:
Accessing Individual Repositories
If you want to access one particular repository and its file structure, the process is much the same, but instead of giving the subgroup ID as the Namespace/Group, we need to give it <groupName></subgroupName>, i.e. our config tab will now look something like this:
Now we can make a GET request to ../api/v2/<gitlabservicename>/_repo/<repositoryname>, and the JSON response will be the file structure of your repository.
We can also add a file path to the end of our URI to get further details about an individual file (such as commit ids). Using the above image as an example, a call to ../_repo/subgrouptest1/somefiles/testdesign.css returns the following:
Fantastic.
Tip
If you want to see a different branch, you can add the parameter ?branch=<yourbranch> to the end of the URI. This may also be useful when troubleshooting as Dreamfactory will default to searching for the master branch. If your repo was created in the GitLab dashboard, there is a good chance that the branch is main.
10 - Limiting and Logging API Requests
In this chapter you’ll learn how to use DreamFactory’s API limiting and logging capabilities to assign and monitor access to your restricted APIs.
Logging
Whether you’re debugging API workflows or conforming to regulatory requirements, logging is going to play a crucial role in the process. In this section we’ll review various best practices pertaining to configuring and managing both your DreamFactory platform logs and logs managed through DreamFactory’s Elastic Stack integration.
Introducing the DreamFactory Platform Logs
DreamFactory developers and administrators will often need to debug platform behavior using informational and error messages. This logging behavior can be configured within your .env file or within server environmental variables. If you open the .env file you’ll find the following logging-related configuration parameters towards the top of the file:
APP_DEBUG: When set to true, a debugging trace will be returned if an exception is thrown. While useful during the development phase, you’ll undoubtedly want to set this to false in production.
APP_LOG: DreamFactory will by default write log entries to a file named dreamfactory.log found in storage/logs. This is known as single file mode. You can instead configure DreamFactory to break log entries into daily files such as dreamfactory-2019-02-14.log by setting APP_LOG to daily. Keep in mind however that by default only 5 days of log files are maintained. You can change this default by assigning the desired number of days to APP_LOG_MAX_FILES. Alternatively, you could send log entries to the operating system syslog by setting APP_LOG to syslog, or to the operating system error log using errorlog.
APP_LOG_LEVEL: This parameter determines the level of log sensitivity, and can be set to DEBUG, INFO, NOTICE, WARNING, ERROR, CRITICAL, ALERT, and EMERGENCY. DreamFactory can be very chatty when this parameter is set to DEBUG, INFO, or NOTICE, so be wary of using these settings in a production environment. Also, keep in mind these settings are hierarchical, meaning if you set APP_LOG_LEVEL to WARNING for instance, then all WARNING, ERROR, CRITICAL, ALERT, and EMERGENCY messages will be logged.
Here’s an example of typical output sent to the log:
[2019-02-14 22:35:45] local.DEBUG: API event handled: mysql._table.{table_name}.get.pre_process
[2019-02-14 22:35:45] local.DEBUG: API event handled: mysql._table.employees.get.pre_process
[2019-02-14 22:35:45] local.DEBUG: API event handled: mysql._table.{table_name}.get.post_process
[2019-02-14 22:35:45] local.DEBUG: API event handled: mysql._table.employees.get.post_process
[2019-02-14 22:35:45] local.DEBUG: Service event handled: mysql._table.{table_name}.get
[2019-02-14 22:35:45] local.DEBUG: Logged message on [mysql._table.{table_name}.get] event.
[2019-02-14 22:35:45] local.DEBUG: Service event handled: mysql._table.{table_name}.get
[2019-02-14 22:35:45] local.DEBUG: Service event handled: mysql._table.employees.get
[2019-02-14 22:35:45] local.INFO: [RESPONSE] {"Status Code":200,"Content-Type":null}
[2019-02-14 22:35:45] local.INFO: [RESPONSE] {"Status Code":200,"Content-Type":"application/json"}
Logstash
DreamFactory’s Gold edition offers Elastic Stack (Elasticsearch, Logstash, Kibana) support via the Logstash connector. This connector can interface easily with the rest of the ELK stack (Elasticsearch, Logstash, Kibana) from Elastic.io or connect to other analytics and monitoring sources such as open source Grafana.
To enable the Logstash connector you’ll begin as you would when configuring any other service. Navigate to Services, then Create, then in the Service Type select box choose Log > Logstash. Then, add a name, label, and description as you would when configuring other services:
Next, navigate to the “Config” tab at the top of the service creation page. In the next two screenshots you can see the fields and options you will need to select. In the first screenshot, you will add the host. In this case, I am hosting the Logstash connector locally, on my DreamFactory instance. The other optionss are the Port and Protocol/Format. The port corresponds to the port in which your Logstash daemon is running. The Protocol/Format field should be set to match the protocol/format for which your Logstash service is configured to accept input:
GELF (UDP): GELF (GrayLog Extended Format) was created as an optimized alternative to syslog formatting. Learn more about it here.
HTTP: Choose this option if your Logstash service is configured to listen on HTTP protocol. DreamFactory will send the data to Logstash in JSON format.
TCP: Choose this option if your Logstash service is configured to listen on TCP protocol. DreamFactory will send the data to Logstash in JSON format.
UDP: Choose this option if your Logstash service is configured to listen on UDP protocol. DreamFactory will send the data to Logstash in JSON format.
In this second screenshot, you can see some of the logging options available to you via the Logstash connector. I have also added a few services that I would like to log. You can pick various levels information you would like to log. For more detailed information, please see this article.
Valid options are:
fatal
error
warn
info
debug
trace
info
Default Data Objects that can be Captured
The screenshot above shows the default data objects we can catch and send to logstash by selecting the appropiate checkbox. (We can also create scripts to send custom data to logstash which will be explained further below). These data objects can be seperated into three “sections”, Request, Response, and Platform. “Request” and “Response” will be sent to logstash within an “event” object, and “Platform” in its own object, i.e in the following manner:
Data objects that can be captured within the “Request” section are as follows:
Data Object
Will Provide
Content
The body of your api call (if any). For example the resource sent in a POST request.
Content-Type
The entity type, generally application/json
Headers
Will include all headers including host, origin, accept-enconding, accept, user-agent, referer, connection, content-type, x-dreamfactory-api-key, x-dreamfactory-session-token, accept-language, content-length
Parameters
Any parameters added to the api request such as fields, filter, and order
Method
i.e GET, POST etc.
Payload
The resource been sent in the api call as a JSON object (such as in a POST request)
URI
The uri of the request starting with api/v2/
Service
The name of the api service being called, e.g. if you have a mysql connector called “mysql-db” it will display mysql-db
Resource
The endpoint being called of that service, e.g. _table/employees?limit=1
All
All of the above
Note: The API Resource option will show the endpoint of the service being called (e.g employees if calling the employees table in a database). It will not be nested inside the ‘request’ object.
Response
Data objects that can be captured within the “Response” section are as follows:
Data Object
Will Provide
Status Code
The status code of the event (eg 200 for succesful, 401 for unauthorized )
Content
A JSON object of the response content (such as the first employee details in a call to /employeeslimit=1)
Content-Type
The entity type, generally application/json
All
All of the above
Platform
Data objects that can be captured within the “Platform” section are as follows:
Data Object
Will Provide
Config
Configuration of the DreamFactory Platform, e.g. scripting language paths, storage paths, whether windows authorization is enabled etc.
Session
Will return the session_token, whether a role has been assigned to the service, and details of the dreamfactory user making the call.
Session User
Details of the user making the call (e.g username, email, whether they are an admin etc.)
Session API Key
The API key being used (this will be associated with the Role and its correspondong App)
All
All of the above
Custom Logstash Messages
Using DreamFactory’s scripting service we can send customized logs to logstash through a simple internal POST call. This can be a powerful tool as we can send additional information to logstash that otherwise might not be provided in a regular api call, or indeed we might want a simpler, more human message than what is provided in an api response.
For example, whenever a new user is created, we may want to send that information, along with details of who created that user to logstash. We can do so by adding the following script to our system.user.post endpoint:
// Only send to logstash on successful creation
if($event['response']['status_code']===201){$email='';$userName='';$createdUser=$event['request']['payload']['resource'][0]['name'];$createdUserEmail=$event['request']['payload']['resource'][0]['email'];# Get details of the currently logged in user.
if($platform['session']['user']&&$platform['session']['user']['email']){$userEmail=$platform['session']['user']['email'];$userName=$platform['session']['user']['name'];}$log=array("level"=>"alert","message"=>"New user created: {$createdUser}, Email: {$createdUserEmail}, New User Created by: {$userName}, Email: $userEmail");# Send message to logstash
$api=$platform["api"];$post=$api->post;$url='<theNameOfYourLogstashService';$post($url,$log);}
(Replace <theNameOfYourLogstashService> with the name you assigned to your Logstash Service in DreamFactory).
As can be seen above, the POST call takes two arguments, the url of the logstash connector (which we can make with an internal call so only the name of the logstash service is necessary) plus the log itself which should be an array containing the level and the message. The message can be interpolated to contain any variable you create.
Filtering Sensitive Data from Elastic Stack
Sensitive information such as social security numbers, dates of birth, and genetic data must often be treated in a special manner and often altogether excluded from log files. Fortunately Logstash offers a powerful suite of features for removing and mutating data prior to its insertion within Elasticsearch. For instance, if you wanted to prevent API keys from being logged to Elasticsearch you could define the following filter:
As an alternative to the ELK stack, it is possible to hook Logstash up with Splunk to index your DreamFactory logs. The process is relatively simple, however will require some minor modification to your logstash configuration. For the purposes of this tutorial, we will be using Splunk Cloud, although it is a similar process for Splunk Enterprise.
In the Splunk Dashboard, go to Settings->Data inputs->Http Event Collector. First, check and amend the “Global Settings”, making sure that “All Tokens” are enabled, and, if you wish, setup your “Default Source Type” and “Default Index” accordingly (they do not need to be assigned).
Click “New Token”, and follow the prompts, assigning a Name, Source name override if you wish, and a description. Then choose your allowed index, for this example we will use the “main” index. Generate your token, and copy paste it somewhere for later. You will end up with something like the below screenshot (which can be found by clicking on your token in the HTTP Event Collector dashboard):
For your Logstash configuration file, we will use http for our output, turn off ssl verification for testing purposes, and amend our DreamFactory “message” object (which is what comes into Logstash) to “event” (which is what Splunk accepts). So our bare-bones configuration file will look something like this:
# What logstash is listening on, and what DreamFactory is sending to:
input {
  http {
    host => "127.0.0.1"
    port => "12201"
  }
}

output {

  http {
    # ssl verification is turned off just for testing.
    ssl_verification_mode => none
    format => "json"
    http_method => "post"
      # Splunk Cloud's port by default will be 8088. /services/collector is where to send our logs to.
      url => "<splunkURL>:<port>/services/collector"
      # Your token should be preceeded by "Splunk " (the space is important!)
      headers => ["Authorization", "Splunk <splunkToken>"]
      mapping => {
        # We will send our "message" to splunk, but the root key needs to be renamed to "event"
        "event" => "%{message}"
      }
  }
}
Remember!
SSL verification is turned off just for our testing / dev environments. You will not want this off in production!
With our Logstash server running, and DreamFactory configured appropiately, you should now see logs appearing in Splunk’s “main” index. You can see this by clicking on “Search and Reporting” in the Splunk dashboard and running a search on index="main". Here is a picture of the DreamFactory Configuration:
and the data that is sent to Splunk whenever the system/admin endpoint is called via a GET request.
Troubleshooting Your Logstash Environment
If you’re not seeing results show up within Kibana, the first thing you should do is determine whether Logstash is talking to Elasticsearch. You’ll find useful diagnostic information in the Logstash logs, which are found in LS_HOME/logs or possibly within /var/log/logstash. If your Logstash environment is unable to talk to Elasticsearch you’ll find an error message like this in the log:
[2019-02-14T16:20:24,403][WARN ][logstash.outputs.elasticsearch] Attempted to resurrect connection to dead ES instance, but got an error
If Logstash is unable to talk to Elasticsearch and the services reside on two separate servers, the issue is quite possibly due to a firewall restriction.
DreamFactory limits can be set for a specific user, role, service, or endpoint. Additionally, you can set limits for each user, where every user will get a separate counter. Limits can be created to only interact with a specific HTTP verb, such as a GET or you could create another limit for a POST to a specific service. Endpoint limits also provide yet another powerful way to restrict at a granular level within your DreamFactory instance.
Limits Hierarchy
Limits can be created to cover an entire instance or provide coverage down to a specific endpoint. When limits are combined, a type of limits hierarchy is created where the broader limits can sometimes override the more granular ones. Take for example a limit created for the entire instance with 500 hits per minute. If a limit is created for a specific service for 1,000 hits per minute, the instance limit would issue a 429 HTTP (over limit) error at 500 hits within a minute, so the service limit would never ever reach 1,000. Make sure to keep the big picture in mind when creating multiple limits and planning your limits strategy. Set the more broad-based limit types at an appropriate level to the more granular ones.
Limit Types
Each API limit is based on a specific period of time when the limit expires and resets. Options here are configurable and include minute, hour, day, 7-day (week), and 30-day (month). The variety of limit types in combination with limit periods allows for a wide range of control over your instance. The following table provides an overview of the different types of limits available.
Limit Type
Description
Instance
Controls rate limiting over the entire instance to include all services, roles, and users. Limit counter here is cumulative, regardless of user, service, etc.
User
Provides rate limit control to a specified user. In the case where both a User limit and an Each User limit is set, the user-specific limit will override Each User in terms of rate. However, both counters will still increment.
Each User
Sets a rate limit for each user. The main difference between this and the entire instance is that every user gets a separate counter.
Role
Enable rate limiting by a specified role.
Service
Enable rate limiting by a specified service.
Service by User
Enable rate limiting for a specific user on a specific service.
Service by Each User
Enable rate limiting for each user on a specific service.
Endpoint
Enable rate limiting by a specified endpoint.
Endpoint by User
Enable rate limiting for a specific user on a specific endpoint.
Endpoint by Each User
Enable rate limiting for each user on a specific endpoint.
Limit Periods
Limit periods include minute, hour, day, 7-day (week), and 30-day (month). The limit period determines how long the limit remains in effect until automatically resetting after the period has expired.
Limits via API
Like all other services in DreamFactory, limits can be managed via the API alone, provided that the user has the appropriate permissions to the system/ resource. Limits can be managed from the following endpoints:
api/v2/system/limit - Endpoints to manage CRUD operations for limits.
api/v2/system/limit_cache - Endpoints to check current limit volume levels and reset limit counters manually.
Creating Limits
Limits are created by sending a POST to /api/v2/system/limit. To create a simple instance limit, POST the following resource to the endpoint:
Limit Type
API “type” Parameter
Additional Required Params *
Instance
instance
N/A
User
instance.user
user_id
Each User
instance.each_user
N/A
Service
instance.service
service_id
Service By User
instance.user.service
user_id, service_id
Service by Each User
instance.each_user.service
service_id
Endpoint
instance.service.endpoint
service_id, endpoint
Endpoint by User
instance.user.service.endpoint
user_id, service_id, endpoint
Endpoint by Each User
instance.each_user.service.endpoint
service_id, endpoint
Role
instance.role
role_id
Standard required parameters include: type, rate, period, and name. Below is a table which describes all of the available parameters that can be passed when creating limits.
Parameter
Type
Required
Description
type
{string}
Yes
The type of instance you are creating. See table above for a detailed description
key_text
{string}
N/A
Informational field only. This key is built automatically byt the system and is a unique identifier for the limit.
rate
{integer}
Yes
Number of allowed hits during the limit period.
period
{enum}
Yes
Period where limit automatically resets. Valid values are: ‘minute’, ‘hour’, ‘day’, ‘7-day’, ‘30-day’
user_id
{integer}
(see above table)
Id of the user for user type limits.
role_id
{integer}
(see above table)
Id of the role for role type limits.
service_id
{integer}
(see above table)
Id of the service for service and endpoint type limits.
name
{string}
Yes
Arbitrary name of the limit (required).
description
{string}
No
Limit description (optional)
is_active
{boolean}
No
Defaults to true. Additionally, you can create a limit that is in an “inactive” state which can be activated later (optional).
create_date
{timestamp}
N/A
Informational only.
last_modified_date
{timestamp}
N/A
Informational only.
endpoint
{string}
(see above table)
Endpoint string (see table above when required). Additionally, reference the section on Endpoint Limits for additional information.
verb
{enum}
No
Defaults to all verbs. Passing an individual verb will only set the limit for those requests. Can be specified with any limit type. Valid values are: GET, POST, PUT, PATCH, DELETE
User vs. Each User Limits
You can assign a limit to a specific user for the entire instance, a particular service, or a specific endpoint. This type of limit will only affect a single user, not the entire instance, service, or endpoint. Each User type limits can also be created for these as well, the main difference being that in an Each User limit, every user will get a separate counter. For example, if you set a limit on a particular service and set the rate at 1,000 hits per day, a single user can reach the limit and it would affect any subsequent requests coming in to that service, regardless of user. In an Each User Service type limit, every user will get a separate counter to reach the 1,000 per day. This also works the same with the other limit types.
NOTE: There is no way to clear an individual user’s counter with Each User type limits, only a User limit.
Clearing the counter for an Each User limit type will reset all users.
Service Limits
When you create a service limit, you are limiting based on a specific service. To create this type of limit, pass in the id of the service you want to create.
Role Limits
Role limits are much the same as the service limits, but combined with the security settings in Role, you can create some really powerful role-based limit combinations.
Endpoint Limits
Endpoint limits allow an API administrator to get very granular on what type of requests can be singled out for limiting. Basically anything available in the API Docs tab of the Admin Application can be used as an endpoint limit. Endpoint limits can, and in some cases should be combined with a specific verb. Since all of the endpoints within DreamFactory are tied into services, a service_id is required when creating endpoint limits. So, if you are targeting db/_table/contact, you will need to select the db service by id and the supply the rest of the endpoint as a string. Example:
Creating the type of limit as shown in the example above would only hit if the specific resource of the request coming in matches exactly the stored limit. Therefore, only _table/contact would increment the limit counter, not _table/contact/5 or further variations on the endpoint’s parameters.
Wildcard Endpoints
Because there may be a situation where you want to limit an endpoint and all variations on the endpoint as well, we have built in the ability to add wildcards to your endpoint limits. So, by adding a wildcard * character to your endpoint, you are creating an endpoint limit that will hit with the specific endpoint as well as any additional parameters. Every endpoint limit is associated with a service. Therefore, endpoint limits are simply an extension of a service type limit. A service limit will provide limit coverage to every endpoint under the service, whereas the endpoint limit is more targeted. Combined with wildcards and specific verbs, endpoint limits become very powerful.
Limit Cache
By default, Limits use a file-based cache storage system. Garbage collection is automatic and is based on the limit period. You can poll the limit cache system via API in order to get the current hit count for each limit. The GET call to system/limit_cache will provide the Id of the limit, a unique key, the max number of attempts and the current attempt count, as well as remaining attempts in the limit period.
Clearing Limit Cache
Clearing the limit cache involves resetting the counter for a specific limit. Additionally, all limit counters can be reset at once by passing a allow_delete=true parameter to the system/limit_cache endpoint. Passing the Id of a specific limit to the system/limit_cache endpoint, such as system/limit_cache/11 will only clear the limit counter for that particular limit.
Limit Cache Storage Options
By default, the limit cache uses file-based caching. This file cache is separate from the DreamFactory (main) cache so that when cache is cleared in DreamFactory, limit counts are not affected. Redis can also be used with the limit cache. Please see the .env-dist file for limit cache options.
11 - Securing Your DreamFactory Environment
The DreamFactory platform is built atop the Laravel framework. Laravel is an amazing PHP-based framework that in just a few short years has grown in popularity to become one of the today’s most popular framework solutions. There are several reasons for its popularity, including a pragmatic approach to convention over configuration, security-first implementation, fantastic documentation, and a comprehensive ecosystem (in addition to the framework itself, the Laravel team maintains a number of sibling projects, among them an e-commerce framework called Spark, an application adminstration toolkit called Nova, and an application deployment service called Envoyer). Regardless, like any application you’re going to want to learn all you can about how to best go about maintaining and securing the environment.
Security
CORS Security
CORS (Cross-Origin Resource Sharing) is a mechanism that allows a client to interact with an API endpoint which hails from a different domain, subdomain, port, or protocol. DreamFactory is configured by default to disallow all outside requests, so before you can integrate a third-party client such as a web or mobile application, you’ll need to enable CORS.
You can modify your CORS settings in DreamFactory under the Config tab. You’ll be presented with the following interface:
To enable CORS for a specific originating network address such and an IP address or domain, press the plus + button located at the top of the screen. Doing so will enable all of the configuration fields found below:
Path: The Path field defines the path associated with the API you’re exposing via this CORS entry. For instance if you’ve created a Twitter API and would like to expose it, the path might be /api/v2/twitter. If you want to expose all APIs, use *.
Description: The Description field serves as a descriptive reference explaining the purpose of this CORS entry.
Origins: The Origins field identifies the network address making the request. If you’d like to allow more than one origin (e.g. www.example.com and www2.example.com), separate each by a comma (www.example.com,ww2.example.com). If you’d like to allow access from anywhere, supply an asterisk *.
Headers: The Headers field determines what headers can be used in the request. Several headers are whitelisted by default, including Accept, Accept-Language, Content-Language, and Content-Type. When set, DreamFactory will send as part of the preflight request the list of declared headers using the Access-Control-Allow-Headers header.
Exposed Headers: The Exposed Headers field determines which headers are exposed to the client.
Max Age: The Max Age field determines how long the results of a preflight request (the information found in the Access-Control-Allow-Methods and Access-Control-Allow-Headers headers) can be cached. This field’s value is passed along to the client using the Access-Control-Max-Age field.
Methods: The Methods field determines which HTTP methods can be used in conjunction with this CORS definition. The selected values will be passed along to the client using the Access-Control-Allow-Methods field.
Supports Credentials: The Supports Credentials field determines whether this CORS configuration can be used in conjunction with user authentication. When enabled, the Access-Control-Allow-Credentials header will be passed and set to true.
Enabled: To enable the CORS configuration, make sure this field is enabled.
Always make sure your CORS settings are only set for the appropriate “scheme/host/port tuple” to ensure you are observing the maximum security you can by only allowing cross origin resources access when there is no other way around it. For a great explanation of CORS, refer to these articles:
From a networking standpoint DreamFactory is a typical web application, meaning you can easily encrypt all web traffic between the platform and client using an SSL certificate. Unless you’ve already taken steps to add an SSL certificate to your web server, by default your DreamFactory instance will run on port 80, which means all traffic between your DreamFactory server and client will be unencrypted and therefore subject to capture and review. To fix this, you’ll want to install an SSL certificate. One of our favorite resources to create SSL certificates is Let’s Encrypt.
Below are resources on how to add an SSL cert to your web server:
When generating APIs using DreamFactory’s native connectors, you’ll logically need to supply a set of credentials so DreamFactory can connect to and interact with the underlying data source. These credentials are stored in the system database, and are encrypted using AES-256 encryption. The credentials are decrypted on-the-fly when DreamFactory connects to the destination data source, and are never cached in plaintext.
Suppressing Errors
When running DreamFactory in a production environment, be sure to set the .env file’s APP_ENV value to production and APP_DEBUG to false. Leaving it set to local will result in detailed error-related information being returned to the client rather than quietly logged to the log file. When set properly in a production environment, your .env file will look like this:
...APP_DEBUG=false
Environment this installation is running in: local, production (default)
APP_ENV=production
Separating the Web Administration Interface from the Platform
New DreamFactory users often conflate the web administration interface with the API platform; in fact, the web administration interface is just a client like any other. It just so happens that the DreamFactory team built this particular interface expressly for managing the platform in an administrative capacity. This interface interacts with the platform using a series of administrative APIs exposed by the platform, and accessible only when requests are accompanied by a session token associated with an authenticated administrator.
By default this interface runs on the same server as the platform itself. Some users prefer to entirely separate the two, running the interface in one networking environment and entirely isolating the platform in another.
The interface is maintained within an Angular application hosted in a public GitHub repository. The README file contains instructions regarding both building the Angular app and separating it from the platform. To learn more head over to the GitHub repository.
Best Practices
For database-backed APIs, create the API using a database account privileges that closely correspond to your API privilege requirements. For instance, if the database includes a table called employees but there is no intention for this table to be accessible via the API, then configure the proxy user’s privileges accordingly.
Never use a blanket API key for your APIs! Instead, create roles which expressly define the level of privileges intended to be exposed via the API, and then associate the role with a new App and corresponding API Key. Don’t be afraid to create multiple roles and therefore multiple corresponding API keys if you’d like to limit API access in different ways on a per-client or group basis.
Should you need to make API documentation available to team members, use DreamFactory’s user-centric role assignment feature to make solely the documentation available to the team members, rather than granting unnecessary administrative access.
12 - Performance Considerations
DreamFactory is a PHP-based application, and while we work hard to optimize the code at every opportunity, performance is going to largely be dictated by decisions made at the infrastructure level. Fortunately, these decisions are not so much dictated by budget as by sound technology and hosting choices. While your DreamFactory environment will undoubtedly be more performant on for instance an AWS t2.large than on a $15 Digital Ocean Droplet, the chasm between the two can be dramatically reduced when care is taken to properly configure and tune the environment. In this chapter we’ll provide some general performance benchmarks, and then provide guidance how to ensure your DreamFactory instance is running at peak capacity.
Performance Benchmarks
The following table presents DreamFactory’s average response time in association with hosting the platform on various popular hosting solutions. In each case the hosting environments were unmodified, and not optimized in any fashion. It is however important to note all are running PHP 7.2, NGINX, and PHP-FPM.
Environment
Load and API Type
Average Response Time
$15 Digital Ocean Droplet
10 MySQL API requests/second (10 records)
2524 ms
$15 Digital Ocean Droplet
10 MySQL API requests/second with caching enabled (10 records)
101 ms (96% improvement)
$15 Digital Ocean Droplet
10 MySQL API requests/second with caching enabled (100 records)
145ms
AWS t2.large
50 MySQL API requests/second (100 records)
83 ms
AWS t2.large
50 MySQL API requests/second with caching enabled (100 records)
72 ms (13.3% improvement)
AWS t2.large
100 MySQL API requests/second (100 records)
85 ms
AWS t2.large
100 MySQL API requests/second with caching enabled (100 records)
73 ms (14.2% improvement)
AWS t2.large
10 S3 API JPEG file requests/second
198 ms
AWS t2.large
10 MySQL API requests/second (1,000 records)
281 ms
AWS t2.large
10 MySQL API requests/second with caching enabled (1,000 records)
264 ms (7.2% improvement)
These load tests were carried out using the third-party load testing service Loader.io..
The clearest takeaway here is that enabling database caching can have a tremendous impact on performance in the event you’re running DreamFactory on a low-powered server. In more robust server environments the impact isn’t as stark, however all the same enabling caching on the AWS t2.large produced on average a 11.6% performance improvement for the scenarios cited above. So what else can you do to improve performance?
Optimizing DreamFactory’s Database APIs
Ensuring the DreamFactory-generated database APIs are running at peak performance is accomplished by ensuring your database is properly configured, has been allocated appropriate hardware and network resources, and turning on DreamFactory’s database caching feature. In this section we’ll talk more about all of these tasks.
Index the Database
For database-backed APIs, there is no more impactful task one could take than properly indexing the database. Database indexing is what allows your database engine to quickly identify which rows match conditions defined by a where clause. Refer to the following resources for both general and database-specific indexing information:
Enable database API caching whenever practical, as it will undoubtedly improve performance.
DreamFactory instances may be load balanced, and can be configured to share the system database, cache details, and other information necessary to operate in a distributed environment. Below are some links that may help you configure a load balancer with some of the most common cloud providers.
DreamFactory enables file-based caching by default, however you may opt to configure one of the other supported caching solutions, such as Redis. Please see these links to see connection tutorials:
If you are using an Oracle database, you may see performance improvements by setting up Connection Pooling. This should reduce the number of database connections being made. To do so with your DreamFactory Oracle connector, simple add PDO::ATTR_PERSISTENTtrue as a driver option on the configuration tab of your Oracle Service.
Adding Redis Caching
One of DreamFactory’s great advantages is it is built atop Laravel, and as such, you can take advantage of Laravel’s support for shared caching solutions, among other things. This is great because it means the caching solution has been extensively tested and proven in production environments.
To install the predis package you just need to navigate to your project’s root directory and execute this command:
$ composer require predis/predis
Next, open your .env file and look for this section:
Next, scroll down and uncomment these lines by removing the #, and then update the CACHE_HOST, CACHE_PORT, and (optionally) the CACHE_PASSWORD parameters to match your Redis environment:
# If CACHE_DRIVER = memcached or redis
#CACHE_HOST=
#CACHE_PORT=
#CACHE_PASSWORD=
Finally, scroll down to the following section and uncomment CACHE_DATABASE and REDIS_CLIENT:
# If CACHE_DRIVER = redis
#CACHE_DATABASE=2
# Which Redis client to use: predis or phpredis (PHP extension)
#REDIS_CLIENT=predis
You can leave CACHE_DATABASE set to 2. For the REDIS_CLIENT you can leave it set to predis if you’ve installed the predis/predis package (recommended). By default your Redis Database will be on 0, so be sure to SELECT whatever the number is you have set your CACHE_DATABASE equal to. Then you can start seeing the KEYS populate.
Load Balancing Your DreamFactory Environment
You can use a load balancer to distribute API requests among multiple servers. A load balancer can also perform health checks and remove an unhealthy server from the pool automatically. Most large server architectures include load balancers at several points throughout the infrastructure. You can cluster load balancers to avoid a single point of failure. DreamFactory is specifically designed to work with load balancers and all of the various scheduling algorithms. A REST API request can be sent to any one of the web servers at any time and handled in a stateless manner.
The following diagram depicts a typical load-balanced, high-availability environment. Like many HTTP-based applications, DreamFactory can be scaled using a three tier architecture:
Application tier: These are the servers where one or more DreamFactory instances operate.
Caching tier: If you load balance DreamFactory across multiple servers, you will need to use a caching solution such as Redis or Memcached for distributed cache management.
Database tier: In a load balanced environment the DreamFactory system database will need to be shared across the instances. You can use MySQL, PostgreSQL, or Microsoft SQL Server for this purpose.
Compiling the DreamFactory Code with OPcache
You can achieve particularly high performance by compiling your DreamFactory application code using OPcache. The following
Amazon EC2 cost calculator: This calculator can help you navigate AWS' notoriously opaque EC2 instance pricing model.
Conclusion
These are just a few tips intended to help you ensure your DreamFactory environment is running at peak capacity! If you have other ideas, please send them to code AT dreamfactory.com!
13 - Installing DreamFactory on a Raspberry Pi
For this tutorial we used Raspberry Pi’s official Raspbian operating system. Raspbian is Debian-based, and although it doesn’t include all of the requisites required by DreamFactory, as you’ll see those can be installed easily enough.
Incidentally, we use the balenaEtcher to flash images onto SD cards. It includes a very friendly user interface, and is supported on macOS, Windows, and Linux.
After firing up your Raspberry Pi and completing the initial configuration process, you’ll need to install NGINX, PHP, and a few other required libraries. This isn’t as easy as just running apt install a few times, because at the time of this writing Raspbian did not yet ship with PHP 7.1 or newer. DreamFactory 2.14.2 requires at least PHP 7.1, and this requirement will again be raised in an upcoming release now that PHP 7.3 has been released.
To install a supported PHP version, you’ll need to add the Raspbian testing branch to your sources list. To do so, create this file:
Save these changes, and run the following command:
$ sudo apt-get update
With these changes in place, you’ll be able to install PHP 7.1 or newer and therefore satisfy DreamFactory’s minimum PHP requirements.
Installing DreamFactory
Next we’ll install the DreamFactory and its prerequisite software, beginning with the latter. Rather than create a redundant set of instructions, we’ll instead point you to the DreamFactory wiki. We followed the NGINX-specific instructions and everything worked perfectly.
Home Automation Ideas
There are a number of great open source home automation libraries which could be easily integrated into your DreamFactory / Raspberry Pi environment:
PHP TP-Link Smartplug: This PHP library supports a variety of TPLink Smartplug devices.
Be sure to let us know if you use these or other libraries in your DreamFactory projects!
14 - Demo DreamFactory Applications
We regularly receive requests for examples involving connecting DreamFactory to a web interface. In this chapter we’ll include several examples involving modern JavaScript technologies, and in the near future will provide a GitHub repository where these and other examples can be downloaded.
Dynamic Dashboard with Pagination, Sorting, and Filtering
R&D departments and others interested in rapid prototype development regularly turn to DreamFactory for quickly exposing data through an API which can then be connected to a web-based interface such as a dashboard. This sort of project is particularly easy since numerous interactive table-oriented JavaScript libraries can be configured to consume an API endpoint. One such solution is Tabulator.
In this example (screenshot below), viewable at https://tabulator.demo.dreamfactory.com/ and with the source code available on GitHub, we’ve configured a MySQL database API containing almost 5 million records, and used Tabulator to present 300,000 records residing in one of the tables.
Check out the GitHub project README for information regarding how DreamFactory was configured to expose this API, and how you can easily configure this project to consume your own API.
Progressive Web Application
The above dashboard example certainly has its purposes, however web applications are often much more involved. For instance, you might connect to multiple data sources such as Salesforce and MySQL, and require users to authenticate via an authentication services provider such as Okta. Further, the interface must be responsive, capable of suiting different screen sizes (phone, tablet, and desktop).
We’ve created a demo application (screenshots below) to suit this more ambitious set of requirements. It’s live at https://pwa.demo.dreamfactory.com/, and the source code is downloadable via GitHub.
This example demonstrates how to create a simple dashboard which will display status information (enabled or disabled) for a series of devices. Because a picture is worth a thousand words, let’s start with a screenshot of the finished product:
The device information is stored in a database table called devices. Naturally any DreamFactory-supported database could be used, however for sake of example we’ll include the MySQL table creation statement here:
After generating the API within your DreamFactory instance (see Generating a Database-backed API to learn how to create a database-based API), it’s time to create the web page which will interact with the API and present the data. We started by creating a new web page containing a simple HTML5 template. There are plenty such templates online, however we’re fans of the version provided by SitePoint. Here’s what the starter file looks like:
Next, we’re going to take advantage of three popular open source/free solutions for executing AJAX calls and page design. These include:
Bootstrap: Bootstrap is the world’s most popular front-end component data, used on hundreds of thousands if not millions of websites around the globe. We’ll use Bootstrap’s CSS styles for stylizing the tabular layout.
Axios: Axios is a JavaScript-based HTTP client. We’ll use Axios to craft AJAX calls which will talk to the database API.
Font Awesome: FontAwesome is a very popular icon library. We’ll use two of FontAwesome’s icons to visually depict device status.
With these libraries added, the template looks like this:
Next up is the JavaScript. We’ve purposely chosen to use standard JavaScript for this project rather than using more convenient third-party libraries such as React or VueJS. That said, we recognize there are far more eloquent JavaScript-based approaches to this problem, but didn’t want to provide an example which required an additional learning curve or potentially extra configuration. With that said, add the following snippet to the head tag of your template, directly below the libraries we referenced in the previous snippet:
<script>
var error = '';
var rows = '';
var disabled = "<i class='fa fa-exclamation-triangle' style='color: red;'></i>";
var enabled = "<i class='fa fa-thumbs-up' style='color: green;'></i>";
window.onload = function() {
axios.get('https://example.com/api/v2/mysql/_table/devices', { 'headers': { 'X-DreamFactory-Api-Key': 'YOUR_API_KEY_GOES_HERE' }})
.then(function (response) {
for (var i= 0; i < response.data.resource.length; i++) {
if (response.data.resource[i].status == 0) {
var status = disabled;
} else {
var status = enabled;
}
rows += "<tr><td>" + response.data.resource[i].name + "</td><td>" + status + "</td></tr>";
}
document.getElementById('rows').innerHTML = rows;
})
.catch(function (error) {
error = error;
});
};
</script>
The only required change you’ll need to make to the above snippet is replacement of the YOUR_API_KEY_GOES_HERE with the actual API key you’ve configured to communicate with the API. If you don’t know how to configure an API key, please refer to Generating a Database Backed Api.
All that remains is the HTML. In the following snippet you’ll see we’ve defined a simple HTML table, adorned with CSS classes exposed by the Bootstrap library. The tbody element is assigned the rows ID, which is what the above JavaScript will use to insert the table rows into the appropriate page location:
Return to this chapter often as we’ll be periodically updating it with new examples!
15 - Creating File System APIs
This chapter shows you how to quickly create REST APIs for SFTP, AWS S3, and more using the DreamFactory platform.
Creating an SFTP REST API
SFTP (SSH File Transfer Protocol) is the secure version of FTP, capable of transferring data over a Secure Shell (SSH) data stream. Despite the media buzz being focused on file services like Dropbox and AWS S3, SFTP-based file transfers remain an indispensable part of IT infrastructures large and small. But incorporating SFTP functionality into a web application or system management script can be a real drag. Fortunately you can use DreamFactory to easily create a full-featured REST API for your SFTP servers. This API can perform all of the standard tasks associated with an SFTP server, including:
Creating, listing, updating, and deleting folders
Creating, listing, retrieving, updating, and deleting files
In this tutorial we’ll show you how to configure DreamFactory’s SFTP connector, and then walk through several usage examples.
Generating the SFTP API and Companion Documentation
To generate your SFTP API, log into DreamFactory and click on the Services tab, then click the Create link located on the left side of the page. Click on the Select Service Type dropdown, navigate to the File category, and select SFTP File Storage:
You’ll be prompted to supply an API name, label, and description. Keep in mind the name must be lowercase and alphanumeric, as it will be used as the namespace within your generated API URI structure. The label and description are used for reference purposes within the administration console so you’re free to title these as you please:
Next, click the Config tab. There you’ll supply the SFTP server connection credentials. There are however only 5 required fields:
Host: The SFTP server hostname or IP address.
Port: The SFTP server port. This defaults to 22.
Username: The connecting account username.
Password: The connecting account password.
Root folder: The designated SFTP account root directory.
The other fields (Timeout, Host Finger Print, Private Key) are not always required, and depend upon your particular SFTP server’s configuration.
After saving your changes, head over to the API Docs tab to review the generated documentation. You’ll be presented with a list of 13 generated endpoints:
Listing Directory Contents
If the root directory you identified during the configuration process already contains a few files and/or directories, click on the List the folder's content, including properties endpoint and press Try It Out. Doing so will enable all of the supported parameters for this endpoint, allowing you to experiment. Scroll down to the folder_path parameter, set it to /, and press Execute. You should see output similar to the following:
To create a folder, you can use one of two endpoints:
POST / Create some folders and/or files
POST /{folder_path}/ Create a folder and/or add content
These endpoints are identical in functionality, but their URI signatures differ so you might choose one over the other depending upon the desired approach. Let’s start by creating a single empty folder. To do so, click on the POST / Create some folders and/or files endpoint inside API Docs, press the Try It Out button, and enter a folder name in the X-Folder-Name field. In the folder_path field enter the destination path, such as /. Press Execute and the folder will be created and a 201 response code returned with a response body that looks like this:
{
"name": "Marketing",
"path": "Marketing"
}
Note the X-Folder-Name field is identified as a header, meaning you’ll need to handle it accordingly when performing an API call outside of API Docs. The screenshot below shows you how this is handled in the great HTTP testing client Insomnia:
Uploading Files
To upload a file, you’ll send a POST request to the SFTP API. You must specify the file name, and can do so either via the URL like this:
Alternatively you can use the X-File-Name in header to identify file name.
Upload size limitations aren’t so much a function of DreamFactory as they are web server configuration. For instance, Nginx' default maximum body size is 1MB, so if you plan on uploading files larger than that you’ll need to add the following configuration directive to your nginx.conf file:
client_max_body_size 10M;
You’ll know if the client_max_body_size setting isn’t suffice because you’ll receive a 413 Request Entity Too Large HTTP error if the file size surpasses the setting.
Additionally, you’ll receive a 413 Payload Too Large HTTP error if PHP’s upload_max_filesize setting isn’t suffice. To change this setting you’ll open the php.ini file associated with the PHP-FPM daemon and modify it accordingly:
upload_max_filesize = 100M
Don’t forget to restart the respective daemons after making changes to the Nginx and PHP configuration files.
Downloading Files
To download a file you’ll send a GET request to the SFTP API, identifying the path and file name in the URL:
If you’re using a tool such as Insomnia, you can view many file types within the response preview:
Creating an AWS S3 REST API
The DreamFactory AWS S3 connector offers a convenient REST-based interface for interacting with S3 objects and buckets. Supporting all of the standard CRUD operations, it’s easy to interact with and manage your S3 data. Further, because the S3 API is native to DreamFactory, it’s easy to integrate S3 actions alongside other API-driven tasks such as:
Uploading a newly registered user avatar to S3 while inserting the user’s registration information into a database
Emailing a website visitor a link to your product PDF after writing the user’s email address to your marketing automation software
Creating a new S3 bucket as part of a Dev Ops workflow
Further, because the API is part of the DreamFactory API management ecosystem, you can apply DreamFactory’s context-specific role-based access * controls to your AWS S3 API, attach API request volume limiting controls, and audit access logs via DreamFactory’s Logstash integration.
Generating the AWS S3 API and Companion Documentation
To generate your S3 API, log into DreamFactory and click on the Services tab, then click the Create link located on the left side of the page. Click on the Select Service Type dropdown, navigate to the File category, and select AWS S3:
You’ll be prompted to supply an API name, label, and description. Keep in mind the name must be lowercase and alphanumeric, as it will be used as the namespace within your generated API URI structure. The label and description are used for reference purposes within the administration console so you’re free to title these as you please:
Next, click the Config tab. There you’ll supply the AWS S3 bucket connection credentials. There are however only 3 required fields:
Access Key ID: An AWS account root or IAM access key.
Secret Access Key: An AWS account root or IAM secret key.
Region: Select the region to be accessed by this service connection.
Container: Enter a Container (root directory) for your storage service. It will be created if it does not exist already.
After saving your changes, head over to the API Docs tab to review the generated documentation. You’ll be presented with a list of generated endpoints. the operations listed above for an SFTP connector are the same for the AWS S3 Container as well. One of the examples is listed below
Downloading Files
To download a file you’ll send a GET request to the AWS S3 API, identifying the path and file name in the URL:
If you’re using a tool such as Insomnia, you can view many file types within the response preview:
Snapshot of the file on S3
Converting Excel to a JSON Response
DreamFactory’s Excel connector is capable of turning an entire Excel workbook or specific worksheet into a JSON response (CSV files are also supported). Workbooks can be retrieved from any DreamFactory supported file-system (AWS S3, SFTP, and Azure Blob Storage, among others), or as in the example we will run through below, uploaded directly to the server’s local file system. Access is controlled just like any other connector with role-based access control and API keys.
To create an Excel connector, create a new service, and choose it from the Service Type Box:
Next, on the config tab, we will set the file storage service. If you have already setup an, e.g. AWS S3 API, then this service will be available to you. For this example, we will use the local file storage service, and we will put our Excel file in /opt/dreamfactory/storage/app which means we will set the container path as / (the ‘root’ of where DreamFactory will look for locally stored files). You can also upload a spreadsheet directly using the Browse button:
The location of our Excel File.
Remember!
The root location for local file storage is /opt/dreamfactory/storage/app. If you store an Excel file(s) here, your Storage Container Path will be /. If you create a folder in here, e.g. /opt/dreamfactory/storage/app/my-folder then your Storage Container Path will be /my-folder/.
Once configured, you will be to access the API endpoint documentation via the API Docs tab. Here we have an example call to our workbook financial-sample.xlsx:
And after configuring our Role and generating an API Key we can interact with it. The below is a GET call to /api/v2/<excelServiceName>/_spreadsheet/<excelFilename>:
Remember!
When creating a role for your Excel connector, you will also need to provide service access to the relevant file storage service, in addition to the Excel service. For local file storage this will be the default “files” service.
16 - Integrating Salesforce Data using DreamFactory
Salesforce is the de facto standard CRM solution used by companies large and small to manage customer information and interactions. Although many competing solutions exist, Salesforce’s dominance is made clear in the company’s 2019 annual report in which it states 95% of the Fortune 100 run at least one application from the company’s suite of solutions.
Many companies desire to access and manage Salesforce data into other applications. DreamFactory can greatly reduce the amount of work required to do so thanks to the native Salesforce database connector. In this chapter you’ll learn how to configure the connector, and then interact with your Salesforce database using the DreamFactory-generated REST API.
Configuring the Salesforce Service
Connecting your Salesforce account to DreamFactory is easily accomplished in a few short steps. As with all DreamFactory services, you’ll begin by logging into your DreamFactory instance, selecting the Services tab, and clicking the Create link located in the left-hand menubar. From there you’ll choose the Salesforce service located within the Database category:
Next you’ll assign a name, label, and description. Recall from earlier chapters that the name will play a role as a namespace for the generated API URI structure, therefore you’ll need to use alphanumeric characters only. I’ll use the name salesforce for purposes of this tutorial. The label and description are used as referential information and can be assigned anything you please.
Next, click on the Config tab. Here you’ll enter authentication credentials used to connect to your Salesforce environment. DreamFactory supports two authentication options: OAuth and non-OAuth. I’ll show you how to configure the latter. To configure non-OAuth authentication, you’ll need to complete the following Config tab fields:
Username: This is the e-mail address you use to login to your Salesforce account.
Password: This is the password associated with your Salesforce account.
Security Token: This is an alphanumeric key that is supplied to the Salesforce API along with your username and password. It is intended to serve as an additional safeguard should the account username and password be compromised. I’ll show you how to find your account’s security token in a moment.
Organization WSDL: The organization WSDL defines the web service endpoints associated with your specific organization. I’ll show you how to obtain and install this document in a moment.
Obtaining the Security Token
I’ll presume you know your Salesforce account username and password, so let’s turn attention to the security token. Login to your Salesforce account, and click on your account avatar located at the top right of the page:
Click the Settings link. On the left-side of the page you’ll see a link titled Reset My Security Token. Click the Reset Security Token button to generate a new token. the new token will be emailed to the e-mail address associated with your account. Paste this token into DreamFactory’s Security Token field.
Warning
Keep in mind that if you’ve previously generated a security token, clicking this button will replace the old token, meaning any Salesforce integrations you’ve created using the original token will no longer work. Therefore if you already possess a security token, there is no need to generate a new one.
Obtaining the Enterprise WSDL
Next, let’s obtain the Enterprise WSDL document. Login to your Salesforce account, and enter API in the search box located at the top of the page. Select API from the list of candidate results. You’ll be taken to the following page:
Click the Generate Enterprise WSDL link to generate the required WSDL document. A new tab will open containing the document contents. Copy the contents into a file named enterprise.wsdl (you can actually call the file anything you want, just made sure it uses the wsdl extension). Some browsers such as Chrome will prepend a warning message of sorts about the document content. For instance this is what Chrome adds:
This XML file does not appear to have any style information
associated with it. The document tree is shown below.
You’ll need to remove any such messages found at the beginning of the WSDL document because it is invalid syntax. After saving the changes, upload the document to your DreamFactory server and place it within your DreamFactory storage/wsdl directory. Then return to the Config tab and set the Organization WSDL field to just the name of the WSDL file (do not include the path).
After completing the Username, Password, Security Token, and Organization WSDL fields, save the changes by pressing the Save button. Congratulations, your Salesforce API has just been generated!
Interacting with the Salesforce API
After saving your new Salesforce API, head over to the API Docs tab to learn more about the generated endpoints. Perhaps most notably in the exploratory stages, you’ll want to check out the GET /_table Retrieve one or more Tables endpoint because executing it will present a list of all tables you can query and modify. At the time of this writing almost 500 tables were exposed, giving you all sorts of capabilities regarding managing Salesforce data.
Among the available tables is one named Account. You can retrieve data from this table by navigating to the next available endpoint presented in the API Docs interface. It’s named GET /_table/{table_name} Retrieve one or more records. Click the Try it out button, enter Account in the table_name field, and press Execute. In return you’ll receive an array of accounts managed in your Salesforce database. Below I’ve pasted in a partial example of one of the example records found in the example Salesforce database:
To retrieve a specific account, you can use the GET /_table/{table_name}/{id} endpoint. For instance the above example “United Oil & Gas Corp” account is associated with id 0016A00000MJRN9QAP. Therefore you can obtain this specific record by requesting the following URI:
Accounts are associated with dozens of attributes, many of which might not be of any interest to you. You can use the fields parameter to identify which specific attributes you’d like returned:
Many DreamFactory users use the Salesforce connector to facilitate updating records outside of the Salesforce web interface. You can easily do so using the PATCH /_table/{table_name} endpoint. For instance, suppose you want to update the “United Oil & Gas Corp.” account record to include the billing latitude and longitude. After all, one can never be too exacting when it comes to billing requirements.
To update the record you’ll send a PATCH request to:
Upon successful update, the following response is returned:
{
"attributes": {
"type": "Account",
"url": "/services/data/v46.0/sobjects/Account/0016A00000MJRN9QAP"
},
"Name": "United Oil & Gas Corp.",
"BillingCity": "New York",
"Id": "0016A00000MJRN9QAP"
}
Synchronizing Salesforce Data with MySQL
Many DreamFactory users desire to synchronize Salesforce data with a database such as MySQL. This can be accomplished using a few different approaches. The easiest involves adding business logic to one of the exposed Salesforce API endpoints. For instance, suppose we wanted to additionally check a MySQL database for the existence of an account record every time a particular account record was retrieved via the Salesforce API. If the record doesn’t exist in the MySQL database, we’ll add it.
To do so, navigate to the Scripts tab inside your DreamFactory administration console, choose the salesforce API, and then drill down until you reach the salesforce._table.Account.get.post_process endpoint. The post_process event handler was chosen because the associated business logic will execute after the account data has been returned from Salesforce.
Here you’ll be presented with the scripting interface. Four scripting engines are supported, including PHP, Python (2 and 3), and NodeJS. You can link to a script found in a repository hosted on GitHub, GitLab, or BitBucket, however for the purposes of this example I’ll just use the glorified text area included in the interface.
Returning to our earlier example, recall that this request:
{
"attributes": {
"type": "Account",
"url": "/services/data/v46.0/sobjects/Account/0016A00000MJRN9QAP"
},
"Name": "United Oil & Gas Corp.",
"BillingCity": "New York",
"Id": "0016A00000MJRN9QAP"
}
The JSON will automatically be converted into an array and made available to your script within the $event array which is injected into the script. Specifically, you’ll find it within $event['response']['content']. The following example script retrieves this array, and repurposes the desired data within another array named $record which is subsequently POSTed to another API named mysql, specifically to the API’s billing table:
$api = $platform['api'];
// Retrieve the response body. This contains the returned records.
$responseBody = $event['response']['content'];
$record = [];
$record["resource"] = [
[
'name' => $responseBody["Name"],
'billing_city' => $responseBody["BillingCity"]
]
];
$url = "mysql/_table/billing/";
$post = $api->post;
$result = $post($url, $record, []);
return $result;
Keep in mind the supported scripting engines (PHP, Python, NodeJS) are not incomplete or hobbled versions. These are the very same engines installed on the same server as DreamFactory, and as such you are free to take advantage of any language-specific packages or libraries simply by installing them on the server.
Conclusion
DreamFactory’s Salesforce connector dramatically reduces the amount of time and effort required to integrate Salesforce with other systems. If you’d like to learn more about what DreamFactory can do for you, e-mail us at [email protected]!
17 - Using DreamFactory's Remote HTTP and SOAP Connectors
Although the DreamFactory Platform is best known for the ability to generate REST APIs, many also take advantage of the platform’s Remote Service connectors.
Proxying a Remote HTTP API
The HTTP Service connector is used to proxy third-party HTTP APIs through DreamFactory. This opens up a whole new world of possibilities in terms of creating sophisticated API-driven applications, because once mounted you can create powerful workflows involving multiple APIs. Once example we like to show off is DreamFactory’s ability to retrieve records from a MySQL database and then translate some of the returned text into a different language using IBM Watson’s language translation API. You could also easily mount any of the thousands of APIs found in the Rakuten RapidAPI Marketplace.
In this section you’ll learn how to add the third-party OpenWeather API to your DreamFactory instance. If you’d like to follow along with this example, head over to https://openweathermap.org/ and create a free account in order to obtain an API key.
Configuring the HTTP Service Connector
Connecting a remote HTTP API to DreamFactory is easily accomplished in a few short steps. As with all DreamFactory services, you’ll begin by logging into your DreamFactory instance, selecting the Services tab, and clicking the Create link located in the left-hand menubar. From there you’ll choose the HTTP Service connector located within the Remote Service category:
Next you’ll assign a name, label, and description. Recall from earlier chapters that the name will play a role as a namespace for the generated API URI structure, therefore you’ll need to use alphanumeric characters only. I’ll use the name openweather for purposes of this tutorial. The label and description are used as referential information and can be assigned anything you please.
Next, click on the Config tab. It’s here where you’ll tell DreamFactory how to connect to the remote service:
The easiest solution involves pasting in the remote API’s base URL. According to the current OpenWeather API documentation you’ll use the URL https://api.openweathermap.org/data/2.5/weather as the base URL.
Next scroll down to the Parameters section and click the plus sign located on the right-side of the section:
Return to the OpenWeather website and login to your account you’ll find your API key under the section API keys. This API key is passed in as a parameter, meaning you’ll need to add it to the Parameters section like so:
The parameter name is APPID, and the (grayed out) value is found in the Value field. The parameter is declared as Outbound because we’re going to pass it on to the destination API. This is in contrast to the Exclude option which will prevent a particular parameter passed from the client from being passed on to the destination. You can also optionally cache the key for performance reasons by selecting the Cache Key option. Finally, we’ve declared the verbs for which this parameter is enabled. In this case the only verb declaration is GET because we’re going to issue GET requests in order to retrieve weather data.
After adding the base URL and APPID parameter, save your changes by pressing the Save button.
Calling the API
With the service in place, let’s open up an HTTP testing tool such as Insomnia or Postman to test it out. As with all DreamFactory APIs, you’ll first need to create a role
and API key. If you don’t already know how to do this follow these links and then return here to continue with the example.
To call your service you’ll create a GET request pointing to https://YOUR_DREAMFACTORY_DOMAIN/api/v2/openweather, passing along parameters associated with the desired geographical destination. You can find a list of supported parameters in the OpenWeather API documentation. Note we’re also passing along the X-DreamFactory-Api-Key header. This API key was created when following along with the previously mentioned instructions found elsewhere in the guide.
In the following screenshot queries for weather assocated with the United States zip code 43016:
Because this request is being forwarded from DreamFactory to the OpenWeather API, the outbound request will look like this:
Admittedly, OpenWeather API’s practice of requiring the API key be passed along as a parameter is a bit odd, because even when using HTTPS these parameters can be intercepted by a third-party and additionally can be logged to a web server log file. Instead, it’s typical practice that authorization keys be passed along via a header. Headers are preferable because they are encrypted when HTTPS is used.
To add a header, click the plus sign located on the right-side of the Headers section:
The input fields are similar to those found in the Parameters header, with one notable difference. You can choose the Pass From Client option to pass headers from the requesting client. This is useful if your clients are working with a third-party service by way of your DreamFactory instance, and need to pass along their own custom headers. For instance, the following screenshot demonstrates passing along required Rakuten RapidAPI headers X-RapidAPI-Host and X-RapidAPI-Key from the client to DreamFactory:
This is how the headers were configured inside DreamFactory to achieve this:
Adding a Service Definition
Section forthcoming.
Converting SOAP to REST
The SOAP-to-REST connector is available in the DreamFactory Silver and Gold Editions. Interested in a demo or free trial for either edition? Contact us!
Video-based Learning
If video-based learning is more your style, check out the ~12 minute Youtube video we created which walks you through the configuration and access process:
18 - Using the System APIs
All DreamFactory versions include a web-based administration console used to manage all aspects of the platform. While this console offers a user-friendly solution for performing tasks such as managing APIs, administrators, and business logic, many companies desire to instead automate management through scripting. There are two notable reasons for doing so:
Multi-environment administration: APIs should always be rigorously tested in a variety of test and QA environments prior to being deployed to production. While DreamFactory does offer a service export/import mechanism, it’s often much more convenient to write custom scripts capable of automating multi-environment service creation.
Integration with third party services: The complexity associated with creating new SaaS products such as API monetization can be dramatically reduced thanks to the ability to integrate DreamFactory into the solution. Following payment, the SaaS could interact with DreamFactory to generate a new role-based access control, API key, and define a volume limit. The new API key could then be presented to the subscriber.
In this chapter we’ll walk you through several examples explaining exactly how these two use cases can be achieved.
General Notes on Making API Calls
As with the APIs that you create using DreamFactory, the system endpoints use the same authentication method, and thus will, at minimum require a session-token (if an admin), or a session-token together with an API-key (if a user). For users to be able to access the system endpoints, the appropiate permissions must be assigned as a role to that user.
Session Tokens and API Keys
If you are the system admin, you will need to provide a session token with any call using the X-DreamFactory-Session-Token header. A user who has the permissions to create admins/users will need to also provide an Api Key using the X-DreamFactory-API-Key header.
Using Curl
The majority of the example below will show the request type, along with the endpoint required. When using curl, you will want to use the following flags:
-X for your request type (GET, POST etc.)
-H for your headers, you will most likely use a combination of the following:
-H "accept: application/json"
-H "Content-Type: application/json" # For requests with a body
-H "X-DreamFactory-Session-Token: <sessionToken>"
-H "X-DreamFactory-Api-Key: <sessionToken>"
-d for your json body when used.
User Management
Users and Admins can be managed using the /system/user / /system/admin endpoint respectively.
For the below examples, replace user with admin when managing admins.
You can retrieve an individual user / admin’s details using the ?ids=<id_number> parameter. If you don’t know the id number off hand, you can filter by any field which you do know, such as an email address by using the filter parameter. For example:
To update a pre-existing User / Admin, a PATCH request can be made referencing the ID of the user to be changed with the ?ids=<ID> parameter. (You will need to provide your session token in a X-DreamFactory-Session-Token header)
Creating a service will no doubt be the first key componenent to when you are using DreamFactory to handle your API management needs. The below example will be for a Database API, but the logic is fundamentally the same for any kind of service that you will create.
Retrieving Service Types and Configuration Schemas
Each service type naturally requires a different configuration schema. For instance most database service types require that a host name, username, and password are provided, whereas the AWS S3 service type requires an AWS access key ID, secret access key, and AWS region. You can obtain a list of supported service types and associated configuration schemas by issuing a GET request to /api/v2/system/service_type.
Then, if you wish to see the config details for a partiuclar service, you can add it to the end of the url. For example, to see the config details for a MySQL service:
GET http://{url}/api/v2/system/service_type/mysql
will return:
{
"name": "mysql",
"label": "MySQL",
"description": "Database service supporting MySQL connections.",
"group": "Database",
"singleton": false,
"dependencies_required": null,
"subscription_required": "SILVER",
"service_definition_editable": false,
"config_schema": [
{
"name": "host",
"label": "Host",
"type": "string",
"description": "The name of the database host, i.e. localhost, 192.168.1.1, etc."
},
{
"name": "port",
"label": "Port Number",
"type": "integer",
"description": "The number of the database host port, i.e. 3306"
},
{
"name": "database",
"label": "Database",
"type": "string",
"description": "The name of the database to connect to on the given server. This can be a lookup key."
},
{
"name": "username",
"label": "Username",
"type": "string",
"description": "The name of the database user. This can be a lookup key."
},
...
Create a Database API
To create a database API, you’ll send a POST request to the /api/v2/system/service endpoint. The request payload will contain all of the API configuration attributes. For instance this payload reflects what would be required to create a MySQL API:
After submitting a successful request, a 201 Created status code is returned along with the newly created service’s ID:
{
"resource": [
{
"id": 194
}
]
}
Retrieve API details
To retrieve configuration details about a specific API, issue a GET request to /api/v2/system/service. You can pass along either an API ID or the API name (namespace). For instance to retrieve a service configuration by ID, you’ll pass the ID like this:
/api/v2/system/service/8
It is likely more natural to reference an API by it’s namespace. You can pass the name in using the filter parameter:
Now that you understand how to create and query DreamFactory-managed APIs, your mind is probably racing regarding all of the ways at least some of your administrative tasks can be automated. Indeed, there are many different ways to accomplish this, because all modern programming languages support the ability to execute HTTP requests. In fact, you might consider creating a simple shell script that executes curl commands. Begin by creating a JSON file that contains the service creation request payload:
Name this file mysql-production.json, and don’t forget to update the authentication placeholders. Next, create a shell script that contains the following code:
Of course, this is an incredibly simple example which can be quickly built upon to produce a more robust solution. For instance you might create several JSON files, one for development, testing, and production, and then modify the script to allow for environment arguments:
$ ./create-service.sh production
Creating a Scripted Service to perform Bulk Actions
There is a useful DreamFactory feature that allows the administrator to add a database function to a column so when that column is retrieved by the API, the function runs in its place. For instance, imagine if you want to change the format of the date field, you could use ORACLE’s TO_DATE() function to do that:
TO_DATE({value}, 'DD-MON-YY HH.MI.SS AM')
DreamFactory can be configured to do this by adding TO_DATE({value}, ‘DD-MON-YY HH.MI.SS AM’)to the field’s DB Function Use setting, which is found by going to the Schema tab, choosing a database, then choosing a table. Then click on one of the fields found in the fields section.
To perform this action at a service level, we can create a scripted service by going to Services -> Scirpt -> And selecting a language of your choice. We will select PHP. The script below adds the datbase function to all the columns and allows us to performs this as a Bulk Action.
$api = $platform['api'];
$get = $api->get;
$patch = $api->patch;
$options = [];
set_time_limit(800000);
// Get all tables URL. Replace the databaseservicename with your API namespace
$url = '<API_Namespace>/_table';
// Call parent API
$result = $get($url);
$fieldCount = 0;
$tableCount = 0;
$tablesNumber = 0;
// Check status code
if ($result['status_code'] == 200) {
// If parent API call returns 200, call a MySQL API
$tablesNumber = count($result['content']['resource']);
// The next line is to limit number of tables to first 5 to see the successfull run of the script
//$result['content']['resource'] = array_slice($result['content']['resource'], 0, 5, true);
foreach ($result['content']['resource'] as $table) {
// Get all fields URL
$url = "<API_Namespace>/_schema/" . $table['name'] . "?refresh=true";
$result = $get($url);
if ($result['status_code'] == 200) {
$tableCount++;
foreach ($result['content']['field'] as $field) {
if (strpos($field['db_type'], 'date') !== false || strpos($field['db_type'], 'Date') !== false || strpos($field['db_type'], 'DATE') !== false) {
// Patch field URL
$fieldCount++;
$url = "<API_Namespace>/_schema/" . $table['name'] . "/_field";
// Skip fields that already have the function
if ($field['db_function'][0]['function'] === "TO_DATE({value}, 'DD-MON-YY HH.MI.SS AM')") continue;
// Remove broken function
$field['db_function'] = null;
$payload = ['resource' => [$field]];
$result = $patch($url, $payload);
// Add correct function
$field['db_function'] = [['function' => "TO_DATE({value}, 'DD-MON-YY HH.MI.SS AM')", "use" => ["INSERT", "UPDATE"]]];
$payload = ['resource' => [$field]];
$result = $patch($url, $payload);
if ($result['status_code'] == 200) {
echo("Function successfully added to " . $field['label'] . " field in " . $table['name'] . " table \n");
\Log::debug("Function successfully added to " . $field['label'] . " field in " . $table['name'] . " table");
} else {
$event['response'] = [
'status_code' => 500,
'content' => [
'success' => false,
'message' => "Could not add function to " . $field['label'] . " in " . $table['name'] . " table;"
]
];
}
}
}
\Log::debug("SCRIPT DEBUG: Total tables number " . $tablesNumber . " -> Tables " . $tableCount . " fieldCount " . $fieldCount);
} else {
$event['response'] = [
'status_code' => 500,
'content' => [
'success' => false,
'message' => "Could not get all fields."
]
];
}
}
} else {
$event['response'] = [
'status_code' => 500,
'content' => [
'success' => false,
'message' => "Could not get list of tables."
]
];
}
return "Script finished";
Call the service
From any REST client, make the request GET /api/v2/apinamespace and you should get a status 200. A simple REST client can be found at <your_instance_url>/test_rest.html. Remember if you are not an admin user your user role must allow access to the custom scripting service.
Managing Roles
After creating an API, you’ll typically want to generate a role-based access control and API key. API-based role management is a tad complicated because it involves bit masks. The bit masks are defined as follows:
Verb
Mask
GET
1
POST
2
PUT
4
PATCH
8
DELETE
16
To create a role, you’ll send a POST request to /api/v2/system/role, accompanied by a payload that looks like this:
It can send GET requests to the _table/employees/* endpoint associated with the API identified by SERVICE_ID.
It can send GET and POST requests to the _table/supplies/* endpoint associated with the API identified by SERVICE_ID.
In the second case, the verb_mask was set to 3, because you’ll add permission masks together to achieve the desired permission level. For instance GET (1) + POST (2) = 3. If you wanted to allow all verbs, you’ll add all of the masks together 1 + 2 + 4 + 8 + 16 = 31. The requestor_mask was set to 3 because like the verb_mask it is represented by a bitmask. The value 1 represents API access whereas 2 represents access using DreamFactory’s scripting syntax. Therefore a value of 3 ensures the endpoint is accessible via both an API endpoint and via the scripting environment.
You can learn more about role management in our wiki.
Viewing a Role’s Permissions
You can retrieve basic role information by contacting the /system/role/ endpoint and passing along the role’s ID. For instance to retrieve information about the role associated with ID 137 you’ll query this endpoint:
However you’ll often want to learn much more about a role, including notably what permissions have been assigned. To do so you’ll need to join the role_service_access_by_role_id field:
This will return a detailed payload containing the assigned permissions, including each permission’s service identifier, endpoint, verb mask, requestor mask, and any row-level filters (if applicable):
To add a new permission to an existing role, you’ll the new role information along within the role_services_access_by_role_id JSON object. For instance, to add a new permission to the role identified by ID 137 you’ll send a PUT request to this endpoint:
It’s possible to create and manage API keys via the system API. To retrieve a list of all API keys (known as Apps in DreamFactory lingo), send a GET request to the URI /api/v2/system/app. You’ll receive a list of apps that look like this:
You can also return each application’s defined role using the related parameter. Issue a GET request to the following URI:
/api/v2/system/app?related=role_by_role_id
This will return a list of apps, and additionally any roles associated with the app. Note how in the following example a nested JSON object called role_by_role_id includes the role definition:
You can add an id number of a role if you would like a default role for your application. (A default role will mean that anyone can call services associated with that roles permissions without having to login to DreamFactory first, i.e without a session token, with only the API Key).
Assigning Roles to Users
Once you have your service, role, and app, you will most likely want to assign particular users to particular roles, giving them permission to call only what you want them to be able to, or indeed, want to be able to see what roles we have assigned to a particular user. To do so we will use the user_to_app_to_role_by_user_id relationship.
Role Assignment
As an example let’s say we want to assign user id 100 with a certain role for a certain app. If the role id is 7 and the app id is 4, the following would create the required relationship to assign that role to that user for that app.
PUT /api/v2/system/user/100?related=user_to_app_to_role_by_user_id
To see what roles have been assigned to a user, do a GET with the relationship ‘user_to_app_to_role_by_user_id’. The last one is the one we just created above.
GET /api/v2/system/user/100?related=user_to_app_to_role_by_user_id
For performance purposes DreamFactory caches all service definitions so the configuration doesn’t have to be repeatedly read from the system database. Therefore when editing a service you’ll need to subsequently clear the service cache in order for your changes to take effect. To clear the cache for a specific service, issue a DELETE request to the following URI, appending the service ID to it:
/api/v2/system/admin/session/8
To clear the cache for all defined services, issue a DELETE request to the following URI:
/api/v2/system/admin/session
19 - Migrating Your System Database to a New Instance
There can be a variety of reasons for wanting to copy all your data over to a new instance and this chapter goes over various ways to do so. We will cover using our Import/Export feature, System APIs, and manually moving the System Database to a new server.
Import and Export
TODO
System APIs
If you would like to export your instance into a .zip file to be Imported to a new instance you can do so by also using the System APIs.
Get a System overview
GET /api/v2/system/package
This will output all details pertaining to your instance including Services, Roles, and more.
Retrieve the .zip of the System
Once we have the details from our system overview, we can now perform a POST call with the same data. We will provide the data from our previous API call as the JSON body.
Now we can download that file via cURL, wget, or your preferred method. Below is an example of downloading the file without an API key but rather using basic authentication through the URL.
Now you have a zip file with all the JSON for your Services, Admins, Roles, etc. We can now upload this to the new instance but I recommend unzipping the file just to get a brief overview of everything it contains.
Upon unzipping the file you will notice all the JSON files and there is a particular order they must be uploaded since they can rely on each other.
Tip
Please note removing the System, API Docs, Files, Logs, db, email, and user from the JSON (typically ids 1-7) help in avoiding any duplication errors being thrown.
Uploading Services
First you will want to upload all your Services with the following endpoint and passing the JSON as apart of the body.
POST /api/v2/system/service
Uploading Roles
POST /api/v2/system/role
Uploading API Keys
POST /api/v2/system/app
Uploading Admins
POST /api/v2/system/admin
Uploading Users
POST /api/v2/system/user
20 - Modifying the Service Definition
There can be a variety of reasons for wanting to modify the pre-defined API documentation that is generated in the API Docs tab. We will cover modifying the documentation and exporting the documentation to have a developer portal without any coding.
Exporting API Documentation
When in the API Docs for any Service you will see Download Service Doc at the top of the page. This will download the documentation in JSON format to use elsewhere. In this example we are downloading the Service Definition and importing it into SwaggerHub. This tool enables us to leverage the DreamFactory documentation, modify the endpoints, and expose it as a developer portal.
We can then use a tool such as JSON2YAML to convert our Service Definition from JSON to YAML. Now we can paste it into SwaggerHub. You might notice that it is not playing well and that is because we need to point it to our DreamFactory instance.
Under the servers section you will want to add your DreamFactory instance details like below:
Now you have a fully functioning developer portal for your API!
Modifying Existing API Documentation
To modify existing API Documentation we will still need to download the Service Documentation. After we have the documentation we cannot modify it and change that existing Services documentation, but rather create a new Service with that documentation.
Customizing your Documentation
To customize your API Documentation it is fairly straightforward. You can begin by briefly taking a look at the existing structure and use it as a boiler plate for your own custom documentation. In this example we will be removing the /_schema,/_function, and /_proc endpoints entirely.
First we start by modifying the Service Definition we downloaded. We can simply navigate down to “paths” and begin deleting the endpoints from the documentation. As we go through deleting these endpoints you may also notice the summaries and descriptions can be modified to your liking as well.
Making a New API
Now we can import this custom documentation to DreamFactory via the HTTP connector. We start by specifying the base URL for the API we customized and providing an API Key for the Service.
Then we move to the Service Definition tab, where we simply copy and paste the documentation.
Once done we can save it and navigate to the API Docs to see our custom documentation.
APP_CIPHER: Database encryption cipher, options are AES-128-CBC or AES-256-CBC (default). Only change this if you are starting from a clean database
APP_DEBUG: When your application is in debug mode, detailed error messages with stack traces will be shown on every error that occurs within your application. If disabled, a simple generic error page is shown
APP_ENV: This may determine how various services behave in your application
APP_KEY: This key is used by the application for encryption and should be set to a random, 32 character string, otherwise these encrypted strings will not be safe. Use ‘php artisan key:generate’ to generate a new key. Please do this before deploying an application!
APP_LOCALE: The application locale determines the default locale that will be used by the translation service provider. Currently only ‘en’ (English) is supported
APP_LOG: This setting controls the placement and rotation of the log file used by the application
APP_LOG_LEVEL: The setting controls the amount and severity of the information logged by the application. This is hierarchical and goes in the following order: DEBUG -> INFO -> NOTICE -> WARNING -> ERROR -> CRITICAL -> ALERT -> EMERGENCY. If you set log level to WARNING then all WARNING, ERROR, CRITICAL, ALERT, and EMERGENCY will be logged. Setting log level to DEBUG will log everything. Default is WARNING
[‘APP_NAME’]=“This value is used when the framework needs to place the application’s name in a notification or any other location as required by the application or its packages
APP_TIMEZONE: Here you may specify the default timezone for your application, which will be used by the PHP date and date-time functions
APP_URL: This URL is used by the console to properly generate URLs when using the Artisan command line tool. You should set this to the root of your application so that it is used when running Artisan tasks
DF_LANDING_PAGE: This is the starting point (page, application, etc.) when a browser points to the server root URL
Database settings
DB_CONNECTION: This corresponds to the driver that will be supporting connections to the system database server
DB_HOST: The hostname or IP address of the system database server
DB_PORT: The connection port for the host given, or blank if the provider default is used
DB_DATABASE: The database name to connect to and where to place the system tables
DB_USERNAME: Credentials for the system database connection if required
DB_PASSWORD: Credentials for the system database connection if required
DB_CHARSET: The character set override if required. Defaults use utf8, except utf8mb4 for MySQL-based databases - may cause problems for pre-5.7.7 (MySQL) or pre-10.2.2 (MariaDB), if so, use utf8
DB_COLLATION: The character set collation override if required. Defaults use utf8_unicode_ci, except utf8mb4_unicode_ci for MySQL-based database - may cause problems for pre-5.7.7 (MySQL) or pre-10.2.2 (MariaDB), if so, use utf8_unicode_ci
DB_MAX_RECORDS_RETURNED: This is the default number of records to return at once for database queries
DF_SQLITE_STORAGE: This is the default location to store SQLite3 database files
FreeTDS configuration (Linux and OS X only)
DF_FREETDS_DUMP: Enabling and location of dump file, defaults to disabled or default freetds.conf setting
DF_FREETDS_DUMPCONFIG: Location of connection dump file, defaults to disabled
Cache
CACHE_DRIVER: What type of driver or connection to use for cache storage
CACHE_DEFAULT_TTL: Default cache time-to-live, defaults to 300
CACHE_PREFIX: A prefix used for all cache written out from this installation
CACHE_PATH: The path to a folder where the system cache information will be stored
CACHE_TABLE: The database table name where cached information will be stored
REDIS_CLIENT: What type of php extension to use for Redis cache storage
CACHE_HOST: The hostname or IP address of the memcached or redis server
CACHE_PORT: The connection port for the host given, or blank if the provider default is used
CACHE_USERNAME: Credentials for the service if required
CACHE_PASSWORD: Credentials for the service if required
CACHE_PERSISTENT_ID: Memcached persistent ID setting
CACHE_WEIGHT: Memcached weight setting
CACHE_DATABASE: The desired Redis database number between 0 and 16 (or the limit set in your redis.conf file
Limits
LIMIT_CACHE_DRIVER: What type of driver or connection to use for limit cache storage
LIMIT_CACHE_PREFIX: A prefix used for all cache written out from this installation
LIMIT_CACHE_PATH: Path to a folder where limit tracking information will be stored
LIMIT_CACHE_TABLE: The database table name where limit tracking information will be stored
LIMIT_CACHE_HOST: The hostname or IP address of the redis server
LIMIT_CACHE_PORT: The connection port for the host given, or blank if the provider default is used
LIMIT_CACHE_USERNAME: Credentials for the service if required
LIMIT_CACHE_PASSWORD: Credentials for the service if required
LIMIT_CACHE_PERSISTENT_ID: Memcached persistent ID setting
LIMIT_CACHE_WEIGHT: Memcached weight setting
LIMIT_CACHE_DATABASE: The desired Redis database number between 0 and 16 (or the limit set in your redis.conf file
Queuing
QUEUE_DRIVER: What type of driver or connection to use for queuing jobs on the server
QUEUE_NAME: Name of the queue to use, defaults to ‘default’
QUEUE_RETRY_AFTER: Number of seconds after to retry a failed job, defaults to 90
QUEUE_TABLE: The database table used to store the queued jobs
QUEUE_HOST: The hostname or IP address of the beanstalkd or redis server
QUEUE_PORT: The connection port for the host given, or blank if the provider default is used
QUEUE_DATABASE: The desired Redis database number between 0 and 16 (or the limit set in your redis.conf file
QUEUE_PASSWORD: Credentials for the service if required
SQS_KEY: AWS credentials
SQS_SECRET: AWS credentials
SQS_REGION: AWS storage region
SQS_PREFIX: AWS SQS specific prefix for queued jobs
Event Broadcasting
BROADCAST_DRIVER: What type of driver or connection to use for broadcasting events from the server
PUSHER_APP_ID:
PUSHER_APP_KEY:
PUSHER_APP_SECRET:
BROADCAST_HOST: The hostname or IP address of the redis server
BROADCAST_PORT: The connection port for the host given, or blank if the provider default is used
BROADCAST_DATABASE: The desired Redis database number between 0 and 16 (or the limit set in your redis.conf file
BROADCAST_PASSWORD: Credentials for the service if required
User Management
DF_LOGIN_ATTRIBUTE: By default DreamFactory uses an email address for user authentication. You can change this to use username instead by setting this to ‘username’
DF_CONFIRM_CODE_LENGTH: New user confirmation code length. Max/Default is 32. Minimum is 5
DF_CONFIRM_CODE_TTL: Confirmation code expiration. Default is 1440 minutes (24 hours)
DF_ALLOW_FOREVER_SESSIONS: false
JWT_SECRET: If a separate encryption salt is required for JSON Web Tokens, place it here. Defaults to the APP_KEY setting
DF_JWT_TTL: The time-to-live for JSON Web Tokens, i.e. how long each token will remain valid to use
DF_JWT_REFRESH_TTL: The time allowed in which a JSON Web Token can be refreshed from its origination
DF_CONFIRM_RESET_URL: Application path to where password resets are to be handled
DF_CONFIRM_INVITE_URL: Application path to where invited users are to be handled
DF_CONFIRM_REGISTER_URL: Application path to where user registrations are to be handled
Server-side Scripting
DF_SCRIPTING_DISABLE: To disable all server-side scripting set this to ‘all’, or comma-delimited list of v8js, nodejs, python, and/or php to disable individually
DF_NODEJS_PATH: The system will try to detect the executable path, but in some environments it is best to set the path to the installed Node.js executable
DF_PYTHON_PATH: The system will try to detect the executable path, but in some environments it is best to set the path to the installed Python executable
API
DF_API_ROUTE_PREFIX: By default, API calls take the form of http://<server_name>/<api_route_prefix>/v<version_number>
DF_STATUS_ROUTE_PREFIX: By default, API calls take the form of http://<server_name>/[<status_route_prefix>/]status
DF_STORAGE_ROUTE_PREFIX: By default, API calls take the form of http://<server_name>/[<storage_route_prefix>/]<storage_service_name>/<file_path>
DF_XML_ROOT: XML root tag for HTTP responses
DF_ALWAYS_WRAP_RESOURCES: Most API calls return a resource array or a single resource, if array, do we wrap it?
DF_RESOURCE_WRAPPER: Most API calls return a resource array or a single resource, if array, what do we wrap it with?
DF_CONTENT_TYPE: Default content-type of response when accepts header is missing or empty
Storage
DF_FILE_CHUNK_SIZE: File chunk size for downloadable files in bytes. Default is 10MB
Other settings
DF_PACKAGE_PATH: Path to a package file, folder, or URL to import during instance launch
DF_LOOKUP_MODIFIERS: Lookup management, comma-delimited list of allowed lookup modifying functions like urlencode, trim, etc. Note: Setting this will disable a large list of modifiers already internally configured
DF_INSTALL: This designates from where or how this instance of the application was installed, i.e. Bitnami, GitHub, DockerHub, etc.
21.2 - Appendix B: Security FAQ
Appendix B. Security FAQ
What is the DreamFactory Platform?
DreamFactory is an on-premise platform for instantly creating and managing APIs, currently used across the healthcare, finance, telecommunications, banking, government, & manufacturing industries.
DreamFactory’s product is designed with security in mind to create APIs that maintain confidentiality of customer data, allow for restricted access to APIs based on administrator-defined privilege levels, and provide uninterrupted availability of the data.
DreamFactory does not store or maintain customer data associated with customer databases or customer generated APIs using its software.
DreamFactory software and product updates are downloaded by the customer and data is transmitted using secure HTTPS/TLS protocols.
Access to customer data is only through express permission from the customer. This is rarely requested and only in circumstances where DreamFactory product support is directly assisting the customer with debugging and/or product support.
No sensitive, confidential, or other protected data is stored by DreamFactory beyond contact and billing information required for business transactions.
Who is responsible for developing the DreamFactory platform?
DreamFactory’s internal development team collaborates closely with a trusted third party for technical support and coding for product updates. During this process, third parties have no access to customer data and all lines of code are audited and individually reviewed by DreamFactory’s Chief Technical Officer (CTO).
Does DreamFactory employ any staff members focused specifically on security?
DreamFactory has a CISSP(TM) actively involved in its security assessment, procedures and review. Moreover, the business staffs Cybersecurity Masters trained leaders to support their approach.
The software is open source and fully available for testing, at source level, by its customers. Currently the business satisfies the needs of several Fortune 100 customers.
Our incident response plan that brings together key company representatives from the leadership, legal, and technical teams for rapid assessment and remediation. It includes business continuity and disaster response elements as well as notification processes to ensure customers are fully informed.
Is DreamFactory certified to be in compliance with security frameworks such as FISMA and HIPAA?
The DreamFactory security policy framework is built on the Cloud Security Alliance’s (CSA’s) Consensus Assessments Initiative Questionnaire (CAIQ v3.0.1) which maps to other commonly utilized compliance frameworks including SOC, COBIT, FedRAMP, HITECH, ISO, and NIST.
DreamFactory uses industry standard cybersecurity controls to protect against all of the OWASP Top 10 web application security risks.
Product updates and improvements follow a standardized SDLC process, including DevSecOps under the supervision of our CTO.
Our policies are designed in compliance with key privacy regulations such as GDPR, PIPEDA, COPPA, HIPAA and FERPA.
How does DreamFactory prevent information compromise?
DreamFactory software uses an integrated defense in depth to provide customers configurable tools secure their information. This defense starts with access keys that are individually generated and associated with each API.
Beyond basic authentication, DreamFactory supports LDAP, Active Directory, and SAML-based SSO.
Customers can create and assign roles to API keys, and delegate/manage custom permissions as well as mapping AD/LDAP groups to roles.
Other controls include the ability for customers to set rate limiting (by minutes, hours, or days), logging, and reporting preferences, and individually assigning them to users. Real-time traffic auditing is possible through Elasticsearch, Logstash, and Kibana or Grafana dashboards.
Collectively, this approach allows customers to instantly see who has accessed their data, and individually adjust their access by role or user profile.
DreamFactory 3.0 includes several new security features including API lifecycle auditing and restricted administrator controls.
How does DreamFactory prevent the misuse of customer information?
Our customers fully own and control their own data, so there is virtually no way for a DreamFactory employee to access a customer’s data.
Employees that disclose or misuse confidential company or customer data are subject to disciplinary action up to and including termination.
All DreamFactory employees receive full background checks during the hiring process, and access to the product is strictly controlled by our CTO.
Employee role changes and termination events include an immediate review of access which is assigned on a need to know basis commensurate with employee responsibilities. Terminated employees immediately lose access to email, files, and use of company systems and networks.
DreamFactory utilizes a Password Manager system that enforces the updated recommendations in NIST 800-63-3, and employees may not share passwords or access. This is supervised through the use of logging and reporting controls.
How does DreamFactory prevent accidental information disclosure?
All DreamFactory employees receive cybersecurity training during onboarding and periodically throughout the year.
Role based permissions are employed and access is granted based on individual responsibilities and time required.
Internal company data is secured in the cloud through GSuite’s Data Loss Prevention (DLP) tools, and employees are granted access on a need to know basis based on their role within DreamFactory.
What DreamFactory safeguards are in place to prevent the loss of data?
Employees have limited access to DreamFactory information and no access to customer data.
Internal company data is secured in the cloud through GSuite’s Data Loss Prevention (DLP) tools, and employees are granted access on a need to know basis based on their role within DreamFactory.
DreamFactory security policies do not allow employees to use external media.
DreamFactory utilizes MacOS systems and the included Apple FileVault product to encrypt all data at rest. Should a laptop be stolen, all data will remain encrypted and can be remotely wiped. Customer data is never saved on company systems and devices.
Dreamfactory intellectual property and proprietary product information is backed up in secure cloud enclaves and managed by our CTO and technical staff.
Two-Factor Authentication is required for access to company data.
What DreamFactory safeguards are in place to alleviate privacy concerns?
Customer privacy is a paramount concern for DreamFactory. This focus goes to the heart of our product which allows customers to retain full control of their data, as well as rapidly create and manage personalized controls.
As a rule, DreamFactory collects only the information absolutely required, stores it only as long as it is needed, and shares it with the absolute minimum number of employees.
Our policies are designed in compliance with key privacy regulations such as GDPR, PIPEDA, COPPA, HIPAA and FERPA.
Our goal is to be fully transparent and responsive with our customers on privacy issues.
What is the recommended application hardening document for production deployment of DreamFactory?
DreamFactory is an HTTP-based platform which supports a wide array of operating systems (both Windows and Linux) and web servers (notably Nginx, Apache, and IIs), and therefore administrators are encouraged to follow any of the many available hardening resources for general guidance. Hardening in the context of DreamFactory would primarily be a result of software-level hardening, and several best practices are presented in the next answer. We’re happy to provide further guidance on this matter after learning more about the target operating system.
How should DreamFactory administrators ensure the data security and integrity for production deployment?
Data security and integrity is ensured by following key best practices associated with building any HTTP-based API solution:
Ensure the server software (Nginx, PHP, etc) and associated dependencies are updated to reduce the possibility of third-party intrusion through disclosed exploits.
Stay up to date with DreamFactory correspondence regarding any potential platform security issues.
Periodically audit the DreamFactory role definitions to ensure proper configuration.
Periodically audit database user accounts used for API generation and communication to ensure proper configuration. In this case, proper configuration is defined as ensuring each user account is assigned a minimally viable set of privileges required for the API to function is desired.
Periodically audit API keys, disabling or deleting keys no longer in active use.
If applicable (requires Enterprise license), use DreamFactory’s logging integration to send traffic logs to a real-time monitoring solution such as Elastic Stack or Splunk.
If applicable (requires Enterprise license), use DreamFactory’s restricted administrator feature to limit administrator privileges.
What is the method for DreamFactory Encryption for data at Rest ? is it enabled by default or do we have to do it manually?
DreamFactory does not by default store any API data as it passes through the platform. Some connectors offer an API data caching option which will improve performance, however the administrator must explicitly enable this option. Should caching be enabled, data can be stored in one of several supported caching solutions, including Redis and Memcached. Solutions such as Redis are designed to be accessed by “trusted clients within trusted environments”, as described by for instance the Redis documentation: https://redis.io/topics/security.
How does DreamFactory encrypt data in transit? Is it enabled by default or are additional steps required?
DreamFactory plugs into a variety of third-party data sources, including databases such as Microsoft SQL Server and MySQL, file systems such as S3, and third-party HTTP APIs such as Salesforce, Intercom, and Twitter. DreamFactory will then serve as a conduit for clients desiring to interacting with these data sources via an HTTP-based API. DreamFactory runs atop a standard web server such as Apache or Nginx, both of which support SSL-based communication. Provided HTTPS is enabled, all correspondence between DreamFactory and the respective clients will be encrypted.
Lost/Forgotten Admin UI Password
I lost my DreamFactory administrator password. How can I recover it?
DreamFactory uses one-way encryption for passwords, meaning that once they are encrypted they cannot be decrypted. If email-based password recovery has not been configured, you can create a new administrator account by logging into the terminal console included with all versions of DreamFactory. To do so, begin by SSHing into your DreamFactory server. Next, navigate to the DreamFactory root directory. For those who used an automated DreamFactory installer, the root directory will be /opt/dreamfactory. The path will vary in accordance to other installers.
Use the following command to retrieve the desired administrator account. You’ll need to swap out the placeholder email address with the actual administrator address:
Exit the console, and return to the browser to login using the new password:
>>> exit
21.3 - Appendix C: Leveraging an API Gateway for GDPR Readiness
Executive Overview
API platforms are recognized as the engine driving digital transformation, enabling the
externalization of IT assets across enterprise and customers boundaries. By adopting this new
architecture, enterprises can transform the way they do business with unprecedented time to
value and entirely new engagement models to monetize IT as a business.
What is less promoted, however, is the power of full-lifecycle API platforms in addressing
regulatory compliance requirements. There is a common thread in IT’s modernization and
regulatory compliance agendas, being the repackaging of data systems as a shared resource that
is able to support a myriad of new consumption models. The cornerstone of this repackaging is
implementing Data Gateways to enable and manage secure and monitorable access to enterprise
data systems.
This paper outlines how to leverage an API platform to retrofit existing infrastructure for
“GDPR readiness”, essentially as a byproduct of implementing a modern architecture for digital
transformation.
General Data Protection Regulation (GDPR)
While having a simple stated goal of returning control of any European citizen’s private data
back to the consumer- the implications spread far past the EU and touch every organization that
handles consumer data directly or through a partner. The penalties for non-compliance are
severe, potentially 4% of global revenue - per incident! So as you might guess, companies are
paying close attention to the regulation and scrambling to ensure compliance by the rapidly
approaching start date of May 25, 2018.
PII (Personally Identifiable Information)
PII is the specific data that GDPR regulates. PII is data that can be used to distinguish an
identity and includes social security numbers, date and place of birth, mother’s maiden name,
biometric records, etc. PII also includes logged behavioral data such as data collected from a
user’s web session.
Data Protection Officer (DPO)
A data protection officer is a new leadership role required by the General Data Protection
regulation for companies that process/store large amounts of personal data as well as any public
authority (national, state, or local government body). DPO’s are responsible for overseeing the
organization’s data protection strategy and implementation to ensure compliance with GDPR
requirements.
API Automation Platform
As the name suggests, API Automation platforms automate the creation of APIs and provide a
gateway for secure access to data endpoints. A full lifecycle platform combines API
management, API generation, and API orchestration into a single runtime. Also referred to as
Data Gateways, they provide discovery, access, and control mechanisms surrounding enterprise
data that needs to be shared with external consumers. Ideally, a Data Gateway is non-disruptive
to existing infrastructure - meaning that it can be retrofitted versus “rip and replace” approach.
A full lifecycle data gateway automates several key functions:
Facilitating the creation of bidirectional data APIs for CRUD operations
Providing a secure gateway to control access, track, log and report on data usage.
Discovering key aspects of data to generate catalogs and inventory
Orchestrating APIs to chain operations within and between data systems.
Packaging and containerizing data access for portability
The remainder of the document looks at specific requirements in GDPR and illustrates how the
DreamFactory API platform can help you bake in GDPR readiness into your infrastructure.
DreamFactory’s API platform is unique in that it is the only “plug and play” platform,
automatically generating a data gateway for any data resource.
Right to be forgotten
This is a primary requirement and allows consumers to demand that their private data be deleted.
To be able to do this in a timely manner an organization needs to know where all instances of
this data exist in their internal systems as well as the partner ecosystems (data supply chain).
Capabilities of DreamFactory’s Data Gateway relevant to “right to be forgotten” include:
Auto-generation of APIs for any data resource, SQL, NoSQL, cloud storage, and
commercial software systems such as Salesforce.com. Regardless of how or where you
structure your data, DreamFactory provides a cons istent and reusable interface for
on-demand CRUD operations, including record deletion.
Data Cataloging. Dreamfactory automatically discovers and catalogs all of the assets of a
data resource including metadata, stored procedures, and data relationships providing you
with a holistic view of your data assets from a single pane of glass.
Data Mesh. DreamFactory allows you to create virtual data relationships between
databases and perform operations on all of them in a single API call.
Role based access control. This allows your data supply chain to securely share PII with
their partners and determine which operations can be performed on it.
Pre/Post processing of API calls allows you to notify other systems of change
Provide access to everything via REST to ensure standards based integration with
analysis and workflow systems.
Moreover, DreamFactory is non-disruptive to existing infrastructure and easily bolts-on to
retrofit existing systems for compliance.
Data Portability
Consumers have the right to move their data between vendors, and a vendor is obligated to
provide this data to them in a timely manner. An example would be a customer can demand that
their PII from one online banking vendor be transferred to another.
DreamFactory normalizes the interface to data. Regardless of how (SQL, NoSQL, storage) or
where (cloud, on-prem) it persists you can expose it to data consumers as a single reusable API.
This enables external systems to connect to the data using the same interface regardless of its
underlying structure or location.
One important capability of DreamFactory’s gateways is that it handles all of the firewall
plumbing required to access on-prem systems in cloud portals, providing a secure access
mechanism across the data supply chain.
Governance
As with any business critical regulation, enterprises need to gauge and track compliance. GDPR
places increased emphasis on governance as the penalties can be so severe as to jeopardize the
viability of a company.
DreamFactory bakes compliance readiness into the gateway between your data and all of the
consumers of your data, with:
Role based access control at various levels of granularity (e.g. app, record)
Logging of all API calls accessing data records
Limiting of API Calls to preemptively protect against attacks
Reporting on all data activity
What databases are we talking about?
The DreamFactory platform automatically creates RESTified Data Gateways for the following
databases:
As of the publication date of this paper, a SAP Hana integration is in late beta, while GraphQL
support is additonally offered.
A full list of DreamFactory’s database connections can be seen here. The scope of platform
capabilities, including SOAP to REST, EXCEL to REST, as well as integration with SMS, push
notifications, Apple/Google technologies and more can be viewed here.
Summary
Progressive organizations are re-architecting their infrastructure with API platforms to get ahead
of the competition. By taking this approach, enterprises have been able to share their data assets
safely with any data consumer they need to support - whether to turbo charge new mobile and
web app ecosystems, integrate cross-enterprise data, or create new business opportunities with
partners & customers.
Now, with GDPR, there is an emerging and mission critical consumer of enterprise data that an
API platform can support: the Data Protection Officer.
The DreamFactory Data Gateway is unique in that it is a unified runtime that automatically
enables, controls, and monitors access for any enterprise data system.
To see how DreamFactory can help your organization, please request a demo to see how your
digital transformation initiatives can be both automated and readied for GDPR regulations.
21.4 - Appendix D: Architecture FAQ
Basic System Architecture
DreamFactory is an open source REST API backend that provides RESTful services
for building mobile, web, and IoT applications. In technical terms, DreamFactory is a runtime application that runs on a web server similar to a website running on a
traditional LAMP server.
In fact, as a base, we require a hosting web server like Apache, NGINX, or IIS.
DreamFactory is written in PHP and requires access to a default SQL database for saving configuration. Depending on configuration for caching, etc. it may or may not need access to the file system for local storage. If pre- and/or post-process scripting is desired, access to V8Js or Node.Js may also be required. It runs on most Linux distributions (Ubuntu, Red Hat, CentOS, etc.), Apple Mac OS X, and Microsoft
Windows.
Installation options are highly flexible. You can install DreamFactory on your IaaS cloud, PaaS provider, as a Docker container, on premises server, or a laptop. Installer packages are available, or the DreamFactory source code is available under the Apache License at GitHub.
DreamFactory Components
The DreamFactory application can logically be divided into several operational
components. While these components are logical and do not necessarily represent
the code structure itself, they are useful in discussing the subsystems and
functionality of the application, as well as the anatomy of the API call later on.
Routing
Routing sets up the supported HTTP interfaces to the system. In tandem with
Controllers, this component controls the flow of the calls through the system.
Controllers are essentially groups of routes or HTTP calls that share some logical handling and are paired with a set of access control components. There are essentially three controllers that the routing component can hand the call off to.
• Splash Controller - This handles the initial load and setup states of the system. It also routes web traffic to the default web application (i.e. Launchpad), where users can login and access other configured applications like the admin console, etc.
• Storage Controller - This handles direct file access to any file services where folders have been made public through configuration. Files are requested via the service name and the full file path relative to that service. The file contents are returned directly to the client. This is primarily used for running applications hosted on the DreamFactory instance.
• REST Controller - This is the main controller for the API, it handles the versioning of the API and routing to the various installed services via a Service Handler. It also handles any system exceptions and response formatting. The Service Handler communicates generically with all services through a service request and response object.
Access Control
Access Control is made up of middleware, groups of checks and balances that can be used to control access to various parts of the application. The services and resources for Access Control consist of the following:
• System status checks
• Cross-Origin Resource Sharing (CORS) configuration allowances
• Authentication via user login, API keys, and/or session tokens
• Authorization via assigned user and app role access
• And usage limit tracking and restrictions
If any of these checks fail, the call is denied and the correct error response is sent back to the client; no further processing is done. If all of these checks pass, the call is allowed to continue on to one of the handling controllers, which routes the call for the appropriate API processing.
API Processing
At this point the API can be broken down further into logical components that we call Services. Services can be anything from a system configuration handler (i.e. the “system” service), to a database access point, or a remote web service. Service types can be dynamically added to the system to expand service offerings, but many are included out of the box and are list here.
Server-side Scripting
Part of this REST handling by the services includes server-side scripting. Each API endpoint, be it a Service endpoint, or a subtending Resource endpoint, triggers two processing events, one for pre-process and one for post-process. Each event can be scripted to alter the request (pre) or response (post), perform extra logic including additional calls to other services on the instance or external calls, as well as halt execution and throw exceptions. Scripting can be used for formula fields, field validations, workflow triggers, access control, custom services, and usage limits. The role-based access controls have separate settings that govern data access for both client-side applications and server-side scripts. This capability enables server-side scripts to safely perform special operations that are not available from the client-side REST API.
The event scripting all happens in the context of the original API call. Therefore, event scripts block further execution of the API call until finished.
DreamFactory uses the V8 Engine developed by Google to run server-side code written in JavaScript. The V8 engine is sandboxed, so server side scripts cannot interfere with other system operations or resources.
In 2.0, DreamFactory also provides access to use Node.js and PHP as a server-side scripting environment. These environments are not sandboxed however and care must be taken when used.
Database and File Storage Access
Many of the services mentioned above eventually need to access some data or file store or communicate with a remote process or server. DreamFactory takes
advantage of many available open-source packages, SDKs and compiled drivers to
access these other resources.
In the case of database accesses, DreamFactory utilizes PDO drivers for SQL
databases, as well as, other compiled drivers and extensions like MongoDB, and
even HTTP wrapper classes for databases like CouchDB that provide a HTTP
interface.
DreamFactory provides internal models and schema access for frequently used data components, particularly the system configuration components. The most
frequently used are also cached to reduce database transactions.
A DreamFactory instance may utilize local file storage or various other storage
options such as cloud-based storage. DreamFactory utilizes generic file access
utilities that support a majority of the storage options, thus giving the system, and thus the API, a consistent way to access file storage.
Anatomy of an API Call
Anatomy of a Storage Call
In Conclusion
DreamFactory is designed to be secure, simple to use, easy to customize, and
dynamically expandable to meet most of your API needs. Reach out to the DreamFactory engineering team if you have additional questions of concerns.
21.5 - Appendix E: Scalability
Before we dive into the details, the most important thing to know is that DreamFactory is a configurable LAMP stack running PHP. As far as the server is concerned, DreamFactory looks like a website written in WordPress or Drupal. Instead of delivering HTML pages, DreamFactory delivers JSON documents, but otherwise the scaling requirements are similar.
Instead of using traditional session management, where the server maintains the state of the application, DreamFactory handles session management in a stateless manner, not requiring the server to maintain any application state. This
makes horizontal scaling a breeze, as you’ll see below. For demanding deployments, we suggest using NGINX, more on that later.
This is important because you can apply all the standard things you already know about scaling simple websites directly to scaling DreamFactory. This is not an accident. It makes DreamFactory easy to install on any server and easy to scale for massive deployments of mobile applications and Internet of Things (IoT) devices.
Vertical Scaling
You can vertically scale DreamFactory on a single server through the addition of extra processing power, extra memory, better network connectivity, and more hard disk space. This section discusses how vertical scaling and server configuration
can impact performance.
By increasing server processor speed, number of processors, and RAM, you can improve the performance of the DreamFactory engine. Processor speed will especially improve round-‐trip response times. In our testing, DreamFactory can
usually respond to a single service request in 100 to 200 milliseconds.
The other important characteristic is the number of simultaneous requests that DreamFactory can handle. On a single server with vertical scaling, this will depend on processor speed and available RAM to support multiple processes running at the same time. Network throughput is important for both round-‐trip time and handling a large number of simultaneous transactions.
Default SQL Database
Each DreamFactory instance has a default SQL database that is used to store information about users, roles, services, and other objects required to run the platform. The default Bitnami installation package includes a default SQL database, but you can also hook up any other database for this purpose. When this database is brought online, DreamFactory will create the additional system tables that are needed to manage the platform.
DreamFactory also stores server-‐side scripts in this default database. These scripts can be written in JavaScript or PHP to customize either the request or response of the API calls running through the engine. DreamFactory uses the V8 engine to execute JavaScript. This allows developers to use JavaScript both on the client and on the server and call the API from either side of the stack. The V8 engine is included in the Bitnami installers and must exist for server-‐side scripting to work.
Developers can also create tables on the default database for their own projects. Based on application requirements, mobile projects can query this database in various ways, and this activity can impact performance. The DreamFactory user
records are also stored in the default database. Anything that you do to boost the performance of this database will increase the speed of the admin console and developer applications.
Local File Storage
Each DreamFactory instance also needs some file storage for HTML5 web application hosting. Each application is given a folder where the developer might store HTML files, graphic images, CSS style sheets, JavaScript files, etc. Native applications might store other documents or resources in local storage for simple download. The size and access speed of the local file system will impact application performance just like a normal web site.
Persistent Storage
By default, DreamFactory uses persistent local storage for two things: system-‐wide cache data and hosted application files and resources. Many of the Platform as a Service (PaaS) systems such as Pivotal, Bluemix, Heroku, and OpenShift do not support persistent local storage.
For these systems, you need to configure DreamFactory to use memory-‐based cache storage such as Memcached or Redis. You also need to create a remote cloud storage service such as S3, Azure Blob, Rackspace etc. to store your application files. You can easily configure DreamFactory to use a memory-based cache via the config files.
The database for PaaS needs to be a remote SQL database like ClearDB or whatever the vendor recommends. If you use the local file system to create files at runtime these will disappear when the PaaS image is restarted or when multiple instances are scaled. Working with PaaS is discussed in greater detail under the cloud scaling section, below.
External Data Sources
You can hook up any number of external data sources to DreamFactory. DreamFactory currently supports MySQL, PostgreSQL, Oracle, SQL Server, DB2, S3, MongoDB, DynamoDB, CouchDB, Cloudant, and more. Some of the NoSQL databases are specifically designed for massive scalability on clustered hardware. You can hook up any SQL database running in your data center in order to mobilize legacy data. You can also hook up cloud databases like DynamoDB and Azure Tables.
DreamFactory acts as a proxy for these external systems. DreamFactory will inherit the performance characteristics of the database, with some additional overhead for each REST API call. DreamFactory adds a security layer, a customization layer, normalizes the web services, and implements role-based access control for each service. The scalability of these external data sources will depend on service level agreements with your cloud vendor, the hardware behind database clustering, and other factors.
DreamFactory vs. Node.js
I’m going to take a small detour here and discuss some of the differences between DreamFactory and Node.js. This is helpful background information in order to understand how DreamFactory can be scaled horizontally with multiple servers, load balancers, and clustered databases.
We considered using Node.js for the DreamFactory engine, but were concerned that a single thread would be insufficient to support a massively scalable mobile deployment. The workload in a sophisticated REST API platform is quite comparable to an HTML website written in Drupal or WordPress where multiple threads are required to process all the data.
Another issue was the need for mature interfaces to a wide variety of SQL and NoSQL databases. This was a challenge with Node.js. Instead, we chose PHP because this language is in widespread use and has great frameworks such as Laravel. The main thing we liked about Node.js was the V8 engine. This allows developers to write JavaScript on the client and on the server. DreamFactory harnesses the power of the V8 engine by using the V8Js extension for PHP, except that DreamFactory runs it in parallel for scalability. The V8 engine is also sandboxed for security.
On an Apache server running DreamFactory, we use Prefork MPM to create a new child process with one thread for each connection. You need to be sure that the MaxClients configuration directive is big enough to handle as many simultaneous requests as you expect to receive, but small enough to ensure enough physical RAM for all processes.
There is a danger that you will have more incoming requests than the server can handle. In this case, DreamFactory will issue an exponential backoff message telling the client to try again later. DreamFactory Enterprise offers additional methods of limiting calls per second. But still, the total number of transactions will be limited. Node.js can potentially handle a very large number of simultaneous requests with event-‐based callbacks, but in that situation you are stuck with a single thread for all of the data processing. In this situation, Node.js becomes a processing bottleneck for every REST API call.
If you expect a massive number of incoming requests, then consider running DreamFactory on an NGINX server with PHP-FPM instead of Apache. NGINX can maximize the requests per second that the hardware can handle, and reduce the memory required for each connection. This is a “best of both worlds” scenario that allows a conventional web server to handle massive transaction volumes without the processing bottleneck of Node.js.
Horizontal Scaling
This section discusses ways to use multiple servers to increase performance. The simplest model is just to run DreamFactory on a single server. When you do a Bitnami install, DreamFactory runs in a LAMP stack with the default SQL database and some local file storage. The next step up is to configure a separate server for the default SQL database. There are also SQL databases that are available as a hosted cloud service.
Multiple Servers
You can use a load balancer to distribute REST API requests among multiple servers. A load balancer can also perform health checks and remove an unhealthy server from the pool automatically. Most large server architectures include load balancers at several points throughout the infrastructure. You can cluster load balancers to avoid a single point of failure. DreamFactory is specifically designed to work with load balancers and all of the various scheduling algorithms.
DreamFactory uses JWT (JSON Web Token) to handle user authentication and session in a completely stateless manner. Therefore, a REST API request can be sent to any one of the web servers at any time without the need to maintain user session/state across multiple servers. Each REST API call to a DreamFactory Instance can pass JWT in the request header, the URL query string, or in the request payload. The token makes the request completely aware of its own state, eliminating the need to maintain state on the server.
Shared Local Storage
All of the web servers need to share access to the same local file storage system. In DreamFactory Version 1.9 and below, you will need a shared “storage” drive mounted with NFS or something similar. DreamFactory Version 2.0 and higher supports a more configurable local file system. The Laravel PHP Config File specifies a driver for retrieving files and this can be on a local drive, NFS, SSHFS, Dropbox, S3, etc. This simplifies multiple server setup and also PaaS delivery options.
Multiple Databases
The default SQL database can be enhanced in various ways. You can mirror the database, create database clusters for enhanced performance, and utilize failover clusters for high-availability installations. A full discussion of this topic is beyond the scope of this paper.
Performance Benchmarks
Below are some results that show the vertical scalability of a single DreamFactory Instance calculated with Apache Benchmark. Five different Amazon Web Services EC2 instances were tested. The servers were t2.small, t2.medium, m4.xlarge, m4.2xlarge, and finally m4.4xlarge.
Vertical Scaling Benchmarks
For this test, we conducted 1000 GET operations from the DreamFactory REST API. There were 100 concurrent users making the requests. Each operation searched, sorted, and retrieved 1000 records from a SQL database. This test was designed to exercise the server side processing required for a complex REST API call.
Looking at the three m4 servers, we see a nice doubling of capacity that matches the extra processors and memory. This really shows the vertical scalability of a single DreamFactory instance. The complex GET scenario highlights the advantages of the additional processor power.
Next, we tried a similar test with a simple GET command that basically just returned a single database record 5000 times. There were 100 concurrent users making the requests. In this situation, the fixed costs of Internet bandwidth, network switching, and file storage start to take over, and the additional processors contribute less.
Look at these results for 5000 simple GETs from the API. As you can see, performance does not fully double with additional processors. This demonstrates the diminishing returns of adding processors without scaling up other fixed assets.
By the way, we also looked at POST and DELETE transactions. The results were pretty much what you would expect and in line with the GET requests tested above.
Horizontal Scaling Benchmarks
Below are some results that show the horizontal scalability of a single DreamFactory Instance calculated with Apache Benchmark. Four m4.xlarge Amazon Web Services EC2 instances were configured behind a load balancer. The servers were configured with a common default database and EBS storage.
First we tested the complex GET scenario. The load balanced m4.xlarge servers ran at about the same speed as the m4.4xlarge server tested earlier. This makes sense because each setup had similar CPU and memory installed. Since this example was bound by processing requirements, there was not much advantage to horizontal scaling.
Next we tested the simple GET scenario. In this case there appears to be some advantage to horizontal scaling. This is probably due to better network IO and the relaxation of other fixed constraints compared to the vertical scalability test.
Concurrent User Benchmarks
We also evaluated the effects of concurrent users simultaneously calling REST API services on the platform. This test used the complex GET scenario where 1000 records were searched, sorted, and retrieved. The test was conducted with three different Amazon Web Services EC2 instances. The servers were m4.xlarge, m4.2xlarge, and m4.4xlarge. We started with 20 concurrent users and scaled up to 240 simultaneous requests.
The minimum time for the first requests to finish was always around 300 milliseconds. This is because some requests are executed immediately and finish first while others must wait to be executed.
The maximum time for the last request to finish will usually increase with the total number of concurrent users. Based on the processor size, the maximum time for the last request can increase sharply past some critical threshold. This is illustrated by the 8 processor example, where maximum request times spike past 160 concurrent users.
The 16 processor server never experienced any degradation of performance all the way to 240 concurrent users. This is the maximum number of concurrent users supported by the Apache Bench test program. Even then, the worst round trip delay was less than 1⁄2 second. Imagine a real world scenario with 10,000 people logged into a mobile application. If 10% of them made a service request at the same time, you would expect a round trip delay of 1⁄2 second on average and a full second in the worst case.
Your Mileage May Vary
For your implementation, we recommend getting a handle on the time required to complete an average service call. This could depend on database speed, server side scripting, network bandwidth, and other factors. Next, experiment with a few server configurations to see where the limits are. Then scale the implementation to the desired performance characteristics for your application.
In all of my benchmarking tests, there were never any unexplained delays or other performance characteristics that did not respond in a scalable manner. The addition of horizontal or vertical hardware will scale DreamFactory 3.0 in a linear fashion for any requirements that you may have.
Cloud Scaling
Most of the Infrastructure as a Service (IaaS) vendors have systems that can scale web servers automatically. For example, Amazon Web Services can scale EC2 instances with Auto Scaling Groups and Elastic Load Balancers. Auto scaling is built into Microsoft Azure and Rackspace as well. If you want to deploy in the cloud, then check with your vendor for the options they support.
We discussed Platform as a Service (PaaS) deployment options earlier. These systems do not support persistent local file storage, but the trade-‐off is that your application instance is highly scalable. You can simply specify the maximum number of instances that you would like to run. As traffic increases, additional instances are brought online. If a server stops responding, then the instance is simply restarted.
Conclusion
DreamFactory is designed to be scaled like a simple website. DreamFactory supports the standard practices for scaling up with additional server capabilities and out with additional servers. DreamFactory has installers or installation instructions for all major IaaS and PaaS clouds, and some of these vendors automatically handle scaling for you.