Authenticating Your APIs
One of DreamFactory’s most popular features is the wide-ranging authentication support. While API Key-based authentication is suffice for many DreamFactory-powered applications, developers often require a higher degree of security through user-specific authentication. In some cases Basic HTTP authentication will get the job done, however many enterprises require more sophisticated and flexible approaches largely because of the growing adoption of Single Sign On (SSO)-based solutions such as Active Directory and LDAP, and use of third-party identity providers and solutions such as AWS Cognito, Auth0, and Okta.
You’ll be pleased to know DreamFactory supports all of these options through a comprehensive set of authentication connectors. These connectors include Active Directory, LDAP, OAuth through well-known identity providers such as Facebook, GitHub, and Twitter, OpenID Connect, and SAML 2.0. In this chapter we’ll walk you through all of the different authentication integration options at your disposal!
Authentication Fundamentals
All DreamFactory APIs are private by default, requiring at minimum an API key for authentication purposes. The API key is associated with a role-based access control (RBAC) which determines what actions the client responsible for supplying the API key can undertake with regards to the API. For instance, it’s possible to create a read-only RBAC which ensures the client can’t access the API’s insertion, modification, or deletion endpoints if they exist. If you’re interested in protecting a database-backed API, you could limit access to a specific table, view, or stored procedure.
Further, DreamFactory supports both anonymous and user-based authentication. The former pertains to the provision of solely an API key, meaning DreamFactory won’t possess any additional information regarding the user responsible for issuing API calls through the client. However in many cases you’ll want to identify the connecting user by requiring authentication via an authentication provider such as Active Directory, LDAP, or Okta. In fact, DreamFactory supports these providers and more, including:
- Basic Authentication
- Active Directory
- LDAP
- OpenID Connect
- OAuth, including support for providers such as Facebook and GitHub
- SAML 2.0
The Authentication Process
Regardless of whether the desired authentication approach is anonymous or user-based, you’ll always supply an API key. This API key is passed along with the request via the X-DreamFactory-Api-Key header. DreamFactory will confirm the key exists (all API keys are listed under the administration console’s Apps tab), and then review the associated RBAC to confirm the request method and URI are permissible according to the RBAC definition.
When user-based authentication is used, DreamFactory will additionally expect a JSON Web Token (JWT) be passed along via the X-DreamFactory-Session-Token header. This JWT is generated by DreamFactory following a successful authentication against the authentication service provider. The following diagram outlines the authentication flow when using a third-party authentication provider such as Active Directory:
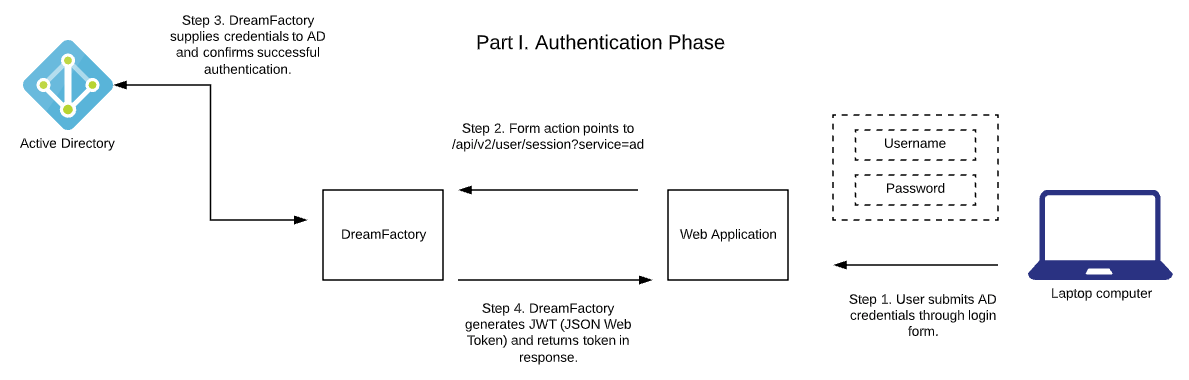
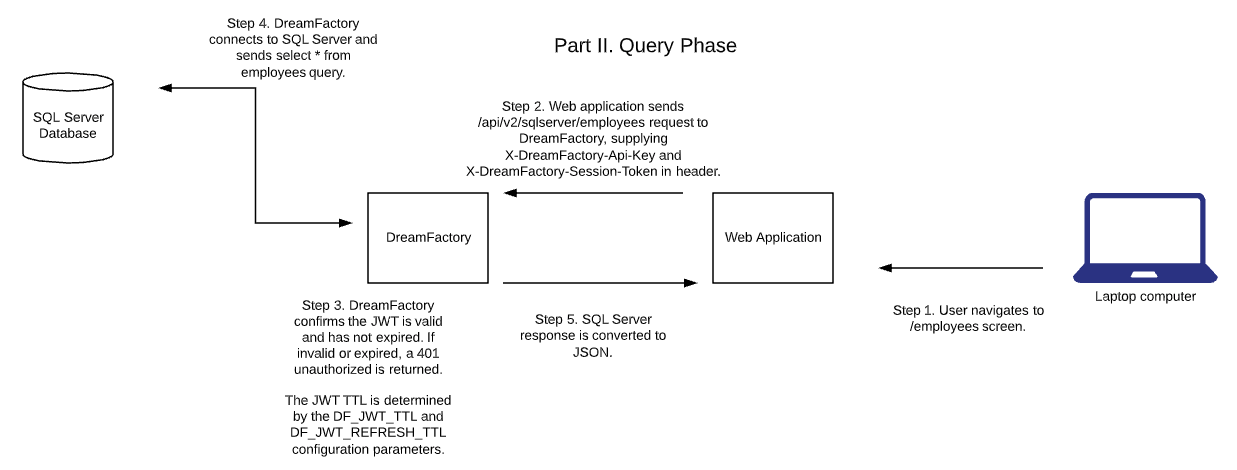
Once successfully authenticated, DreamFactory will generate the JWT and return it to the client. This JWT should then be submitted along with each subsequent request. DreamFactory will check the token’s validity and signature, examine the associated user’s assigned RBAC (role-based access controls can be assigned on a per user-basis via the user’s Roles tab), and if everything checks out the API call will be processed. The following diagram outlines this process:
Authenticating with Basic HTTP Authentication
[Section forthcoming real soon]
GET /api/v2/mysql/_table/employees HTTP/1.1 Host: demo.dreamfactory.com User-Agent: insomnia/6.6.0 Authorization: Basic d2pAd2pnaWxtb3JlLmNvbTpqYXNvbjEyMw== Accept: /
Authenticating with Azure Active Directory OAuth
<?php

$queryString = $_SERVER['QUERY_STRING'];

# Create a connection
$url = 'https://demo.dreamfactory.com/api/v2/user/session?oauth_callback=true&' . $queryString;
$ch = curl_init($url);

# Setting our options
curl_setopt($ch, CURLOPT_POST, 1);
curl_setopt($ch, CURLOPT_RETURNTRANSFER, true);

# Get the response
$response = curl_exec($ch);
curl_close($ch);

var_dump(json_decode($response));
Authenticating with OpenID Connect
OpenID affords users the convenience of using an existing account for signing into different websites. Not only does this eliminate the need to juggle multiple passwords, but OpenID also gives users greater control over what personal information is shared with websites that support OpenID. OpenID has been widely adopted since its inception in 2005, with companies such as Google, Microsoft, and Facebook offering OpenID provider services. Additionally, several OpenID libraries are available for integrating with these providers. Commercial editions of DreamFactory (versions 2.7 and newer) also support OpenID, allowing you to use OpenID-based authentication in conjunction with your APIs.
Configuring OpenID Connect
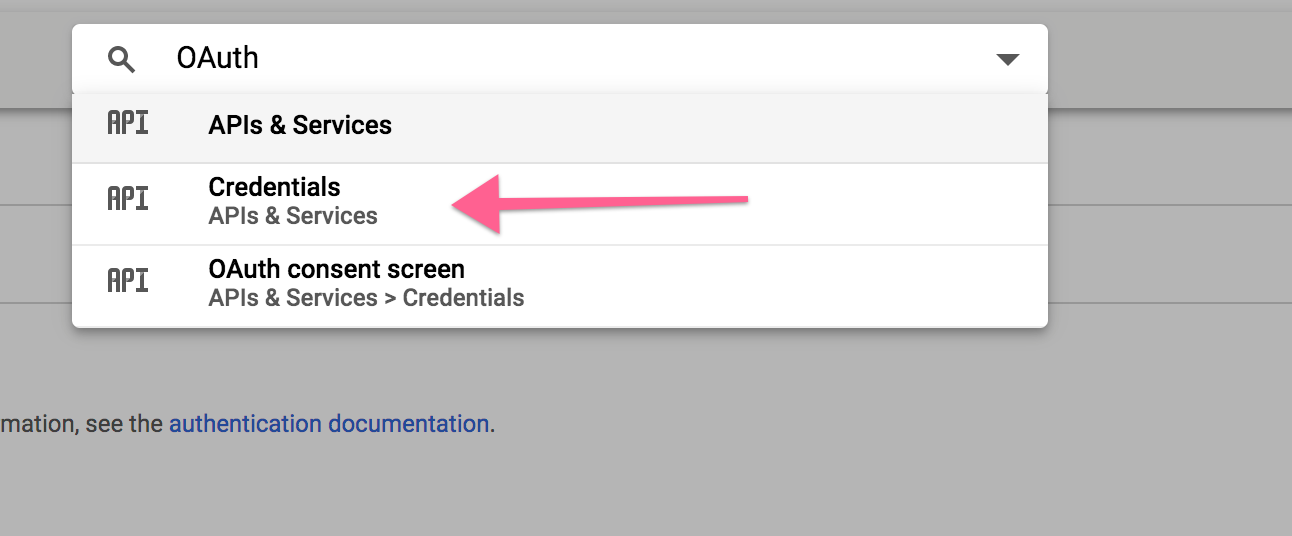
To configure DreamFactory’s OpenID connector, you’ll first need to identify an OpenID provider. This provider manages the credentials your users will use for authentication purposes. For the purposes of this tutorial we’ll use Google’s OpenID implementation. If you want to follow along with this specific example you’ll first need to login to Google’s API Console to create a set of OAuth2 credentials. After logging in, use the search field at the top of the screen to search for OAuth. In the dropdown that appears choose Credentials (see below screenshot).
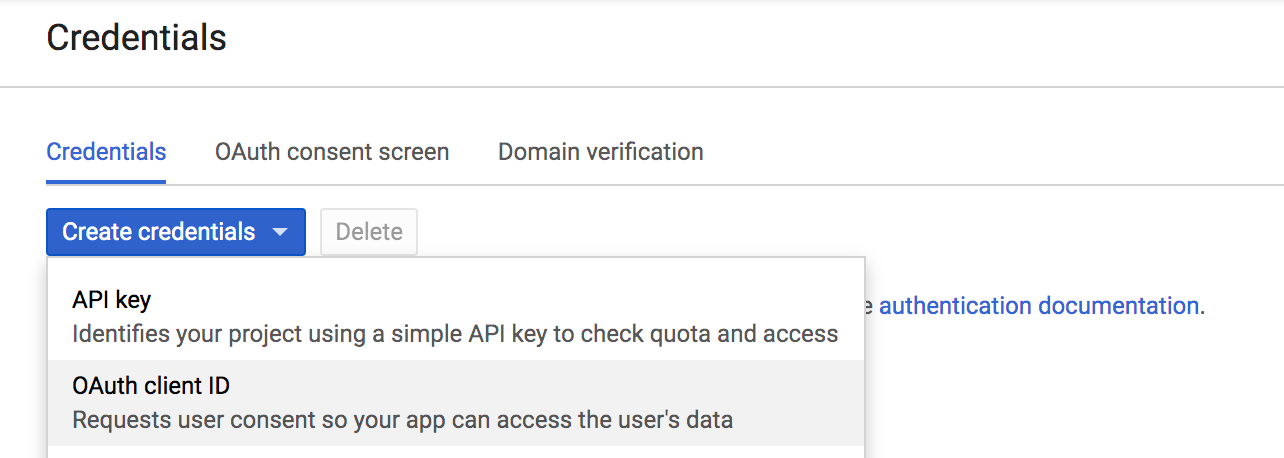
Next, click on the Create credentials dropdown and select OAuth client ID:
Next you’ll be prompted to configure your consent screen. This is the screen the user sees when initiating the authentication process. Click Configure consent screen, and you’ll be prompted to add or confirm the following items:
- Application type: Will this OpenID integration be used solely for users of your organization, or could users outside of your organization also use it to authenticate?
- Application name: The name of the application associated with OpenID integration.
- Application logo: You can optionally upload your organization or project logo for presentation on the consent screen.
- Support email: An organizational e-mail address which the user could contact with questions and issues.
- Scopes for Google APIs: This settings determines what data your application will be able to access on behalf of the authenticated user. We’ll use the default scopes for this example (email, profile, and openid).
- Privacy policy URL: Self-explanatory
- Terms of service URL: Self-explanatory
After saving these changes, you’ll be prompted for two final pieces of information:
- The application type: You can select between
Web application,Android,Chrome App,iOS, orOther. What you choose here won’t affect DreamFactory’s behavior, so be sure to choose the type most suitable to your specific application. - Restrictions: This oddly-named field asks you to supply an authorized JavaScript origin URL and/or an authorized redirect URI. The redirect URI is crucial here because it is the destination where Google will send the authorization code following successful authentication. This code must be intercepted by your application and forwarded on to DreamFactory to complete the process and generate the session token (JWT). If you don’t yet understand exactly how this will work, I suggest just reading on and returning to this configuration screen after seeing an example later in this section.
After saving your changes, you’re ready to configure DreamFactory’s OpenID Connect connector!
Configuring DreamFactory
DreamFactory’s authentication connectors are found in the same location as the standard API connectors. To view them, login to your DreamFactory instance and navigate to the Services tab. Choose Create, and in the dropdown that appears, select OAuth and finally OpenID Connect. You’ll be presented with the following initial configuration screen:
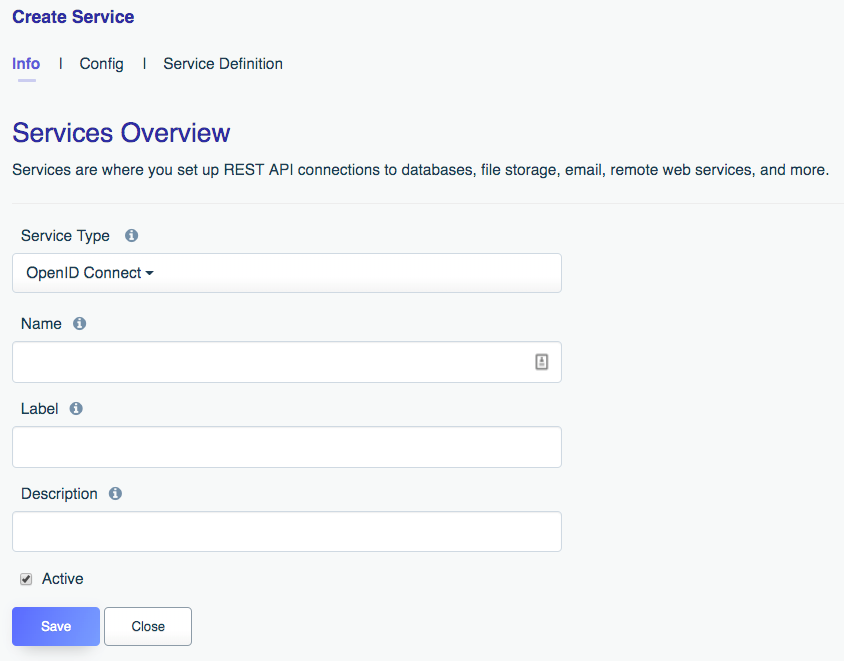
- Name: The name will form part of your API URL, so you’ll want to use a lowercase string with no spaces or special characters. Further, you’ll want to typically choose something which allows you to easily identify the API’s purpose. For instance for your Google-backed OpenID Connect authentication API you might choose a name such as
googleoropenid. Keep in mind a lowercased, alphanumeric name is required. - Label: The label is used for referential purposes within the administration interface and system-related API responses. You can use something less terse here, such as “Google OpenID API”.
- Description: Like the label, the description is used for referential purposes within the administration interface and system-related API responses.
- Active: This determines whether the API is active. By default it is set to active however if you’re not yet ready to begin using the API or would like to later temporarily disable it, just return to this screen and toggle the checkbox.
With these fields completed, click the Config tab to finish configuration. On this screen you’ll be presented with a number of fields, including:
- Default Role: DreamFactory can automatically assign a default role (learn more about roles here) to a user following successful login. You can identify that role here. If you want to more selectively grant roles, see the Role per App field, introduced below.
- Discovery Document Endpoint: If your identity provider offers a discovery document endpoint, adding it here will be the fastest way to configure your OpenID Connect connector. This is because doing so will automatically configure the rest of the fields, requiring you to only additionally supply the client ID, client secret, and redirection URL.
- Authorization Endpoint: This endpoint authorizes access to a protected resource such as the resource owner’s identity. It will be invoked following the resource owner’s successful login and authorization for the requester to access said protected resource.
- Token Endpoint: The token endpoint is contacted by the client after receiving an authorization code from the authorization endpoint. The client passes this authorization code to the token endpoint where if validated, tokens are returned to the client.
- User Info Endpoint: This endpoint can be contacted by the client for reason of retrieving information about the logged-in user’s claims (name, email, etc.).
- Validate ID Token: By checking this field, DreamFactory will validate the ID token by performing tasks such as checking that the encryption algorithm used to encrypt the token matches that specified by the OpenID provider, validating the token signature, and validating the token claims.
- JWKS URI: This identifies the JSON Web Key Set (JWKS) URI. The JWKS contains the set of public keys used for JWT verification. For instance Google defines this URI as
https://www.googleapis.com/oauth2/v3/certs. - Scopes: Scopes identify the level of restricted access requested by the client. For instance this might be some user profile information such as the name and e-mail address, or it might be access to an otherwise private service such as the user’s Google Calendar. Using this field you’ll define your scopes in comma-delimited format, such as
openid,email,profile. - Client ID: Along with the client secret (introduced next), the client ID forms one part of the credentials pair used by the client to interact with the identity provider. You’ll obtain the client ID when creating a developer’s account with the desired identity provider.
- Client Secret: The client secret is used in conjunction with the client ID to authenticate with the identity provider. You’ll receive this secret along with the client ID when creating a developer’s account with the identity provider.
- Redirect URL: Perhaps more than any other, the OpenID redirect URL causes considerable confusion amongst developers when creating an OpenID flow. This is because a bit of additional coding within the application is required in order to complete the OpenID flow. Upon successful authentication and authorization on behalf of the identity provider, this URL will be contacted with a set of parameters that the URL’s script must then forward on to DreamFactory. DreamFactory will contact the identity provider one last time to verify the parameters, and then return a session token (JWT) to the script that initiated the forwarding. Without this additional sequence it would not be possible for your custom application to obtain the JWT! Don’t worry though, later in this section we provide an example script demonstrating this process.
- Role per App: If assigning a blanket role through the Default Role setting is not desired, you can instead use this setting to assign roles on a per application basis.
After configuring these settings, press Save to persist the changes. Next we’ll complete the configuration process by creating a script responsible for completing the OAuth callback and generating the session token (JWT)
The OpenID Authentication Process
Recall when configuring Google’s OpenID settings you added the redirection URI:
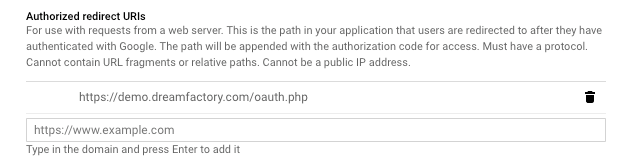
This endpoint is responsible for intercepting the OAuth callback parameters which need to be forwarded onto DreamFactory in order to generate the session token. The following example PHP script does exactly this, and then returns the JSON object containing the JWT and other user profile data such as the name and e-mail address. Here’s the script:
<?php

$queryString = $_SERVER['QUERY_STRING'];

# Create a connection
$url = 'https://example.com/api/v2/user/session?oauth_callback=true&' . $queryString;
$ch = curl_init($url);

# Setting our options
curl_setopt($ch, CURLOPT_POST, 1);
curl_setopt($ch, CURLOPT_RETURNTRANSFER, true);

# Get the response
$response = curl_exec($ch);
curl_close($ch);

$json = json_decode($response);

var_dump($json);
And here is the formatted JSON output:
object(stdClass)#1 (12) {
    ["session_token"]=> string(353)
    "JWT_TOKEN_HERE"
    ["id"]=> int(9)
    ["name"]=> string(13) "Jason Gilmore"
    ["first_name"]=> string(5) "Jason"
    ["last_name"]=> string(7) "Gilmore"
    ["email"]=> string(37) "[email protected]"
    ["is_sys_admin"]=> bool(false)
    ["last_login_date"]=> string(19) "2019-07-10 15:04:45"
    ["host"]=> string(20) "dreamfactory-demo-30"
    ["oauth_token"]=> string(129) "OAUTH_TOKEN_HERE"
    ["id_token"]=> string(1245) "ID_TOKEN_HERE"
}
You’ll add a script like this to your application in order to retrieve the JWT (defined within the session_token attribute) and subsequently pass that JWT along with future API requests. So now that all of the pieces to the puzzle are in place, what does the authentication workflow look like? Let’s walk through the entire process.
Step #1. User clicks on authentication link
To create the authentication link, you’ll use this URL:
https://YOUR_DREAMFACTORY_SERVER.com/api/v2/user/session?service=YOUR_SERVICE_NAME
Of course you’ll need to replace YOUR_DREAMFACTORY_SERVER with your DreamFactory server’s domain name, and YOUR_SERVICE_NAME with the name of the OpenID service you created inside DreamFactory.
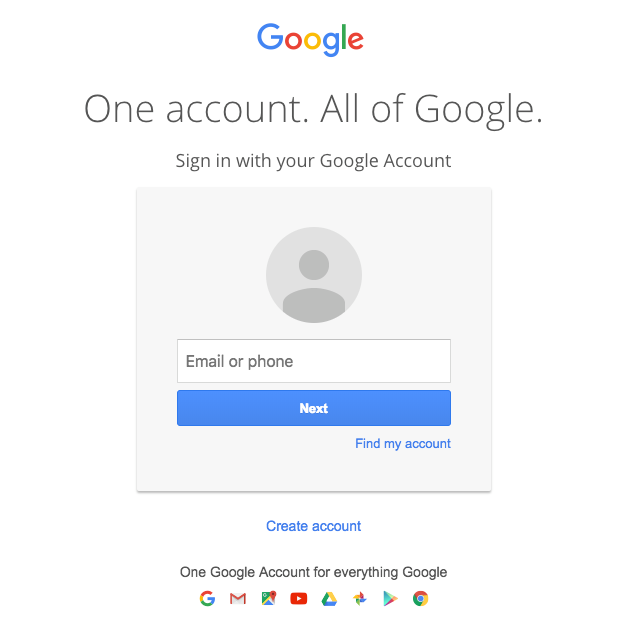
Step #2. Login Using the Designated Identity Provider
Once the user clicks on this link he will be redirected to the authentication form, which when using Google OpenID looks like this:
After entering your e-mail address and password, the user will next be prompted to confirm permission for the client to access a specified set of resources:
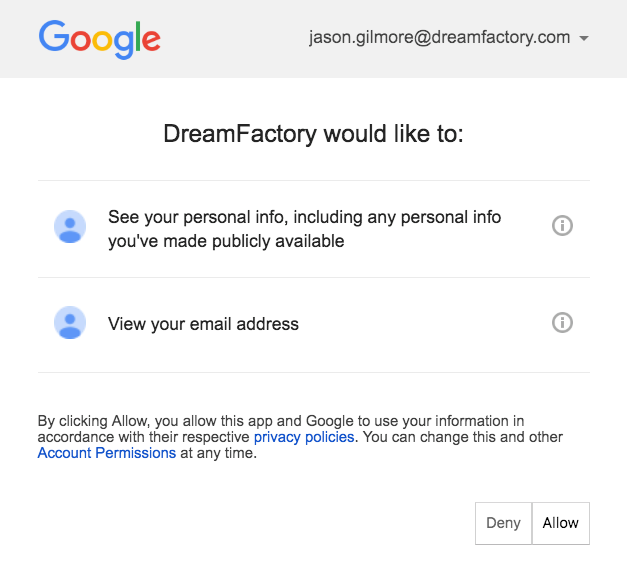
Step #3. DreamFactory Generates the Session Key
Once the user clicks Allow, the OpenID provider will return the authorization information to the redirect URL. At this point the script associated with the redirect URL will forward that information on to DreamFactory (see above script), and DreamFactory will return the session token to the script, at which point your application can persist it and include it with subsequent requests.
Authenticating with Okta
Okta is a powerful and popular identity management solution used by thousands of businesses across the globe. Many developers wish to integrate Okta into their application authentication infrastructure, and DreamFactory offers a straightforward solution for doing so. In this tutorial we’ll guide you through the configuration process.
Configuring OKTA
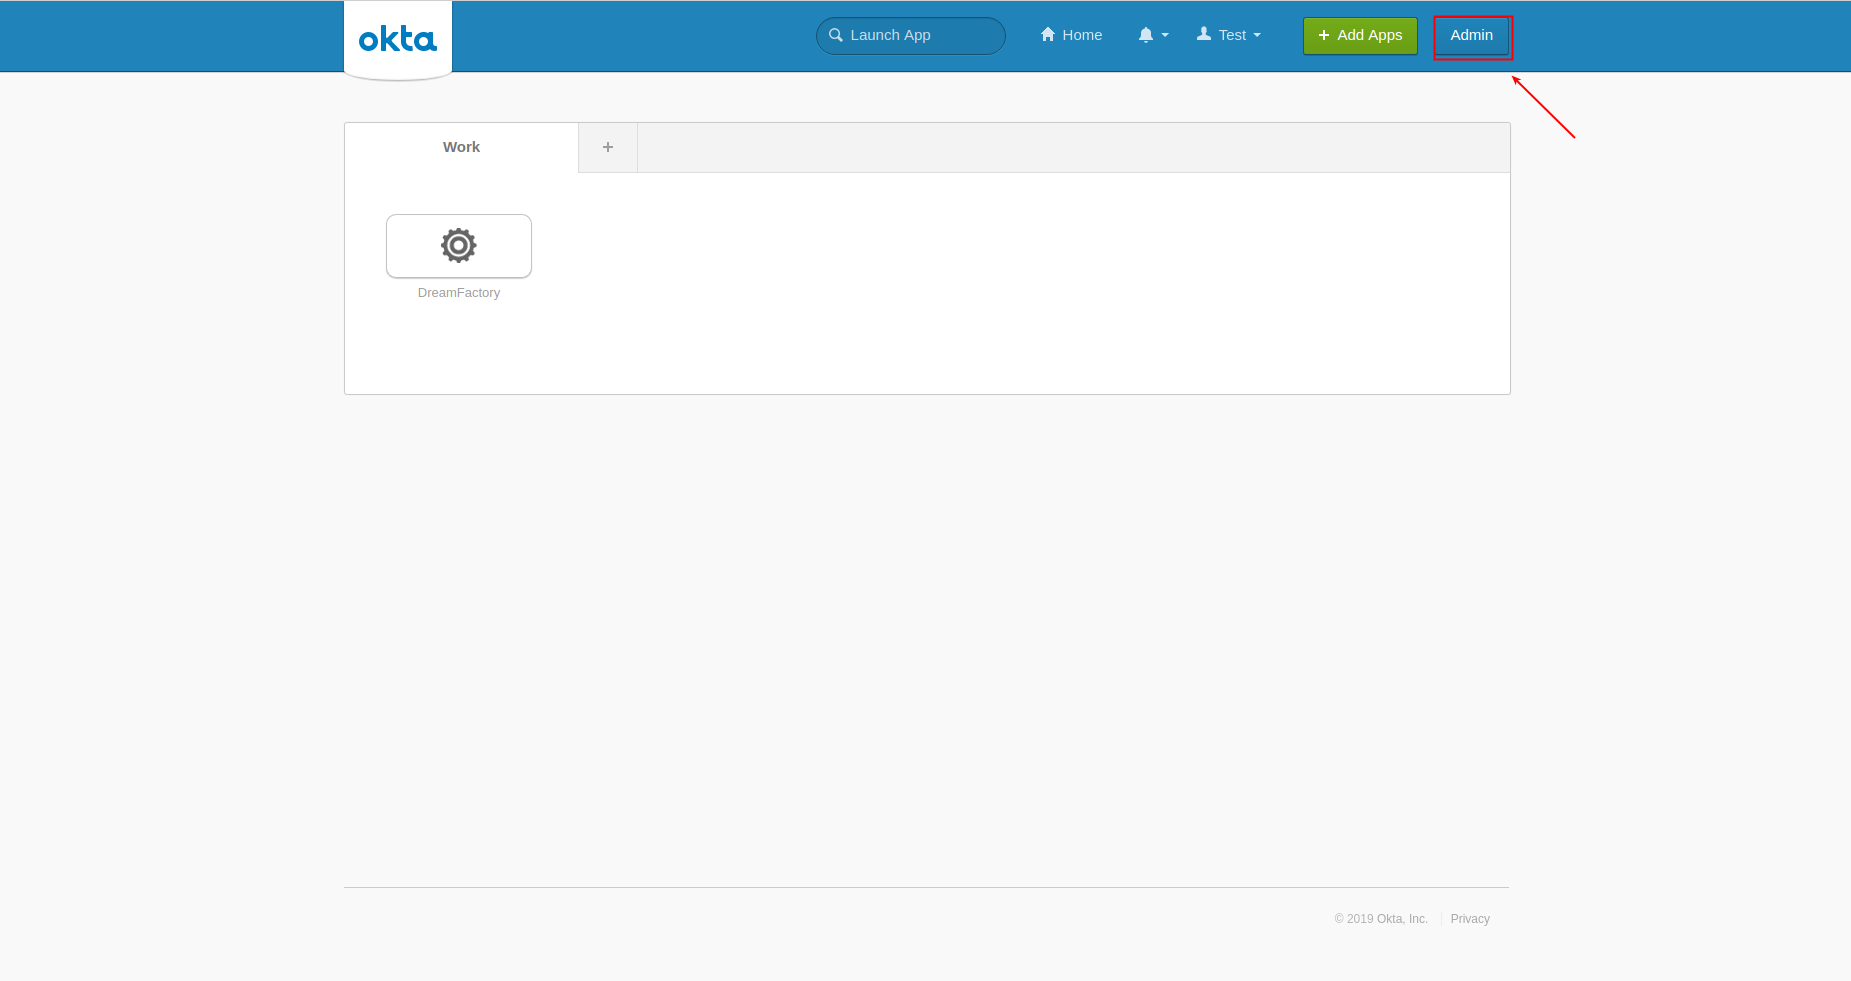
Begin by creating an Okta account at https://www.okta.com if you haven’t already done so. Once logged-in, open the Admin section:
Next, you’ll add a new application:
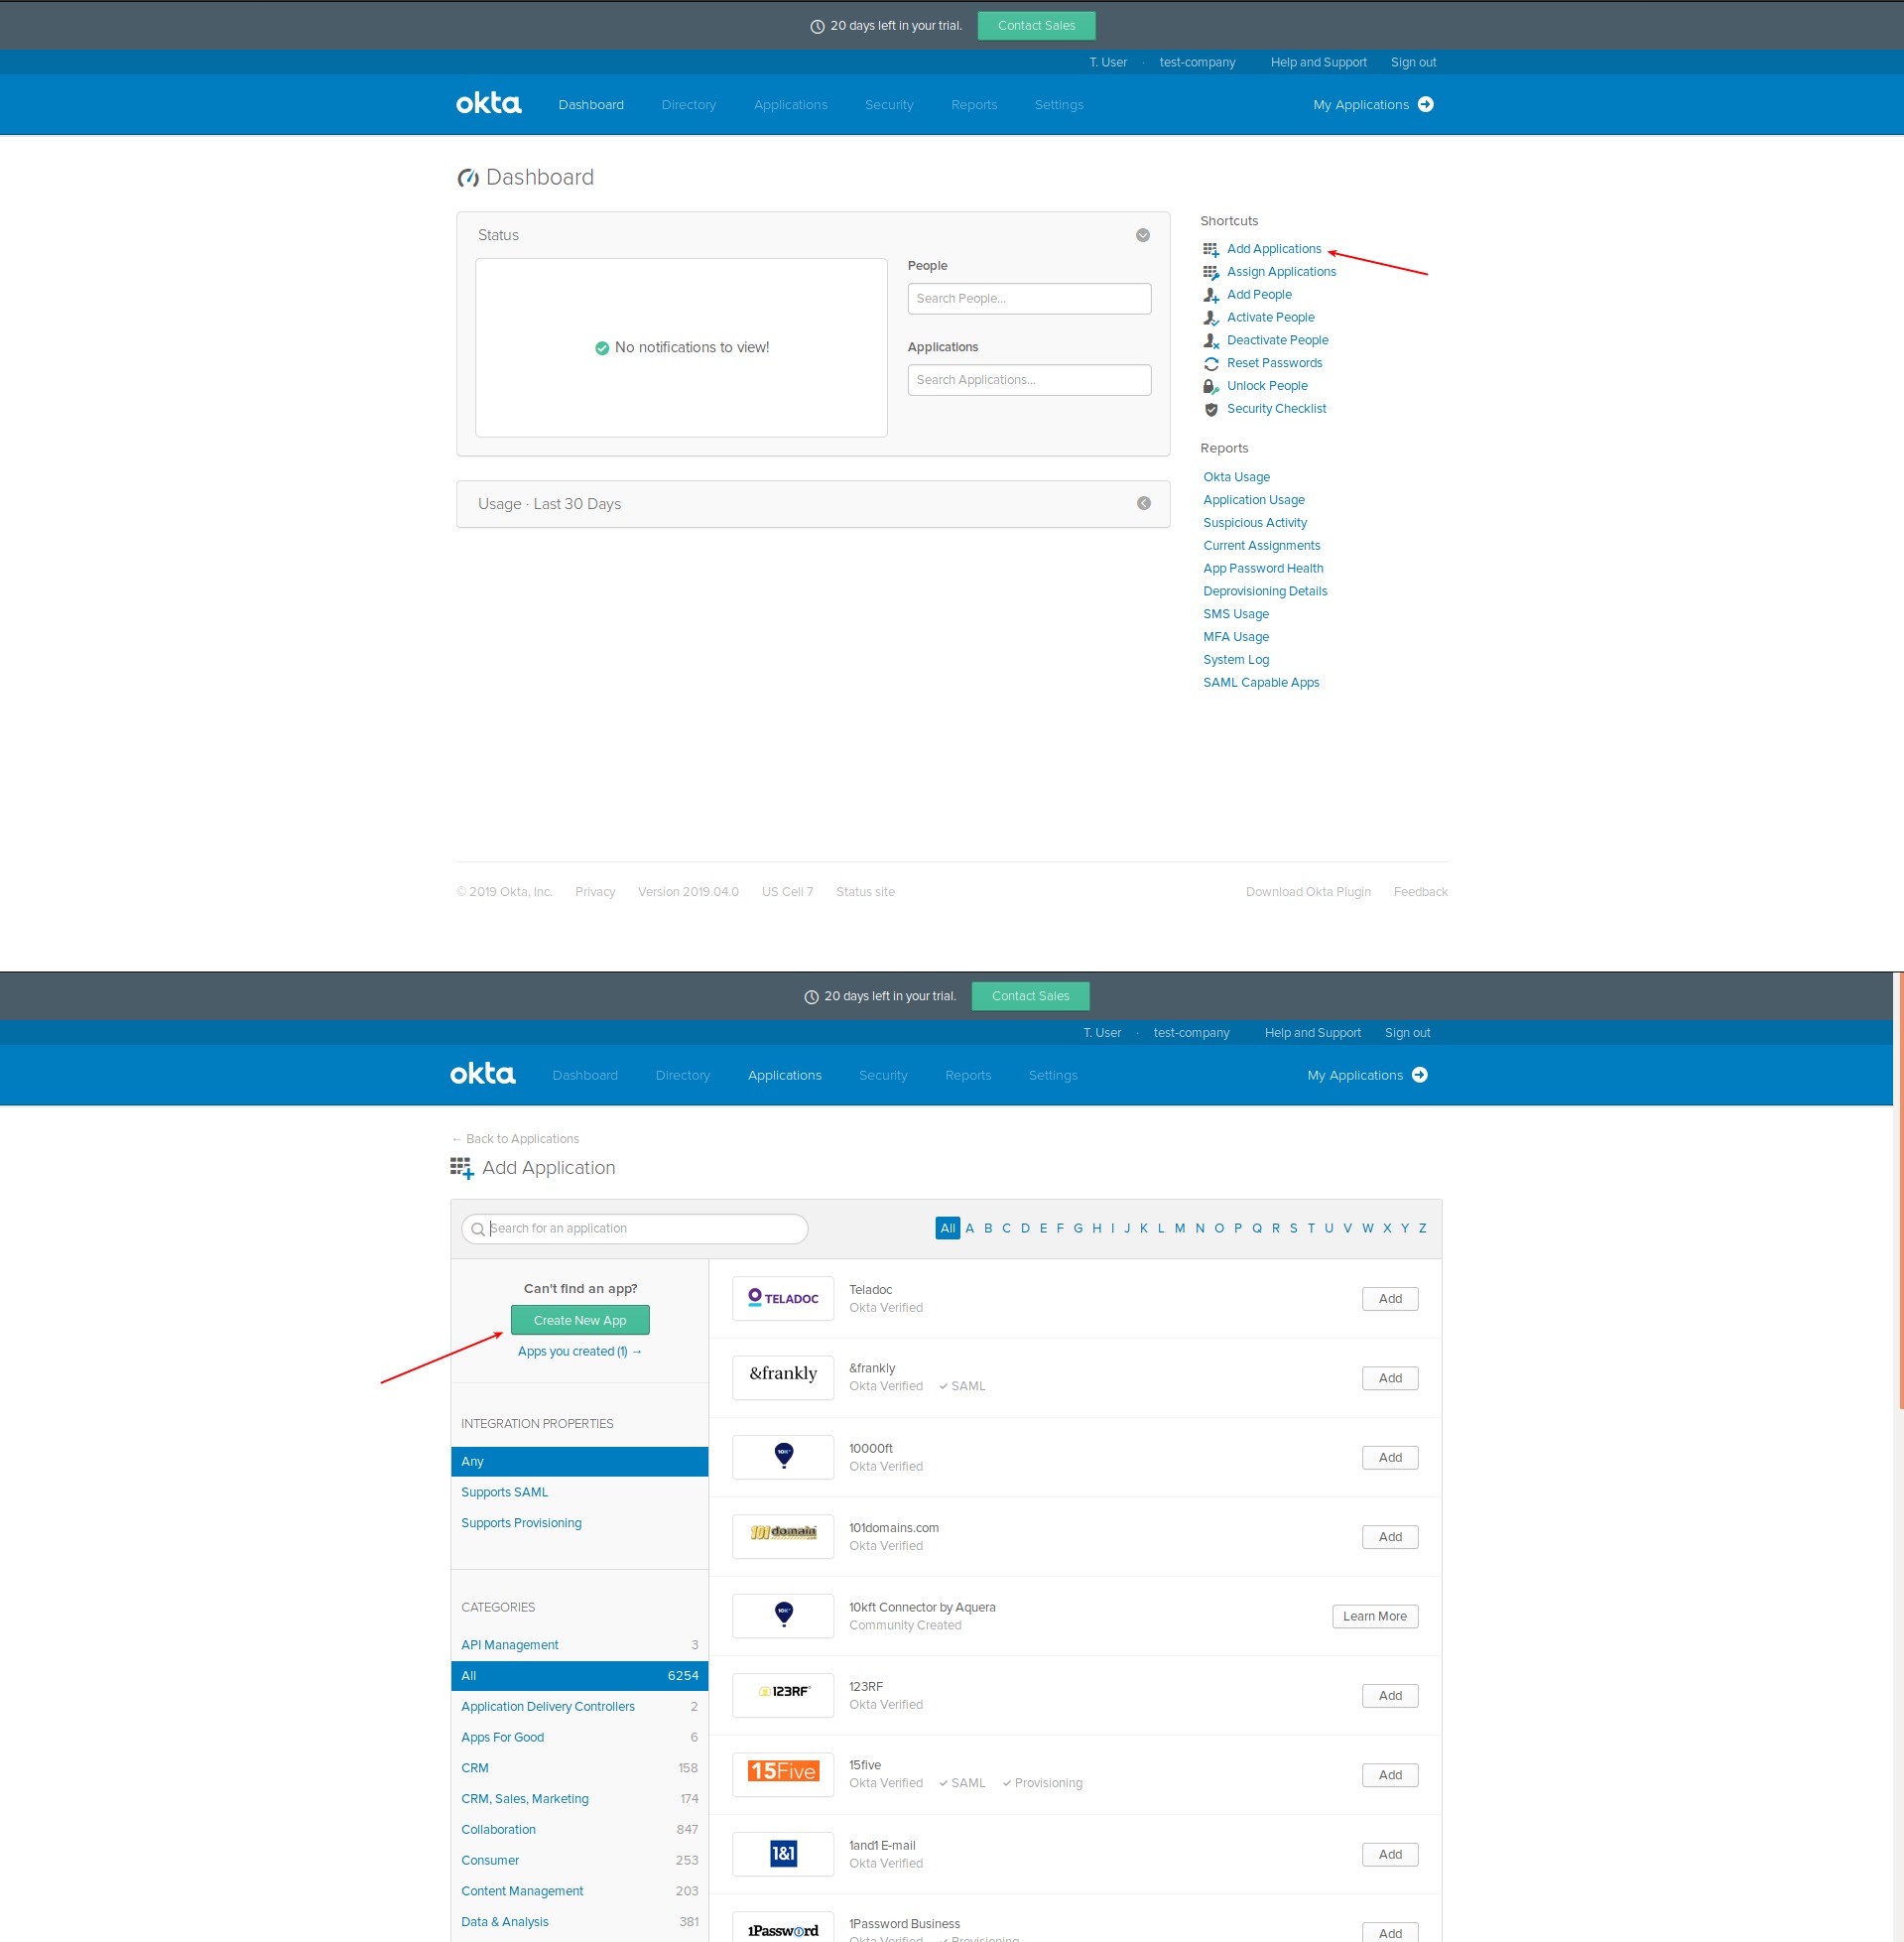
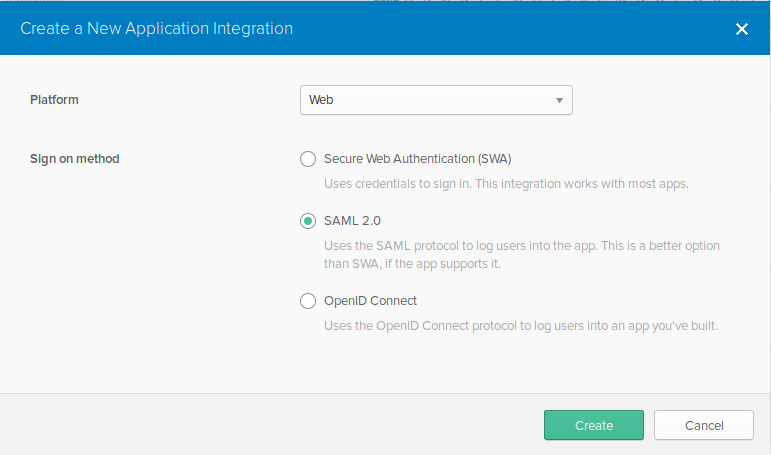
Be sure to select SAML 2.0:
Next, we’ll configure the application:
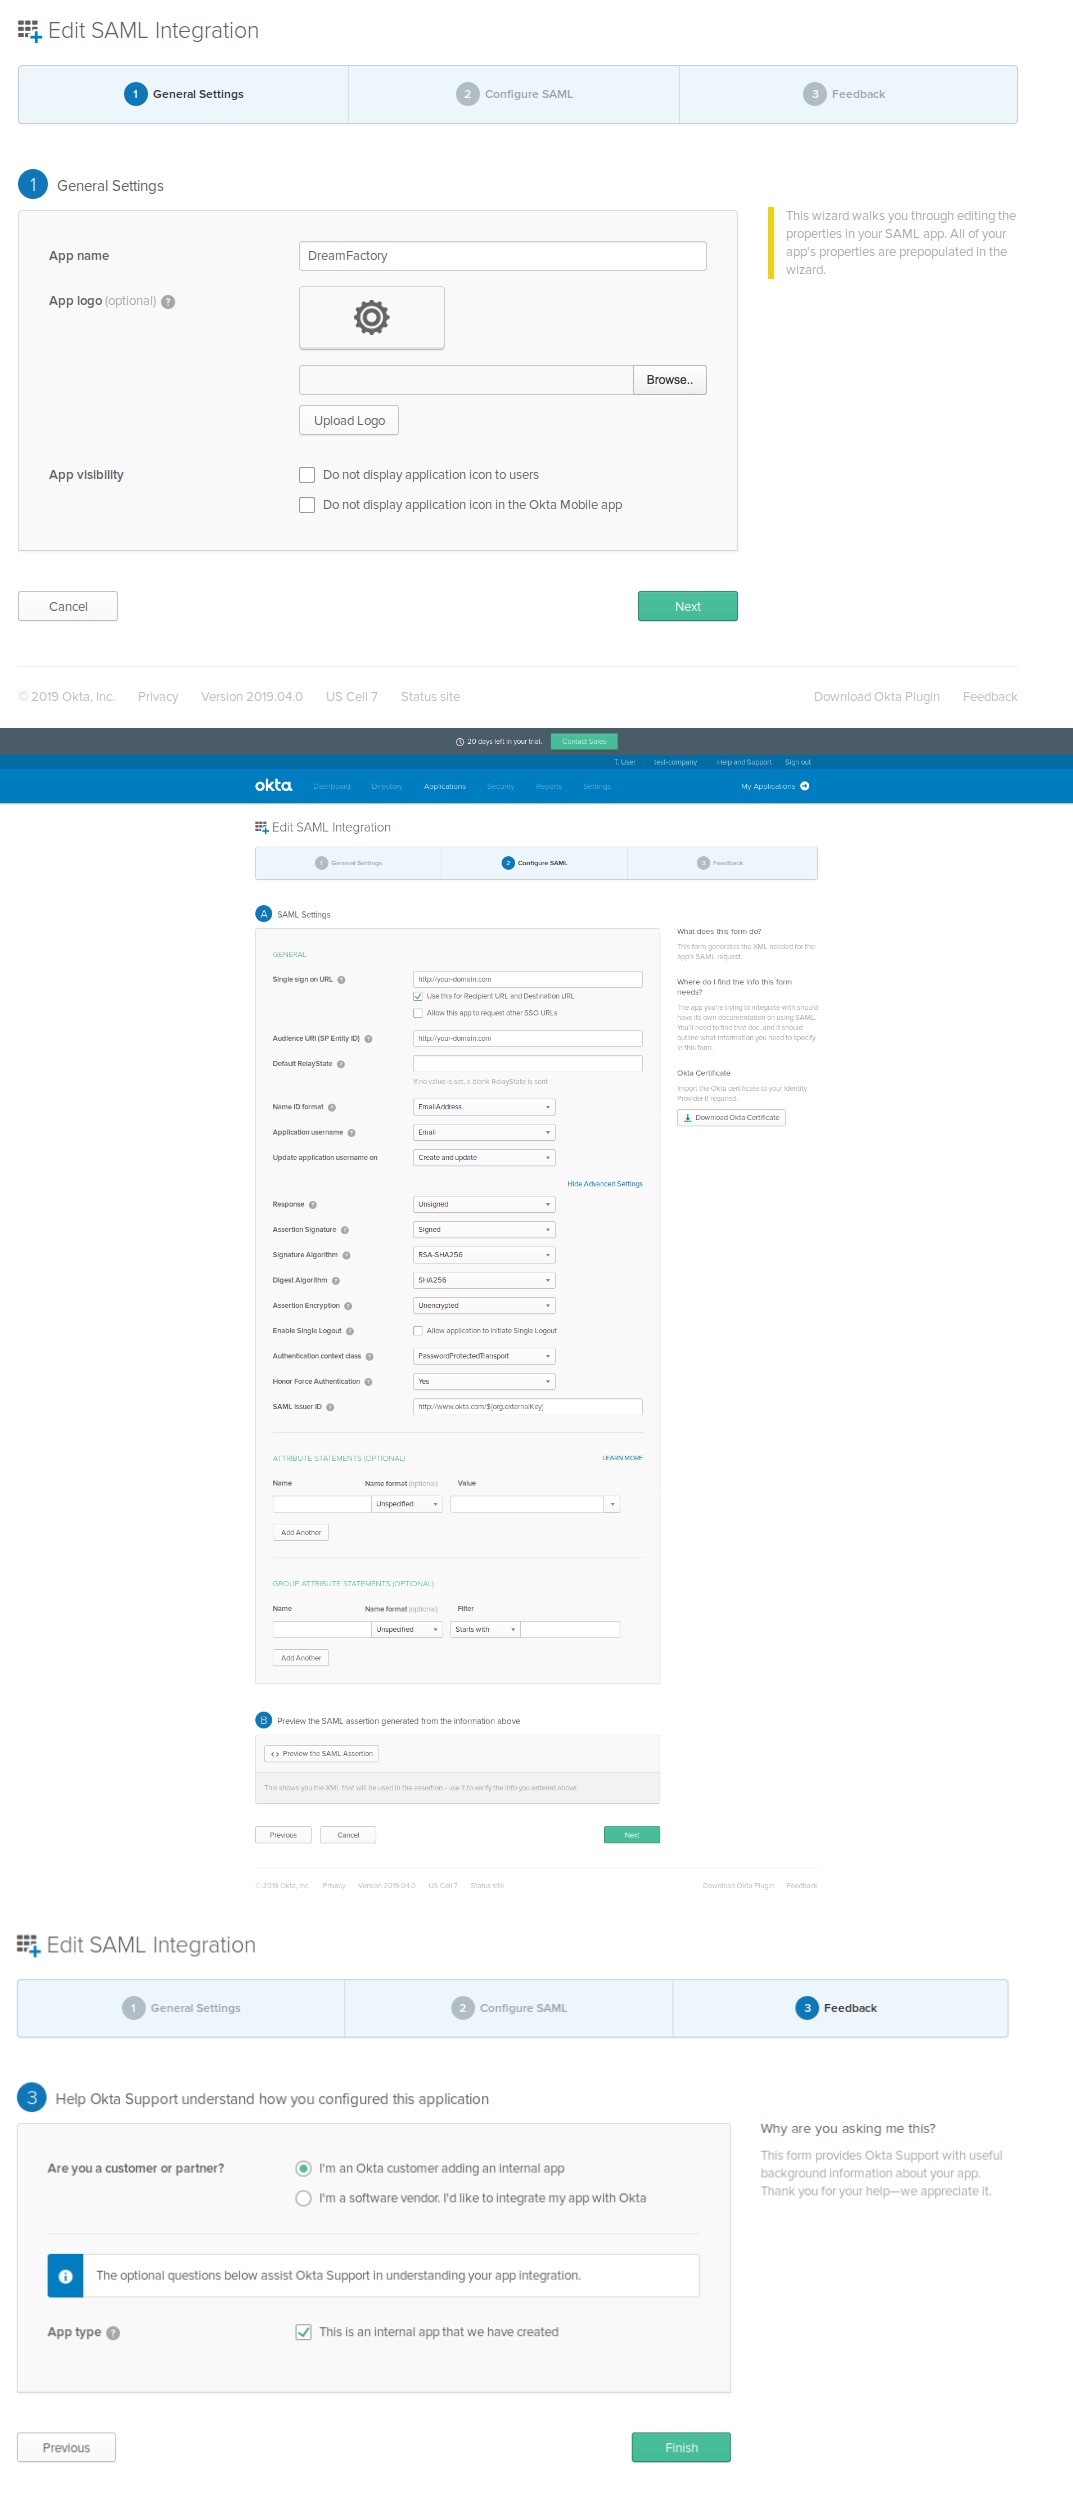
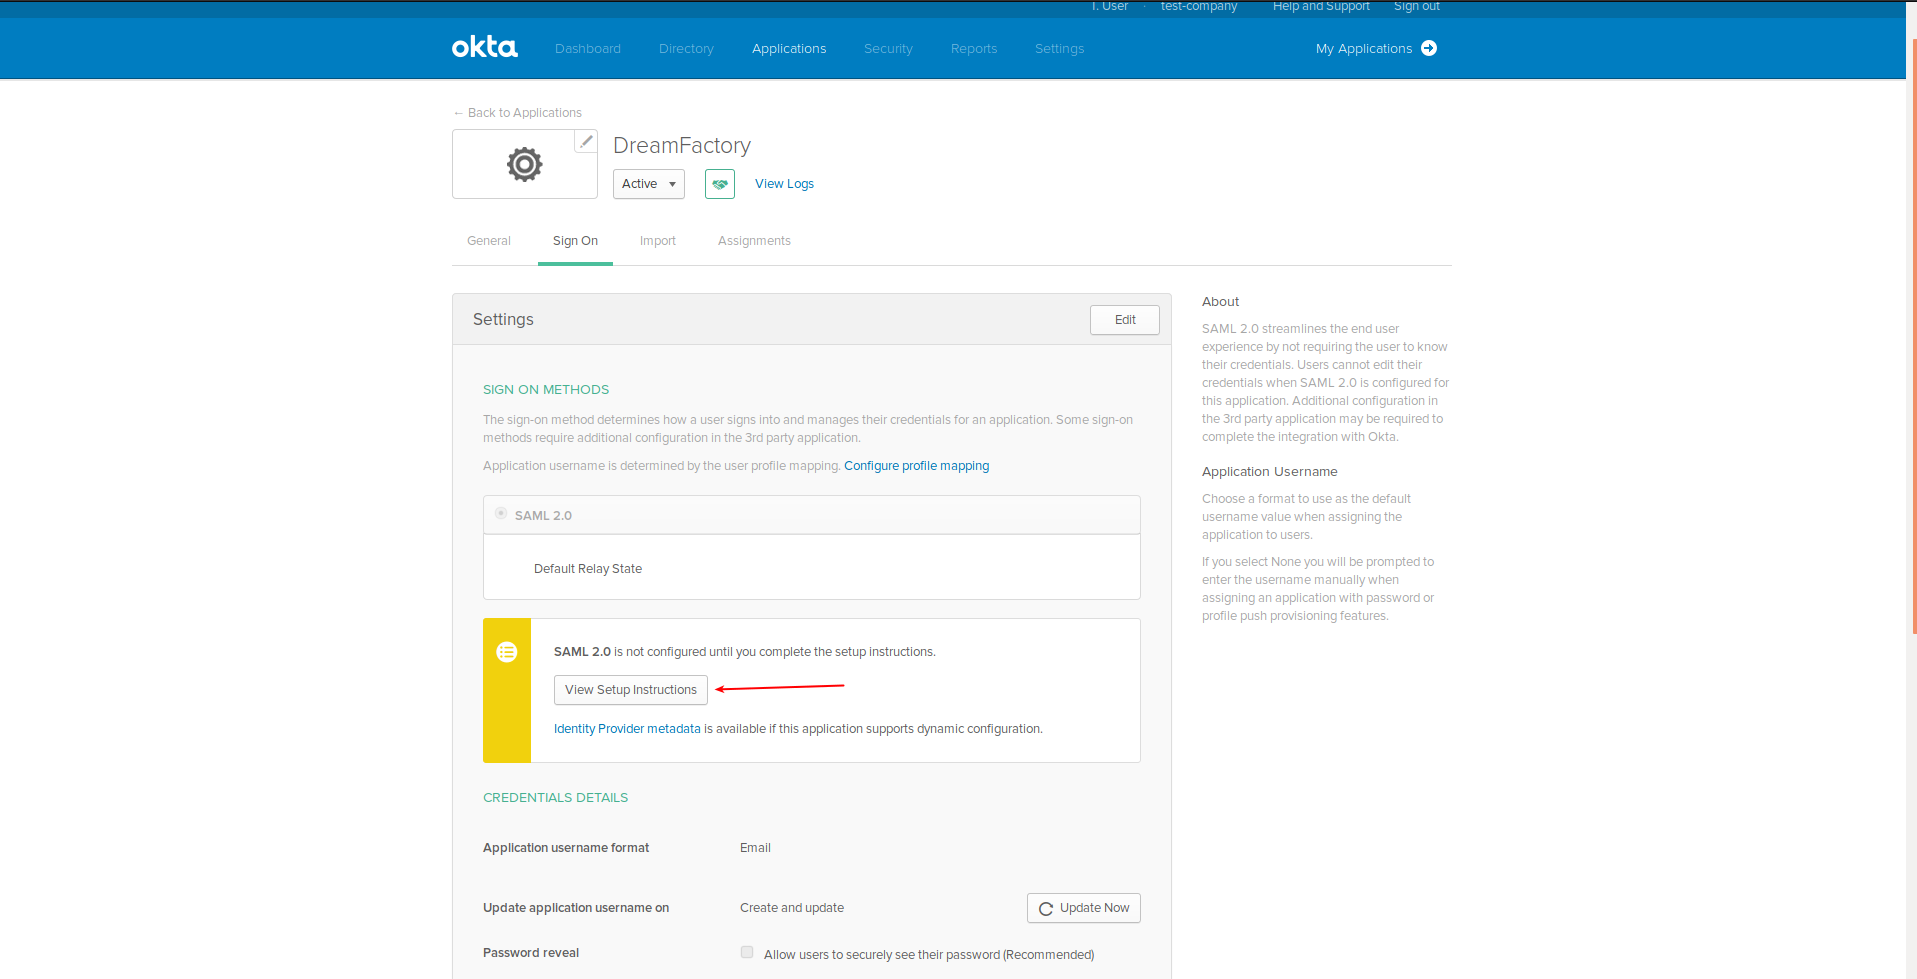
Open Setup instructions, making sure you don’t close the tab containing these instructions as we’ll return to them later:
Configuring DreamFactory
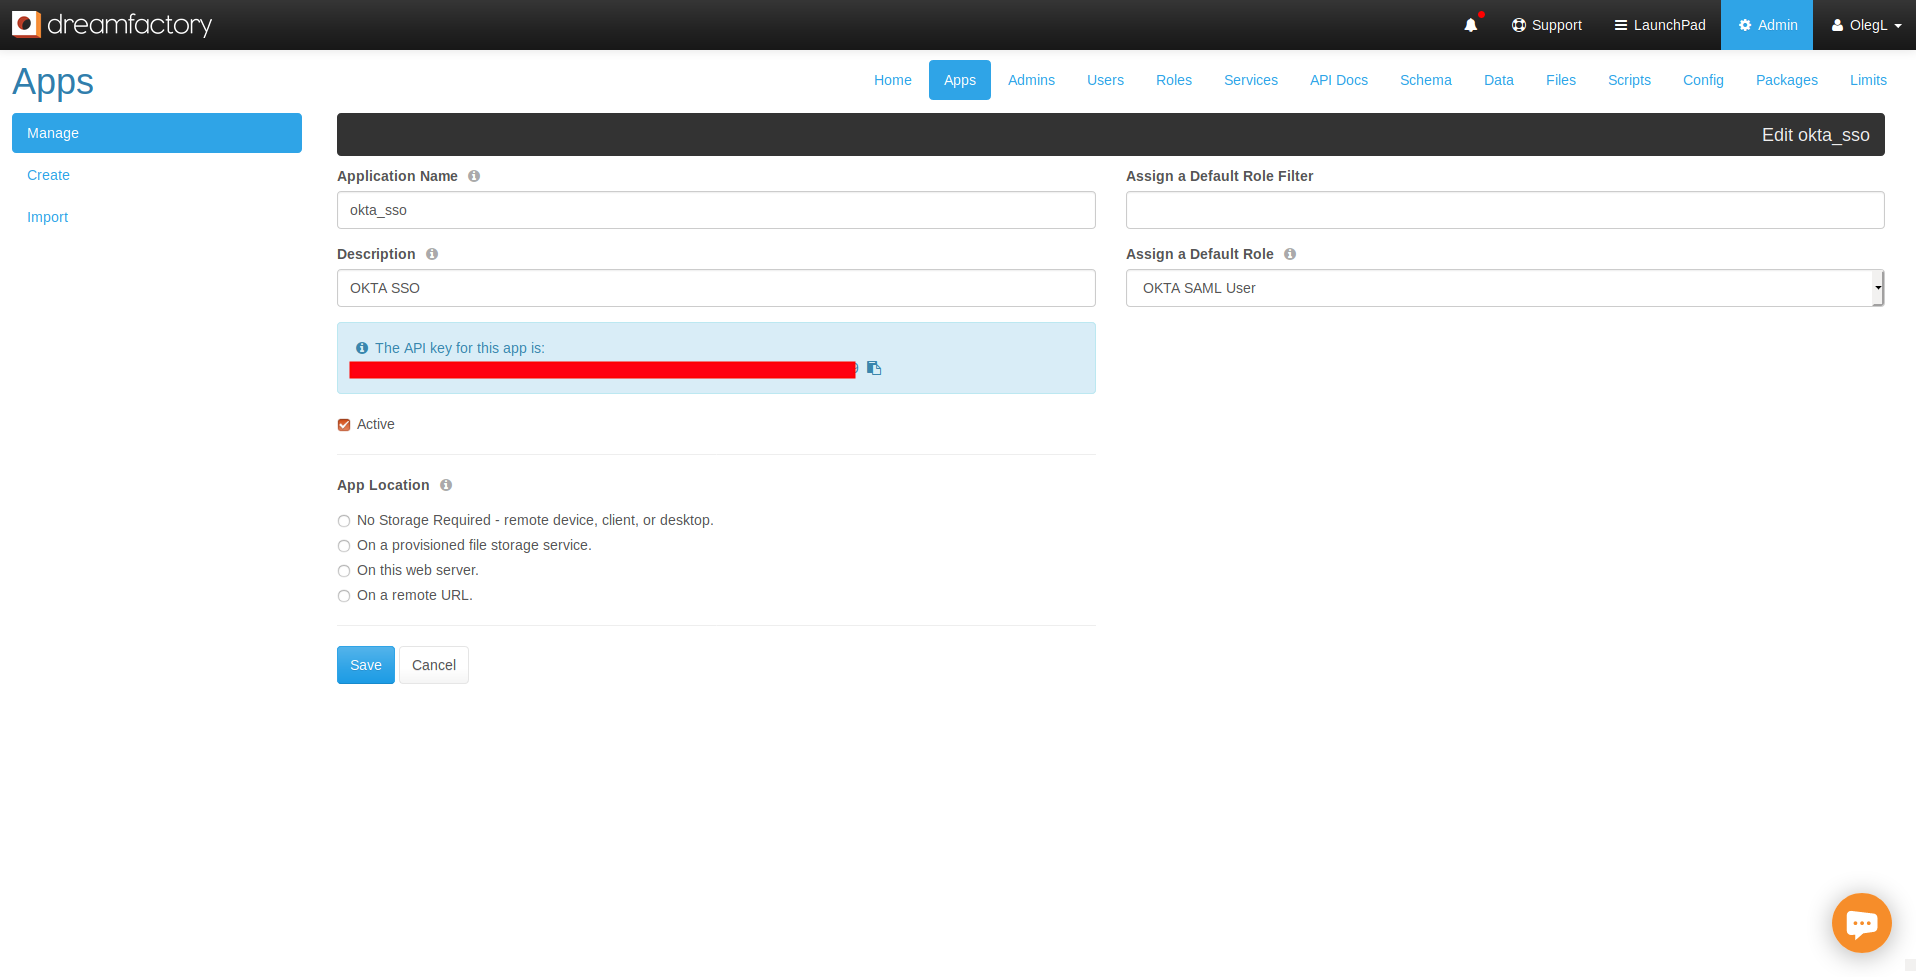
Next, we’ll configure DreamFactory to support the new OKTA application. Begin by signing into DreamFactory as an administrator, and then navigate to the Roles section and configure a role for the users who will sign in via Okta SSO. Here’s an example of a role defining access to all APIs (not typical but nonetheless illustrative):
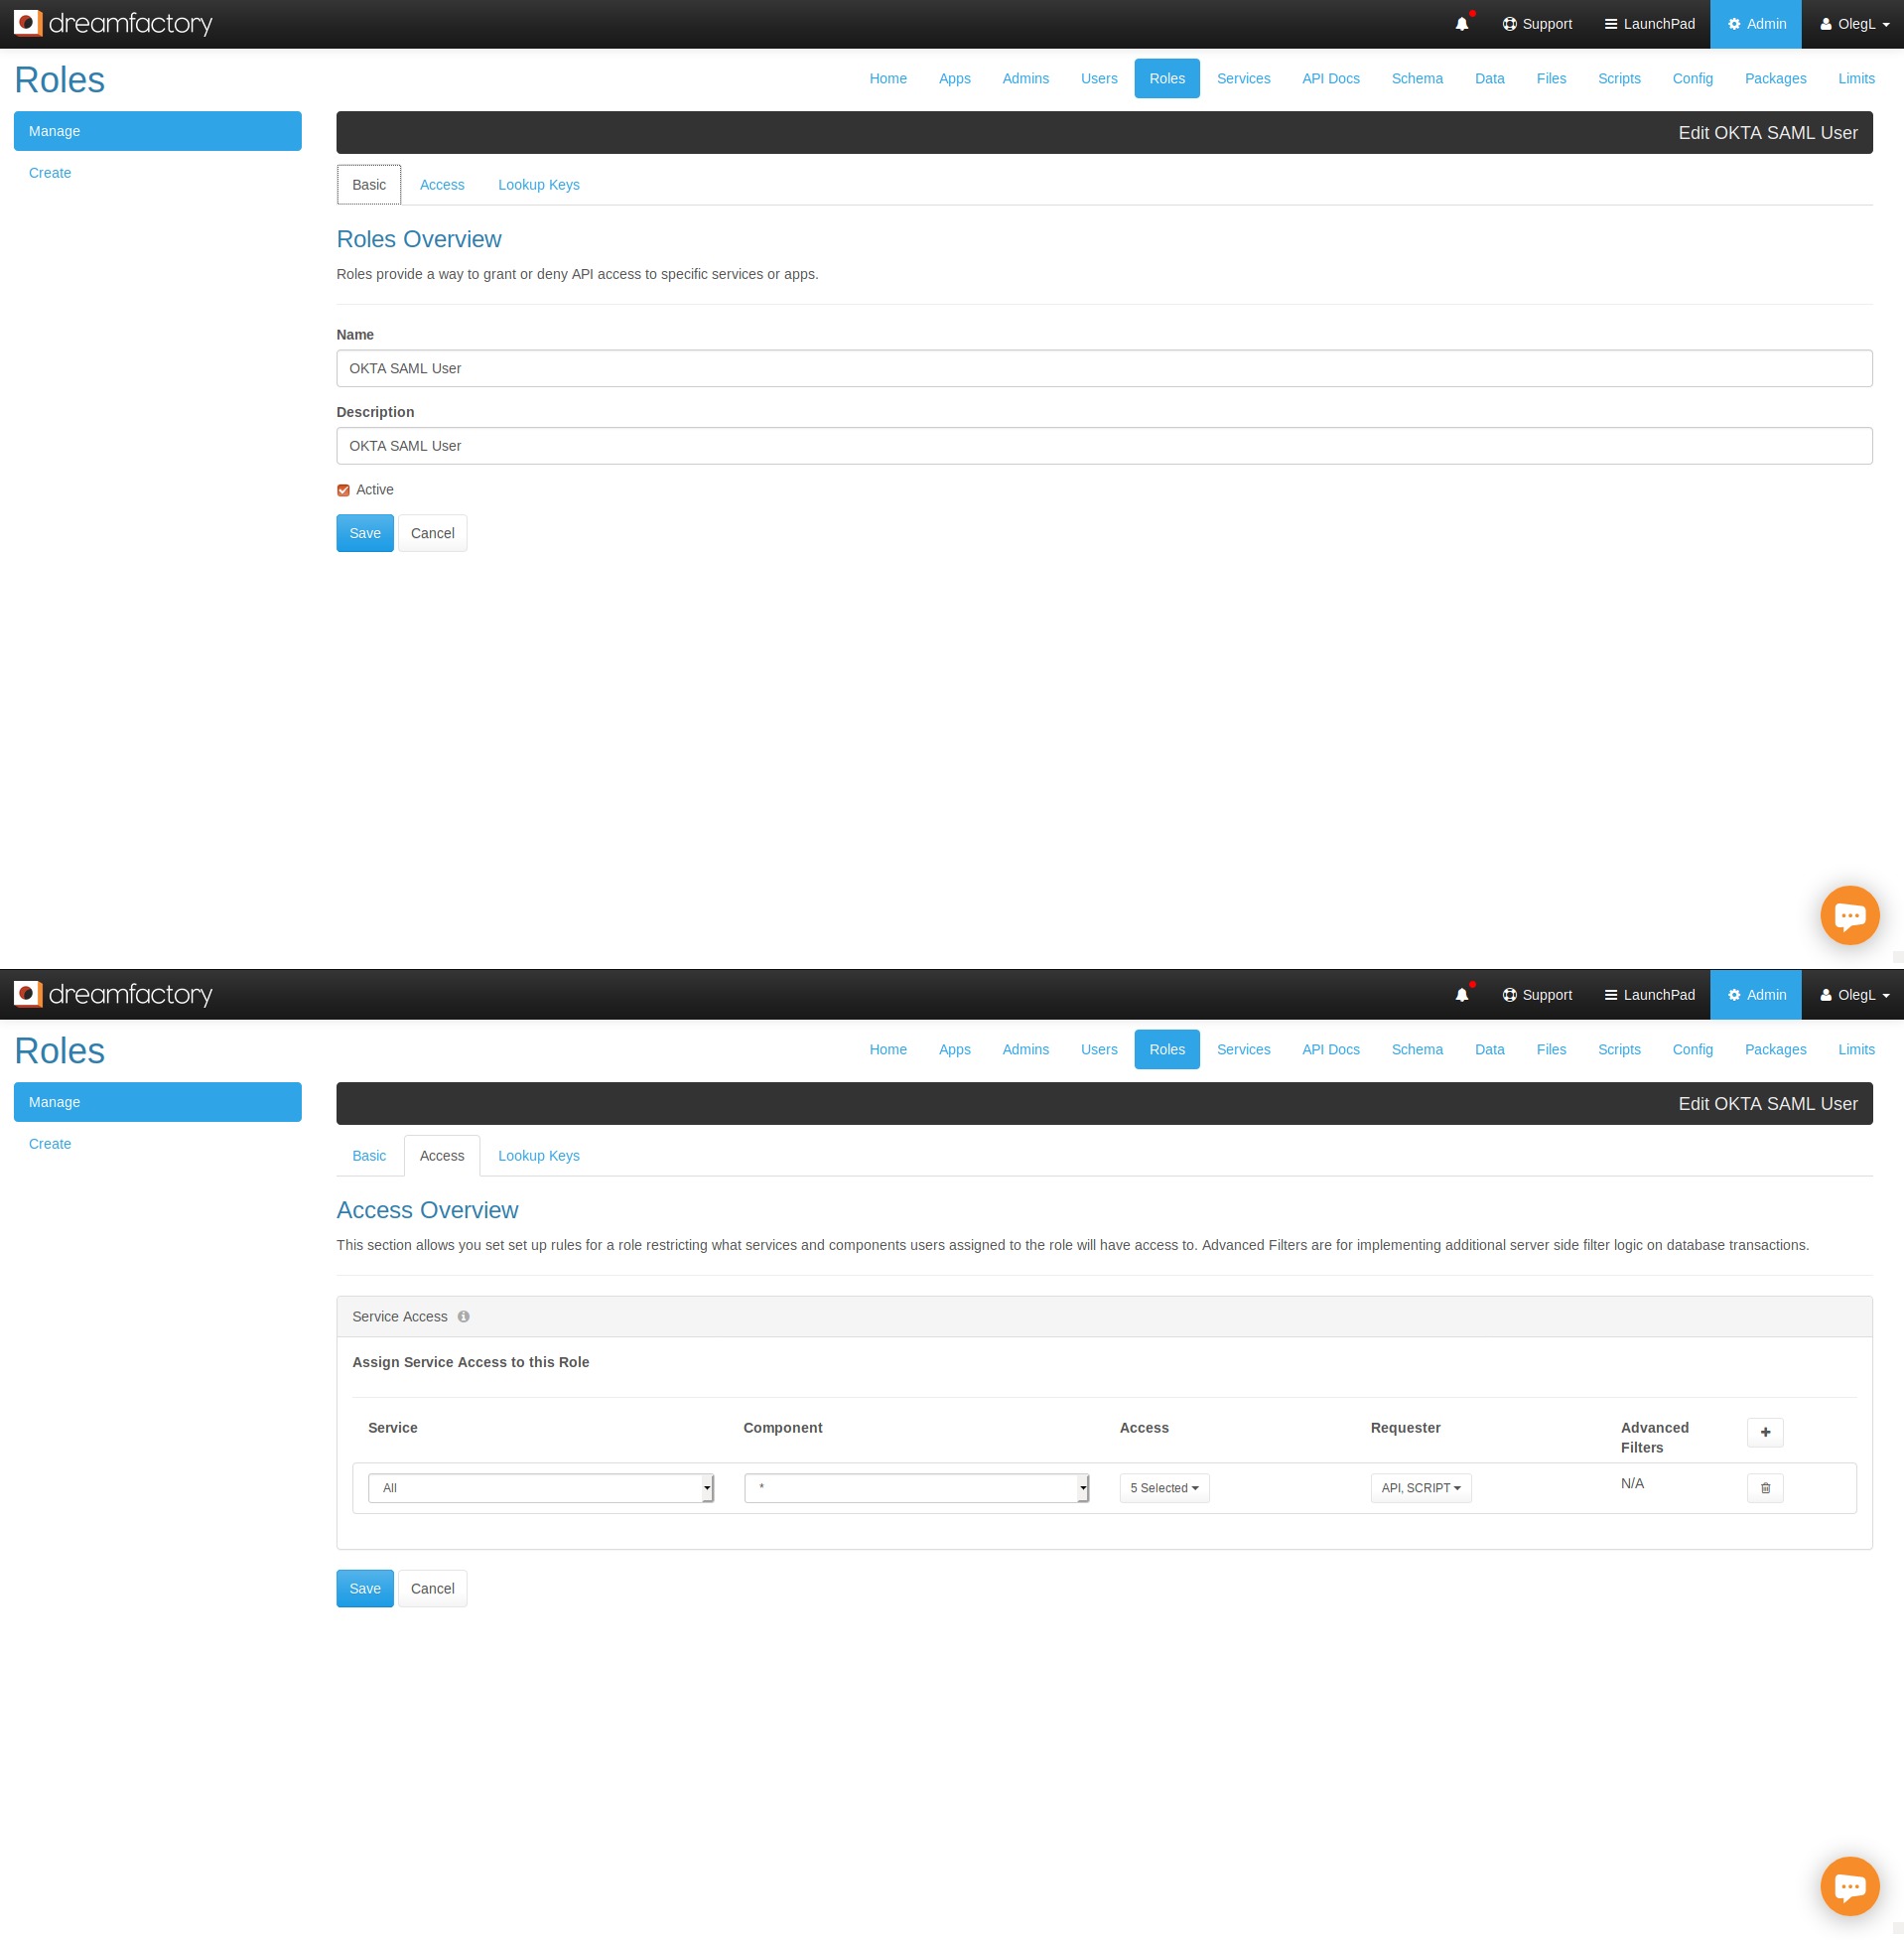
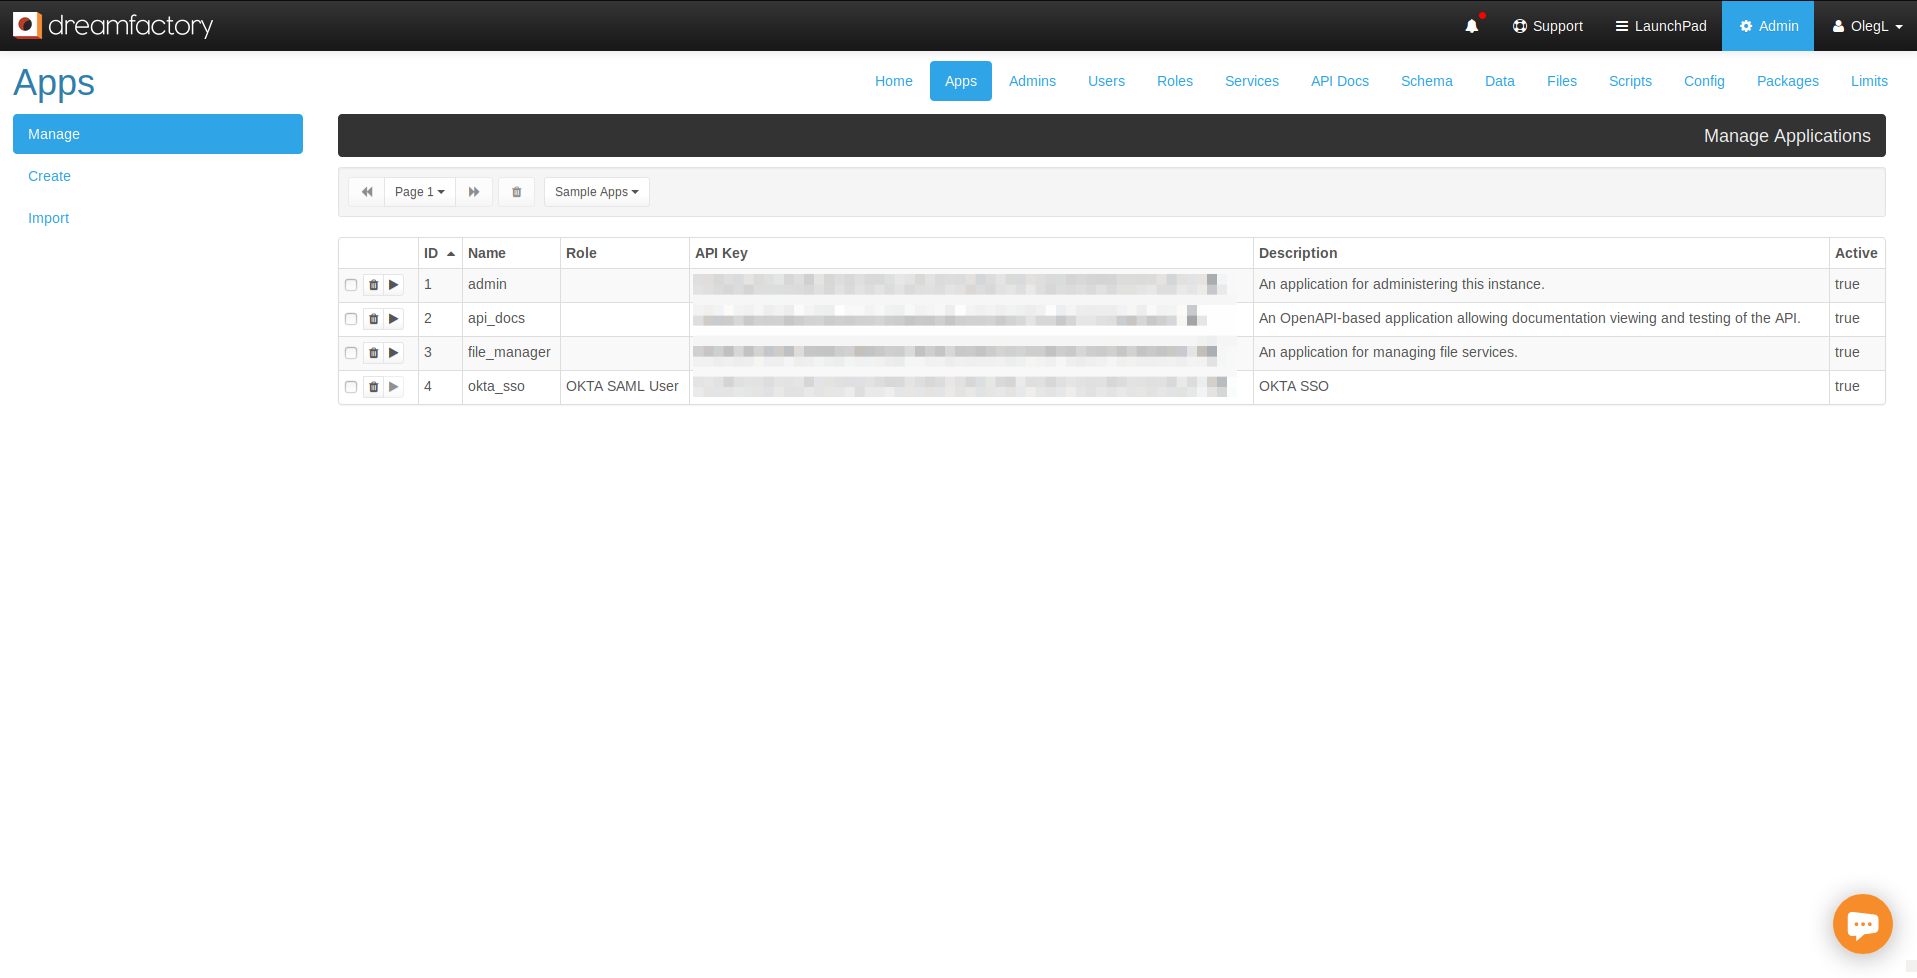
With the role defined, navigate to the Apps tab and create a new API key which will be associated with this role:
Creating the SAML 2.0 Service
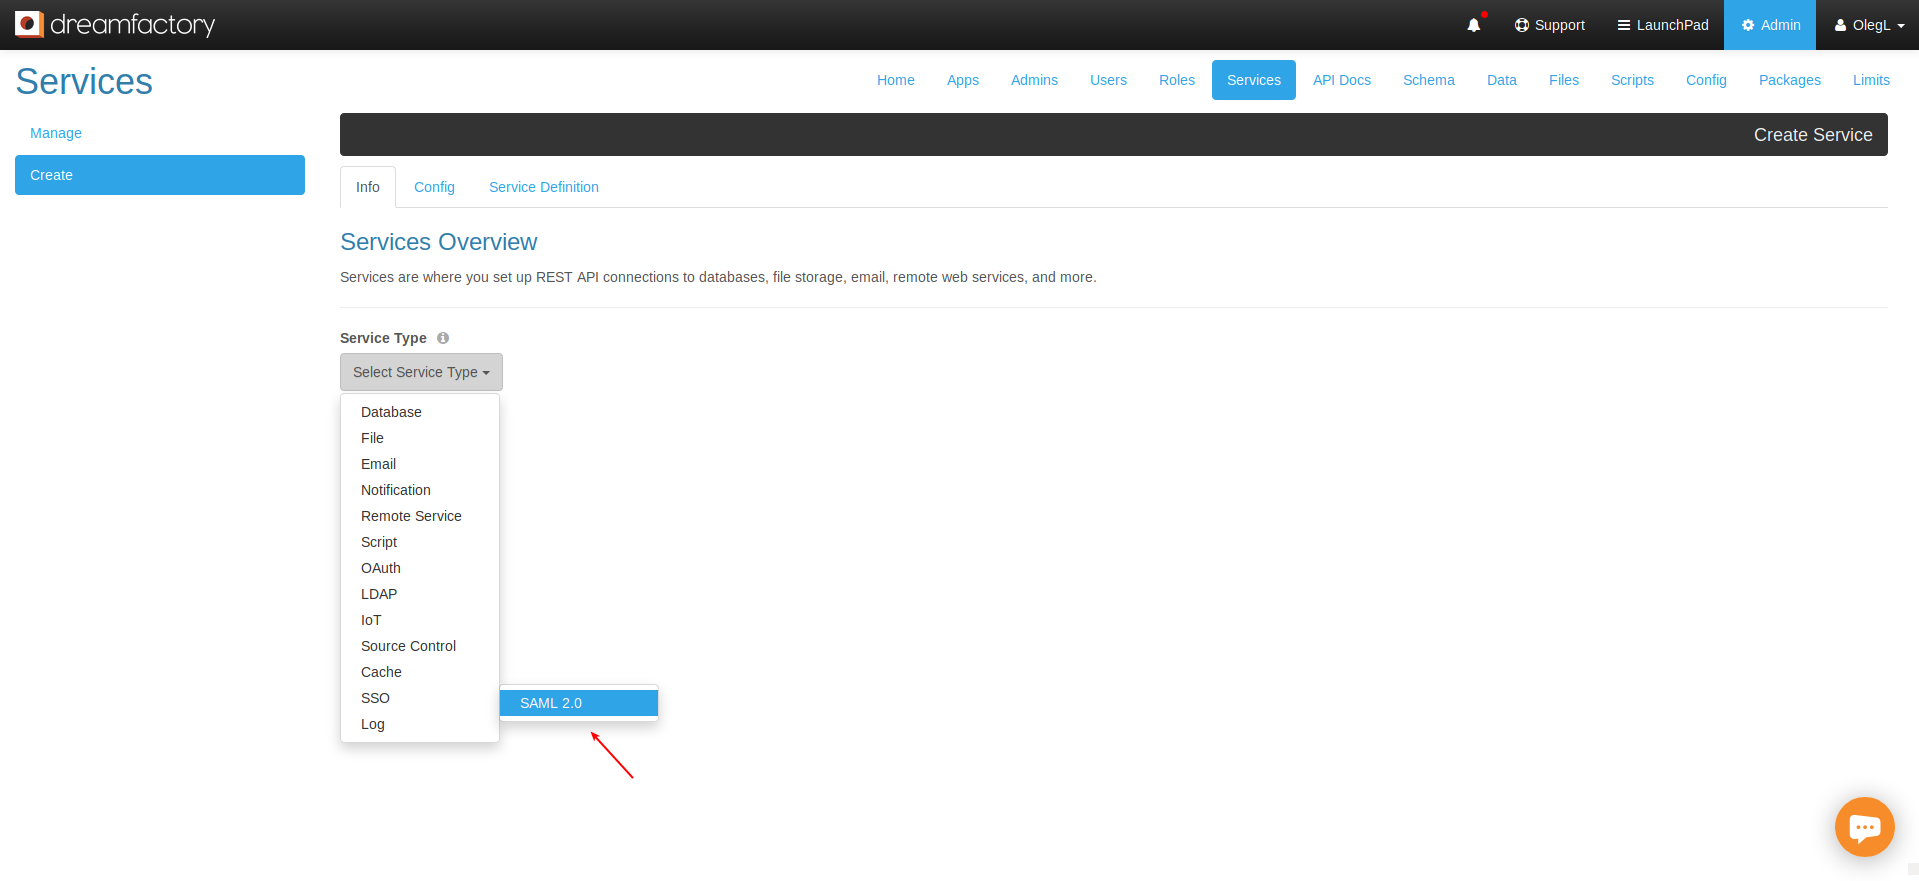
With the role and API key defined, it’s time to create the SAML 2.0 service that will connect your Okta application to DreamFactory. Navigate to Services > Create, choose SSO, and finally SAML 2.0:
Begin by configuring the Info tab:

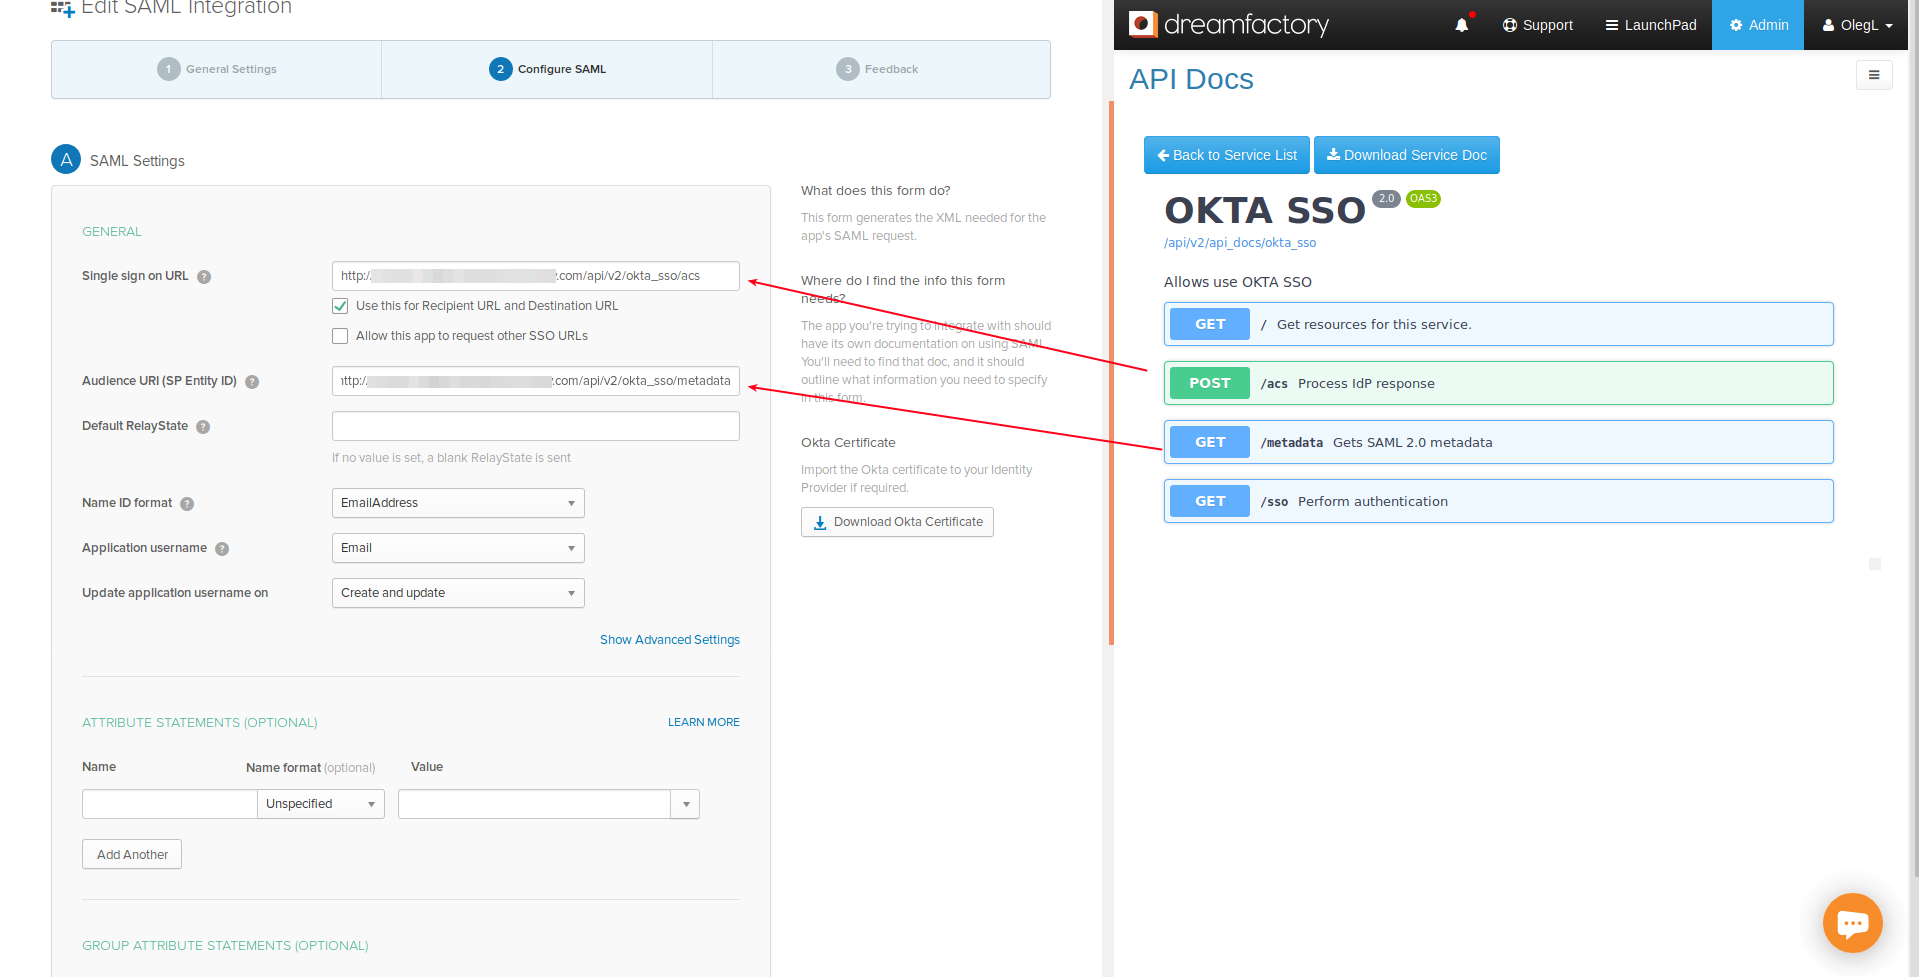
Next, configure the Config tab, filling in the fields with the information found in Okta’s Setup instructions page:
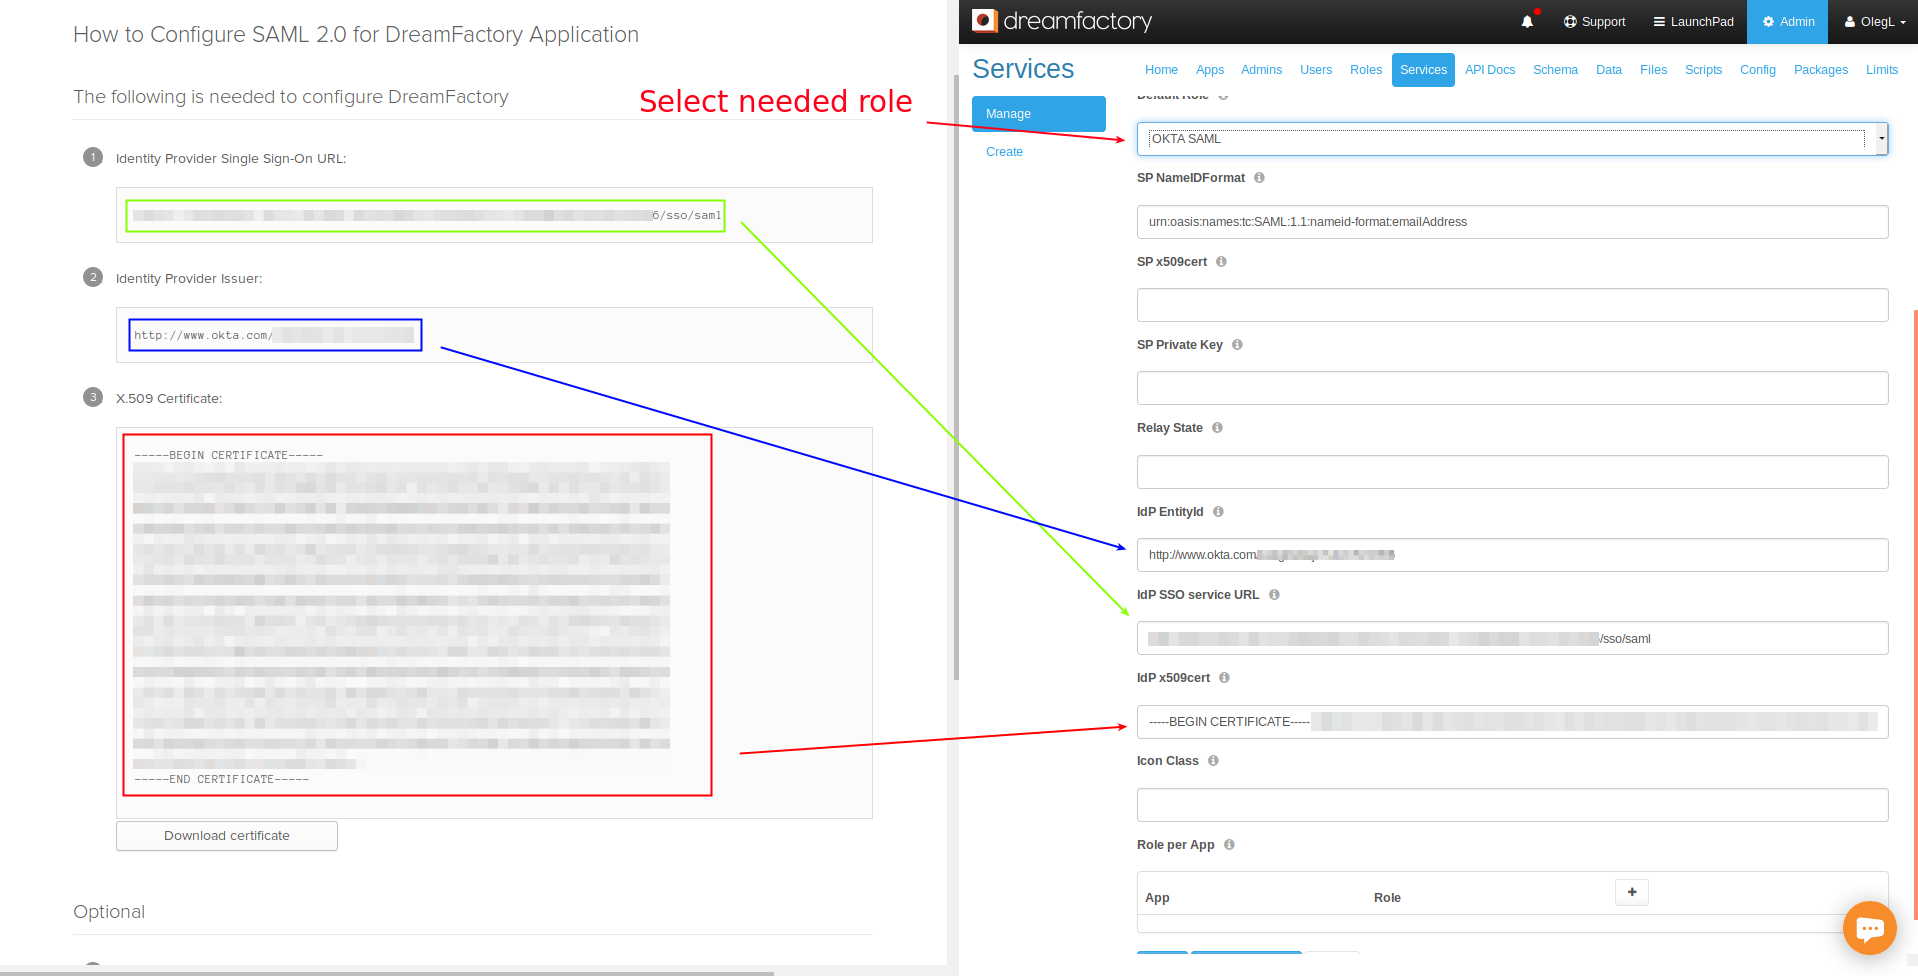
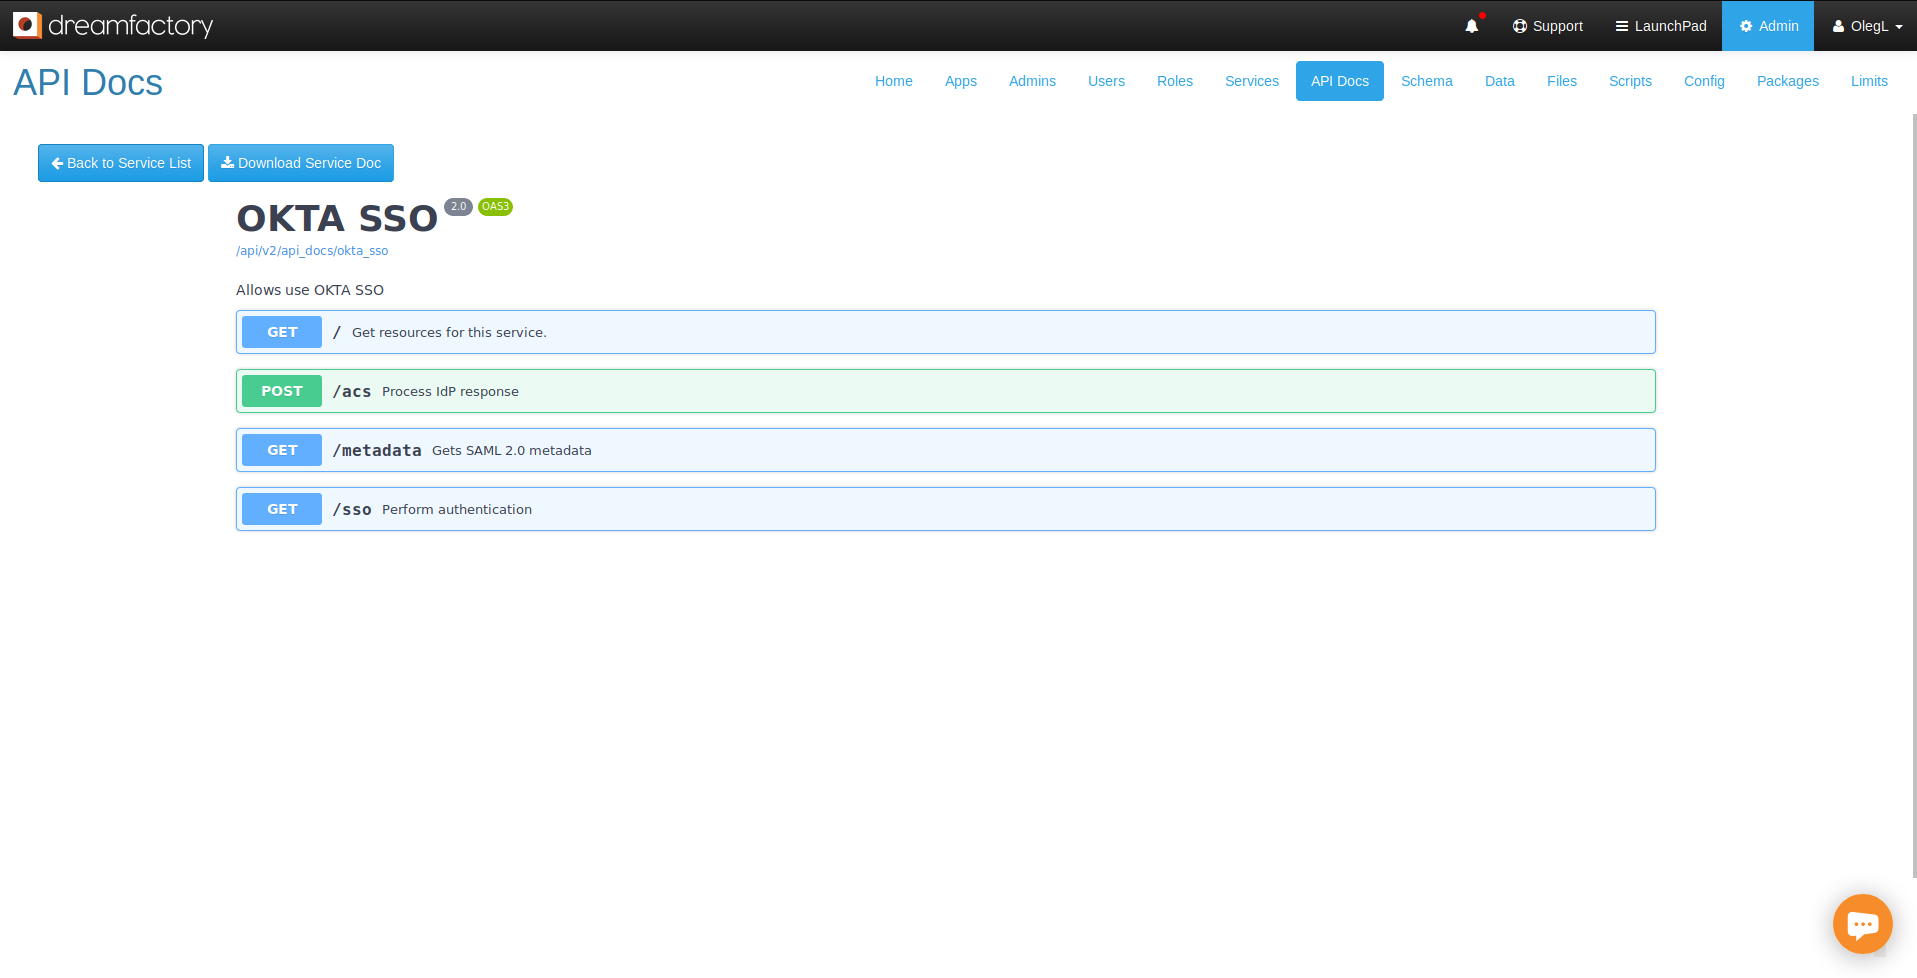
Save these changes, and navigate to the API Docs tab. Here you can see new Okta endpoints:
Adding Okta Users to the DreamFactory Application
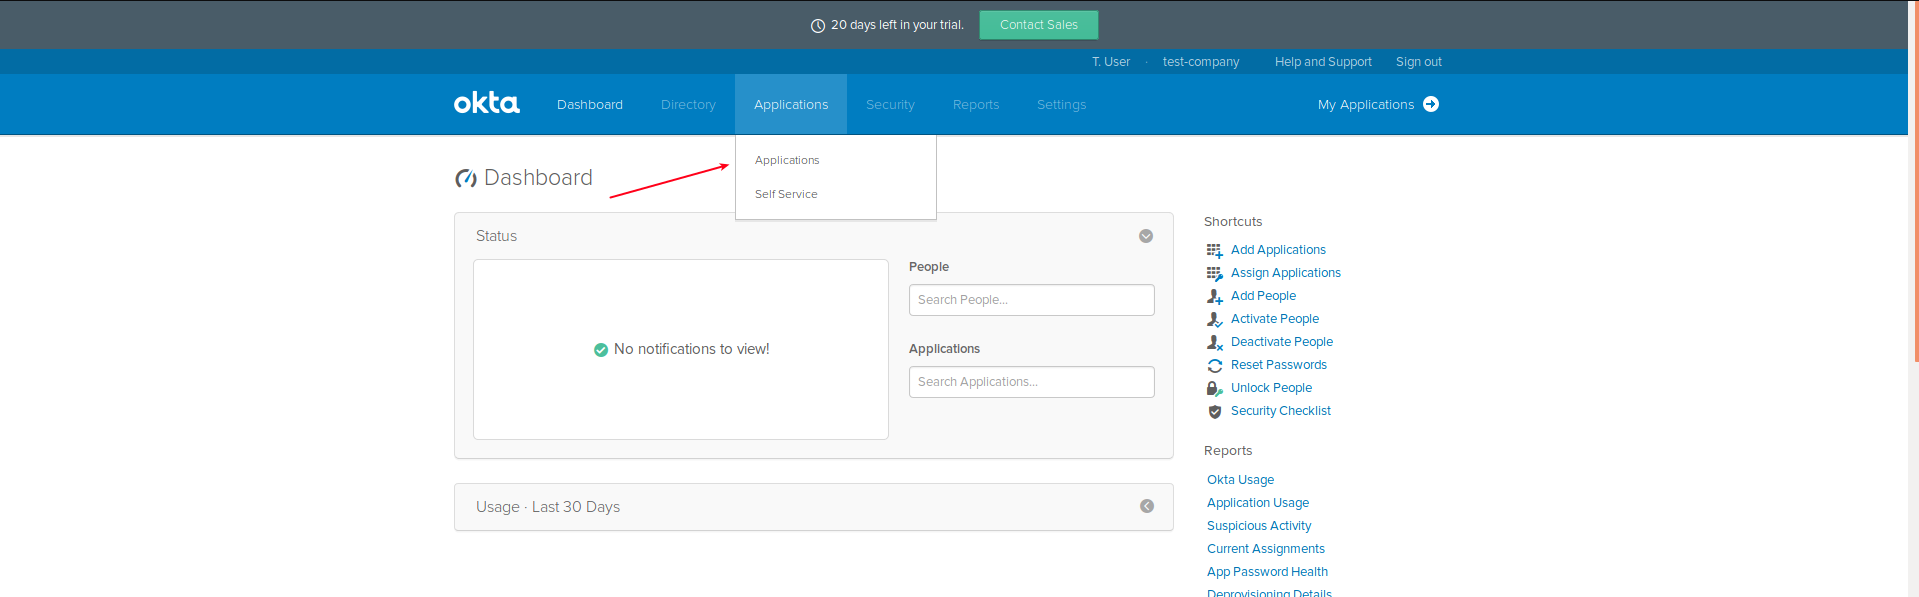
With your Okta application created and DreamFactory configured, return to Okta, and in the Admin app navigate to the Application page:
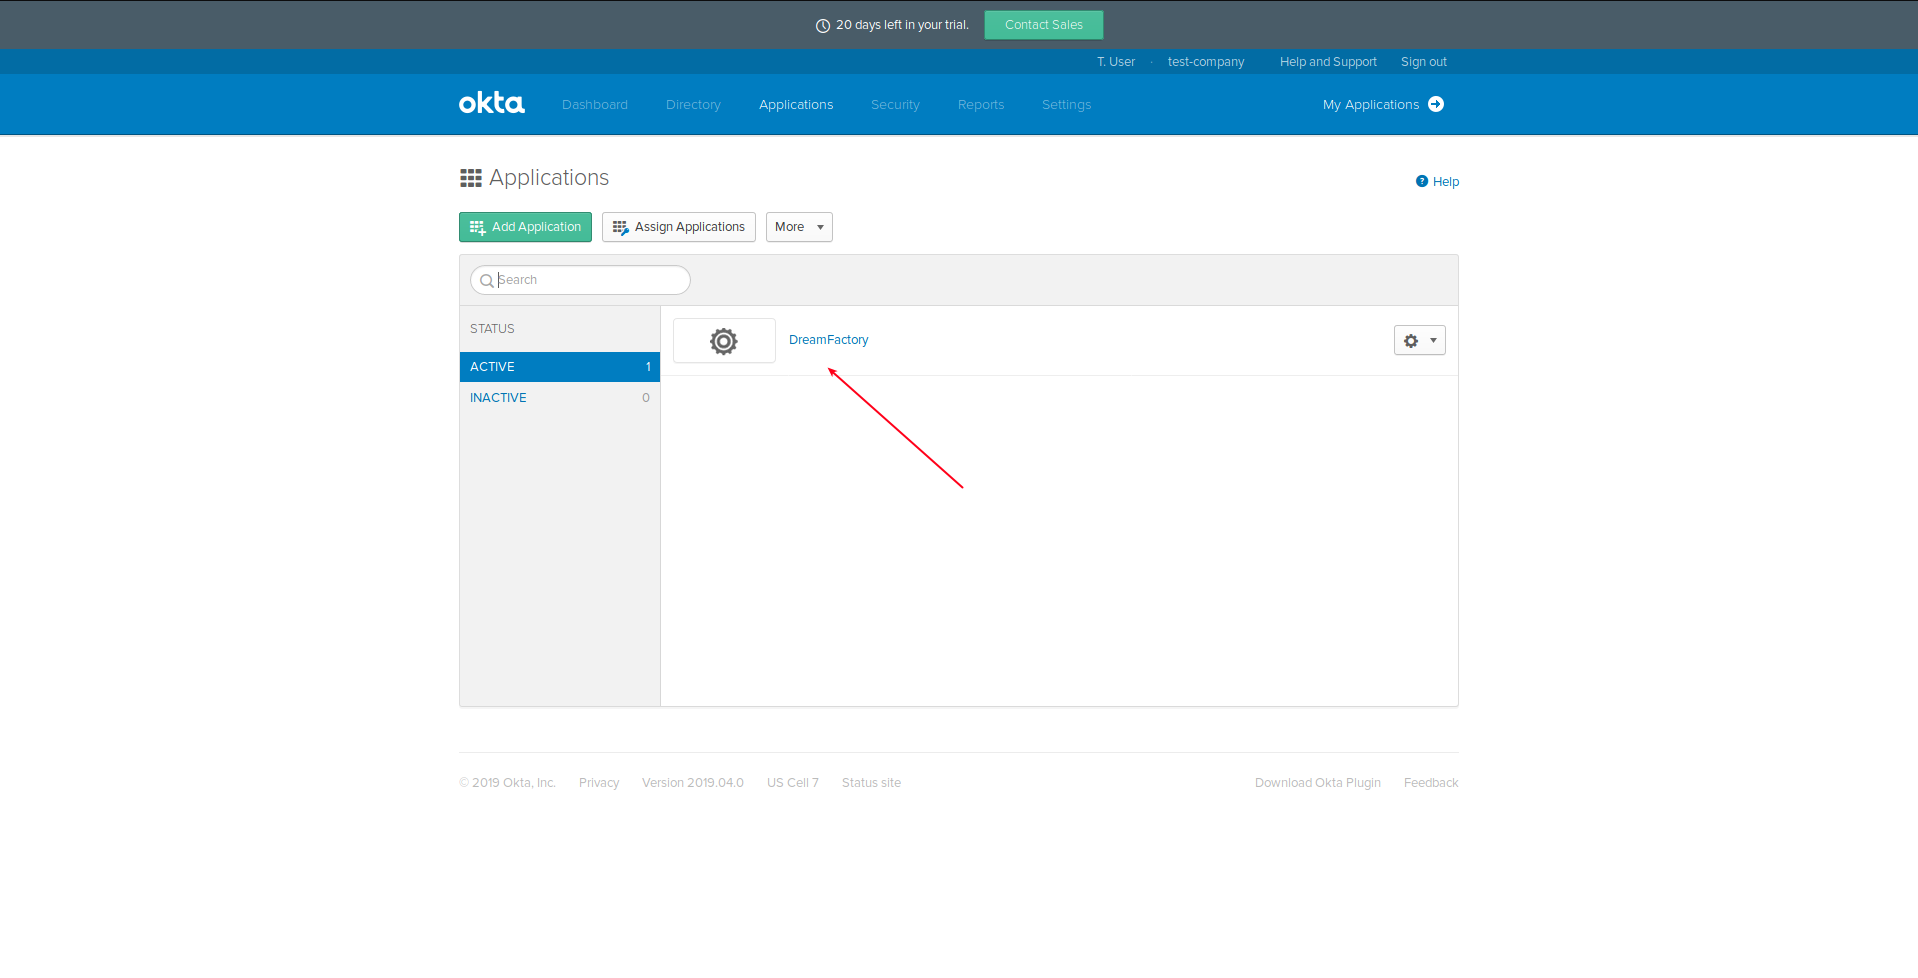
Select our DreamFactory application in the list:
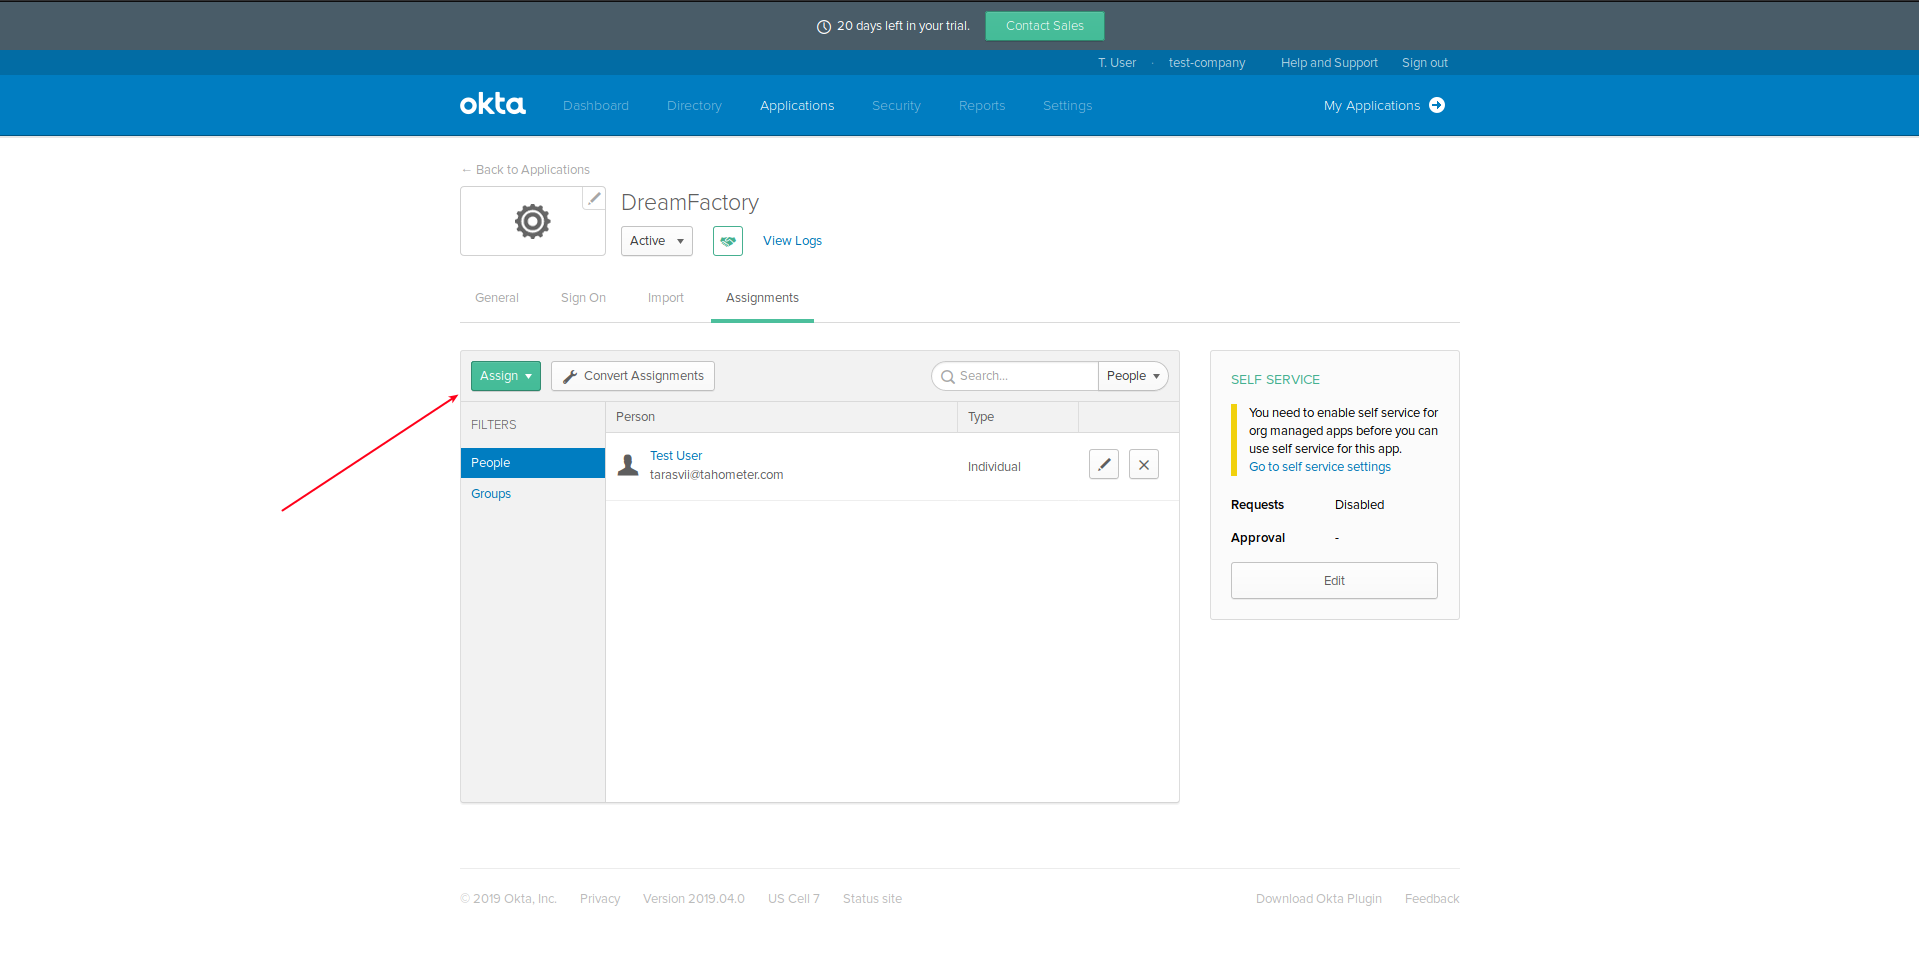
Assign this application to the People and Groups who will use it:
Go to the General tab and click the Edit button:
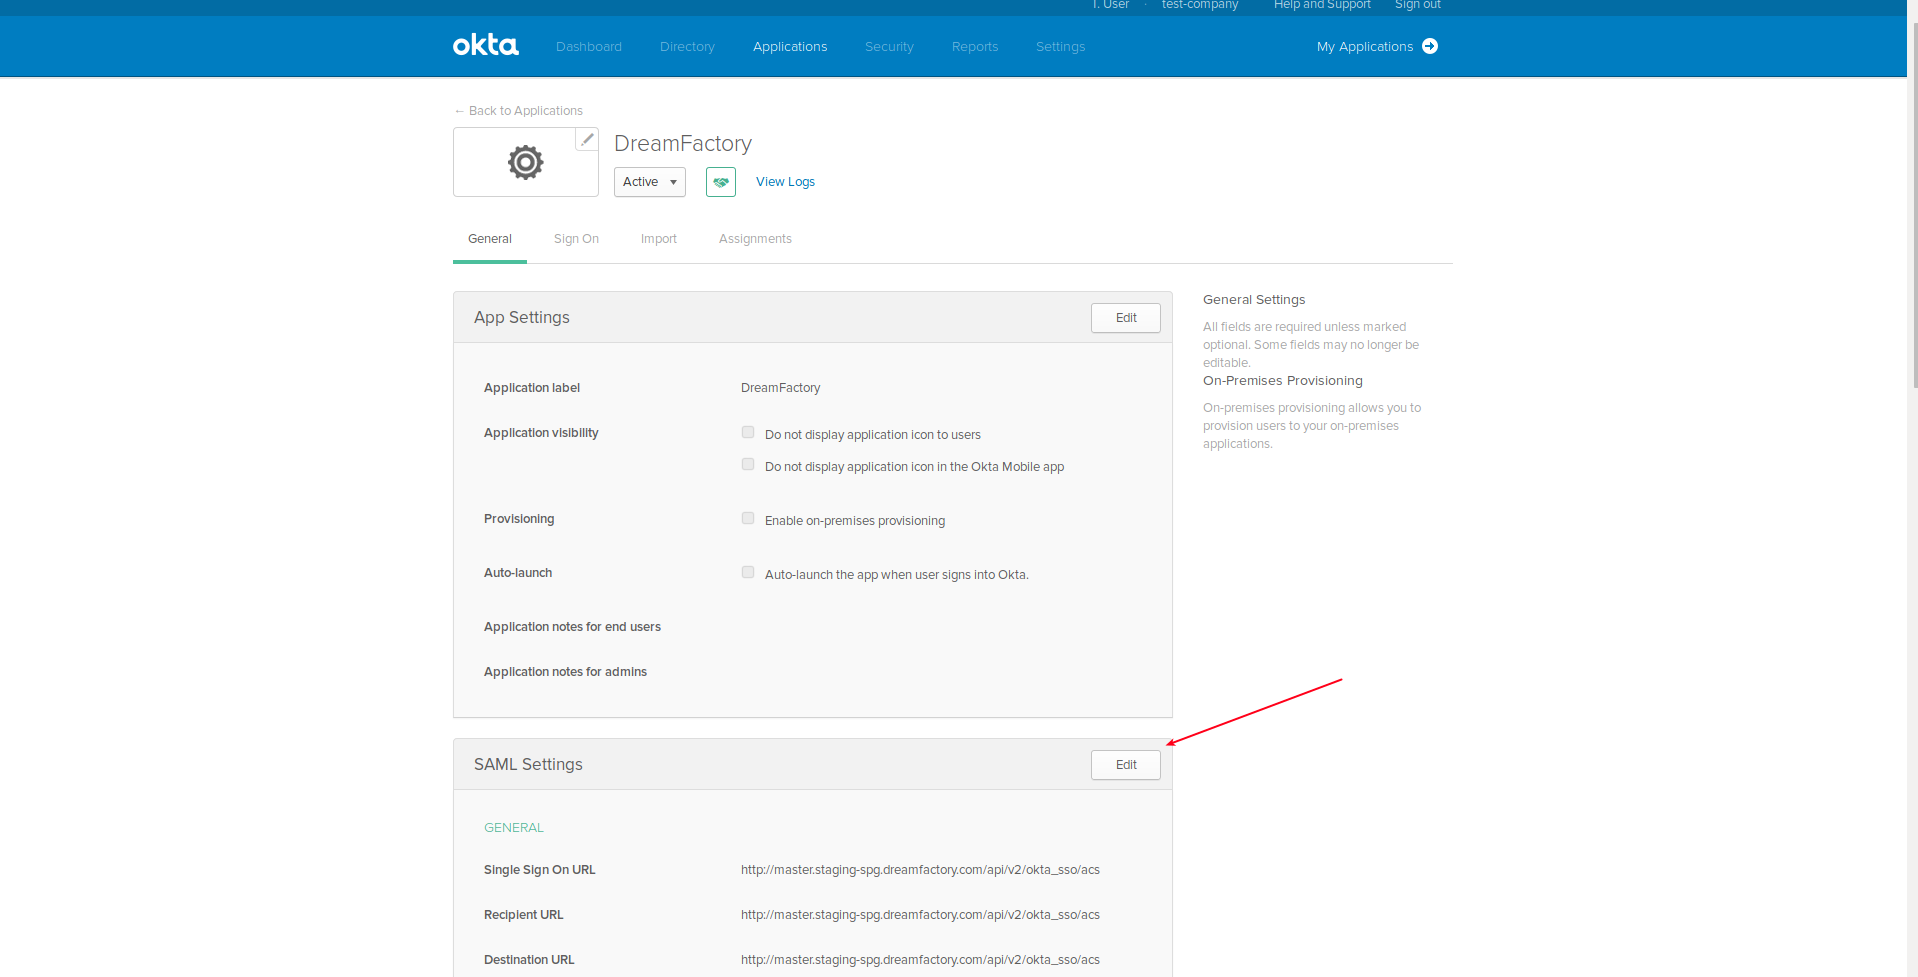
Change Single sign on URL and Audience URI (SP Entity ID) to the values presented in DreamFactory’s Okta API documentation, and then save the changes:
Application configuration
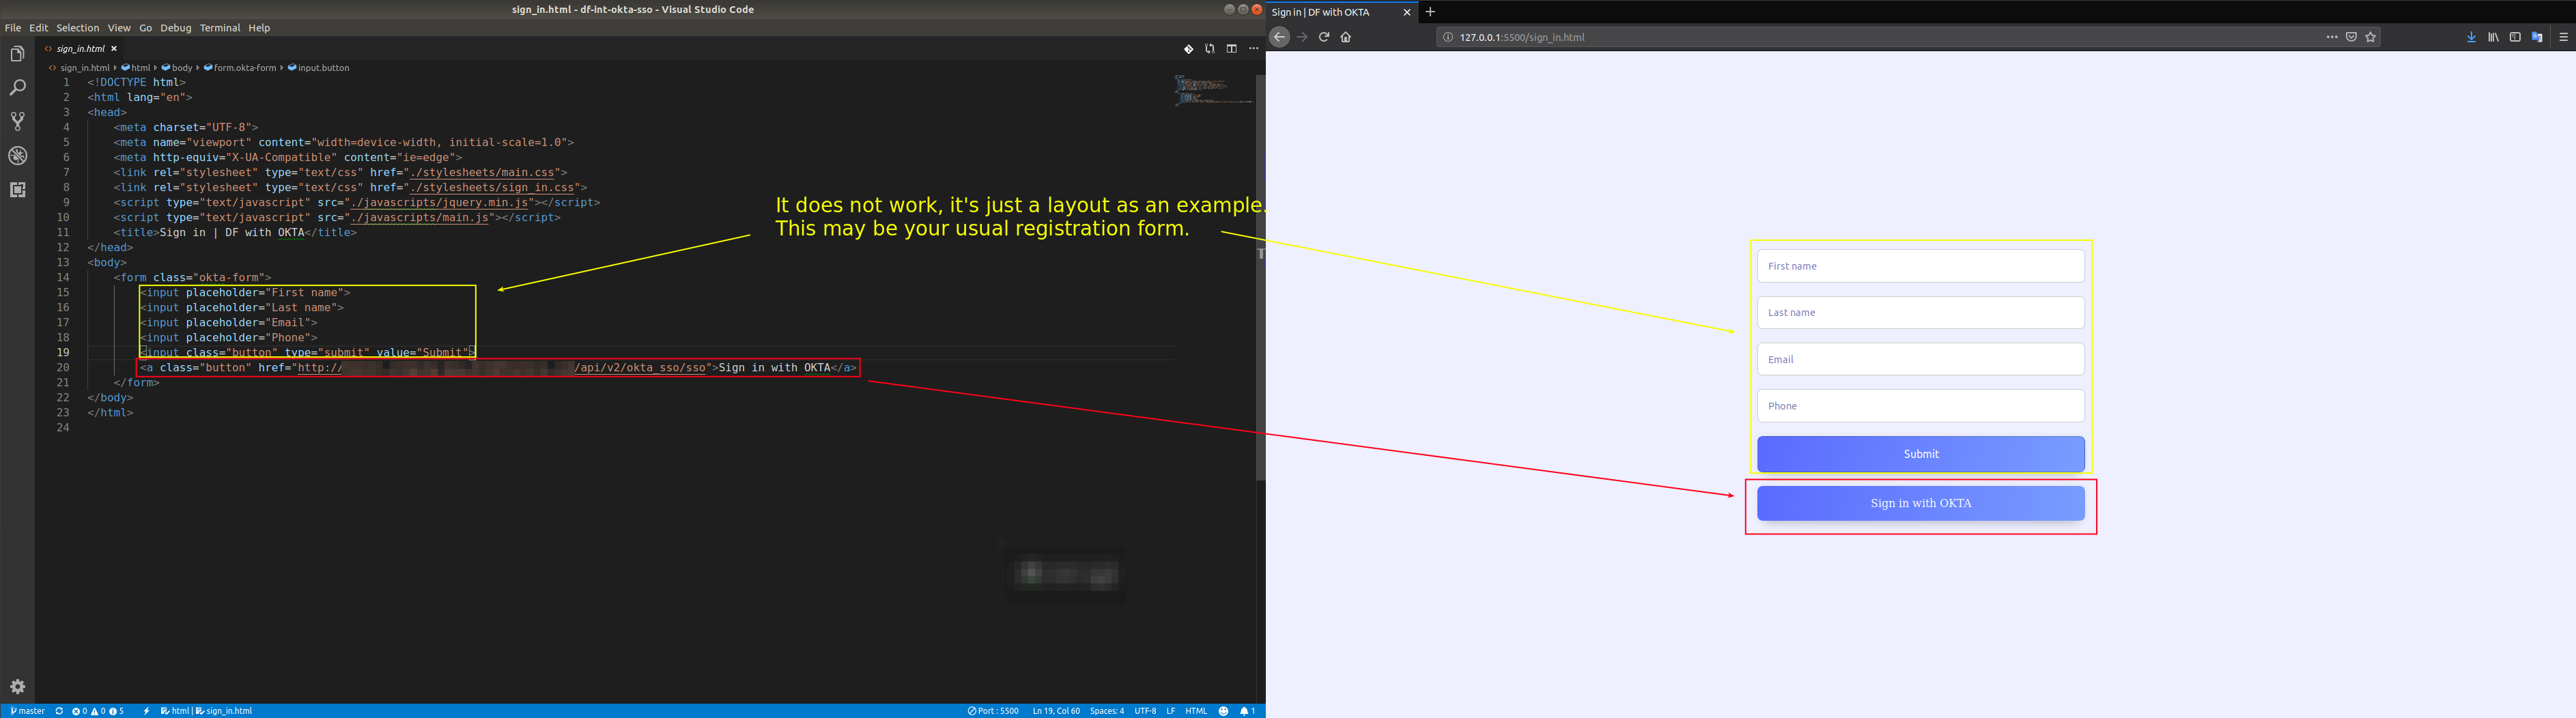
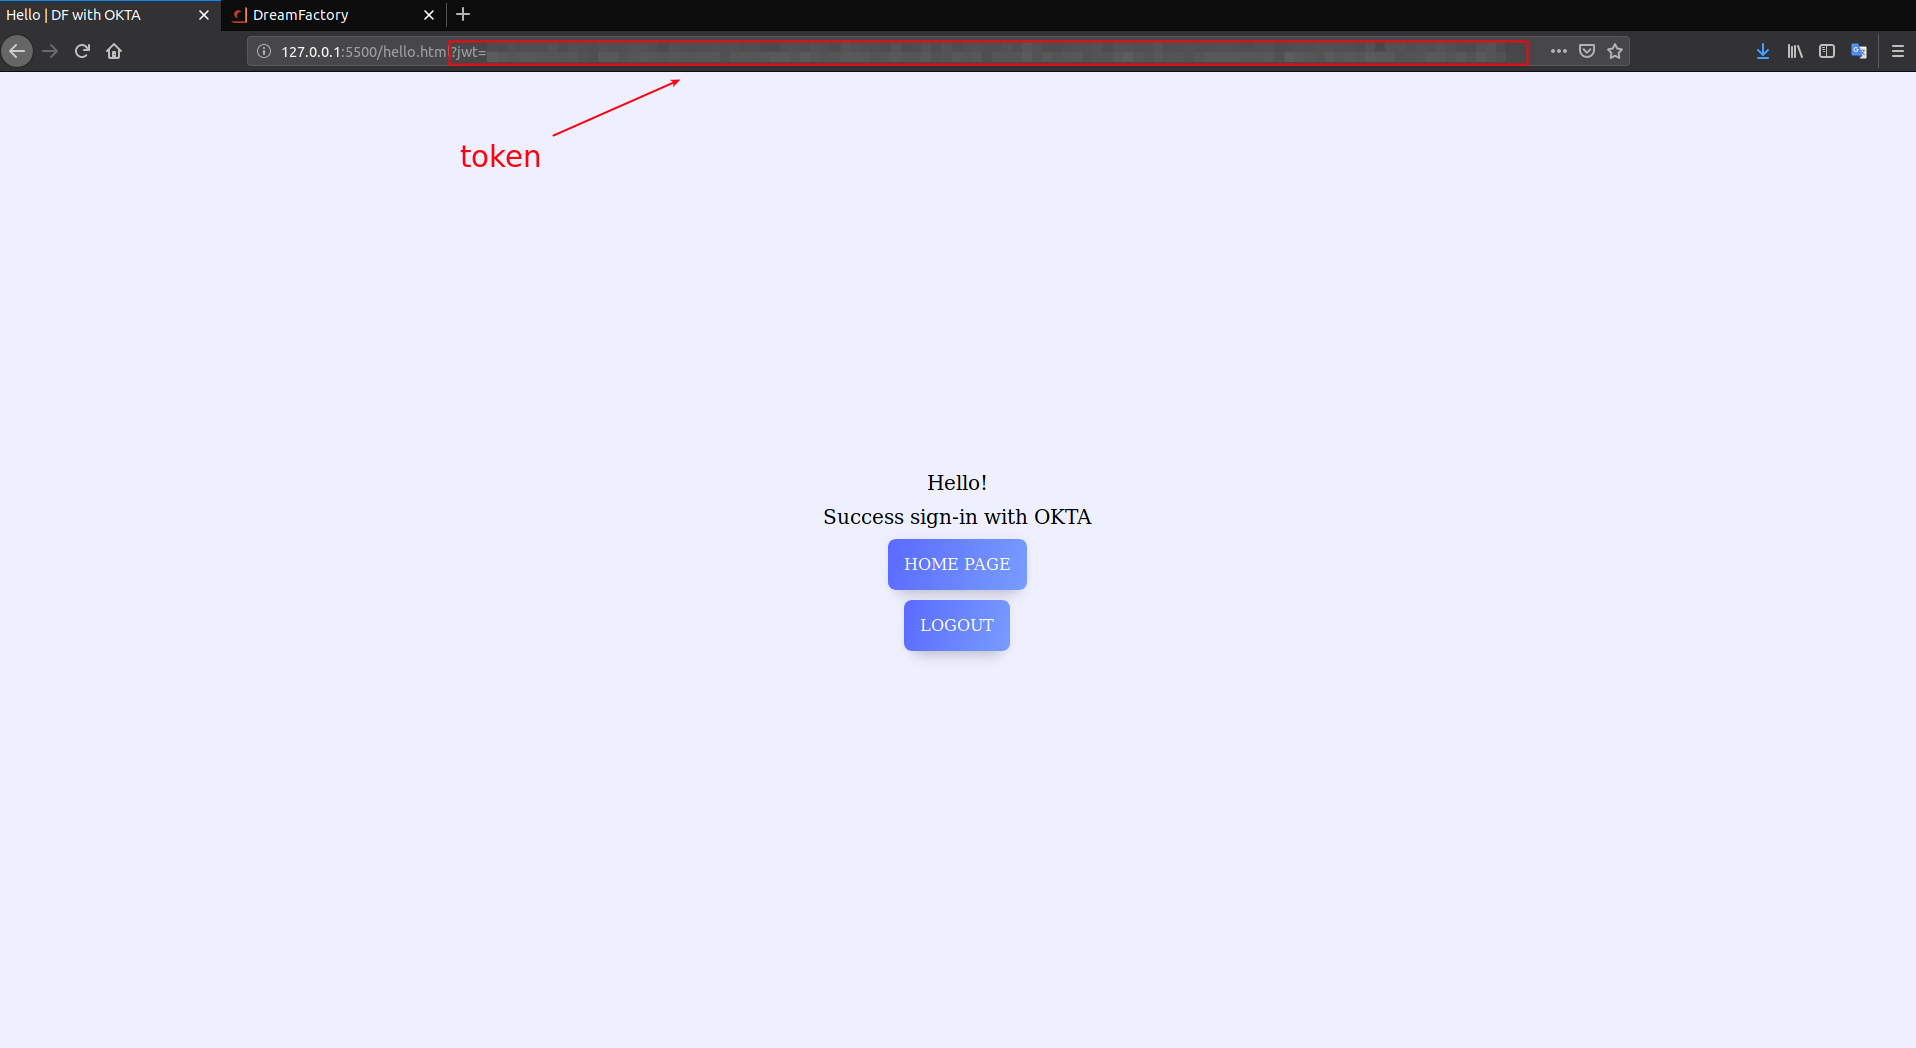
We’re almost done! Now we can sign in via Okta by going to the service’s /sso endpoint. In our example application we assign Sign in with OKTA button to this endpoint. Clicking this button, DreamFactory can return the X-DreamFactory-Session-Token, which we have to use for comunication with DreamFactory:
But how does DreamFactory know where send the token? We have to configure our Relay State for this purpose. Open the Services tab and select your OKTA SSO service. Navigate to the Config tab and update the Relay State field URL which will contain the token returned from DreamFactory. Our example site hosted on http://127.0.0.1:5500 will pass token to the /hello.html page:

DreamFactory will replace the _token_ with a real X-DreamFactory-Session-Token. You might then use JavaScript to persist this token to local storage, or use server-side languages to do the same using cookies:
Now we can communicate with DreamFactory by including X-DreamFactory-Session-Token and X-DreamFactory-API-Key in the request header:
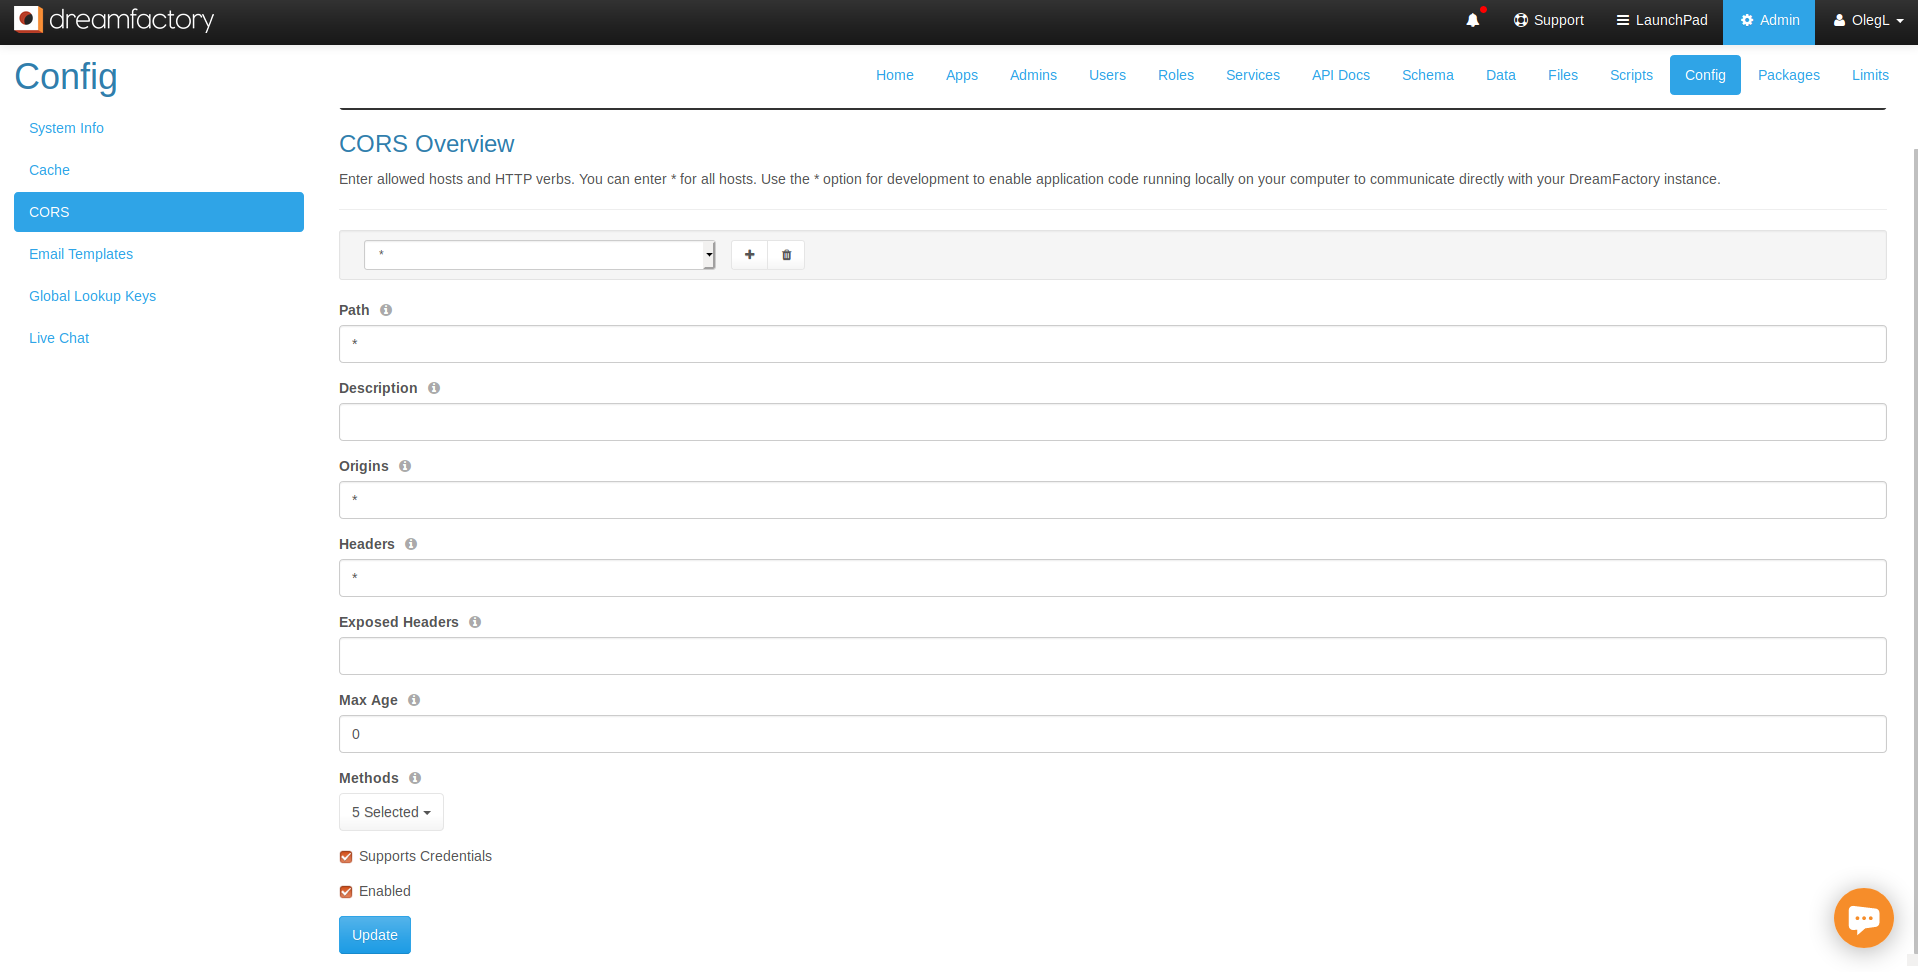
Don’t forget add your application to the CORS interface via Config > CORS. Our example CORS configuration allows any requests to all DreamFactory endpoints with any headers. You can configure it to be more secure:
Debugging SAML
You can use a browser extension to view SAML messages as they are passed from client to the authentication service provider.
- SAML-tracer: Chrome extension
- SAML-tracer: Firefox extension
Managing User Profiles
The Users tab offers a convenient interface for managing user profiles, however it only provides a window for essential information such as e-mail address, password, and phone number. You can however extend the profile by adding custom user attributes. How exactly this is accomplished will depend upon whether the user is authenticated or unauthenticated.
The former would apply when the user is perhaps logged into a profile manager and actively maintaining his own profile via a web form, for instance. The latter would apply in cases where an administrator was editing profiles using an administrative interface, or perhaps a script was bulk updating user information. In this section we’ll show you how to update user profiles to suit both situations.
Adding Custom Attributes to Authenticated Users
If the user is authenticated and managing his own profile, you’ll use the POST /api/v2/user/custom endpoint, passing along the user’s session key and a payload containing the custom attributes. For instance if the user wanted to update his office building and number, then the following payload would be sent to the aforementioned endpoint:
{
    "resource": [{
        "name": "Building",
        "value": "Folsby"
    },
    {
        "name": "Room",
        "value": "456"
    }
    ]
}
Note how the payload itemizes each attribute using a name and value pair. Also, don’t forget to additionally send along the user’s session token using the X-DreamFactory-Session-Token header.
For more information about
Adding Custom Attributes to Unauthenticated Users
If you want to administratively modify an unauthenticated user’s custom attributes, you’ll use the PUT /api/v2/system/user/{ID} endpoint and additionally supply the related parameter. Here is an example URI:
`/api/v2/system/user/7?related=user_custom_by_user_id`
As with authenticated users, you’ll pass along a payload that looks like this:
{
    "resource": [{
        "name": "Building",
        "value": "Folsby"
    },
    {
        "name": "Room",
        "value": "456"
    }
    ]
}
For more information about managing custom user attributes, check out this wiki page.
LDAP Authentication with DreamFactory
Setting up LDAP-based authentication for your users into your DreamFactory workflow is a simple process, and even with LDAPS requires little configuration on the client (DreamFactory) side. In the following section we will guide you through setting up this process. If you would like to create an LDAP server to test, then we have also provided a tutorial below to setup a basic directory with two users.
Testing Your LDAP Connection
Before actually creating an LDAP service, the best way to test that DreamFactory is able to connect to your LDAP server is by creating the following script from within your DreamFactory environment.
vim connection.php
The LDAP uri will be along the lines of ldap://host:port(if necessary)
The BaseDN will be, for example, dc=practice,dc=net
The uid can be any user you wish to test with.
Save and run php connection.php and, if succesful, you will get a return looking like:
`uid=tomo,ou=Employee,dc=practice,dc=net`
This shows that DreamFactory can see your LDAP server, and we will be able to configure our service.
Configuring LDAP
To configure LDAP, login to your DreamFactory instance using an administrator account and click on the Services tab:

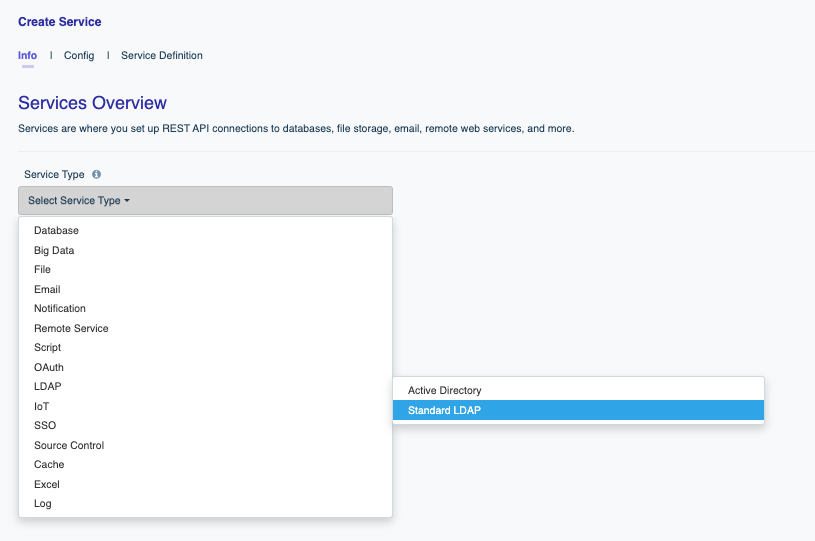
On the left side of the interface you’ll see the Create button. Click this button to begin. You’ll be presented with a single dropdown form control titled Select Service Type. You’ll often use this dropdown to generate new APIs as well as configuring authenetication options. For now, lets navigate to LDAP and then Standard LDAP
After selecting Standard LDAP, you’ll be presented with the following form:
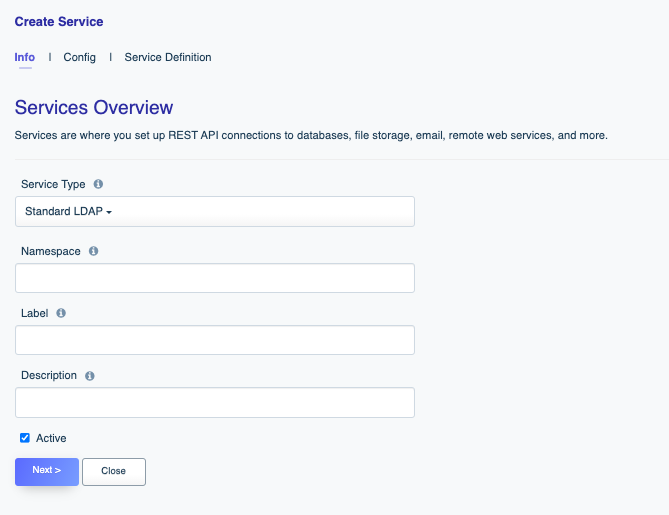
Let’s review these fields:
- Name: The name will form part of the API URL, so use a lowercase string with no spaces or special characters. Further, you’ll want to typically choose something which alloways you to easily identify its purpose. For your LDAP authentication you might choose a name such as
ldap,users, ordevelopers. Lowercasing is a requirement. - Label: The label is used for referential purposes within the administration interface, and will also be used when selecting the authentication type when logging in (more on this later). Something less terse is ok here, such as “LDAP User Login”.
- Description: Like the label, the description is used for referential purposes within the administration interface and system-related API responses.
After completing these fields, click on the Config tab localted at the top of the interface. You’ll be presented with the following form:
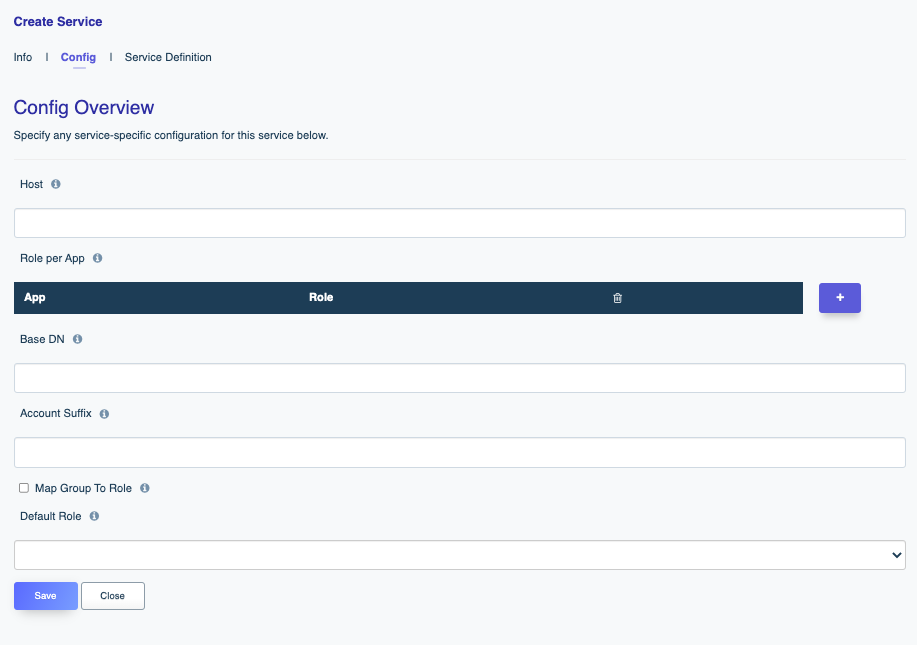
There are not too many fields here, so lets go through them:
- Host: The directory server’s host address. This may be an IP address or domain name. Enter the port number here as well.
- Default Role: DreamFactory can automatically assign a default role (see more here) to a user following successful login. You can identify that role here.
- Role per App: If assigning a blanket role through the Default Role setting is not desired, you can instead use this setting to assign roles on a per application basis.
- Base DN: i.e the starting point wher eyour LDAP server searches for users. For example
dc=example,dc=com - Account Suffix: Usually the same as your Base DN, e.g.
@example.com
Tip
Remember the default port for LDAP (ldap://) is 389, and for LDAPS (ldaps://) is 636.After completion, press the save button to generate. After a moment you’ll see a pop up message indicating Service Saved Succesfully. Congratulations!
Now log out of DreamFactory, and you will notice that the login page now has a “Services” dropdown. The service will correspond to the label you assigned when creating the LDAP service.
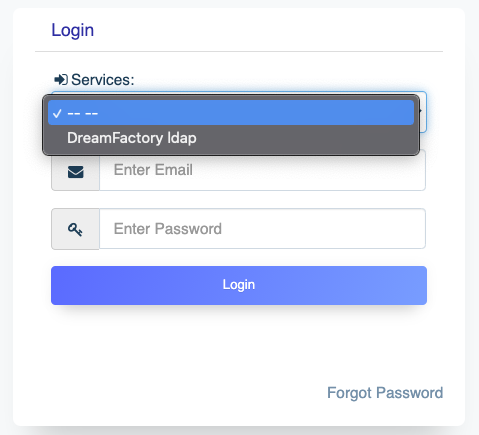
Select your new ldap authentication method, and you will be able to login with a username (uid) and userPassword.
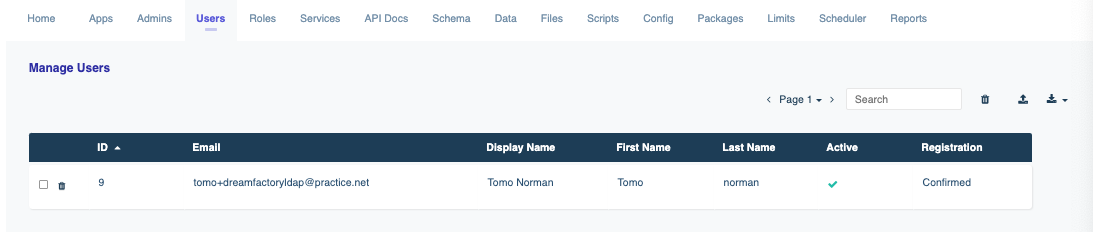
If you log out, and log back in as the administrator, you will now notice that in the Users Tab, the user you signed in with over ldap has been added.
Configuring LDAPS
For LDAPS, the process is much the same as described above, however you will need to go into your DreamFactory server, and make the following change / addition to /etc/ldap/ldap.conf
TLS_REQCERT allow
(you can also use TLS_REQCERT never)
If you are using a client certificate, then make sure the TLS_CACERT option is pointing to the right file also. (You can also use TLS_CACERTDIR to point to a directory rather than a specific file). Remember to also run sudo update-ca-certificates after installing your certificate.
API Authentication Using LDAP
You can make the following API call for your ldap service:
POST https://your-url/api/v2/user/session?service={ldap_service_name}
and in the body, as JSON:
An example response would be:
Troubleshooting LDAPS
Client Side
The only client side configuration change you will need to make (as mentioned previously) is having TLS_REQCERT allow in your ldap.conf file, and if you are using a client certificate, double checking the TLS_CACERT option is pointing to the right file, and that you have run sudo update-ca-certificates.
Server Side
As you are no doubt aware, configuring LDAPS can be somewhat of a nightmare. Given everyone’s setup is different, it can be difficult to offer any advice serverside, however we have found the following settings to work:
- Check the certificate permissions and ownership (should be given to openldap):
sudo chgrp openldap /etc/ldap/<certficatefile>_key.pem
sudo chmod 0640 /etc/ldap/<certificatefile>_key.pem
- Add the following olc configurations:
dn: cn=config
add: olcTLSCipherSuite
olcTLSCipherSuite: NORMAL
-
add: olcTLSCRLCheck
olcTLSCRLCheck: none
-
add: olcTLSVerifyClient
olcTLSVerifyClient: never
- Remember to add ldaps:/// to your
/etc/default.slapdfile. TheSLAPD_SERVICESline should look like the following:
SLAPD_SERVICES="ldap:/// ldapi:/// ldaps:///"
Creating an LDAP Server
If you would like to have a try at creating an LDAP server, or just want something simple to test with, we have prepared the following tutorial to help setup a local LDAP server. The following has been made with Ubuntu as the OS.
Tip
Remember to have ports 389 and 636 open!-
In your server, first run
sudo apt updateandsudo apt upgradeto make sure everything is up to date. -
Now we can start the configuration process.
sudo apt install slapd ldap-utils. This will then ask you to create your administrator password. Once you have done so runsudo dpkg-reconfigure slapdand follow the below instructions:- Omit OpenLDAP Server Configuration? -> No
- DNS Domain Name: E.g. practice.net
- Organization Name: E.g. Practice
- Password -> The same that you previoulsy created
- Database Backend -> use MDB
- Database removed when slapd is purged? -> No
- Move Old Database? -> Yes
You can check everything has installed correctly by running
sudo tree /etc/ldap/slapd.d. You should get something back looking like this:/etc/ldap/slapd.d ├── cn=config │ ├── cn=module{0}.ldif │ ├── cn=schema │ │ ├── cn={0}core.ldif │ │ ├── cn={1}cosine.ldif │ │ ├── cn={2}nis.ldif │ │ └── cn={3}inetorgperson.ldif │ ├── cn=schema.ldif │ ├── olcBackend={0}mdb.ldif │ ├── olcDatabase={0}config.ldif │ ├── olcDatabase={-1}frontend.ldif │ └── olcDatabase={1}mdb.ldif └── cn=config.ldif 2 directories, 11 files
Adding Entries
Lets create a couple of entries. We will need a distinguished name, object class, the organizational unit (attributes associated with the class), and the entries themselves. Whenever we add (or modify), we need to create a file in the .ldif format.
Create a file sudo vim add_entries.ldif and add the following (edit as you wish):
dn: ou=Employee, dc=practice, dc=net
objectClass: organizationalUnit
ou: Employee

dn: ou=Groups, dc=practice, dc=net
objectClass: organizationalUnit
ou:Groups

dn: cn=developers, ou=Groups, dc=practice, dc=net
objectClass: posixGroup
cn: developers
gidNumber: 5000

dn: uid=tomo, ou=Employee, dc=practice, dc=net
objectClass: inetOrgPerson
objectClass: posixAccount
objectClass: shadowAccount
uid: tomo
sn: norman
givenName: Tomo
cn: Tomo Norman
displayName: Tomo Norman
uidNumber: 10000
gidNumber: 5000
userPassword: tomo123
homeDirectory: /home/tomo

dn: uid=alex, ou=Employee, dc=practice, dc=net
objectClass: inetOrgPerson
objectClass: posixAccount
objectClass: shadowAccount
uid: alex
sn: Vieira
givenName: Alex
cn: Alex Vieira
displayName: Alex Vieira
uidNumber: 20000
gidNumber: 5000
userPassword: alex123
homeDirectory: /home/alex
Notice we have created two organizational units; Employee, and Groups. We’ve then created a “Developers” group, and two employees who belong to the Employee organizational unit, and who are both “Developers” (through gidNumber). To add our new group and employees:
ldapadd -x -D cn=admin,dc=practice,dc=net -W -f add_entries.ldif
It will prompt you for your password, and then return the following:
adding new entry "ou=Employee, dc=practice, dc=net"

adding new entry "ou=Groups, dc=practice, dc=net"

adding new entry "cn=developers, ou=Groups, dc=practice, dc=net"

adding new entry "uid=tomo, ou=Employee, dc=practice, dc=net"

adding new entry "uid=alex, ou=Employee, dc=practice, dc=net"
We can confirm these entries are added by running ldapsearch -x -LLL -b dc=practice,dc=net.
And you should be good to go! You can now create an LDAP authentication service in DreamFactory using the guide above.
Setting up LDAPS
If you already have your own ssl certificate for your domain then you should use that. For the purposes of this excercise we will create our own self-signed certificate in order to get LDAPS up and running:
- First lets get the tools required to create our ssl certificates:
sudo apt install gnutls-bin ssl-cert - Create a private key:
`sudo certtool --generate-privkey --bits 4096 --outfile /etc/ssl/private/mycakey.pem`. - Now we will create a template file for our self-signed certificate.
sudo vim /etc/ssl/ca.infoand add the following (edit to your liking):cn = Practice ca cert_signing_key expiration_days = 3650 - Create the self signed certificate:
\sudo certtool --generate-self-signed \
--load-privkey /etc/ssl/private/mycakey.pem \
--template /etc/ssl/ca.info \
--outfile /usr/local/share/ca-certificates/mycacert.crt
and run
sudo update-ca-certficatesand you should get a return stating a certificate has been added to the list of trusted CAs. Something like the following:Updating certificates in /etc/ssl/certs... 1 added, 0 removed; done. Running hooks in /etc/ca-certificates/update.d... done. - We need to then create a private key for the server. We can do so by running:
sudo certtool --generate-privkey \
--bits 2048 \
--outfile /etc/ldap/practice_slapd_key.pem
(Change the filename of the key to match your domain).
- Moving on, we will create a template for our server certificate (again, change filenames and common names to match your domain).
sudo vim /etc/ssl/localhost.infoand add the following:organization = Practice cn = localhost tls_www_server encryption_key signing_key expiration_days = 365and then create the server certificate using the just created template:
sudo certtool --generate-certificate \ --load-privkey /etc/ldap/localhost_slapd_key.pem \ --load-ca-certificate /etc/ssl/certs/mycacert.pem \ --load-ca-privkey /etc/ssl/private/mycakey.pem \ --template /etc/ssl/localhost.info \ --outfile /etc/ldap/localhost_slapd_cert.pem - We need to adjust our permissions and ownership so that openldap can read our key:
sudo chgrp openldap /etc/ldap/localhost_slapd_key.pem sudo chmod 0640 /etc/ldap/localhost_slapd_key.pem - Almost there! Now we just need to tell slapd about our TLS configugration. Create a file
sudo vim certinfo.ldifand point everything to the right place.dn: cn=config add: olcTLSCACertificateFile olcTLSCACertificateFile: /etc/ssl/certs/mycacert.pem - add: olcTLSCertificateFile olcTLSCertificateFile: /etc/ldap/localhost_slapd_cert.pem - add: olcTLSCertificateKeyFile olcTLSCertificateKeyFile: /etc/ldap/localhost_slapd_key.pem - add: olcTLSCipherSuite olcTLSCipherSuite: NORMAL - add: olcTLSCRLCheck olcTLSCRLCheck: none - add: olcTLSVerifyClient olcTLSVerifyClient: neverand then update:
sudo ldapmodify -Y EXTERNAL -H ldapi:/// -f certinfo.ldif - Finally we just need to go to our slapd config file located at
/etc/default/slapdand add ldaps to it. TheSLAPD_Serviceline should end up looking like the below:SLAPD_SERVICES="ldap:/// ldapi:/// ldaps:///"Restarting slapd with
sudo systemctl restart slapdwill start our ldaps connection. If you runsudo lsof -i -P -n | grep LISTENyou should now see port 636 listening. The output will be similar to this:sshd 1269 root 3u IPv4 19533 0t0 TCP *:22 (LISTEN) sshd 1269 root 4u IPv6 19544 0t0 TCP *:22 (LISTEN) systemd-r 2836 systemd-resolve 13u IPv4 26004 0t0 TCP 127.0.0.53:53 (LISTEN) slapd 20316 openldap 8u IPv4 55269 0t0 TCP *:389 (LISTEN) slapd 20316 openldap 9u IPv6 55270 0t0 TCP *:389 (LISTEN) slapd 20316 openldap 11u IPv4 55274 0t0 TCP *:636 (LISTEN) slapd 20316 openldap 12u IPv6 55275 0t0 TCP *:636 (LISTEN)
And thats it! You will now have an LDAP connection over port 389, and an LDAPS connection over port 636, ready to be hooked up to your client(s).
Debugging LDAP and Active Directory
LDAP / AD in Windows
The equivalent location of/etc/ldap/ldap.conf in Windows is c:\openldap\sysconf\ldap.conf. You will have to create this directory yourself.
You can use the following PHP script to determine whether your host, base DN, and credentials are correct:
<?php

$host = "HOSTNAME";
$baseDN = "BASEDN";
$username = "USERNAME";
$password = "PASSWORD";

$connection = ldap_connect($host) or die("Could not connect to LDAP server.");

ldap_set_option($connection, LDAP_OPT_PROTOCOL_VERSION, 3);
ldap_set_option($connection, LDAP_OPT_REFERRALS, 0);

$search = ldap_search($connection, $baseDN, '(uid=' . $username . ')');
$result = ldap_get_entries($connection, $search);

if (isset($result[0]['dn'])) {
    print_r($result);
    $userDN = $result[0]['dn'];
    echo "USER DN: " . $userDN . "\n";
} else {
    echo "USER DN NOT FOUND";
}

$auth = ldap_bind($connection, $userDN, $password);

if ($auth) {
    echo "LDAP bind successful.";
} else {
    echo "LDAP bind failed.";
}
Feedback
Was this page helpful?
Glad to hear it! Please tell us how we can improve.
Sorry to hear that. Please tell us how we can improve.