Integrating Salesforce Data using DreamFactory
Salesforce is the de facto standard CRM solution used by companies large and small to manage customer information and interactions. Although many competing solutions exist, Salesforce’s dominance is made clear in the company’s 2019 annual report in which it states 95% of the Fortune 100 run at least one application from the company’s suite of solutions.
Many companies desire to access and manage Salesforce data into other applications. DreamFactory can greatly reduce the amount of work required to do so thanks to the native Salesforce database connector. In this chapter you’ll learn how to configure the connector, and then interact with your Salesforce database using the DreamFactory-generated REST API.
Configuring the Salesforce Service
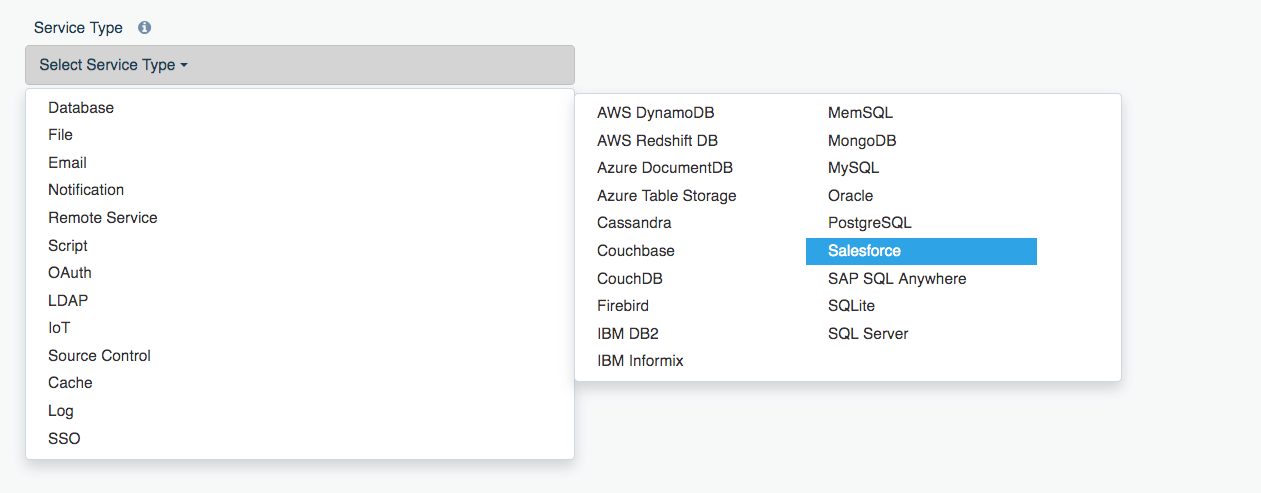
Connecting your Salesforce account to DreamFactory is easily accomplished in a few short steps. As with all DreamFactory services, you’ll begin by logging into your DreamFactory instance, selecting the Services tab, and clicking the Create link located in the left-hand menubar. From there you’ll choose the Salesforce service located within the Database category:

Next you’ll assign a name, label, and description. Recall from earlier chapters that the name will play a role as a namespace for the generated API URI structure, therefore you’ll need to use alphanumeric characters only. I’ll use the name salesforce for purposes of this tutorial. The label and description are used as referential information and can be assigned anything you please.
Next, click on the Config tab. Here you’ll enter authentication credentials used to connect to your Salesforce environment. DreamFactory supports two authentication options: OAuth and non-OAuth. I’ll show you how to configure the latter. To configure non-OAuth authentication, you’ll need to complete the following Config tab fields:
- Username: This is the e-mail address you use to login to your Salesforce account.
- Password: This is the password associated with your Salesforce account.
- Security Token: This is an alphanumeric key that is supplied to the Salesforce API along with your username and password. It is intended to serve as an additional safeguard should the account username and password be compromised. I’ll show you how to find your account’s security token in a moment.
- Organization WSDL: The organization WSDL defines the web service endpoints associated with your specific organization. I’ll show you how to obtain and install this document in a moment.
Obtaining the Security Token
I’ll presume you know your Salesforce account username and password, so let’s turn attention to the security token. Login to your Salesforce account, and click on your account avatar located at the top right of the page:

Click the Settings link. On the left-side of the page you’ll see a link titled Reset My Security Token. Click the Reset Security Token button to generate a new token. the new token will be emailed to the e-mail address associated with your account. Paste this token into DreamFactory’s Security Token field.
Warning
Keep in mind that if you’ve previously generated a security token, clicking this button will replace the old token, meaning any Salesforce integrations you’ve created using the original token will no longer work. Therefore if you already possess a security token, there is no need to generate a new one.Obtaining the Enterprise WSDL
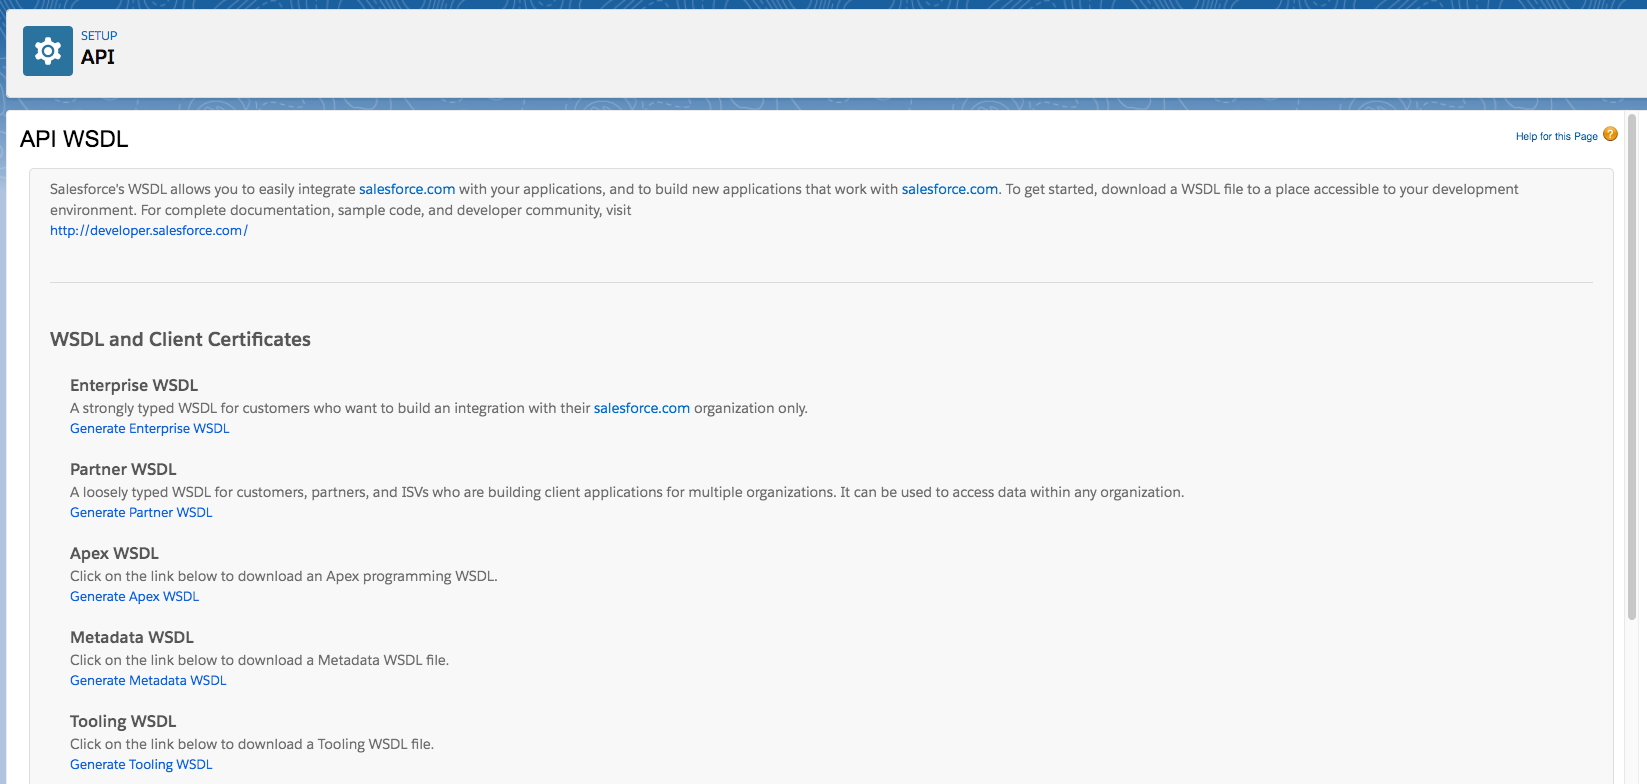
Next, let’s obtain the Enterprise WSDL document. Login to your Salesforce account, and enter API in the search box located at the top of the page. Select API from the list of candidate results. You’ll be taken to the following page:

Click the Generate Enterprise WSDL link to generate the required WSDL document. A new tab will open containing the document contents. Copy the contents into a file named enterprise.wsdl (you can actually call the file anything you want, just made sure it uses the wsdl extension). Some browsers such as Chrome will prepend a warning message of sorts about the document content. For instance this is what Chrome adds:
This XML file does not appear to have any style information
associated with it. The document tree is shown below.
You’ll need to remove any such messages found at the beginning of the WSDL document because it is invalid syntax. After saving the changes, upload the document to your DreamFactory server and place it within your DreamFactory storage/wsdl directory. Then return to the Config tab and set the Organization WSDL field to just the name of the WSDL file (do not include the path).
After completing the Username, Password, Security Token, and Organization WSDL fields, save the changes by pressing the Save button. Congratulations, your Salesforce API has just been generated!
Interacting with the Salesforce API
After saving your new Salesforce API, head over to the API Docs tab to learn more about the generated endpoints. Perhaps most notably in the exploratory stages, you’ll want to check out the GET /_table Retrieve one or more Tables endpoint because executing it will present a list of all tables you can query and modify. At the time of this writing almost 500 tables were exposed, giving you all sorts of capabilities regarding managing Salesforce data.
Among the available tables is one named Account. You can retrieve data from this table by navigating to the next available endpoint presented in the API Docs interface. It’s named GET /_table/{table_name} Retrieve one or more records. Click the Try it out button, enter Account in the table_name field, and press Execute. In return you’ll receive an array of accounts managed in your Salesforce database. Below I’ve pasted in a partial example of one of the example records found in the example Salesforce database:
{
  "attributes": {
    "type": "Account",
    "url": "/services/data/v46.0/sobjects/Account/0016A00000MJRN9QAP"
  },
  "Id": "0016A00000MJRN9QAP",
  "IsDeleted": false,
  "MasterRecordId": null,
  "Name": "United Oil & Gas Corp.",
  "Type": "Customer - Direct",
  "ParentId": null,
  "BillingStreet": "1301 Avenue of the Americas \r\nNew York, NY 10019\r\nUSA",
  "BillingCity": "New York",
  "BillingState": "NY",
  "BillingPostalCode": null,
  "BillingCountry": null,
  ...
  "CustomerPriority__c": "High",
  "SLA__c": "Platinum",
  "Active__c": "Yes",
  "NumberofLocations__c": 955,
  "UpsellOpportunity__c": "Yes",
  "SLASerialNumber__c": "6654",
  "SLAExpirationDate__c": "2018-10-04"
},
Retrieving a Specific Account Record
To retrieve a specific account, you can use the GET /_table/{table_name}/{id} endpoint. For instance the above example “United Oil & Gas Corp” account is associated with id 0016A00000MJRN9QAP. Therefore you can obtain this specific record by requesting the following URI:
/api/v2/salesforce/_table/account/0016A00000MJRN9QAP
Retrieving Specific Fields
Accounts are associated with dozens of attributes, many of which might not be of any interest to you. You can use the fields parameter to identify which specific attributes you’d like returned:
/api/v2/salesforce/_table/account/0016A00000MJRN9QAP?fields=Name,Type,BillingCity
This request returns the following response:
{
  "attributes": {
    "type": "Account",
    "url": "/services/data/v46.0/sobjects/Account/0016A00000MJRN9QAP"
  },
  "Name": "United Oil & Gas Corp.",
  "Type": "Customer - Direct",
  "BillingCity": "New York",
  "Id": "0016A00000MJRN9QAP"
}
Updating a Record
Many DreamFactory users use the Salesforce connector to facilitate updating records outside of the Salesforce web interface. You can easily do so using the PATCH /_table/{table_name} endpoint. For instance, suppose you want to update the “United Oil & Gas Corp.” account record to include the billing latitude and longitude. After all, one can never be too exacting when it comes to billing requirements.
To update the record you’ll send a PATCH request to:
/api/v2/salesforce/_table/account/0016A00000MJRN9QAP
The request body would look like this:
{
  "BillingLatitude": "40.762025",
  "BillingLongitude": "-73.980074"
}
In response to the PATCH request you’ll receive just the record ID in return:
{
  "Id": "0016A00000MJRN9QAP"
}
If you’d like additional fields to be returned in the response, use the fields parameter:
/api/v2/salesforce/_table/account/0016A00000MJRN9QAP?fields=Name,BillingCity
Upon successful update, the following response is returned:
{
  "attributes": {
    "type": "Account",
    "url": "/services/data/v46.0/sobjects/Account/0016A00000MJRN9QAP"
  },
  "Name": "United Oil & Gas Corp.",
  "BillingCity": "New York",
  "Id": "0016A00000MJRN9QAP"
}
Synchronizing Salesforce Data with MySQL
Many DreamFactory users desire to synchronize Salesforce data with a database such as MySQL. This can be accomplished using a few different approaches. The easiest involves adding business logic to one of the exposed Salesforce API endpoints. For instance, suppose we wanted to additionally check a MySQL database for the existence of an account record every time a particular account record was retrieved via the Salesforce API. If the record doesn’t exist in the MySQL database, we’ll add it.
To do so, navigate to the Scripts tab inside your DreamFactory administration console, choose the salesforce API, and then drill down until you reach the salesforce._table.Account.get.post_process endpoint. The post_process event handler was chosen because the associated business logic will execute after the account data has been returned from Salesforce.
Here you’ll be presented with the scripting interface. Four scripting engines are supported, including PHP, Python (2 and 3), and NodeJS. You can link to a script found in a repository hosted on GitHub, GitLab, or BitBucket, however for the purposes of this example I’ll just use the glorified text area included in the interface.
Returning to our earlier example, recall that this request:
/api/v2/salesforce/_table/account/0016A00000MJRN9QAP?fields=Name,BillingCity
Will return this response:
{
  "attributes": {
    "type": "Account",
    "url": "/services/data/v46.0/sobjects/Account/0016A00000MJRN9QAP"
  },
  "Name": "United Oil & Gas Corp.",
  "BillingCity": "New York",
  "Id": "0016A00000MJRN9QAP"
}
The JSON will automatically be converted into an array and made available to your script within the $event array which is injected into the script. Specifically, you’ll find it within $event['response']['content']. The following example script retrieves this array, and repurposes the desired data within another array named $record which is subsequently POSTed to another API named mysql, specifically to the API’s billing table:
$api = $platform['api'];

// Retrieve the response body. This contains the returned records.
$responseBody = $event['response']['content'];

$record = [];

$record["resource"] = [
    [
        'name' => $responseBody["Name"],
        'billing_city' => $responseBody["BillingCity"]
    ]
];

$url = "mysql/_table/billing/";
$post = $api->post;

$result = $post($url, $record, []);

return $result;
Keep in mind the supported scripting engines (PHP, Python, NodeJS) are not incomplete or hobbled versions. These are the very same engines installed on the same server as DreamFactory, and as such you are free to take advantage of any language-specific packages or libraries simply by installing them on the server.
Conclusion
DreamFactory’s Salesforce connector dramatically reduces the amount of time and effort required to integrate Salesforce with other systems. If you’d like to learn more about what DreamFactory can do for you, e-mail us at [email protected]!
Feedback
Was this page helpful?
Glad to hear it! Please tell us how we can improve.
Sorry to hear that. Please tell us how we can improve.