Installing DreamFactory on Windows Server 2022
The following instructions are geared to a Windows Server 2022 installation, however the steps are going to be nearly identical for Windows Server 2019.
This installation guide is meant for a “fresh” install of Windows Server 2022.
Windows Server Prep
Before beginning the DreamFactory installation, there are some general server preparation steps that should be completed. Most of the following must be done with a Windows Administrator account.
RDP
While not essential to install DreamFactory, having RDP active on the server will make access and use much easier. To turn on RDP:
- Open the Server Manager (typically opens automatically on login)
- Select “local server” on the left
- click on “Remote Desktop” and enable it
- You may need to restart the server to gain RDP functionality
Downloading files
IE Enhanced Security
By default, Windows Server 2022 comes with Microsoft Edge installed and downloads disabled with IE Enhanced Security. Within these instructions there will be multiple downloads of various tools and dependencies as well as the download of the DreamFactory code itself, to download these files on the Windows Server, IE Enhanced Security must be disabled. IE Enhanced Security can be disabled in the server manager under “Local Server”.
Transfering files
Alternatively, you can download files on a different machine, and transfer them to the Windows Server. One tool great for this is WinSCP
On Windows Server 2019, Edge may or may not be included, there are a few downloads in this guide that require a browser with Javascript functionality to download. It is recommended to either use another machine with a more modern browser, or download and install a different web browser on the Windows Server
Required Software
There are a few things that must be installed and configured before downloading and installing DreamFactory.
IIS Version 10
IIS version 10 comes pre-installed on Windows Server 2022, however it may need to be activated to function. While you are activating IIS, we will also activate other features we will need later.
To Enable:
- Open Server Manager
- Click on option 2 “Add roles and features”
- Click Next
- Ensure “Role based or feature based” is selected, click Next
- Ensure the server you’re working on is selected, click Next
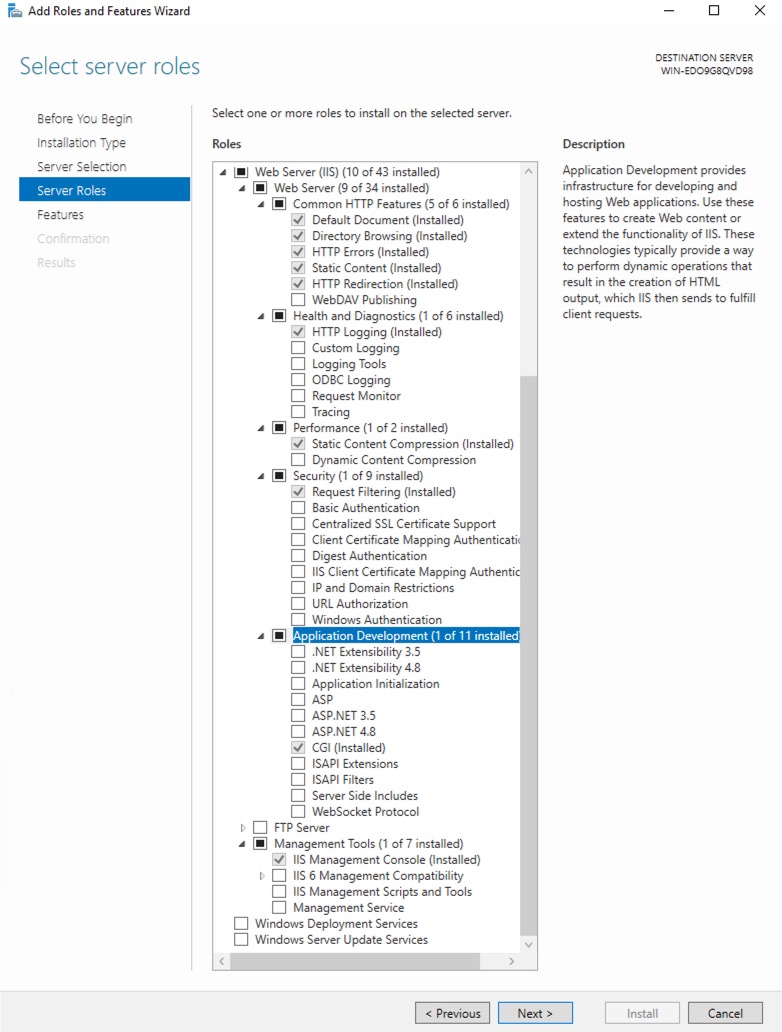
- Check Web Server(IIS) on server roles, install any admin tools if asked
- Your Web Server Role should look like (but will not say “installed”):
- Click Next and then Install, and let the install run
Git
Installing Git is very straightforward. Simply get the installer here and run using the default options.
Visual C++ 2015-2019
Direct download the installer using this link
Run the installer
Install the URL rewrite IIS module
Direct download link
Run the downloaded installer.
Install and configure PHP
DreamFactory is a PHP application, following will walkthrough how to install and configure PHP 8.1.X to work with DreamFactory and IIS.
Downloading
To begin, download a Non thread safe version of PHP 8
- You can direct download a zip of NTS PHP 8.1.17 here
- OR see releases and select one here
- remember to download a NON Thread Safe version!
Installation
To install PHP, begin by making a directory in the C:\ for the PHP installation. For this example, we are making a directory: C:\PHP_8.1
Extract the contents of the PHP zip file into this directory. It will look something like:

Next, this directory must be added to your system path. To do so:
- Open Environment Variables by searching “environment” in the start menu
- Click “Environment Variables…”
- Select the “Path” variable and click “Edit”
- Click “New” and add the
C:\PHP_8.1directory - save and close
From here, it is a good idea to test that everything is working. Open a command prompt and run php -v in the terminal window. You should see the version you installed in the output.
If everything works, great! If not, here are some additional PHP installation resources:
PHP configuration
Building the .ini file
Within the C:\PHP_8.1 directory, there are two sample .ini files. php.ini-development and php.ini-production . Take one of these and duplicate the file. Rename it to php.ini
You may need to turn on file extensions to rename the file appropriately.
Typically during initial installation, we will use the
php.ini-developmentfile, and change to thephp.ini-productionone at a later date. This is entirely up to you.
Open php.ini and add the following to the bottom of the file:
extension=ldap
extension=curl
extension=ffi
extension=ftp
extension=fileinfo
extension=gd
extension=intl
extension=mbstring
extension=exif
extension=mysqli
extension=odbc
extension=openssl
extension=pdo_mysql
extension=pdo_odbc
extension=pdo_pgsql
extension=pdo_sqlite
extension=pgsql
extension=shmop
extension=soap
extension=sockets
extension=sodium
extension=sqlite3
extension=tidy
extension=xsl

zend_extension=opcache

opcache.enable=1
If you are also installing drivers for sql server, you can add those extensions here as well.
handler mappings
Handler mappings are necessary to tell IIS how to run PHP files. To configure the Handler Mappings:
- Open IIS and click on the “Handler Mappings” icon.
- Click on “add module mapping” on the right side
- Fill in the module mapping:
- Request Path: *.php
- Module: FastCgiModule (will autofill, select that option)
- Executable: Use the
...icon and select:C:\php_8.1\php-cgi.exe- You might have to change the “file type” selection when browsing
- Name: PHP_via_FastCGI
- Open “Request Restrictions” and:
- Mapping: File or Folder
- Verbs: all
- Access: script
PHP Manager
The PHP Manager is an IIS utility that gives greater insight and easier configuration options for a PHP installation. To download and install the PHP Manager:
- The download can be found at this link click the “download this extension” button to download the executable.
- run the downloaded file
- If IIS is opened, close and reopen it, you should see a PHP manager icon in the IIS dashboard
Final PHP configurations
Once the PHP manager is installed, open it. If you see a warning about “non optimal PHP configuration” open the warning and apply all recommendations.
Click on check phpinfo() , once the site opens, you should see a phpinfo() screen that displays the version of PHP and various configurations and installed extensions.
The PHP manager can be used to install, enable, and disable extensions. Keep this utility in mind when troubleshooting PHP issues.
Installing Composer
Composer is a dependency manager for PHP, download the installer by going here
Default options are fine for the composer install, you do NOT need to install development mode.
to ensure composer is working, once complete run
composer --vin a new command prompt.
Installing DreamFactory
Now that all the dependencies are installed, and IIS is working, we can install DreamFactory itself. It is recommended to reboot the server at this point to ensure everything is fully installed and mapped.
Get DreamFactory code
Open a fresh command prompt window, navigate (cd) to the C:\inetpub\wwwroot\ directory. Run the git command:
git clone https://github.com/dreamfactorysoftware/dreamfactory
This will create a
dreamfactorydirectory and add the repo contents to it. This directory is referred to as “the dreamfactory directory” in documentation and support.
Once complete, open the dreamfactory directory in a new file explorer window.
If you need a different version of DreamFactory installed other than the lastest, now would be the time to use git to clone the correct branch/version. Versions older than DreamFactory V5 will need a different (older) version of PHP.
Move composer files
If running a licensed, commercial instance, you will have received 3 composer files (composer.json, composer-dist.json and composer.lock) Move these 3 files into the dreamfactory directory and overwrite the existing files if asked.
WinSCP is a great tool for getting these files from your local PC to the server.
composer command
In command prompt, navigate into the dreamfactory directory and run:
composer install --ignore-platform-reqs --no-dev --verbose
Sometimes this command can take quite a bit to run, if it feels like it’s “hung” hit enter a couple times. If the command fails, it sometimes just needs to be ran again, you can contact support if you run into issues.
DF setup commands
Once the composer command finishes, from the dreamfactory directory run:
php artisan df:env
The installer will ask which type of database should hold the DreamFactory system information. Sqlite is the easiest to get going the fastest, however multiple databases are supported. Choose a database that fits your needs and your use case.
When selecting a database name and user, we typically recommend “dreamfactory” and “dfadmin” respectively. However, these can be whatever you’d like. The user will need full permissions on that database.
A note about system databases:
The DreamFactory system database holds all of the configurations for your instance. Backups of this database are highly recommended when in production. You can also use a utility like
mysql dumpto pull down and later recreate the system database on another instance. This and the.envfile will preserve all DreamFactory configurations.
Once the command finishes, run the setup command:
php artisan df:setup
This command will prompt you to create your first admin user. This will be the first account available to log in, and additional administrator accounts can be created later if desired.
Add license key
You will have received a license key, this key will need to be added to the .env file in the dreamfactory directory. At the bottom of the file add:
DF_LICENSE_KEY={YOUR LICENSE KEY}
without the curly braces
Testing
From here DreamFactory is installed, the next section will focus on configuring IIS to point to and serve DreamFactory’s content. However, testing is a great and easy step here.
From the dreamfactory directory, run:
php artisan serve
This will start a small development server, the output will tell you the IP address and port number to navigate to. Usually this is http://127.0.0.1:8000
Open your web browser to this address, and try to login with the user you created earlier. If you can see the DreamFactory UI and do NOT have a red banner at the top, you have done everything correctly. If not, go back and check your steps or contact support if you need help.
Adding DreamFactory to IIS
IIS must be configured to serve the DreamFactory content. The following section will walk through a simple configuration.
Creating the dreamfactory site
Open IIS, if there is a Default Site on the left hand side, right click and stop it.
Right click on the “Sites” folder on the left side and select “Add Website”. Fill out the Add Website dialogue:
- site name: whatever you’d like can go here, we usually recommend “dreamfactory”
- You may optionally select a different Application pool here
- Physical path:
{dreamfactory_directory}/public - Connect As/Test settings: Connect as “Specific User” it is recommended to start with the Administrator account, and complete the installation. Then later a service account with Admin rights can be used.
- If you get green checks when selecting “Test Settings” you should be good to proceed.
- optionally add a host name and IP configurations.
Checking and adding HTTP verbs
FastCGI for IIS by default doesn’t always have everything it needs configured correctly. Open the file: C:\Windows\System32\inetsrv\config\applicationHost.config
Look for a “handlers AccessPolicy” section (ctrl + f “handlers”, usually the second instance), make sure this section looks similar to:
        <handlers accessPolicy="Read, Script">
            <add name="PHP_via_FastCGI" path="*.php" verb="*" modules="FastCgiModule" scriptProcessor="C:\php_8.1\php-cgi.exe" resourceType="Either" />
            <add name="CGI-exe" path="*.exe" verb="*" modules="CgiModule" resourceType="File" requireAccess="Execute" allowPathInfo="true" />
            <add name="TRACEVerbHandler" path="*" verb="TRACE" modules="ProtocolSupportModule" requireAccess="None" />
            <add name="OPTIONSVerbHandler" path="*" verb="OPTIONS" modules="ProtocolSupportModule" requireAccess="None" />
            <add name="StaticFile" path="*" verb="*" modules="StaticFileModule,DefaultDocumentModule,DirectoryListingModule" resourceType="Either" requireAccess="Read" />
        </handlers>
This file does not always need changes, ensure that every handler is allowing every verb and that they are pointed to the correct php-cgi.exe (PHP 8.1)
Request filtering
From the IIS window, open the “Request Filtering” icon. Go to the “HTTP Verbs” tab. Click the “Allow Verb” option on the right side and add the following verbs:
- GET
- HEAD
- POST
- DELETE
- PUT
- PATCH
PROTIP: You can leave your mouse on the “Allow Verb” option and type each verb in and hit enter to confirm.
Double check web.config
Most of the time this file doesn’t need to be touched, however now is a great time to check and make sure. Open the file: {dreamfactory_dir}/public/web.config
This is a sample web.config file, yours may differ slightly, double check the requestFiltering and DefaultDocument sections.
<configuration>
  <system.webServer>
	<rewrite>
  	<rules>
    	<!--
    	<rule name="Imported Rule 1" stopProcessing="true">
      	<match url="^(.*)/$" ignoreCase="false" />
      	<conditions>
        	<add input="{REQUEST_FILENAME}" matchType="IsDirectory" ignoreCase="false" negate="true" />
      	</conditions>
      	<action type="Redirect" redirectType="Permanent" url="/{R:1}" />
    	</rule>
    	-->
    	<rule name="Imported Rule 2" stopProcessing="true">
      	<match url="^" ignoreCase="false" />
      	<conditions>
        	<add input="{REQUEST_FILENAME}" matchType="IsDirectory" ignoreCase="false" negate="true" />
        	<add input="{REQUEST_FILENAME}" matchType="IsFile" ignoreCase="false" negate="true" />
      	</conditions>
      	<action type="Rewrite" url="index.php" />
    	</rule>
                <rule name="Imported Rule 1" stopProcessing="true">
                    <match url="^" ignoreCase="false" />
                    <conditions logicalGrouping="MatchAll">
                        <add input="{HTTP_AUTHORIZATION}" ignoreCase="false" />
                        <add input="{REQUEST_FILENAME}" matchType="IsDirectory" ignoreCase="false" negate="true" />
                        <add input="{URL}" pattern="(.+)/$" ignoreCase="false" />
                    </conditions>
                    <action type="Redirect" url="{C:1}" redirectType="Permanent" />
                </rule>
                <rule name="Imported Rule 2-1" stopProcessing="true">
                    <match url="^" ignoreCase="false" />
                    <conditions logicalGrouping="MatchAll">
                        <add input="{REQUEST_FILENAME}" matchType="IsDirectory" ignoreCase="false" negate="true" />
                        <add input="{REQUEST_FILENAME}" matchType="IsFile" ignoreCase="false" negate="true" />
                    </conditions>
                    <action type="Rewrite" url="index.php" />
                </rule>
  	</rules>
	</rewrite>
    	<security>
        	<requestFiltering>
            	<verbs>
                	<add verb="GET" allowed="true" />
                	<add verb="HEAD" allowed="true" />
                	<add verb="POST" allowed="true" />
                	<add verb="DELETE" allowed="true" />
                	<add verb="PUT" allowed="true" />
                	<add verb="PATCH" allowed="true" />
            	</verbs>
        	</requestFiltering>
    	</security>
        <directoryBrowse enabled="false" />
        <defaultDocument>
            <files>
                <clear />
                <add value="index.php" />
                <add value="Default.htm" />
                <add value="Default.asp" />
                <add value="index.htm" />
                <add value="index.html" />
                <add value="iisstart.htm" />
            </files>
        </defaultDocument>
  </system.webServer>
</configuration>
Import URL rewrite rules
In the IIS window, open the “URL Rewrite” icon. TO import url rewrite rules:
- Click the “Import Rules” option on the right side
- Using the
...icon, browse to{dreamfactory_dir}/public/.htaccess - Click “import”
- If any of the imported rules have red X’s on them, select them and remove them until everything is green checks.
- click “Apply” on the right side
Set directory permissions
Within the dreamfactory directory, there are storage and public directories. Set the permissions of these directories to “Full Control” for the IIS_USRS account type. Ensure these new permissions are applied recursively.
Restart IIS and browse DreamFactory
If everything was done correctly, from here you should be able to navigate in a web browser to localhost and see DreamFactory. Ensure that you can login with the account created earlier.
You can of course contact support if you have additional questions or issues with your installation.
DreamFactory debugging configuration
During the initial implementation phase of your instance, it might be useful to have debugging options on. These options are all found in the .env file within the dreamfactory directory.
APP_DEBUG=trueAPP_LOG_LEVEL=debug
When you have changed anything within the .env file, run the following two commands to ensure the changes take effect:
php artisan config:clearphp artisan cache:clear
Feedback
Was this page helpful?
Glad to hear it! Please tell us how we can improve.
Sorry to hear that. Please tell us how we can improve.